
By Menard Maranan
Testing is an essential part of Software Development. Testing your code ensures that the software you develop works as expected and makes it less vulnerable to attackers.
Software testing is a very broad topic. That's why in the software industry, there are separate professionals who specialize in just QA and testing alone. These professionals are often referred to as QA Engineers.
Although QA is its own thing, that doesn't mean developers don't do testing at all.
The most common tests that developers conduct are Unit Tests. Unit testing is a type of testing where you test small units of code (like functions) – hence the term, Unit Testing. You often do this by comparing the expected behavior of a unit of code against its actual behavior.
Unit testing is such an integral part of the development workflow that some companies' whole development culture is centered around what's called Test-Driven Development (or TDD).
In TDD, developers first write test cases (from the feature requirements, often called the user story) and proceed to write the code that satisfies them. TDD shines mostly in projects where requirements are highly specific.
You can implement unit testing in different ways across different programming languages. But at its core, Unit Testing is just about comparing the expected vs the actual behavior of the code.
So regardless of how it's implemented in a particular language, the same principle generally applies when you work in any other language.
In this tutorial, you'll learn unit testing in the Rust programming language. That said, you should know at least the basics of programming in Rust although you don't need advanced knowledge of it.
This article will cover:
- How unit testing works in Rust
- How to write a unit test in Rust
- How to test a function
- Why failing tests are useful
- How to handle expected error behavior so that your tests won't fail
So, with all that said, let's proceed to learn unit testing with Rust!
How Unit Testing Works in Rust
Rust is built with code safety at its core. Rust's strict type annotation rules help eliminate a ton of bugs early on in the development phase. But still, it's not foolproof.
Like any other language, the business logic is on your shoulders and you have to help Rust understand what's acceptable in your code and what's not.
And yes, that's why we do testing.
You don't need to install a test suite to get started testing in Rust since it has built-in support for testing.
To get started, create a new cargo project (take note of the --lib flag) on your local machine and open it in the text editor or IDE of your choice. For this tutorial, I'll be using VS code.
cargo new --lib rust_unit_testing
code rust_unit_testing
Then, open the src/lib.rs file. This is where we'll spend the most time in this tutorial.
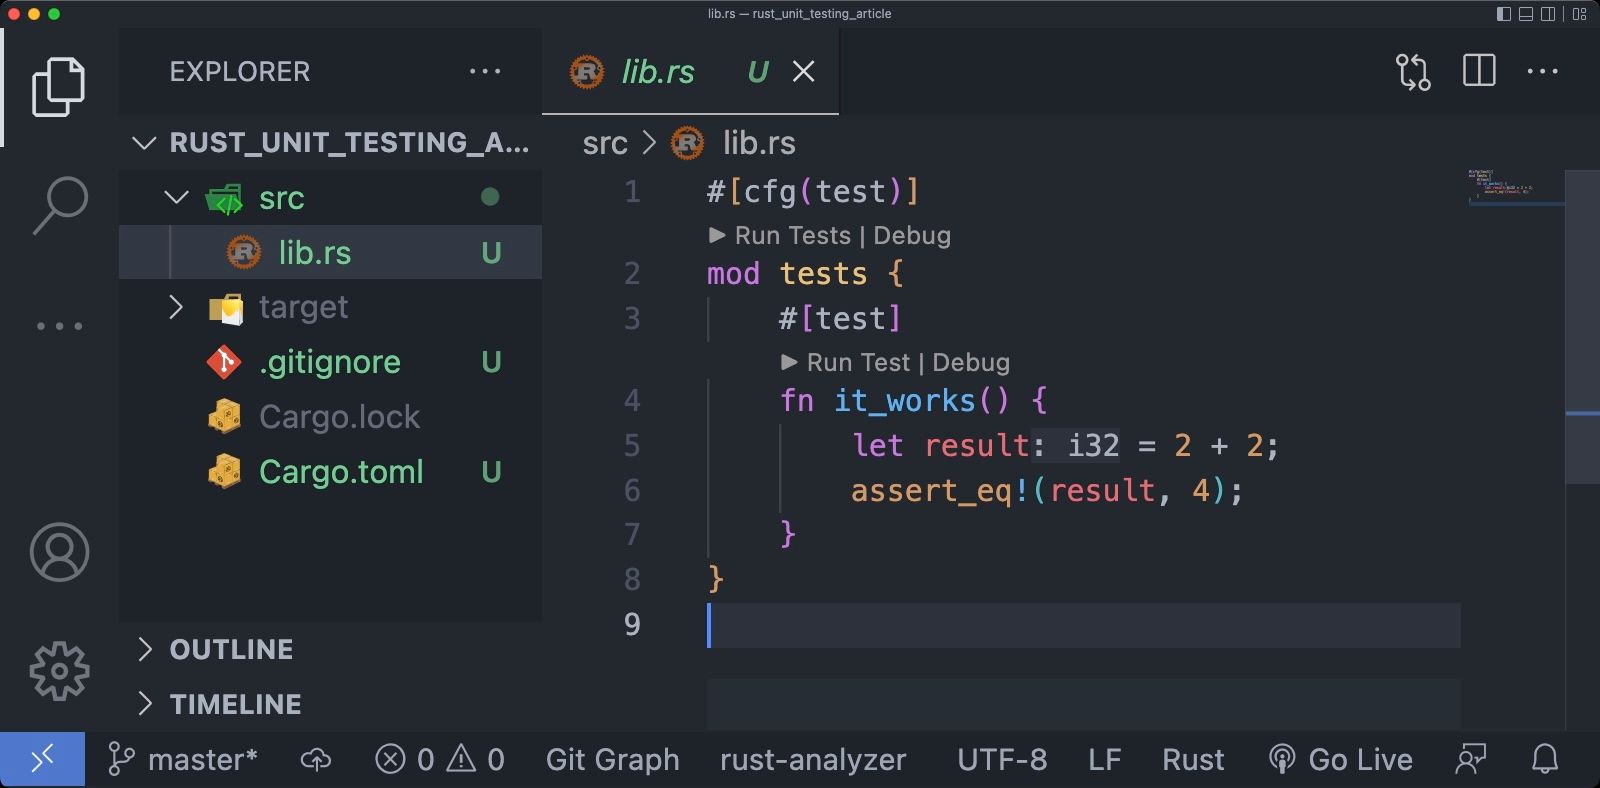 src/lib.rs file of a Rust Library Project
In a newly created library project in Rust, you'll notice that the lib.rs file is already pre-populated by a sample test code by default.
The main purpose of this is for you to have a template to begin with when writing your tests. We'll dissect each part of this simple test and understand the basic testing concepts in Rust.
So first, let's understand what those lines of test code are doing. In this example, you'll see a test module defined in lib.rs with one test inside it which tests if 2 + 2 is equal to 4.
If you don't know the concept of modules and attributes in Rust yet, that's fine and you can ignore them for now.
But just to give you an idea, tests in Rust are written inside the tests module (the mod tests part says it's the tests module), and anything written inside this module tells cargo to run them only during testing (and that's essentially what the #[cfg(test)] attribute implies).
A test in Rust is essentially just a function annotated as a test. From the example above, you'll notice the #[test] attribute above the function it_works. This simply tells cargo that this function is a test, and should be invoked during testing.
Inside the it_works test function, it checks if the value of result derived from 2 + 2 is equal to 4. It performs the checking using the assert_eq! macro. The assert_eq! macro compares the equality ( == ) of the left and right values passed onto it.
In most programming languages, there's a rule that the left values passed to the assert should be the expected values, while the actual value should be in the right. With Rust, there are no hard rules for that and you can pass on either side the expected and actual results.
Now, try running your test using this command:
cargo test
Here's what the result should look like for the example above:
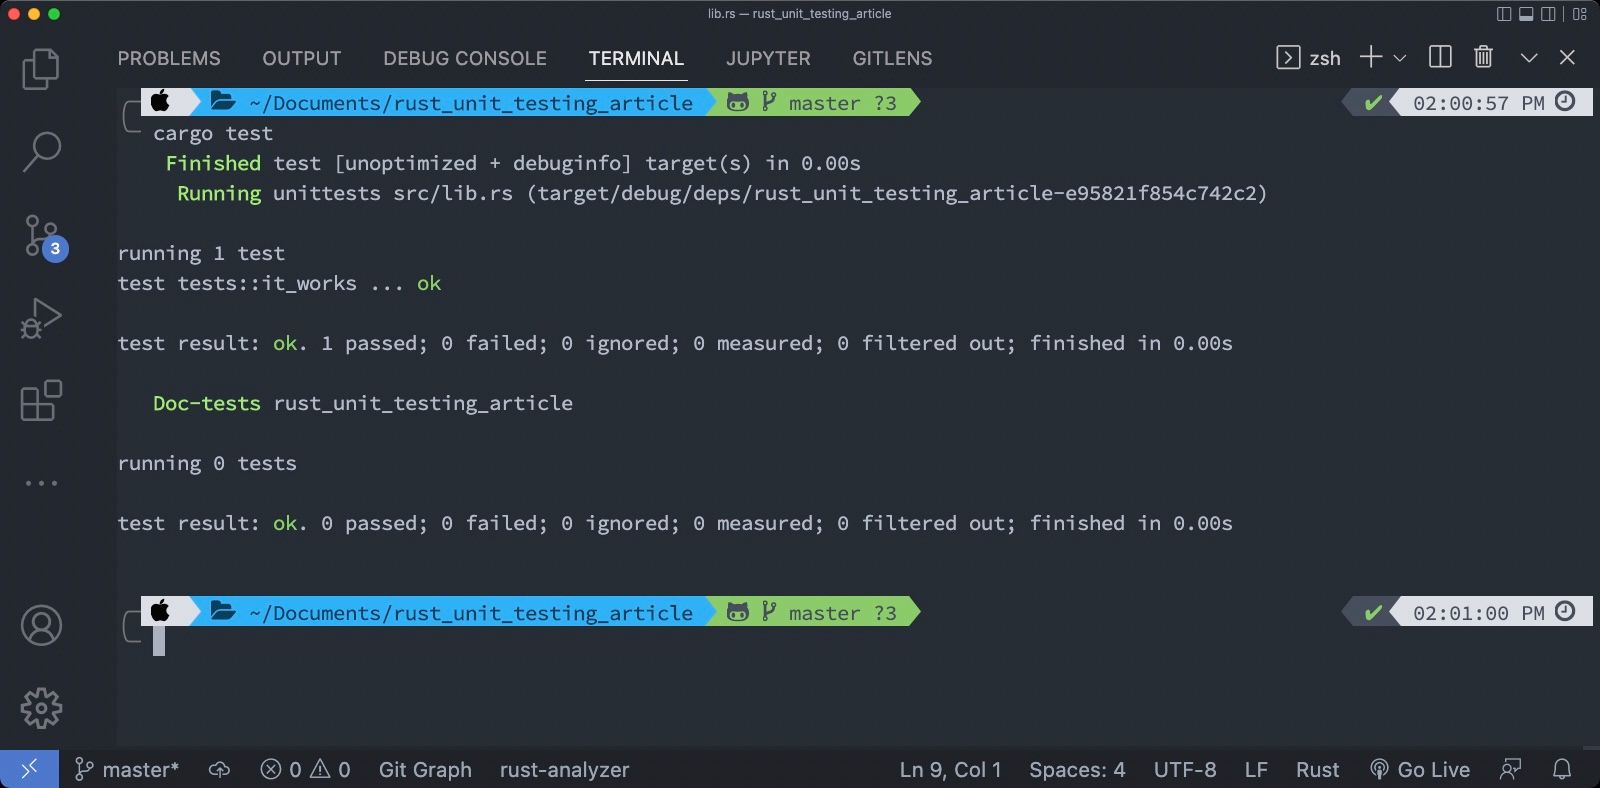 cargo test - results
By running cargo test, cargo will execute your test cases and output the report in your terminal. From that report, you'll see the tests run by cargo.
The first line in the report says running 1 test since we only have one test function tests::it_works. Alongside the tested function, you'll see the message ok, meaning, the test passed.
You can also see the summary of the results below that:
- 1 passed
- 0 failed
- 0 ignored
- 0 measured
- 0 filtered out
- and the status of the result that says
test result: ok
The 1 passed counter here represents that one test function (tests::it_works) that passed the test, while the failed counter tells how many failing tests we have. The same applies to the other counters as well.
You'll also see the results of the Doc-tests below. Since we don't have any doc tests here, you'll see running 0 tests. You can ignore this for now and just focus on the unit tests. But if you want to learn more, you can check Rust's official documentation.
How to Write Tests in Rust
When writing a test, you generally need to go through these three steps:
- Mock the data or state needed for a test case. By this, I mean providing mock or sample data needed by the code you're testing (if necessary) and/or setting up the state or environment needed for the test case to run.
- Run the code that needs to be tested (passing the mock data necessary). An example is invoking a function you want to test.
- Check if the actual behavior of the code you're testing matches its expected behavior. For example, by passing an argument
xto a function, you assert if its returned value is the same as what you're expecting for it to return. Or check if a unit of code raisespanic!—which is the expected behavior, for example—if it's given a certain parameter.
In Rust, unit tests are written in the exact file where the code being tested is written. Test functions are then grouped inside the tests module (which is named this way by convention).
How to test functions in Rust
Now let's proceed to testing functions in Rust.
To begin with, we need a simple function to test. But first, remove the it_works test function since we no longer need it. Then, write this adder function above the tests module:
// src/lib.rs

pub fn adder(x: i32, y: i32) -> i32 {
    x + y
}

#[cfg(test)]
mod tests {
// ...
The adder function from above is a simple public function that just adds two numbers and returns the sum. To test if it works as expected, let's write a unit test for this function.
From the three steps of writing unit tests we discussed earlier, the first two steps are:
- set the data for the code to be tested
- run the code.
So going back to the tests module, first, bring the adder function into its scope (using the use keyword). Then write a function named it_adds annotated with the #[test] attribute.
// src/lib.rs

pub fn adder (x: i32, y: i32) -> i32 {
    x + y
}

#[cfg(test)]
mod tests {
    // this brings everything from parent's scope into this scope
    use super::*;

    #[test]
    fn it_adds() {
    }
}
Inside the it_adds test function is where we'll write the tests. So within it, declare a variable named sum, then call the function adder and pass 4 and 5 as its parameters (which are our mock data).
// src/lib.rs

// --snip--

    #[test]
    fn it_adds() {
        let sum = adder(4, 5);
    }
}
And finally, the third step in writing unit tests is to check the expected vs actual behavior of the code we're testing.
So here, let's assert if the value of sum as returned by the adder function is equal to 9 (which is our expected return value) using the assert_eq! macro.
// src/lib.rs

// --snip--

    #[test]
    fn it_adds() {
        let sum = adder(4, 5);
        assert_eq!(sum, 9);
    }
}
Here's the final version of our code and test in the lib.rs file:
// src/lib.rs

pub fn adder(x: i32, y: i32) -> i32 {
    x + y
}

#[cfg(test)]
mod tests {
    // this brings everything from parent's scope into this scope
    use super::*;

    #[test]
    fn it_adds() {
        let sum = adder(4, 5);
        assert_eq!(sum, 9);
    }
}
As you learned earlier, you can run this test using this command:
cargo test
If everything works well, we should get test result: ok stating that our tests passed.
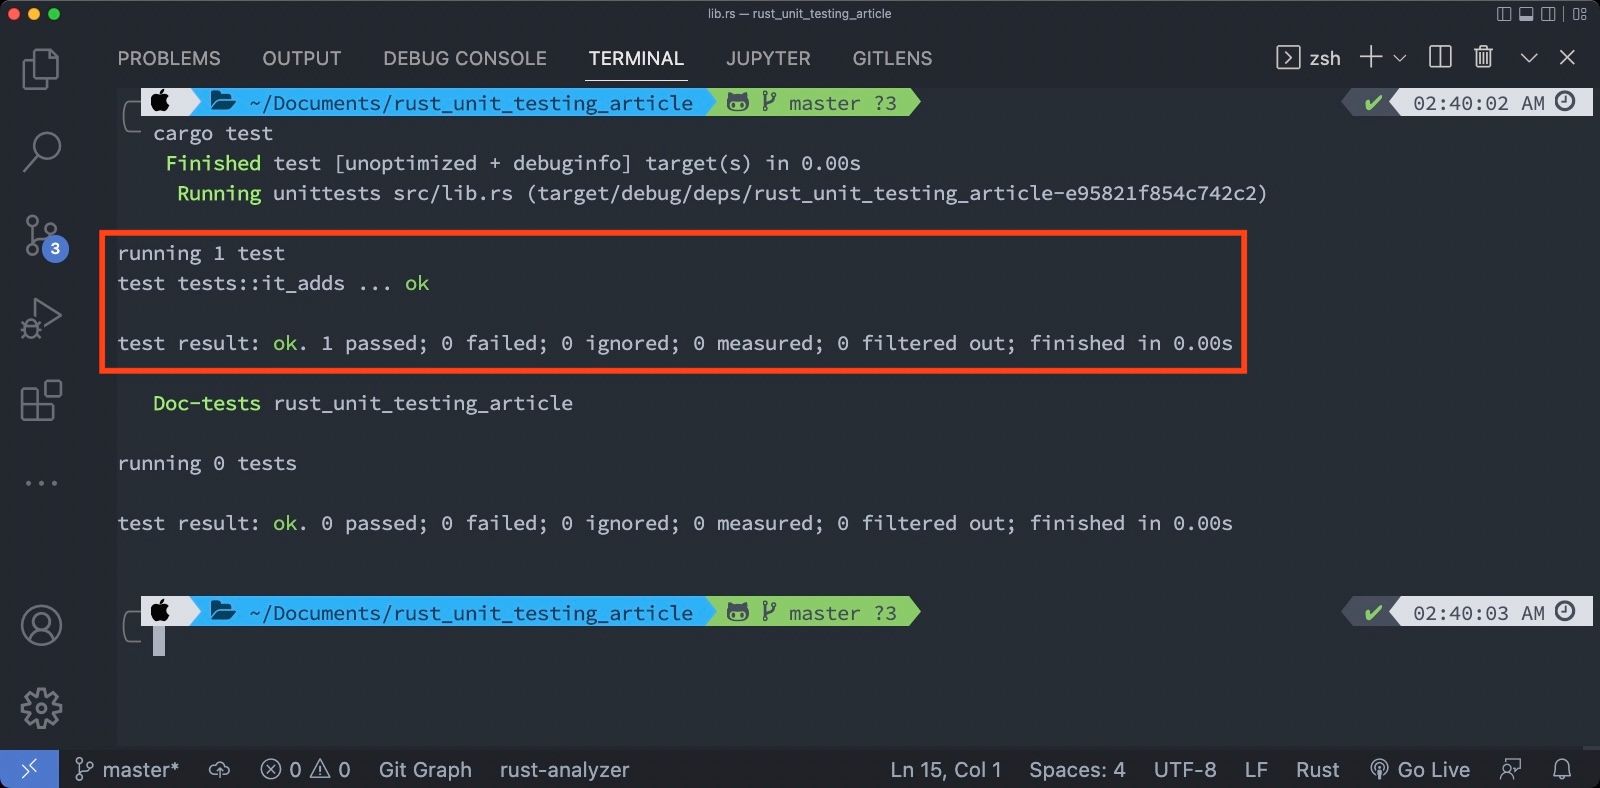
You can add more tests in the tests module for the adder function if you like (for example, adding negative numbers). Or better yet, create your own function and write a test (or tests) for it.
Moreover, there are a lot more built-in assertion macros in Rust that you can use besides the assert_eq! macro. Some of those include the assert_ne! macro for asserting not equal values (!=), and the assert! macro which just asserts if the code you're testing returns a true value.
If you need more assertion macros (for example, comparison assertions that support >, <, >=, <=), you can install external crates like this one: claim. You can check claim's documentation here for more info.
Why Failing Tests Are Useful
So far we're always getting passing results on our tests.
Although it's good, the true power of unit tests comes from catching errors or bugs in our code and reporting them through failing tests. So for this time, let's intentionally write a 'buggy' code and see what happens.
Back in the lib.rs file, modify the adder function by replacing the + operator with -.
// src/lib.rs

pub fn adder(x: i32, y: i32) -> i32 {
    // change the operator from '+' to '-'
    x - y
}

// --snip--
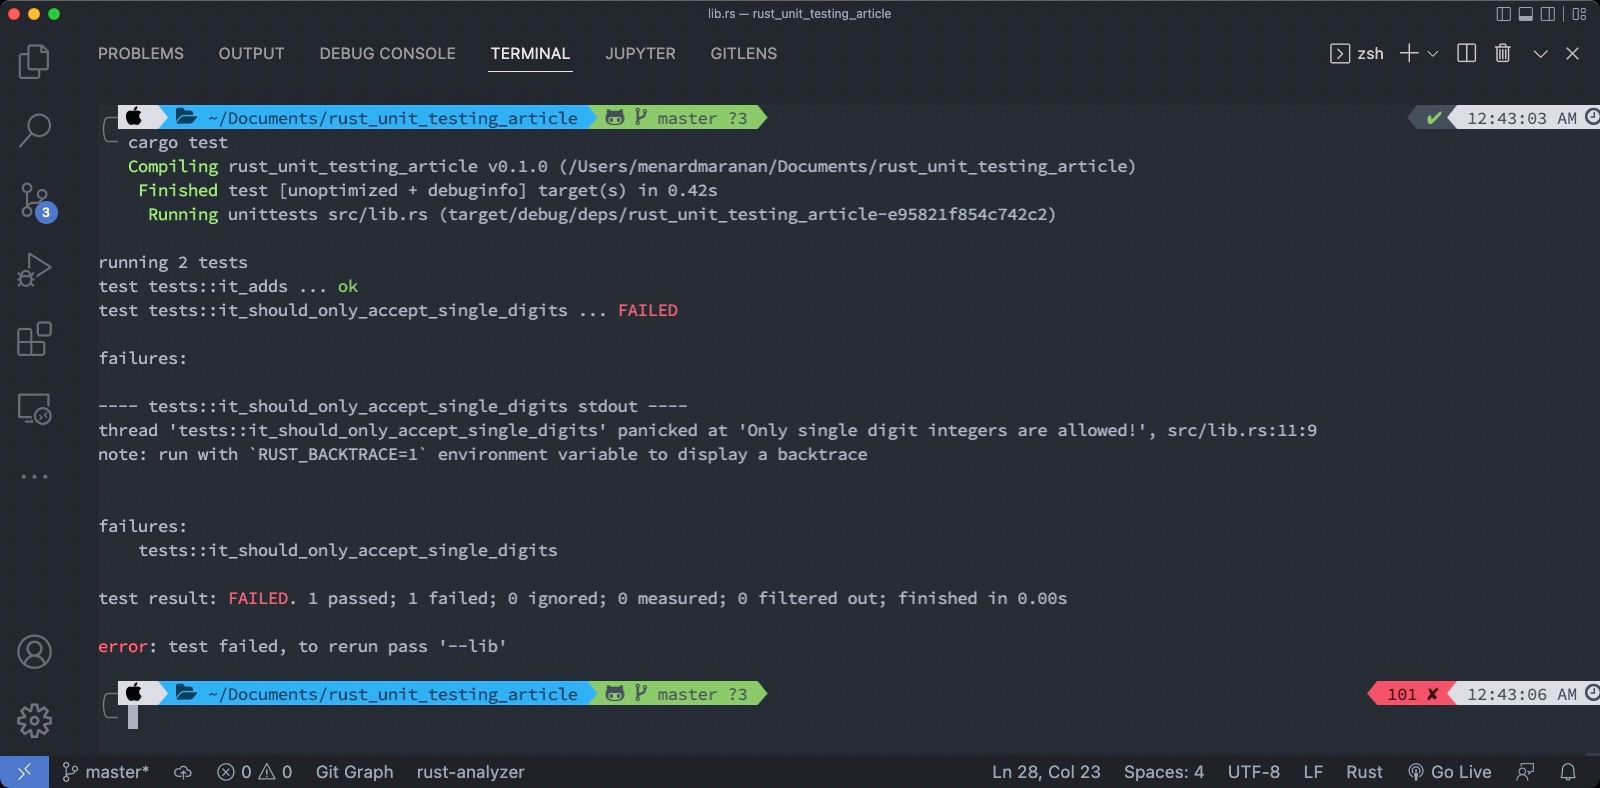
Now run the tests again using cargo test. And as expected, you should see a failing test result like this:
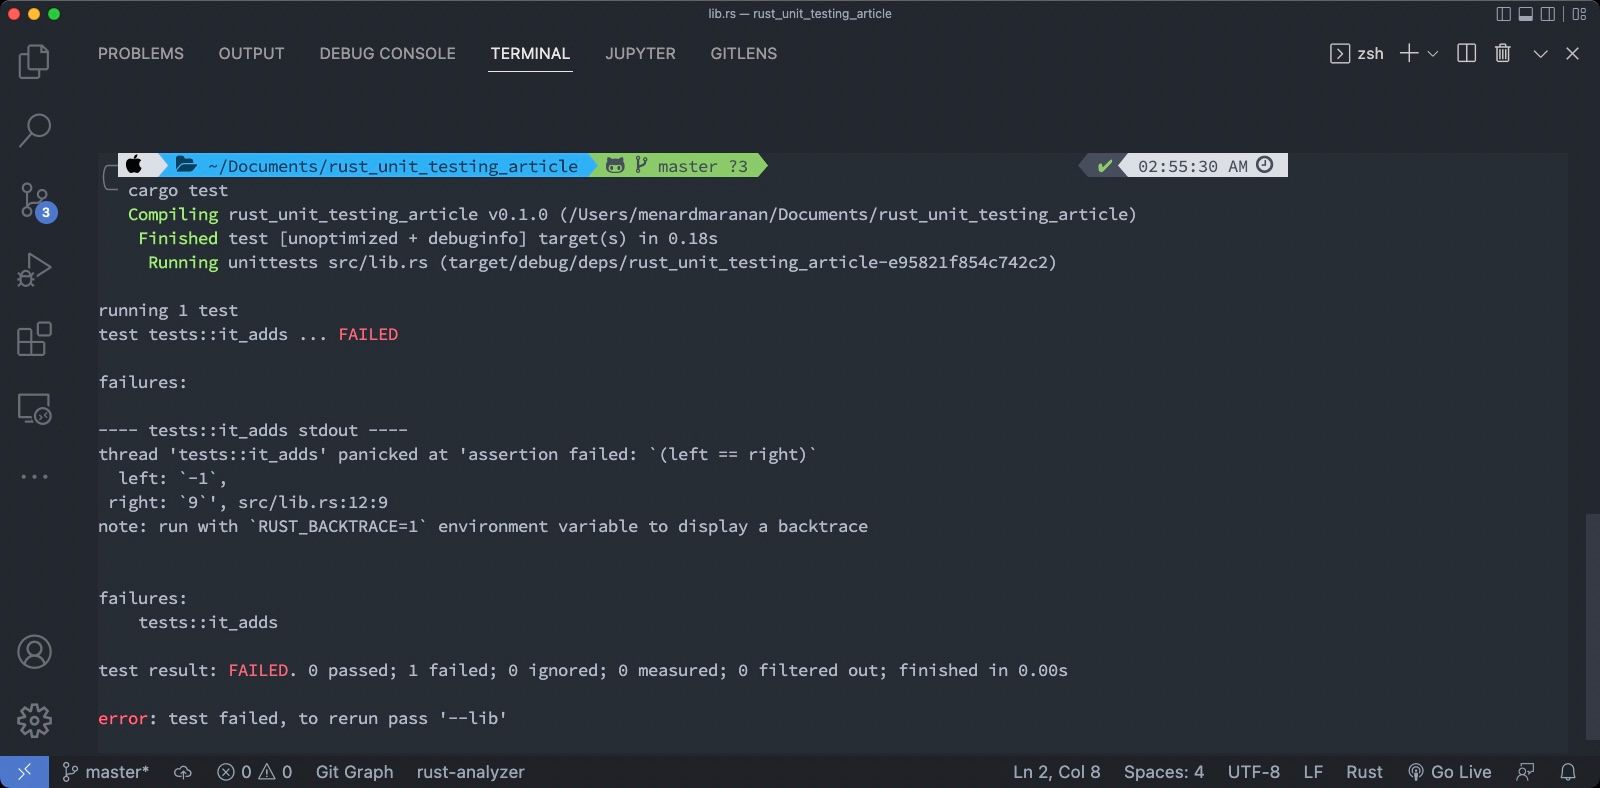 failing test by cargo
First off, notice that the status of the test function tests::it_adds is a big red FAILED. This is what failing tests with cargo look like.
Below that, you'll see the 'failures' report which lists out the failing tests and some information as to why they failed.
From our example, the tests::it_adds test failed and as the report said, the left and right values passed into the assert_eq! macro aren't equal (==).
That's because the left value is -1 while the right value is 9. Remember that on our assert_eq! assertion, the left value that we passed to it is the sum variable that contains the return value of adder(4, 5).
Since our operator is wrong, the adder function performs 4 - 5 instead of the expected 4 + 5. That's why instead of the expected value of 9, we got -1. Cargo noticed this so it raised a failing test.
Below the failed tests report is its summary (sort of), still under the failures category, but just lists out the names of the test functions that failed.
And lastly, the entire summary of the overall test:
- Status is:
test result: FAILED - 0 passed
- 1 failed
- 0 ignored
- 0 measured
- 0 filtered out
This time, our failed counter is 1 (referring to our failed test function) while passed is 0.
How to Handle Expected Errors
From the previous section, you learned that errors cause tests to fail.
But what if you are expecting the code you're testing to fail (like for example, by giving it an invalid parameter). If it gets an error, cargo will flag this as a failing test even though you're actually expecting it to fail.
Can you expect failing behaviors?
The short answer is: yes, you can!
To demonstrate this, let's go back to the lib.rs file and modify our adder function. This time, let's set a rule for it to only accept single-digit integers (positive, zero, and negative) – otherwise, it should 'panic'. And for readability purposes, let's rename our adder function to single_digit_adder.
// src/lib.rs

// modify the `adder` function from earlier
// and turn it into `single_digit_adder`
pub fn single_digit_adder(x: i8, y: i8) -> i8 {
    fn is_single_digit(x: i8) -> bool {
        x < 10 && x > -10
    }

    if !(is_single_digit(x)) || !(is_single_digit(y)) {
        panic!("Only single digit integers are allowed!");
    } else {
        x + y
    }
}

#[cfg(test)]
mod tests {
// --snip--
Since we're expecting the single_digit_adder function to 'panic' whenever it receives a non-single digit integer, we need to specify that on the test function that's responsible for testing exactly this behavior.
To do that, we need to add another attribute to one of our test functions. And that is the #[should_panic] attribute.
Going back to the tests module, first, edit the it_adds test function by renaming the adder function call into single_digit_adder.
Then, create a new test function named it_should_only_accept_single_digits with both the #[test] and the #[should_panic] attribute.
Inside this new test function, call the single_digit_adder function with an invalid parameter (11) in this case.
// src/lib.rs

pub fn single_digit_adder(x: i8, y: i8) -> i8 {
    // ...
}

#[cfg(test)]
mod tests {
    use super::*;

    #[test]
    fn it_adds() {
        let sum = single_digit_adder(2, 3);
        assert_eq!(sum, 5);
    }

    // our new test function that expects `panic!` with invalid param
    #[test]
    #[should_panic]
    fn it_should_only_accept_single_digits() {
        single_digit_adder(11, 4);
    }
}
You don't need any assert macros in the it_should_only_accept_single_digits test function since we just need single_digit_adder to 'panic'. So simply calling the function is enough.
By giving it an invalid parameter (11, which isn't a single digit), we're expecting it to 'panic'. The #[should_panic] attribute will then expect that something should panic inside the it_should_only_accept_single_digits test function. If it didn't catch any panic, this test will fail. It will only pass if single_digit_adder panics.
So to test if it really works, try commenting the #[should_panic] attribute first and then run cargo test. You should expect it to fail.
Now, uncomment the #[should_panic] attribute and re-run the test. Your tests should all pass as expected:
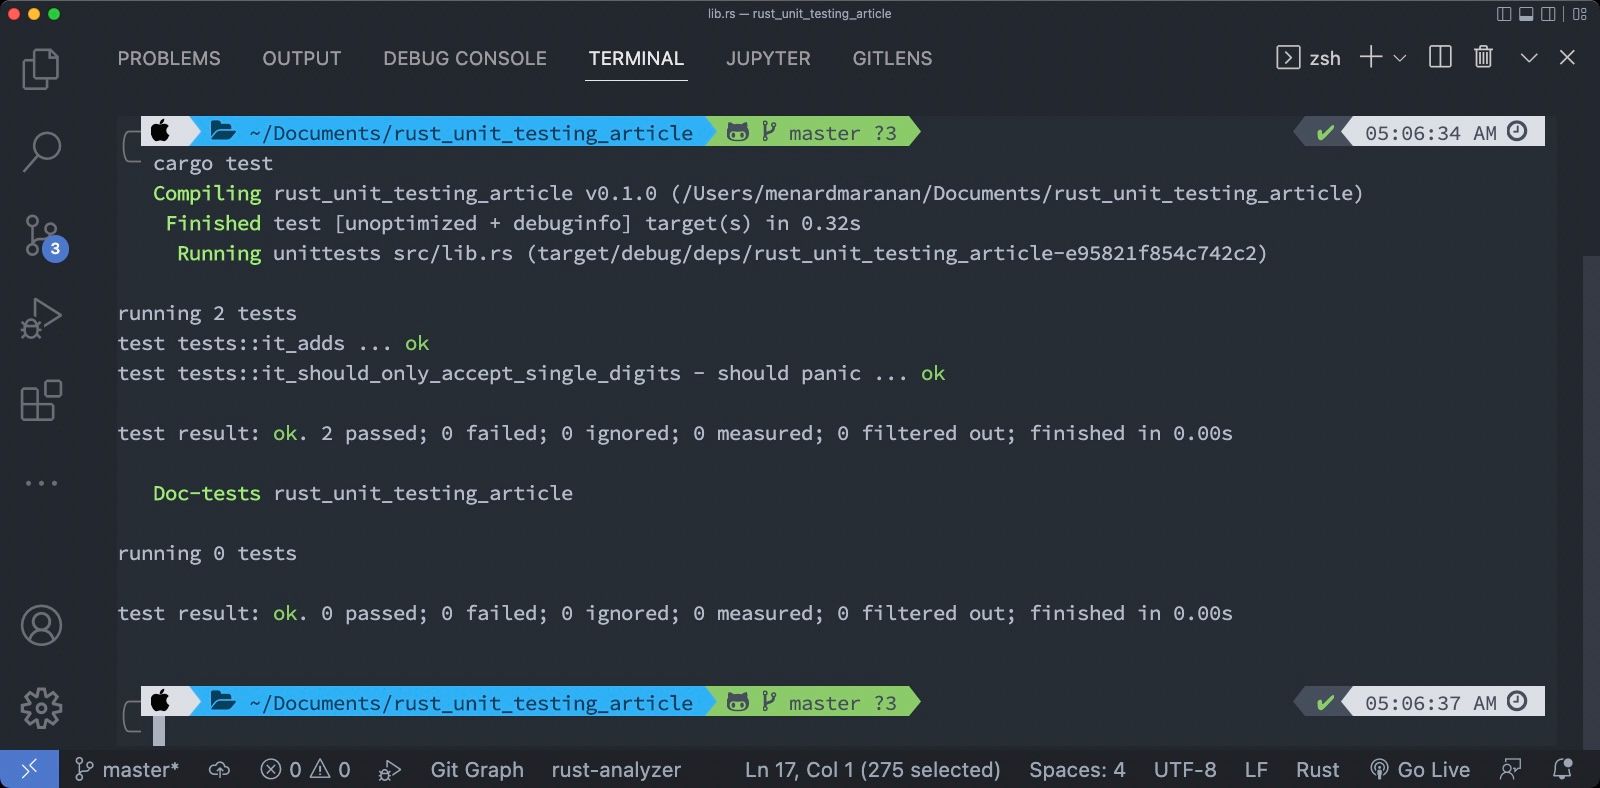 The output of a test case expecting and actually catching a failing behavior
Notice that on the test tests::it_should_only_accept_single_digits, there's a should panic alongside it, and that it passed the test. This means that this test function caught a panic as expected.
And there you have it! You just learned what unit testing is and how to perform unit tests with the Rust programming language. Feel free to write your own tests using the knowledge you obtained from this article and use it in your future projects.
Conclusion
In this article, you learned what unit testing is and its importance in the software development process. You also learned how to write unit tests through the simple three steps process and actually perform testing in the Rust programming language.
We covered the structure of a test module in Rust and how to construct a test function, and then we wrote a simple Rust program and some test cases for it. We also covered failing tests and how to handle an expected failing behavior in the unit of code.
Testing is an important part of the software development process. Testing your code helps ensure that the software works as expected. As a developer, it's important that you test your code to ensure the quality of the software you're shipping and that those silly bugs don't reach the end-user!