


기사 원문: How to Make a Filter Component in React
필터 컴포넌트는 사용자가 필요한 결과를 빠르고 쉽게 찾을 수 있게 도와주기 때문에 웹사이트에서 유용합니다.
특히 API에서 데이터가 올 때 아주 유용한데, 사용자는 당신의 앱이 제공하는 모든 것을 살펴볼 수는 없기 때문입니다.
이 아티클에서는 Data.js라는 별도의 컴포넌트에 배열처럼 하드 코딩하고 저장한 가짜 데이터를 사용할 겁니다.
여기서 다룰 내용
- 시작하기
- 리액트 앱 만들기
- Hook을 사용해서 Data.js로부터 데이터 가져오기
- 앱의 UI 작업하기
- 필터 컴포넌트 만들기
- 마무리하기
시작하기
이 특정 프로젝트를 위해 아래 코드에서 보이듯 몇 가지의 key-value 쌍으로 이루어진 가짜 음식 데이터를 사용할 겁니다.
const Data = [
  {
    id: '1',
    title: 'Poha',
    category: 'Breakfast',
    price: '$1',
    img: 'https://c.ndtvimg.com/2021-08/loudr2go_aloo-poha_625x300_05_August_21.jpg?im=FeatureCrop,algorithm=dnn,width=620,height=350',
    desc: ' Poha. Light, filling and easy to make, poha is one famous breakfast that is eaten almost everywhere in the country. And the best part is- it can be made in a number of ways. Kanda poha, soya poha, Indori poha, Nagpur Tari Poha are a few examples',
  },
  {
    id: '2',
    title: 'Upma',
    category: 'Breakfast',
    price: '$1',
    img: 'https://c.ndtvimg.com/2021-04/37hi8sl_rava-upma_625x300_17_April_21.jpg?im=FeatureCrop,algorithm=dnn,width=620,height=350',
    desc: ' A quintessential South Indian Breakfast! Made with protein-packed urad dal and semolina followed by crunchy veggies and curd, this recipe makes for a hearty morning meal. With some grated coconut on top, it gives a beautiful south-Indian flavour.',
  },
  {
    id: '3',
    title: 'Cheela',
    category: 'Breakfast',
    price: '$1',
    img: 'https://c.ndtvimg.com/2019-05/1afu8vt8_weight-loss-friendly-breakfast-paneer-besan-chilla_625x300_25_May_19.jpg?im=FaceCrop,algorithm=dnn,width=620,height=350',
    desc: 'A staple across Indian households, moong dal is widely used in a number of Indian delicacies. One such delicacy is moong dal cheela. You can also add paneer to this recipe to amp up the nutritional value and make it, even more, protein-dense',
  },
  {
    id: '4',
    title: 'Channa Kulcha',
    category: 'Lunch',
    price: '$1',
    img: 'https://i.ndtvimg.com/i/2015-04/chana-kulcha_625x350_41429707001.jpg',
    desc: 'A classic dish that never goes out of style. The quintessential chana kulcha  needs only a few ingredients - cumin powder, ginger, coriander powder, carom powder, and some mango powder, which is what gives the chana its sour and tangy taste.',
  },
  {
    id: '5',
    title: 'Egg Curry',
    category: 'Lunch',
    price: '$1',
    img: 'https://i.ndtvimg.com/i/2017-11/goan-egg-curry_620x350_41511515276.jpg',
    desc: 'Eggs are a versatile food that can be cooked for any meal of the day. From breakfast to dinner, it can be a go-to food. Here is a mildly-spiced egg curry made with garlic, onions, a whole lot of kasuri methi, fresh cream, yogurt, and fresh coriander.',
  },
  {
    id: '6',
    title: 'Paneer Aachari',
    category: 'Lunch',
    price: '$1',
    img: 'https://i.ndtvimg.com/i/2015-04/paneer_625x350_61429707960.jpg',
    desc: "Don't get intimidated by the list of ingredients because not only are already in your kitchen cabinet, but also because all they'll need is 20 minutes of your time. Chunks of cottage cheese cooked in some exciting spices, yogurt and a pinch of sugar.",
  },
  {
    id: '7',
    title: 'Fish Fry',
    category: 'Dinner',
    price: '$1',
    img: 'https://i.ndtvimg.com/i/2015-06/indian-dinner_625x350_41434360207.jpg',
    desc: 'Get your daily dose of perfect protein. Pieces of surmai fish marinated in garlic, cumin, fennel, curry leaves, and tomatoes are pan-fried in refined oil and served hot. This fish fry recipe has a host of delectable spices used for marination giving it a unique touch.',
  },
  {
    id: '8',
    title: 'Dum Alloo',
    category: 'Dinner',
    price: '$1',
    img: 'https://i.ndtvimg.com/i/2015-06/indian-dinner_625x350_51434362664.jpg',
    desc: 'Your family will thank you for this fantastic bowl of dum aloo cooked Lakhnawi style. Take some potatoes, crumbled paneer, kasuri methi, butter, onions, and some ghee.',
  },
  {
    id: '9',
    title: 'Malai Kofta',
    category: 'Dinner',
    price: '$1',
    img: 'https://i.ndtvimg.com/i/2017-10/makhmali-kofte_620x350_51508918483.jpg',
    desc: 'A rich gravy made of khus khus, coconut and milk that tastes best with koftas made from khoya. This velvety and creamy recipe will leave you licking your fingers. Makhmali kofte can be your go-to dish for dinner parties as this is quite different from other kofta recipes and extremely delicious.',
  },
  {
    id: '10',
    title: 'Malai Kofta',
    category: 'Snaks',
    price: '$1',
    img: 'https://i.ndtvimg.com/i/2017-10/makhmali-kofte_620x350_51508918483.jpg',
    desc: 'A rich gravy made of khus khus, coconut and milk that tastes best with koftas made from khoya. This velvety and creamy recipe will leave you licking your fingers. Makhmali kofte can be your go-to dish for dinner parties as this is quite different from other kofta recipes and extremely delicious.',
  },
];

export default Data;
이러한 key-value 중에는 결과를 필터링할 때 쓰일 카테고리도 있습니다.
앱을 스타일링하기 위해 이 프로젝트의 CDN으로 부트스트랩(Bootstrap)을 사용할 겁니다.
이 튜토리얼 이후에는 리액트에 컴포넌트를 가져오는 방법, 데이터를 동적으로 사용하는 방법, 그리고 가장 중요한 부모 자식 컴포넌트 사이에 props를 전달하고 사용하는 방법에 대해 더 많이 알게 되실 겁니다.
리액트 컴포넌트 만드는 방법
리액트 앱을 만드는 건 정말 쉽습니다. 본인이 선호하는 IDE의 작업 디렉토리로 가서 터미널에 아래의 명령어를 입력하면 됩니다.
npx create-react-app react-filter-app
create-react-app 프로젝트를 만드는 방법을 잘 모르겠다면 create-react-app-dev의 공식 가이드를 참고하셔도 됩니다.
세팅을 마친 후 리액트 앱이 호스팅 될 localhost:3000를 시작하기 위해서 같은 터미널에 npm start를 실행합시다. 모든 변화는 여기서 확인할 수 있습니다.
Hook을 사용해서 Data.js로부터 데이터를 가져오는 방법
이제 리액트 프로젝트를 성공적으로 설정했으므로 Data.js에서 데이터를 가져와 UI에 사용할 차례입니다.
이를 위해 먼저 App.js 컴포넌트에 데이터를 가져온 다음 useState 훅을 사용하여 데이터 상태를 관리해야 합니다.
import React, { useState } from 'react';
import Data from './Data';
import Card from './Card';

const App = () => {
  const [item, setItem] = useState(Data);
  return (
    <>
      <div className="container-fluid">
        <div className="row">
          <h1 className="col-12 text-center my-3 fw-bold">Our Menu</h1>
          <Card item={item} /> // UI Component
        </div>
      </div>
    </>
  );
};

export default App;
앱의 UI 부분을 구축하는 방법
이제 앱에서 자유롭게 사용할 수 있는 변수에 데이터를 저장하고 UI에서 작업할 수 있습니다.
UI는 map 함수를 사용하여 동적으로 만들 부트스트랩 카드가 포함됩니다.
우리는 카드를 위해 다른 컴포넌트를 만들 겁니다. 위의 코드에서 볼 수 있듯이 우리는 Card.js라고 이름을 지었고 가져왔습니다. 또한, 카드 컴포넌트 안의 item에 저장된 데이터를 사용하기 위해 item을 props로 전달했습니다.
이 컴포넌트에서는 map 함수를 이용해 앱에서 동적으로 보여줄 모든 카드와 데이터를 포함할 겁니다.
import React from 'react';
const Card = ({ item }) => {
// destructuring props
return (
<>
<div className="container-fluid">
<div className="row justify-content-center">
{item.map((Val) => {
return (
<div
className="col-md-4 col-sm-6 card my-3 py-3 border-0"
key={Val.id}
>
<div className="card-img-top text-center">
<img src={Val.img} alt={Val.title} className="photo w-75" />
</div>
<div className="card-body">
<div className="card-title fw-bold fs-4">
{Val.title} --
{Val.price}
</div>
<div className="card-text">{Val.desc}</div>
</div>
</div>
);
})}
</div>
</div>
</>
);
};
export default Card;
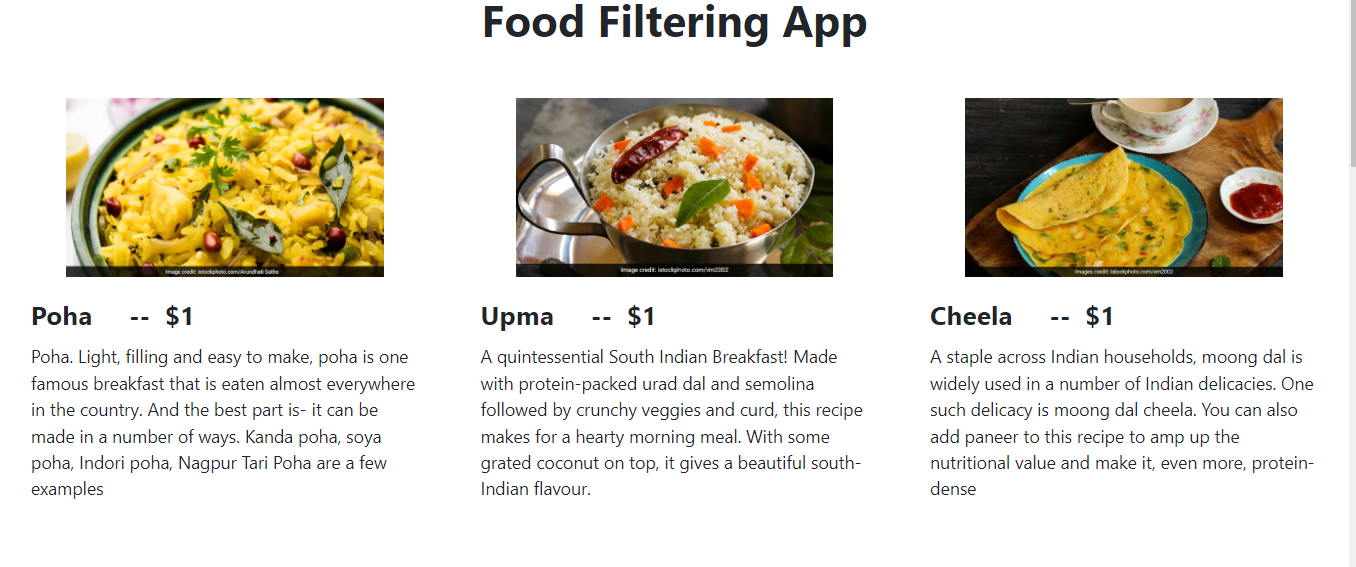
10개의 카드가 있는 앱의 모습은 다음과 같습니다.
필터 컴포넌트를 만드는 방법
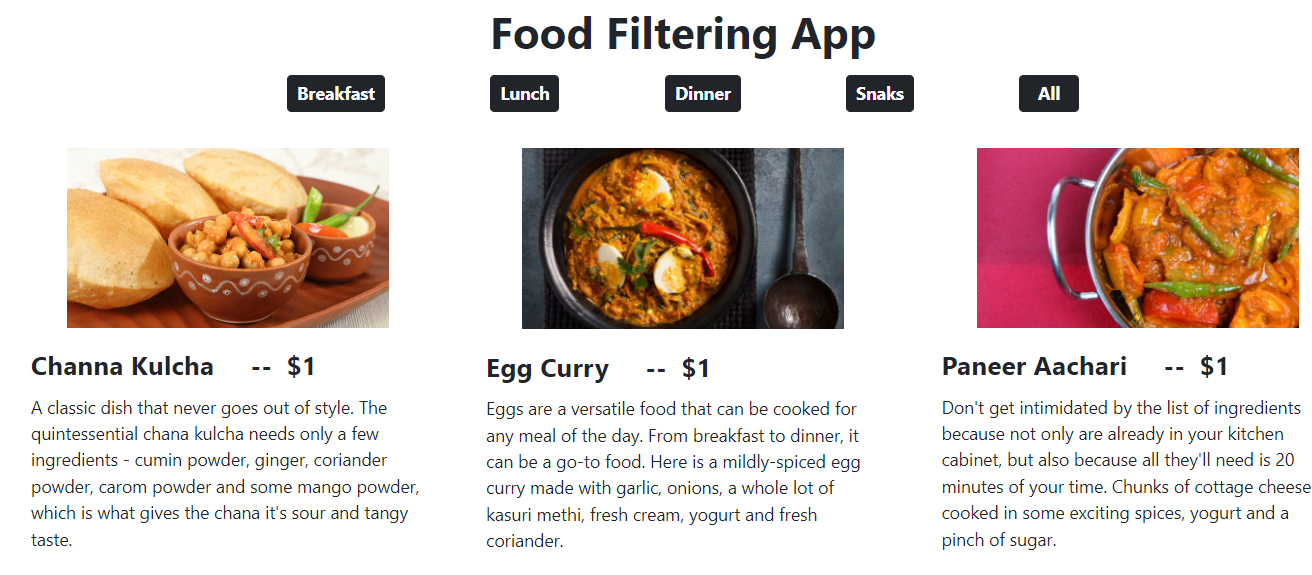
필터 컴포넌트를 사용하여 사용자가 검색 결과를 통해 얻은 데이터를 필터링할 수 있는 방법은 다양합니다. 하지만 여기서는 아침, 점심, 저녁 그리고 간식 같은 음식의 카테고리에 따라 데이터가 필터링 되도록 버튼을 만들 겁니다.
키 카테고리의 값만 포함하는 새로운 배열을 만들고 map 메소드로 보여줘야 합니다.
// spread operator는 데이터 카테고리 섹션의 모든 값을 보여줍니다. 하지만 Set은 각 종류의 단일 값만 표시할 수 있습니다.

const menuItems = [...new Set(Data.map((Val) => Val.category))];
위의 배열을 표시하여 얻은 모든 값이 동일한 UI를 갖고 10개의 카테고리를 모두 버튼으로 보여주기 위해 spread operator를 사용합니다.
Set() 값을 사용하여 고유한 3개 또는 4개의 값만 표시하고 반복되는 값이 없도록 합니다.
map 메소드를 사용하여 동적으로 표시되는 버튼에 대한 새 컴포넌트를 만듭니다. 그러나 이번에는 새로 구성된 배열을 사용할 것입니다. 모든 카테고리가 배열에 저장되어 있고 **Set()**으로 인해 한 번만 표시되기 때문입니다.
import React from 'react';
import Data from './Data';

const Buttons = ({ setItem, menuItems }) => {
  return (
    <>
      <div className="d-flex justify-content-center">
        {menuItems.map((Val, id) => {
          return (
            <button
              className="btn-dark text-white p-1 px-2 mx-5 btn fw-bold"
              key={id}
            >
              {Val}
            </button>
          );
        })}
        <button
          className="btn-dark text-white p-1 px-3 mx-5 fw-bold btn"
          onClick={() => setItem(Data)}
        >
          All
        </button>
      </div>
    </>
  );
};

export default Buttons;
버튼을 표시할 위치에 버튼 컴포넌트를 놓으세요. 우리의 경우 app.js의 카드 컴포넌트 위에 버튼을 놓았습니다.
카테고리에 따라 필터가 되도록 버튼에 필터를 추가할 시간입니다.
const filterItem = (curcat) => {
  const newItem = Data.filter((newVal) => {
    return newVal.category === curcat;
    // comparing category for displaying data
  });
  setItem(newItem);
};
filter 메소드는 오브젝트의 카테고리에 따라 데이터를 필터합니다.
onClick() 이벤트 헨들러를 사용하면 버튼에 이 필터를 연결할 수 있습니다.
import React from 'react';
import Data from './Data';

const Buttons = ({ filterItem, setItem, menuItems }) => {
  return (
    <>
      <div className="d-flex justify-content-center">
        {menuItems.map((Val, id) => {
          return (
            <button
              className="btn-dark text-white p-1 px-2 mx-5 btn fw-bold"
              onClick={() => filterItem(Val)}
              key={id}
            >
              {Val}
            </button>
          );
        })}
        <button
          className="btn-dark text-white p-1 px-3 mx-5 fw-bold btn"
          onClick={() => setItem(Data)}
        >
          All
        </button>
      </div>
    </>
  );
};

export default Buttons;
마무리하기
사용자가 시간 낭비를 줄이고 앱에서 원하는 결과를 찾을 수 있도록 다양한 방법으로 필터 컴포넌트를 사용할 수 있습니다.
이 앱에서 배열에는 10개의 오브젝트만 있었지만 주로 API에서 데이터를 얻을 때는 수많은 데이터가 있습니다. 이럴 경우에는 한 번의 검색으로 정확한 결과를 얻기가 쉽지 않기 때문에 필터를 사용합니다.
여러분은 깃헙 레포에서 전체 코드를 보실 수 있고, 앱의 라이브 링크에서 이 필터 버튼들이 어떻게 작동하는지를 확인할 수 있습니다.
저의 다른 프로젝트들도 확인할 수 있습니다.