
Instagram has become a massively popular social media platform over the last several years. People all over the world use it to share photos, spread messages, and inspire each other.
According to TechCrunch, Instagram has over 1 billion active users (with 500 million posting every day) – so if you want to get your images or your ideas out there, it's a good place to start.
In this tutorial, we'll cover some Instagram basics – what it is, how to set up an account, how to add posts, captions, and hashtags, and so on.
Then we'll look at how you can up your Instagram game with filters, stories, and more.
What we'll cover in this guide:
- What is Instagram?
- Why should you use Instagram?
- How do you sign up for Instagram?
- How to use Instagram – the basics
- How to use Instagram like a pro
- Instagram Etiquette
What is Instagram?
Instagram is a social media platform where people share photos, videos, art, and infographics – really anything visual is fair game.
The photos get posted to a feed which you can scroll through (what feels like endlessly). Along with the photos, you can add a caption and some hashtags (more on those below) to provide more info about your image.
As opposed to other social media sites like Twitter and Facebook, Instagram has traditionally been more focused on visual media and art, and less on textual media.
But recently, text has been appearing more and more as people share important social and political messages through Instagram.
Why should you use Instagram?
There are many reasons you might want to share photos and videos on Instagram.
Perhaps you're starting a business or launching a product. You might work for a company that wants to have an Instagram presence. Maybe you want to build your personal brand as a photographer, traveler, or artist. Or you just want to share what you're into right now via pictures.
Whatever the reason, Instagram is a great place to share ideas, messaging, and art online.
Some of the main benefits of using Instagram are:
- It's free to use
- Hundreds of millions of people use it every day – so you have a huge potential audience
- It can help increase exposure for your site, product, service, or tool
- You can get inspiration and ideas from others' posts (just always be sure to give credit if you use/share their work!)
- You can share what you've learned through infographics
- You can use it to amplify others' voices
- It's generally a very positive atmosphere (and the owner of an account can remove negative/nasty comments if they appear)
How do you sign up for Instagram?
Before you can post anything to Instagram, you have to have an Instagram account. It's not difficult to set up, and we'll go through the steps quickly here.
Just a quick note before we get started: Instagram's desktop interface and mobile app are quite different. Most people use Instagram on their mobile device (from the Instagram app) because that's where you can actually post photos.
 Instagram for Mobile
You can't post to Instagram from your desktop – you can just scroll, follow people, search, and so on.
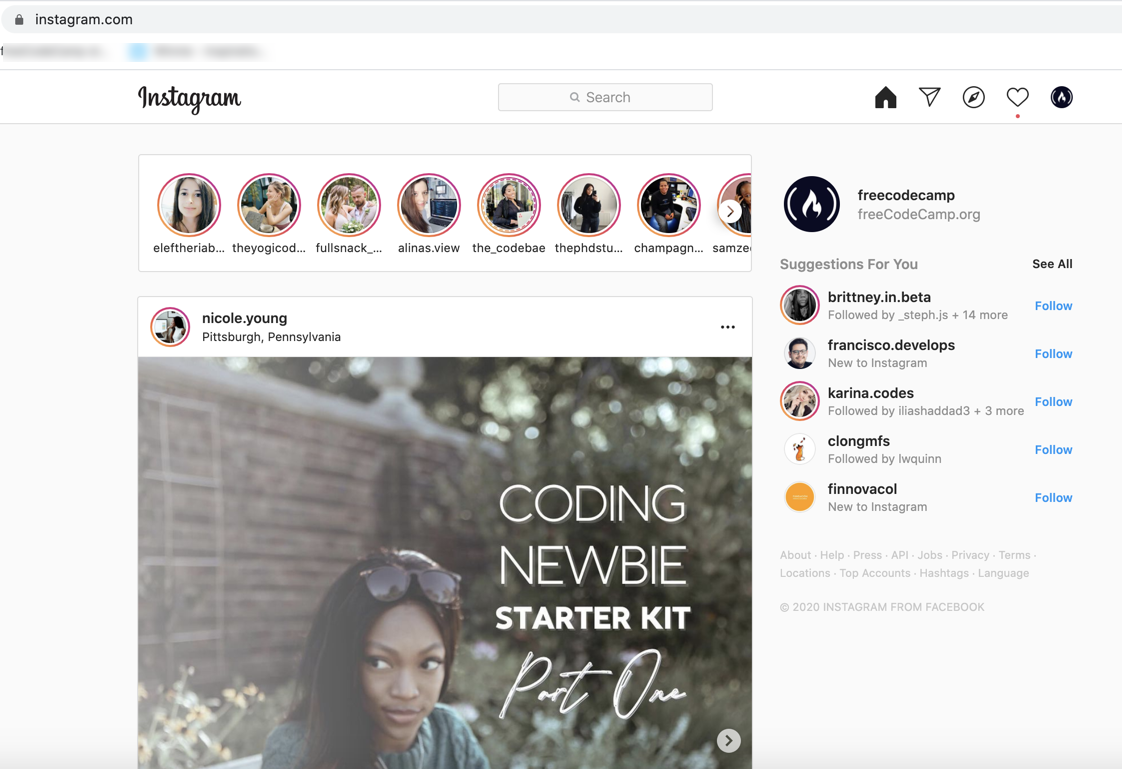 Instagram for Desktop
Now, we'll go through the instructions to set up your account on your mobile device. If you want to see how to do it on your desktop or laptop, just jump down to the "Bonus" section at the end of the article.
How to sign up for Instagram on your phone
Step 1: download the Instagram app
First, you'll need the app. Visit the app store and download it (it's free).
Step 2: Sign up for Instagram
Next, you'll need to create an account. Pick a username (you can change it later if you want) and a password. The app will automatically advance you to the next step once you've entered these values.
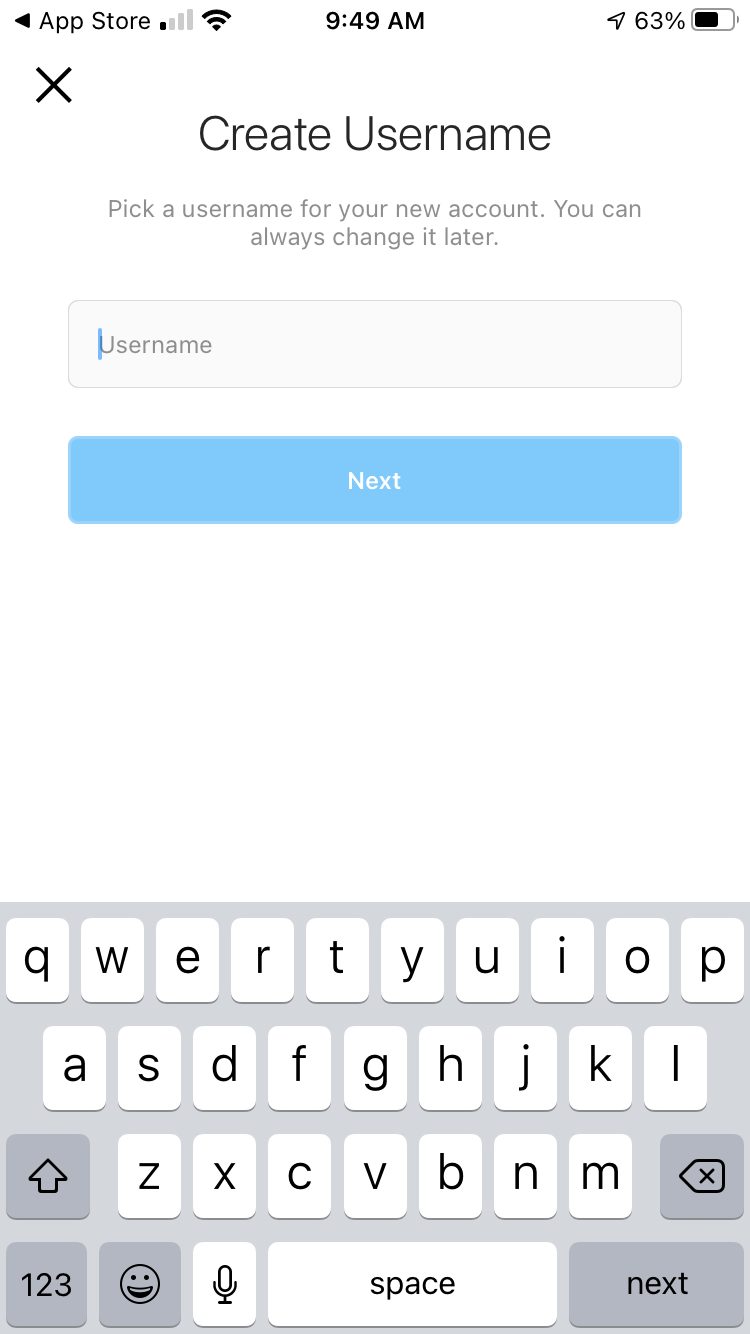 Choose your Instagram username (and password in the next step).
Step 3: Add a profile photo and other info
Once your account is set up, you'll want to add a profile photo. It doesn't have to be a photo of your face – but you should add something. No one wants to see that little grey person icon.
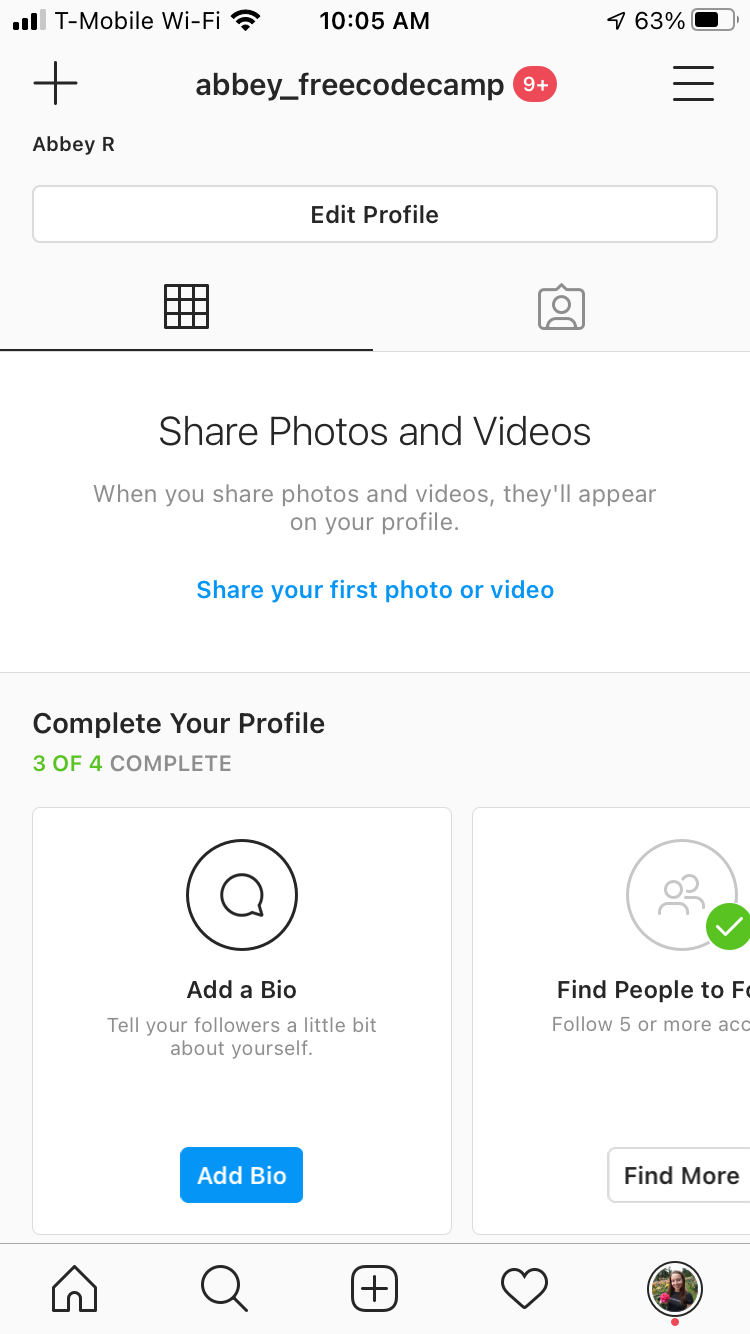 Complete the steps to fill out your profile.
You can also add bio information, a website, and any other info you want people to know (as you see in the image above). Many people use this section to tell a bit about themselves, link to their personal sites, and so on.
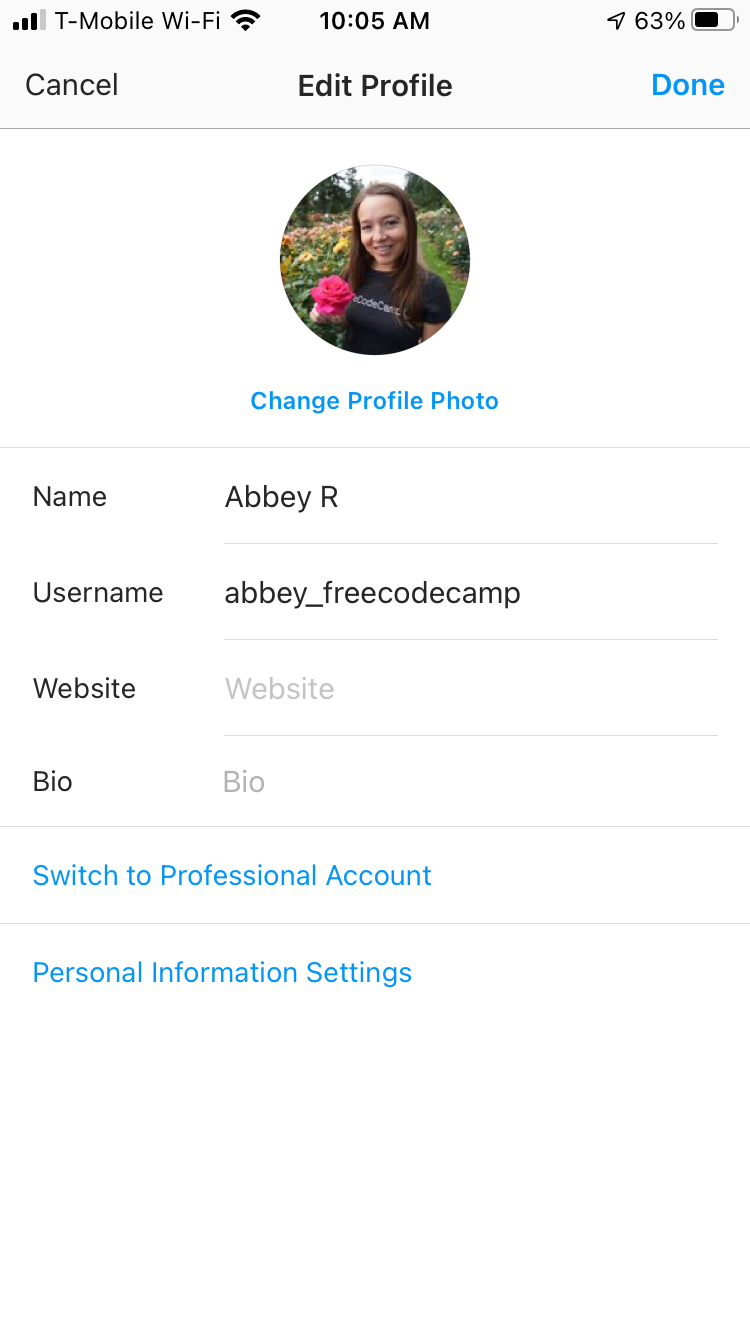 An example profile.
Now that your profile is all set up, you're ready to start exploring and posting to Instagram. Let's dive into some of the features you'll find.
How to Use Instagram – the Basics
In order to get the most out of your Instagram account, you should share some stuff. You don't have to share multiple times a day, or even every day – but you should share regularly.
Different people have different strategies about how often to post, what time of day, what days of the week, and so on.
If you're running a branded/company account, or you're trying to grow your following and eventually make money off of sponsorships and so on, this will be more important for you.
If you're just trying to have a personal account where you can share photos of your pets and amplify others' voices, it's really just up to you to find what works best.
Now, let's get into some of the little buttons and icons you'll see on your home screen and learn more about what you can actually do on Instagram.
Note: from now on, I'll just be sharing info and screenshots from the mobile app, since that's likely how you'll be using the site.
How to Search on Instagram
When you're just getting started on Instagram, search is an important feature. You'll find the search icon on the bottom of your screen, towards the left:
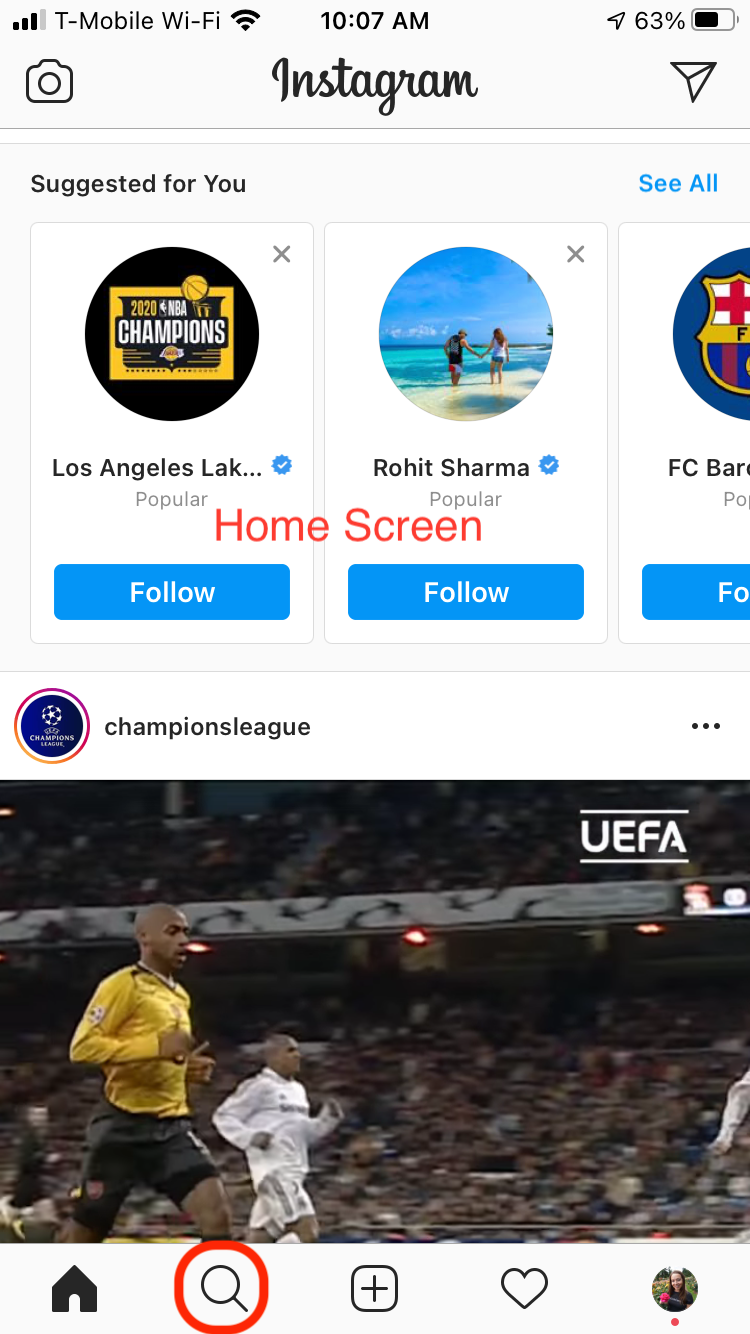 Magnifying glass = search icon (on home screen).
If you click on the little magnifying glass icon, you'll be taken to the search page. It shows a search bar at the top, and a number of popular accounts (photos and videos) below, like this:
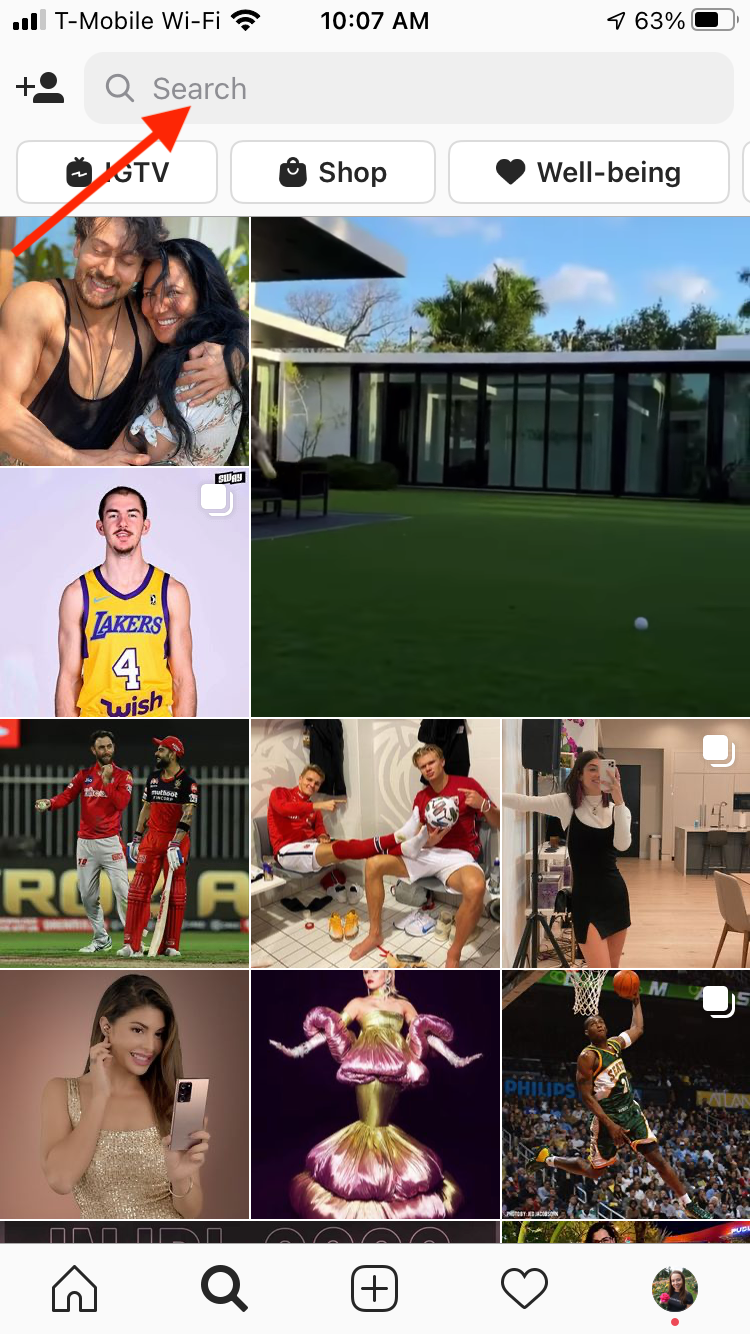 You can search for people by name or Username.
If you have a specific person in mind you want to find, enter their name (or their Instagram username, if you know it) into the search bar. When you find them, you can click "Follow" to get updates from their account in your feed.
If you just want to browse around and follow interesting-looking people, you can do that too on the search page.
How to find the Instagram homepage (feed)
When you open your Instagram app, it'll take you to the home page. Or, if you have already browsed around and visited another page (like your activity), it'll take you there.
To find your home page, look at the menu bar with the five icons along the bottom of the screen. You can get home by tapping the little house icon:
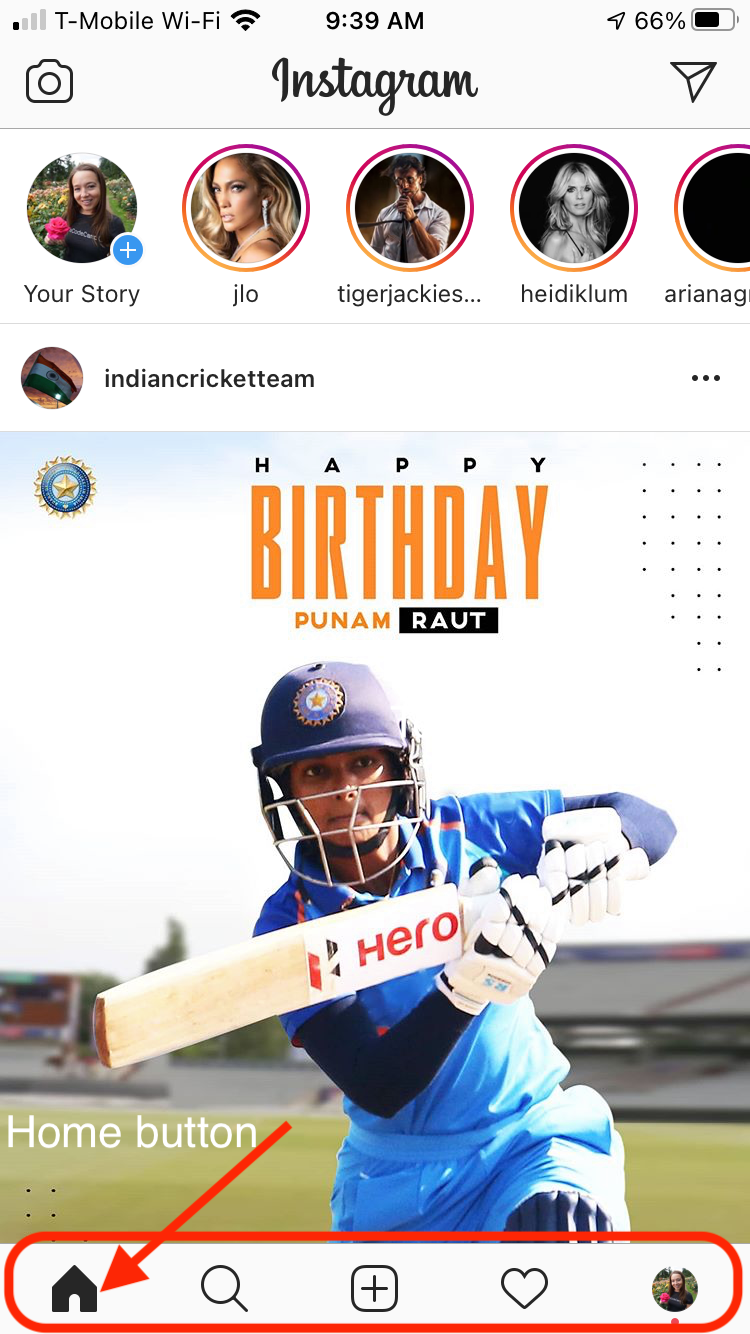 Just tap the little house to get home (in this image, you're already there – so it's highlighted).
Once you're there, you can scroll down to see what people have been sharing. On each post, you can like it (tap the heart icon), comment (tap the speech bubble icon), send the person a message (tap the little paper airplane or message bubble looking icon) or save the post for later (the little flag icon on the right).
I'll discuss how to use these features in more detail below.
You'll also see recent stories on your home page as you scroll down. More on stories below.
Lastly, in the upper right corner, you'll see another copy of the message icon. If you click that icon, you'll see messages people have sent you, and you can send messages from there to other Instagram users. More on that below as well.
October, 2020 Update: If you've updated your Instagram app, you might see a new homescreen, that looks like this:
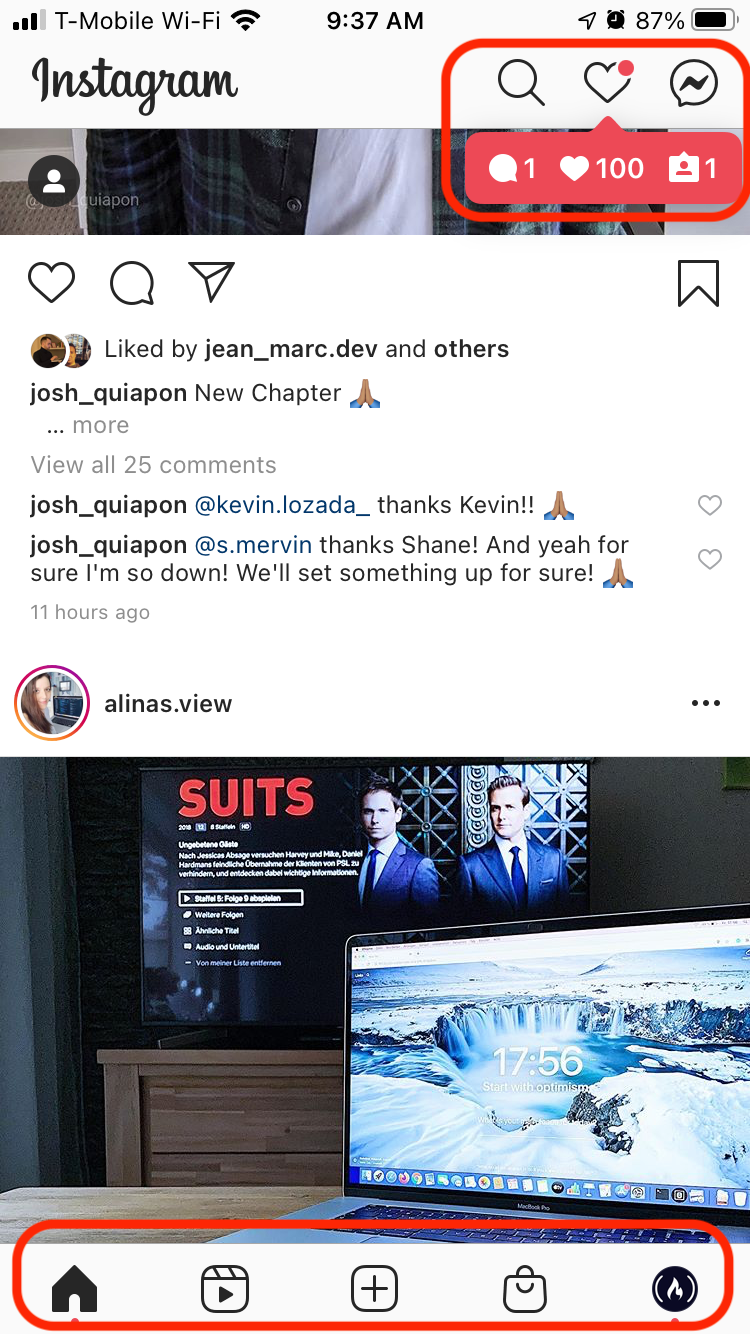 Updated homescreen.
You'll see that your activity button (the heart) and search button (the magnifying glass) are now in the upper right next to the messaging button.
Along the bottom of your homescreen, you'll now find the home button (same), a Reels shortcut (looks like a movie action button), the add photo button (same), a "Shop" button (looks like a shopping bag) and your profile icon (same).
The shopping tab is the only really new thing here. Instagram recommends products for you and you can shop directly on that page.
How to add a photo or video on Instagram
Alright, so you've been scrolling through other people's content, but now you probably want to add your own.
Step 1: Select the photo(s) you want to share
To add a photo or video, click on the plus (+) icon in the bottom middle of your home screen. Your camera roll will pop up, with the last photo you took selected at the top. You can scroll down to find older photos if you want.

You'll also see three little icons in the middle/right of the page on that first photo. They look like an infinity symbol, a couple squares and a rectangle, and a couple layered squares. More on them below. Let's just focus on adding a photo for now.
Once you find the photo you want, just tap on it and a little blue outline will appear around it.
If you want to add more than one photo, tap the layered squares on the right and then you'll be able to select up to 10 photos. The photos will be displayed in the order you select them (and will be numbered).
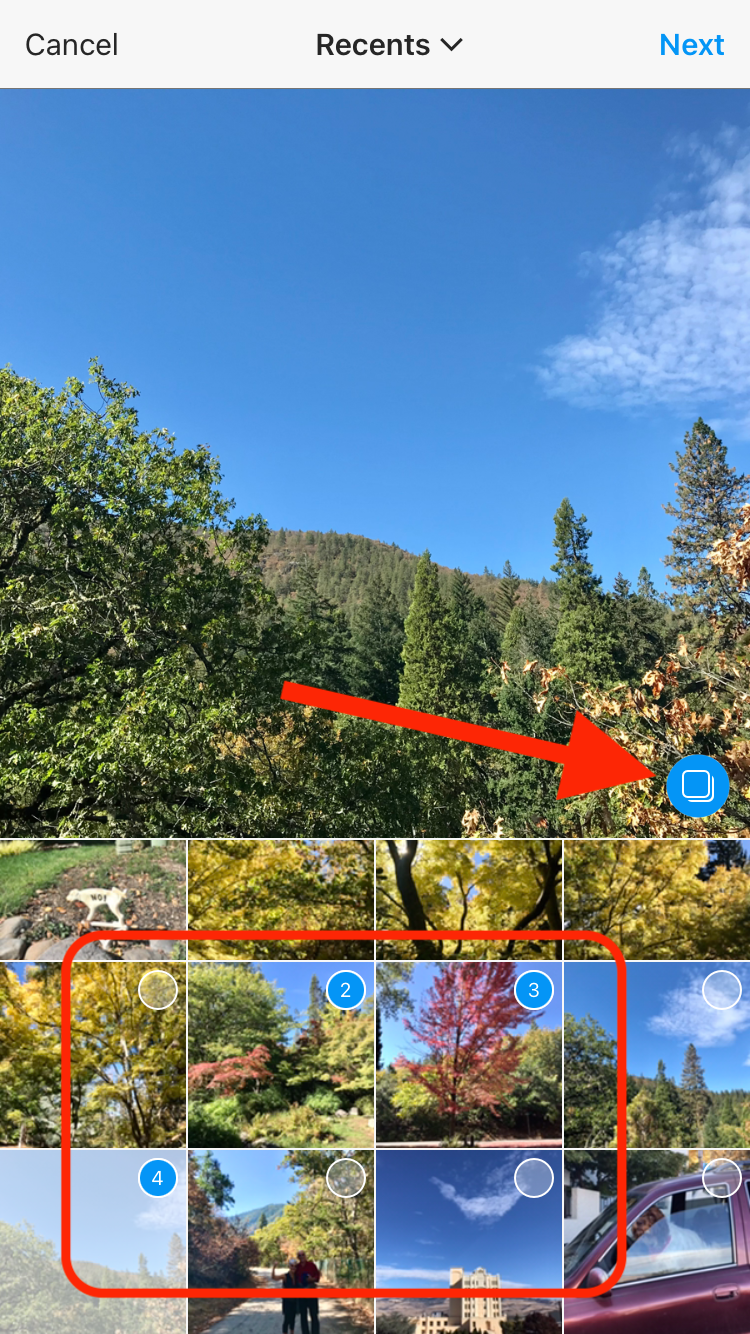 Add more than one photo to your post.
Step 2: Add a filter or edit your photo(s) (if you want)
Once you've selected your photo(s), hit "Next" in the upper right corner of your screen. You'll then have the option to select a filter – they appear along the bottom below the photo and show you a little preview of what the filter would look like.
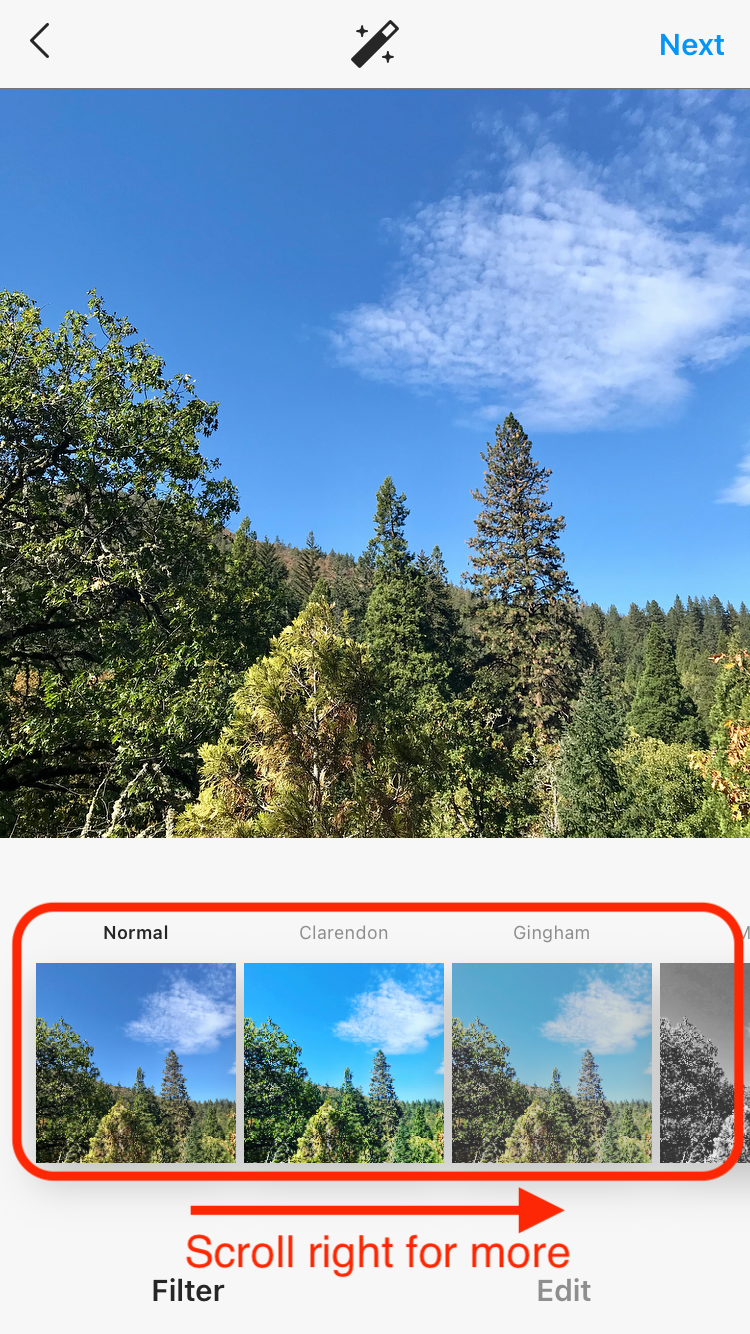 Filter options (scroll to the right to see more). Tap each option to see a preview.
If you tap one of the filter options, the main/large photo above will change to show what that filter will do to the photo. You can also leave the photo without a filter if you like it the way it is.
If you'd like to customize and edit the photo in more detail, just select the "Edit" button (to the right of the "Filter" option).
A new scrollable menu will appear below your photo with options to adjust brightness, contrast, and a number of other visual features. Click on each one to play around with the settings until your photo looks just right.
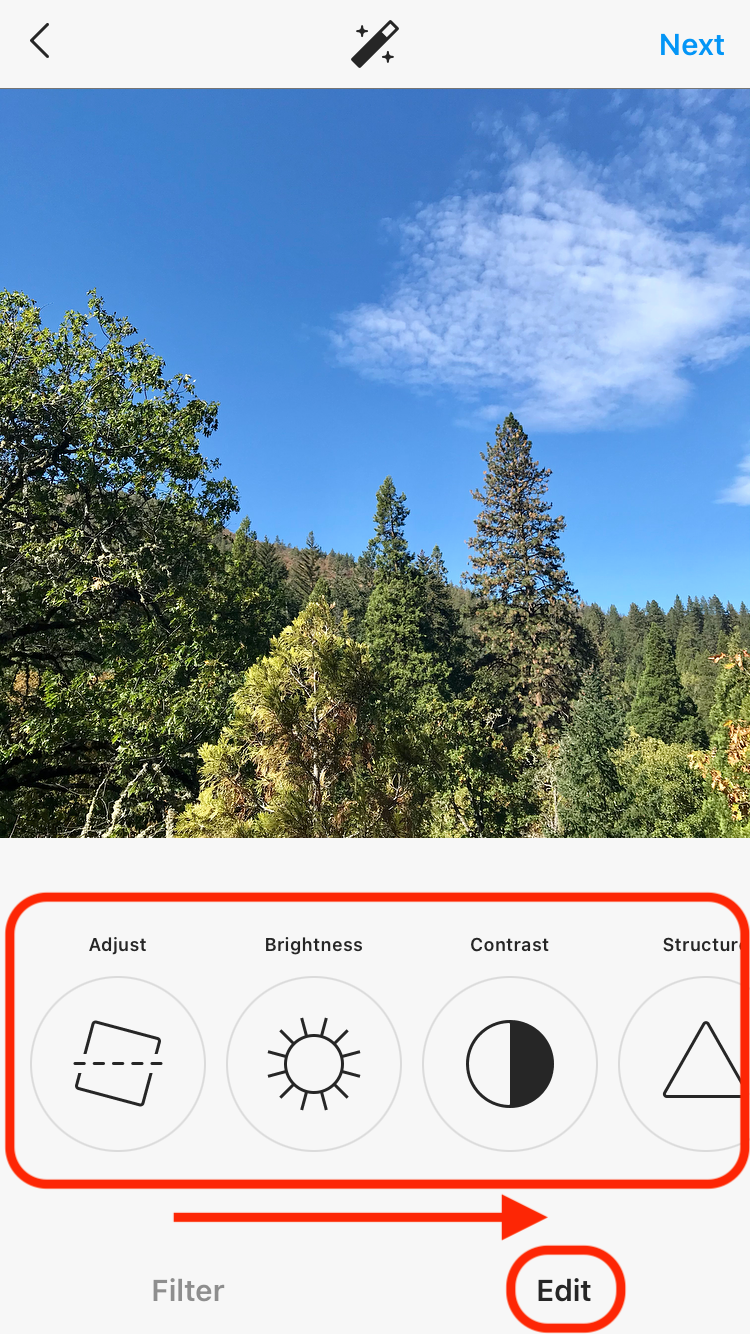 Scroll through the options. Click on each, and drag the toggle left and right to adjust the photo.
Step 3: Add text, hashtags, and location to your post
When you're done editing, click "Next" in the upper right corner. You'll be taken to the final screen where you can add a caption, hashtags, and a location.
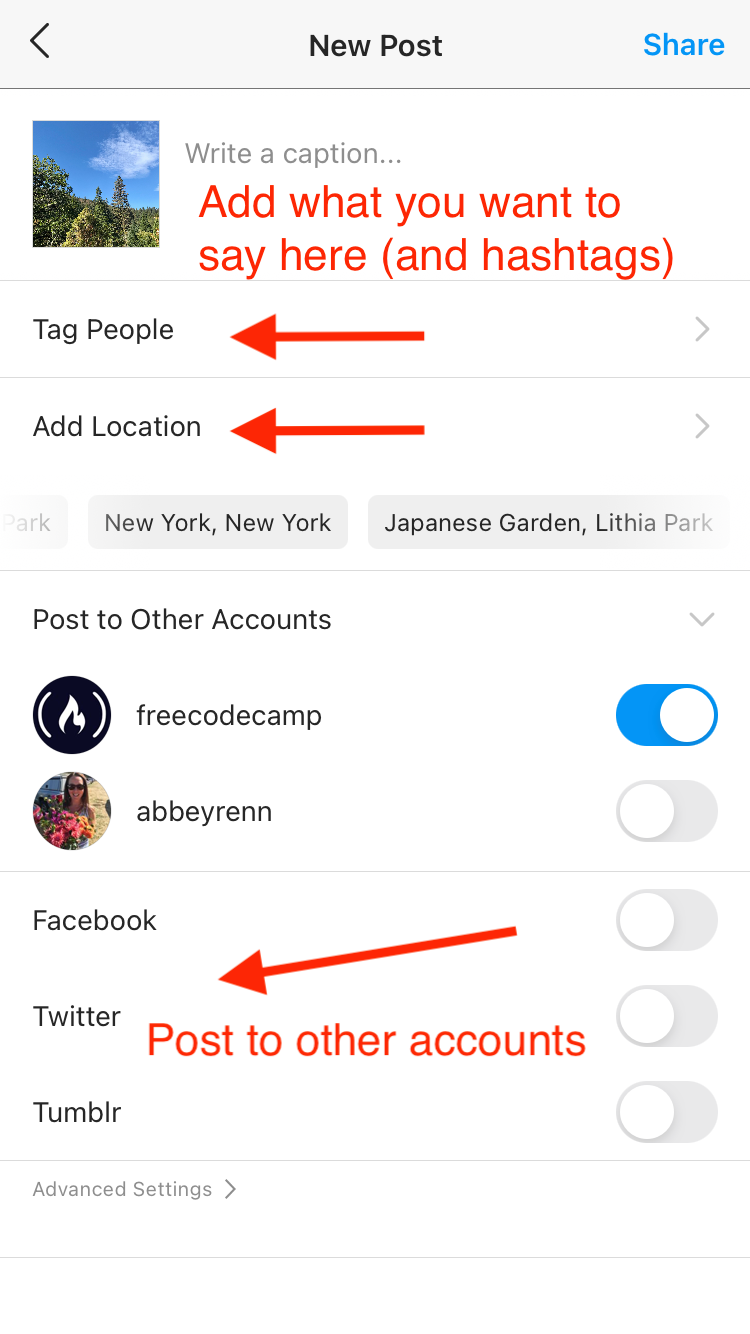 Add all the important info here.
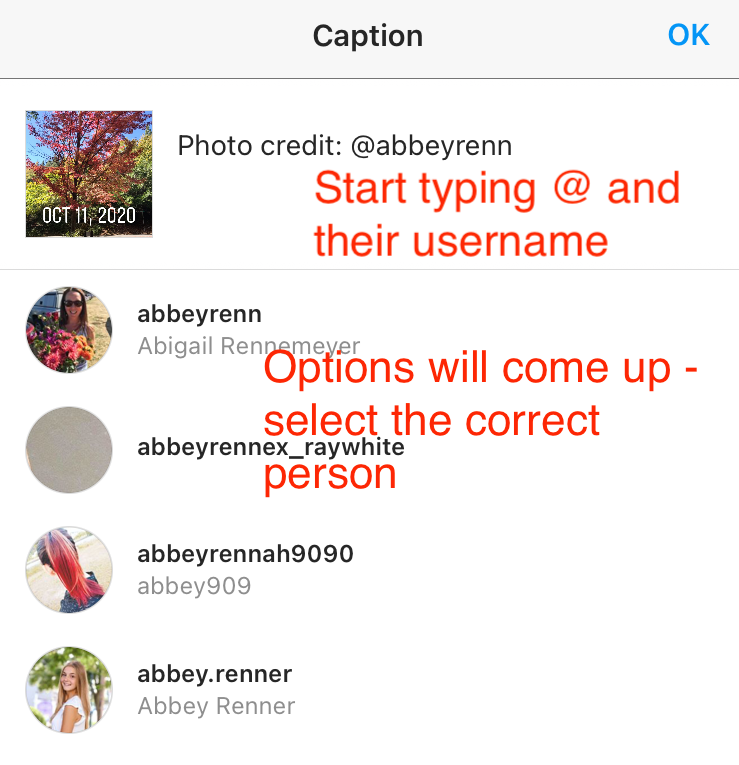
First, add your text (if you want there to be text). Then, add your hashtags. To create a hashtag, simply use the hash/pound sigh/number sign (#) followed by a word, like #technology. No space.
When you create the hashtag, Instagram will provide a list of hashtags that match. For example, if I started typing #tech, then various related hashtags will come up, like this:
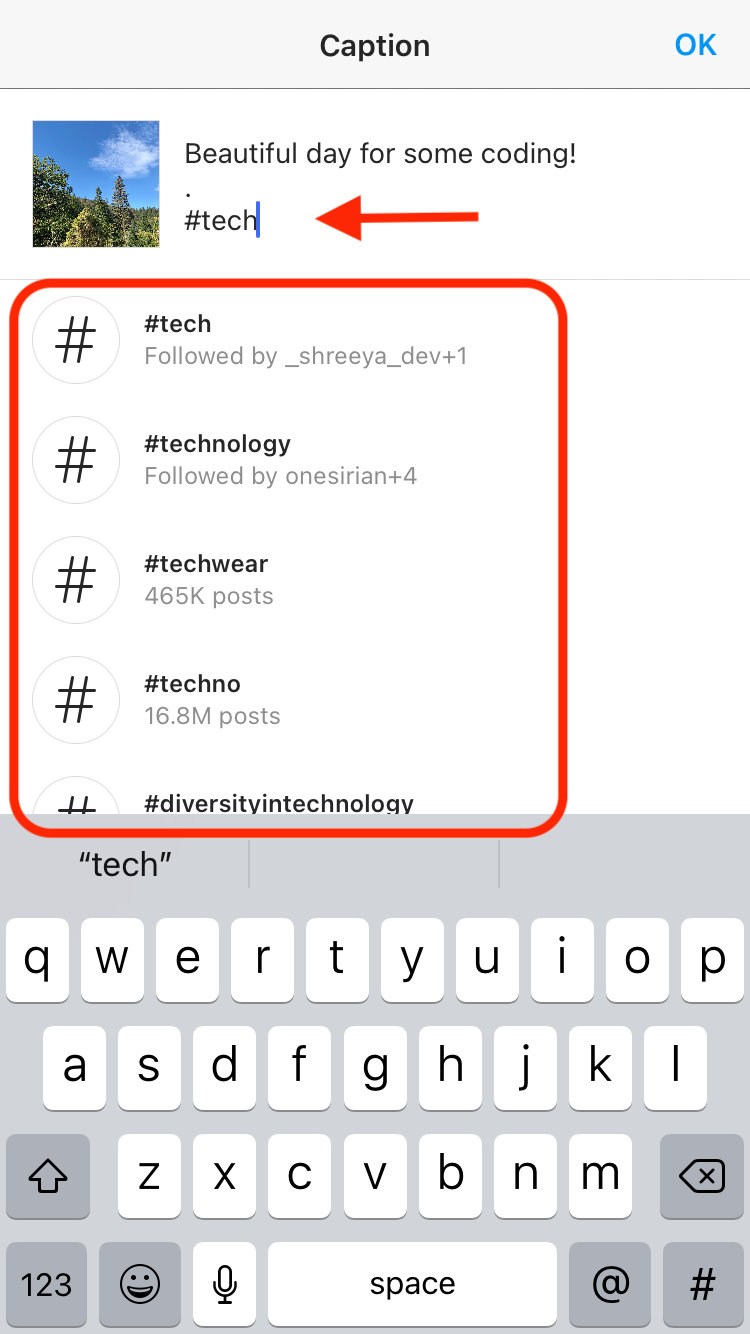 Pick from any of the related hashtags, or create your own.
Tap on the hashtag you'd like to use. You can include lots of hashtags if you want –just leave a space between each one.
A few tips for adding text and hashtags:
- If you want to create spaces between paragraphs, you'll need to add/type a character in that space, otherwise Instagram will collapse it. So, after you've typed a sentence/a few words and want a space and new paragraph, hit enter, then add a period (.) then hit enter again. The period maintains the space (as you can see in the image above).
- If you want to make your captions/text more readable, consider breaking them up into multiple small paragraphs.
- Most people add hashtags at the end, after their caption. You can just add hashtags with no other text if you want. You can also add emoji.
- Make sure your hashtags are relevant to the photo/message you're sharing. Their purpose is to help people find the types of photos/subjects they're searching for.
If anyone is in your photo with you – or you want to make sure someone gets notified of your post – you can tag them. You'll see a "Tag People" option below the text space. Just click that and then tap on the photo to add their Instagram handle.
Another way to mention someone is to tag or @mention them in the text of your post. So, for example, you could say "Studying JavaScript on @freecodecamp today" – and that would let freeCodeCamp know you've mentioned them.
You can also tag people directly in the photo after you've posted it. Just tap the three dots to the upper right of the photo (more on those below) and click edit. Then you'll see an option to tag people on the left:
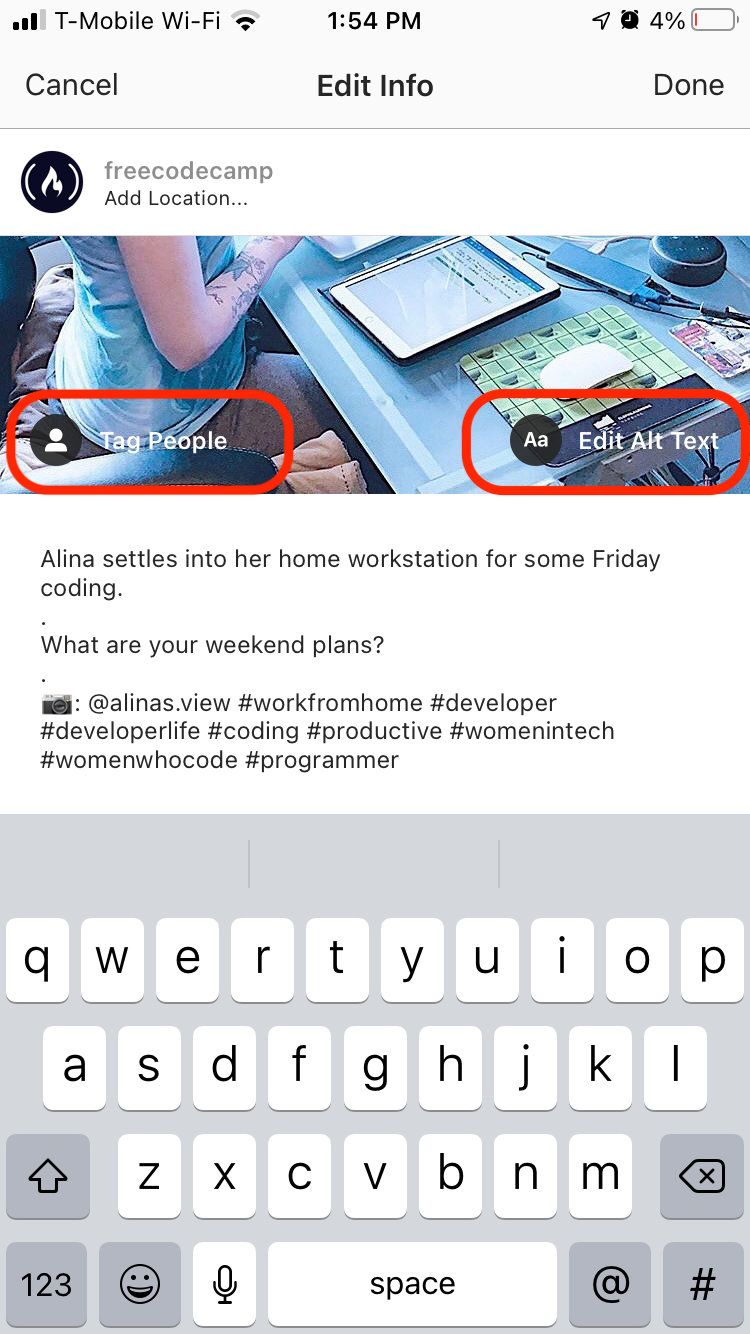 You can tag people in the photo directly, too.
You can also add alt text to make your images more accessible.
Lastly, you can add a location if you want. Just click the "Add location" button below the text/tagging section.
Instagram will likely suggest nearby places, so you can choose one of those if you see your location. Otherwise you can hit the little right arrow to search for a specific spot.
Step 4: Share (and view) your creation!
Once you're done composing your text and adding hashtags, you're ready to share your photo.
Just hit the "Share" button in the upper right corner and watch the photo go live. It'll appear on your homepage once it's posted. You can also see it by clicking on your profile – all your posts are visible there.
How to up your photo sharing game with Boomerang and Layout
Maybe you don't just want to share a regular photo. You want some cool animation or you want to create a collage. Don't worry – Instagram lets you do that with Boomerang and Layout.
How to use Boomerang
Boomerang is a fun and more interactive way to share images. It's short, so people can view and get the whole experience in just a few seconds. And it's eye-catching and engaging, since it moves.
Ok, so how do you use Boomerang? When you're selecting your photos to share, you'll see those three symbols I mentioned earlier (the infinity symbol, the little collage of squares/a rectangle, and the layered squares). We'll get into those first two now.
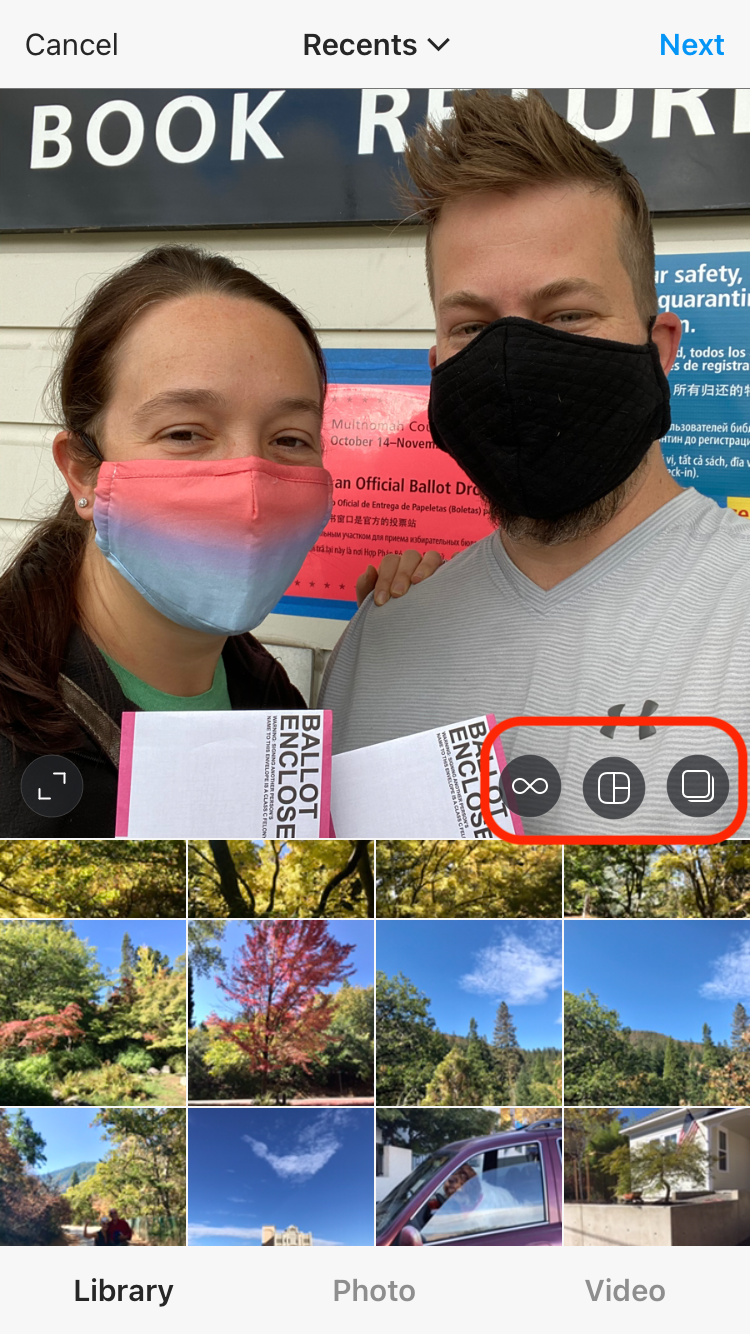 See the infinity symbol and collage symbol to its right? Those are Boomerang and Layout, respectively.
The infinity symbol brings up the boomerang effect. It makes little video clips move back and forth on a loop, hence the "boomerang" name.
If you want to use this effect, just install boomerang (it'll take you to the app store - click "Install", it's free) and then go back to Instagram.
Click the infinity symbol, and you'll get a quick Boomerang tutorial (if it's your first time using the app). Here's the basic interface:
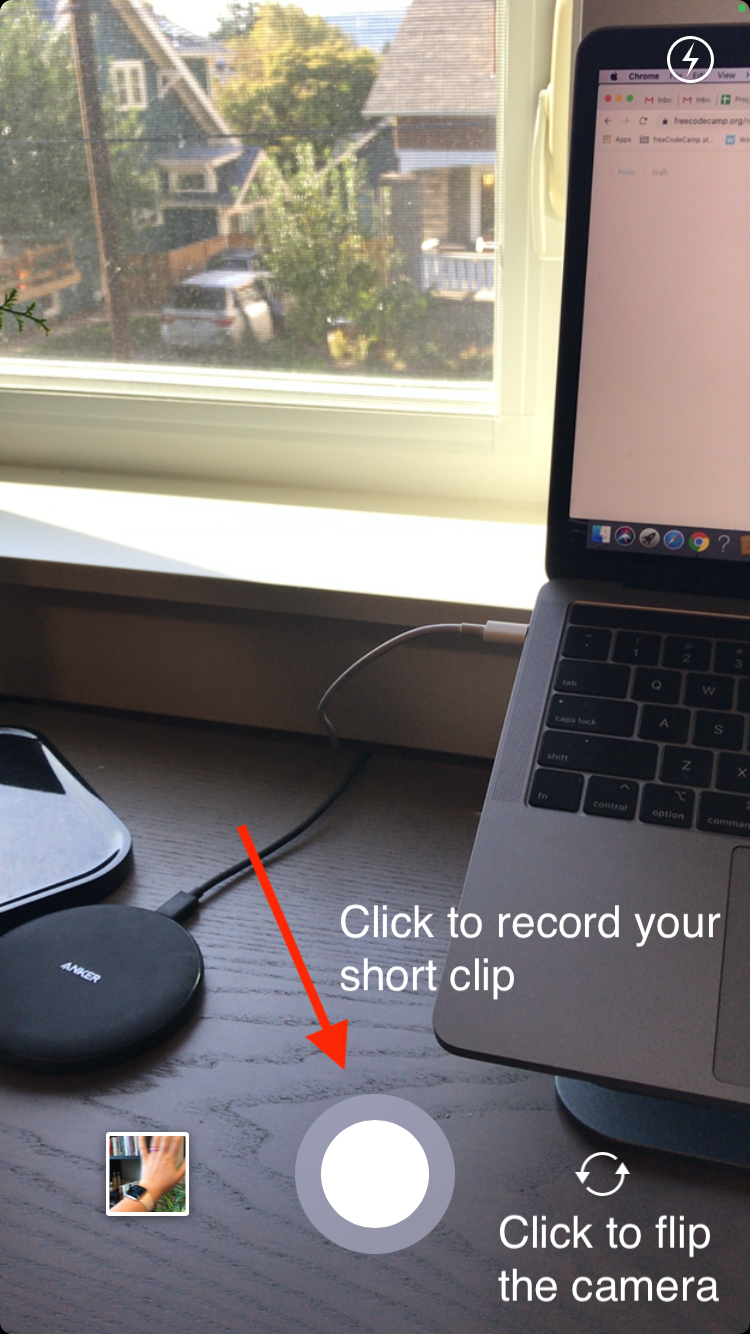
To summarize the Boomerang process: take a short video of something that's moving – like a couple of your friends waving – by clicking the round white button. To do this, you'll actually be capturing a burst of photos (just for a couple seconds). Instagram will turn it into a loop for you.
Once you take your little burst of photos, you'll have the option to share it to Instagram, Facebook, or other social apps.
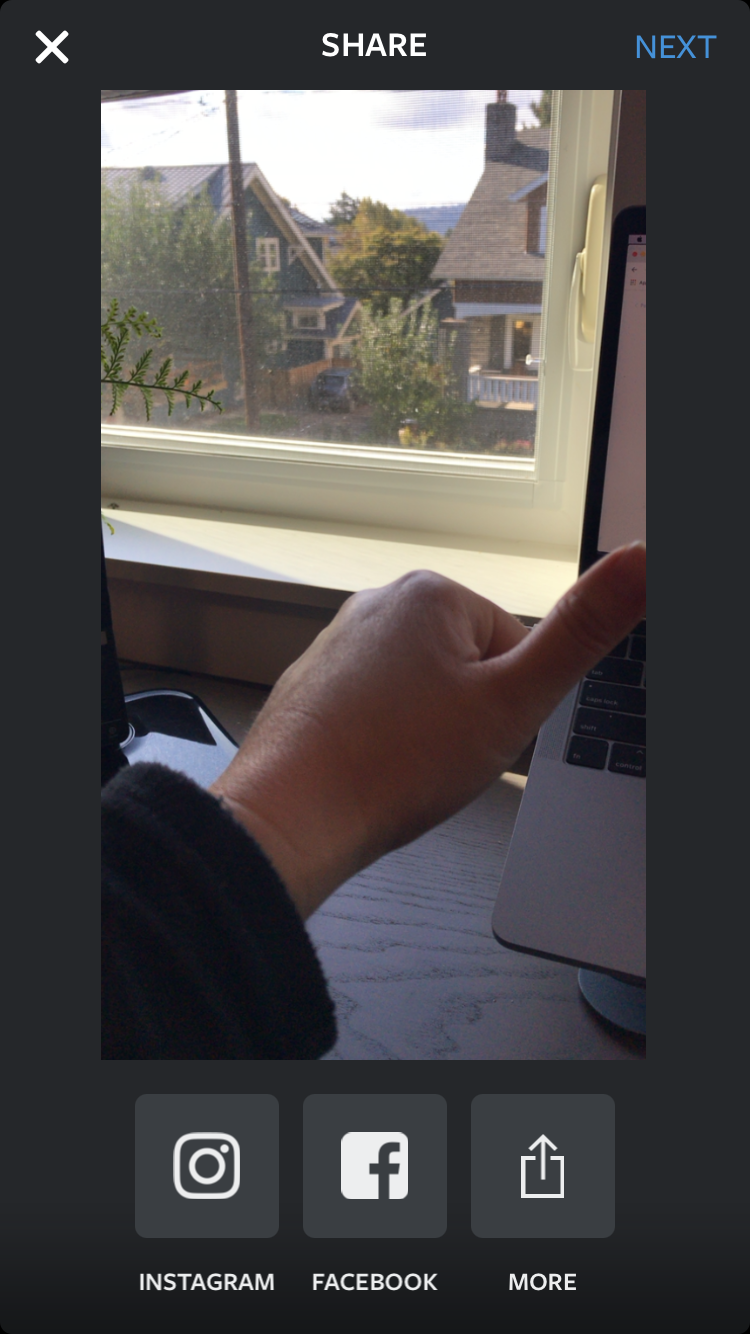 Choose Instagram, Facebook, or other apps. Or you can just save the Boomerang by clicking "Next" (upper right).
You can choose one of those, and Boomerang will take you back to the app so you can post your Boomerang (see process above). Or you can just click "Next" in the upper right corner. This will save your Boomerang to your photos so you can post it at your leisure.
How to use Layout
Now, what about Layout? Let's say you want to maximize the impact of one single image on Instagram. You want to share multiple photos, but don't want people to have to scroll through. Then Layout is for you.
If you click the Layout icon, you'll also be taken to the app store. Just get it, it's free. Then go back to Instagram.
When you click on the layout icon now, it'll take you to your photos. Just select a few of them, and then choose one of the layout options Instagram gives you above the photos.
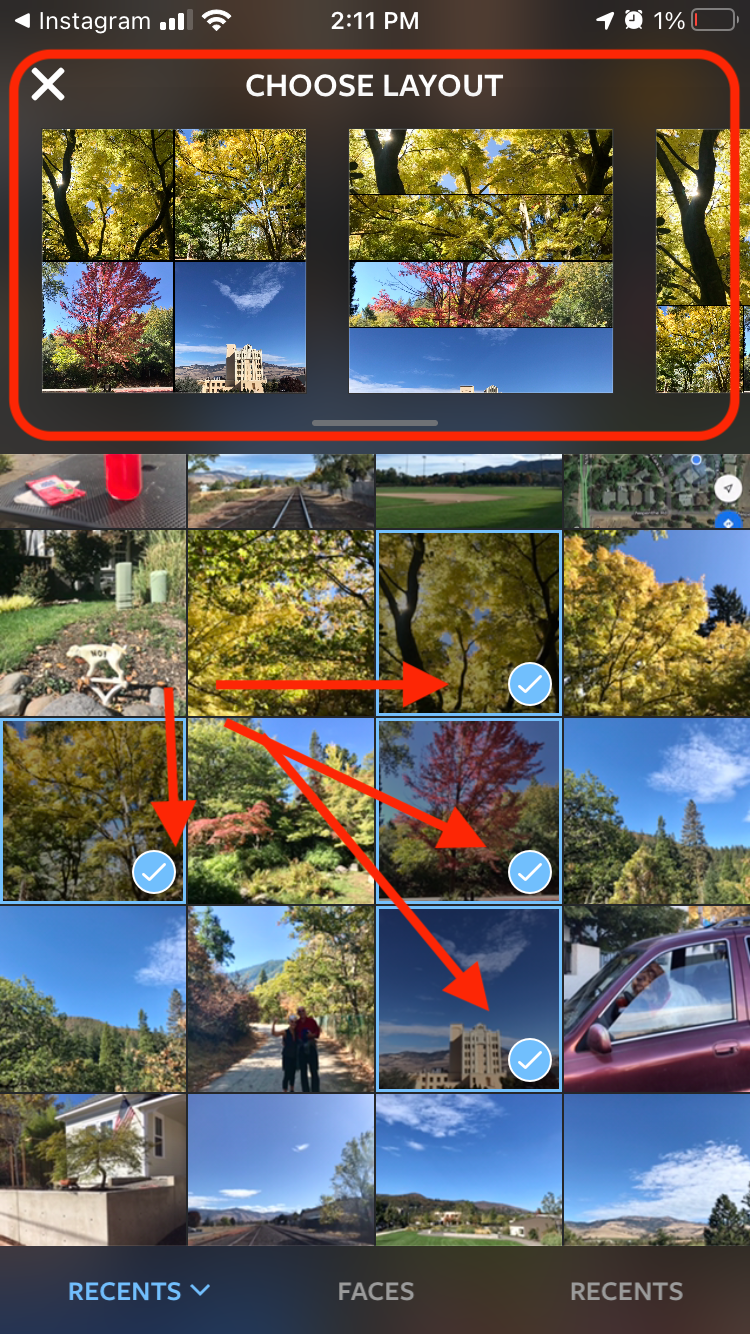 When you select your photos, they'll automatically appear in the layout options above.
You'll see your layout options above the photos. Layout will automatically put your selected photos into these layout options.
Tip: If you want more granular options, just select the "Recent" tab at the bottom of the screen (with the little arrow) and it'll bring up various groupings of images (like "Recents", "Favorites", "Live Photos" and so on).
Anyway, now scroll to the right until you see the layout you like.
Once you click on your favorite arrangement, you'll be able to customize it. You can:
- Drag each photo left/right and up/down to resize it
- Flip or mirror photos to change their orientation
- Add borders for visual effect or to create more separation between photos
- Replace any of the photos in the layout with another if you find a better fit
 Layout customization options.
Once you're happy with your cool amalgamation, just click "Save", and then you'll be able to post your collage like any other photo.
Tip: Boomerang and Layout are technically separate apps that will just post to your Instagram account. So if you're in either app and want to get back to Instagram, just double-tap your home button (or get back to your home screen however you do that) and revisit Instagram.
How to save posts on Instagram
If you want to save someone's post – maybe they're sharing a yummy recipe you want to try, or a particularly helpful coding tip – there's an easy way to do that.
Just click the little flag icon under the photo:
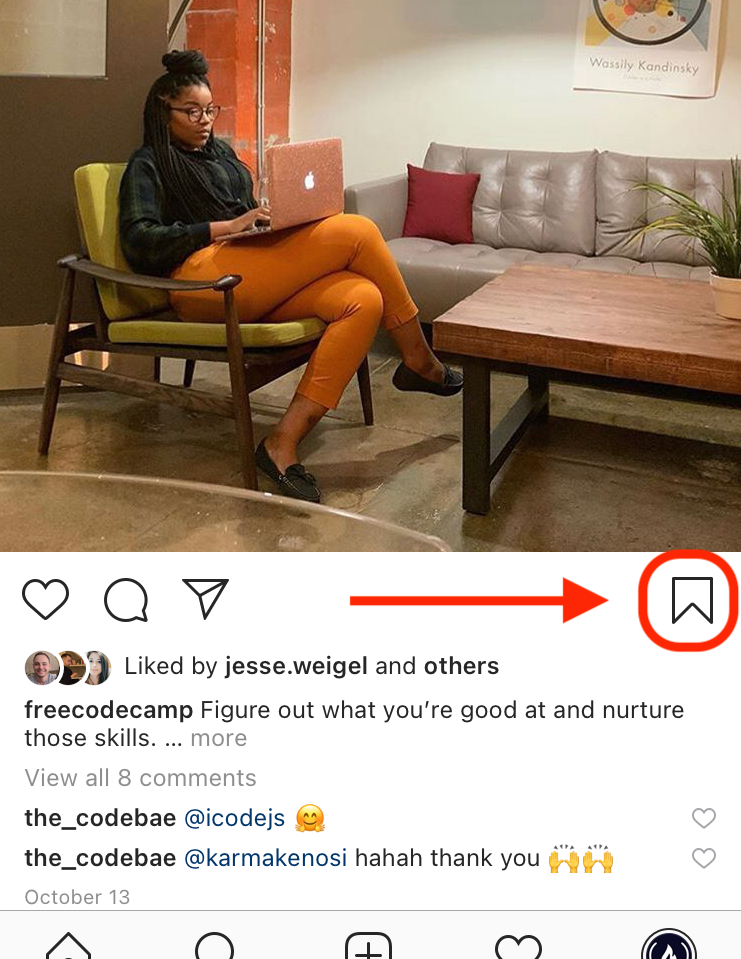 Click that flag icon, and the post will be saved.
And the post will join your saved posts. To access them, just click the little hamburger menu in the upper right of your profile page, and you'll see them there.
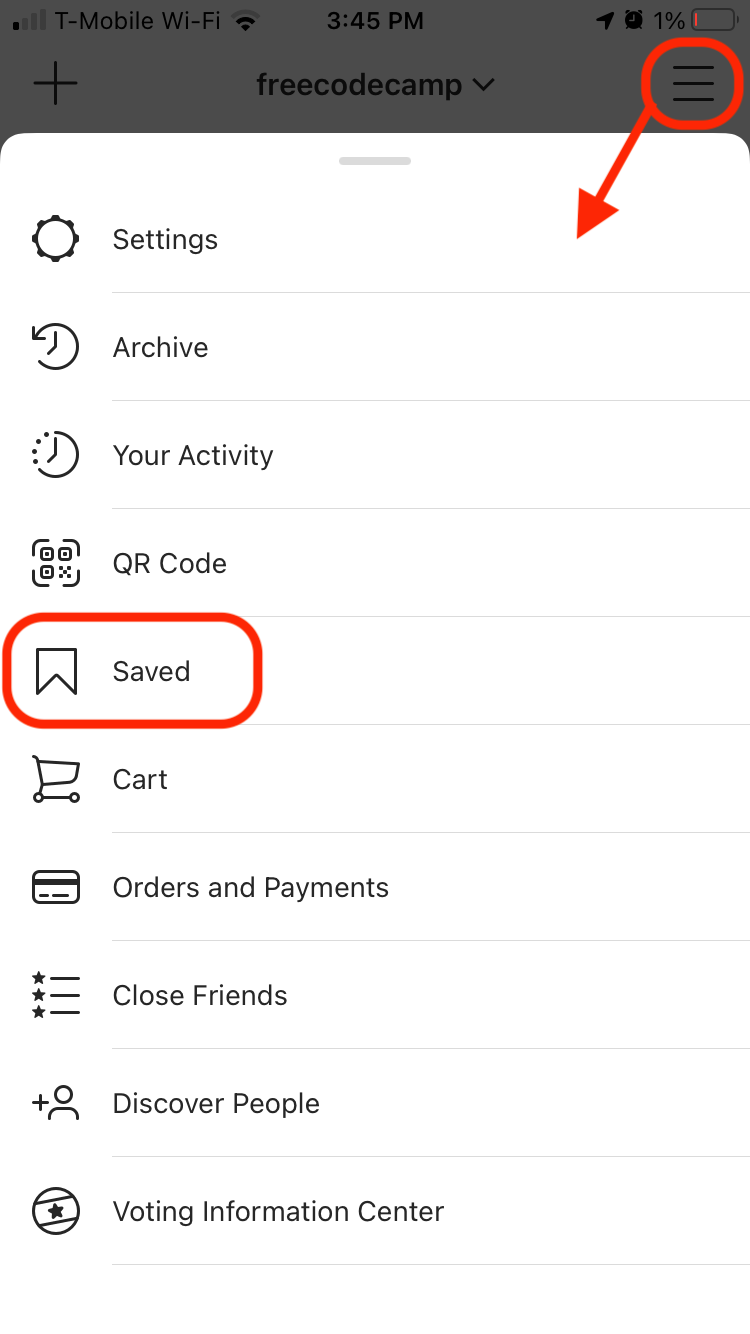 How to find your saved items (on your profile page, under the hamburger menu).
How to comment on a photo (or manage comments on yours)
Sometimes you might want to leave a comment for someone on their post. It's easy to do – you just tap the little speech bubble icon (between the heart and the message icon) below the photo.
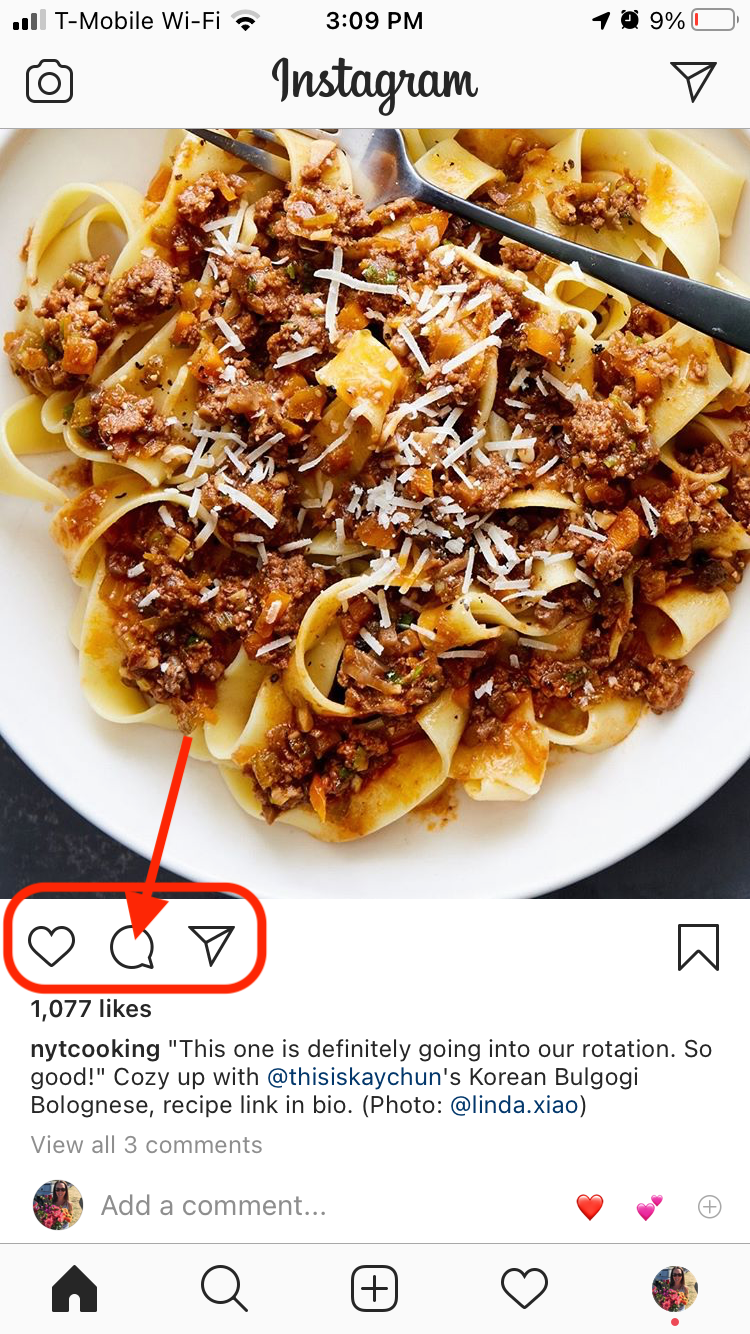 Click the little speech bubble icon below the photo to comment.
You'll type in your text (you can include emoji, too), and then click "Post".
You can also like people's comments or respond to them, either on comments on your posts or on others' posts. To like a comment, tap the heart icon next to the comment. To reply, just tap "Reply" below the comment.
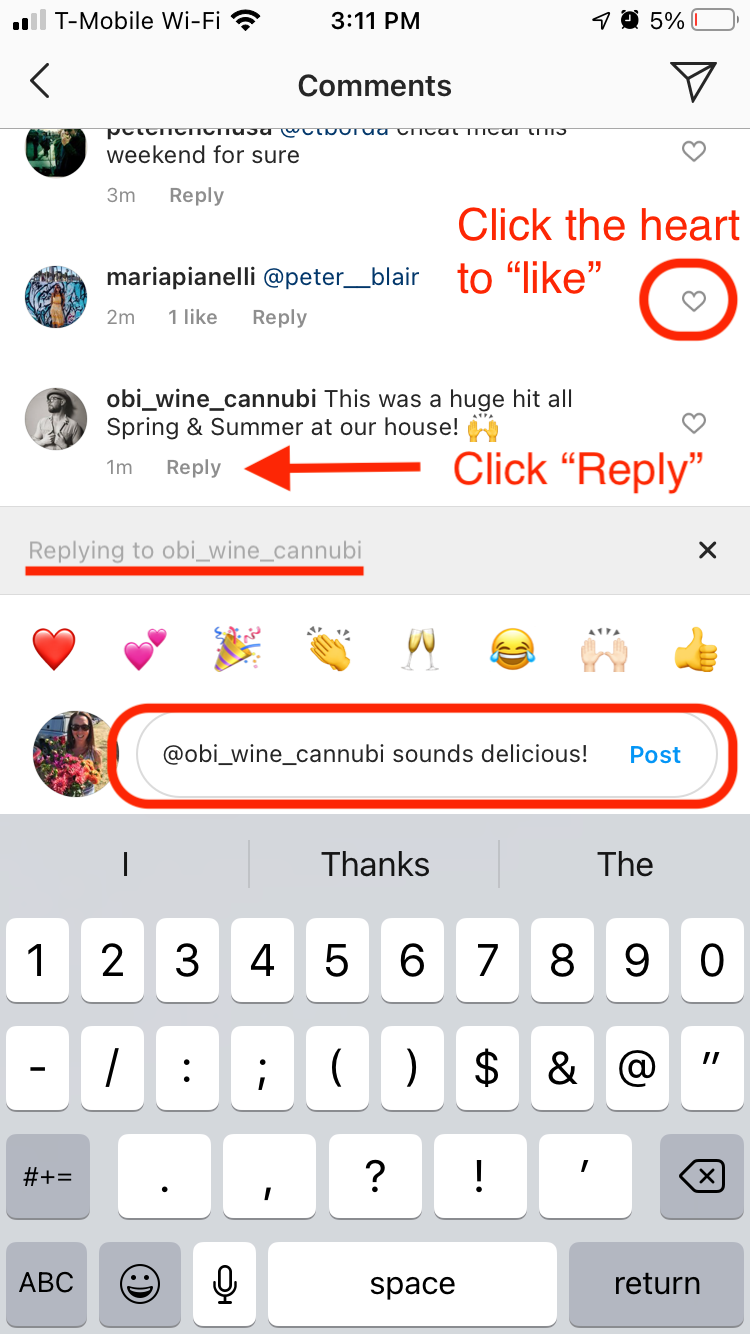 When you tap "Reply", it'll @mention the person whose comment it is (but you can delete that if you want).
Finally, if you see a negative or nasty comment on one of your posts, you can remove it. Simply swipe from right to left (from the edge of your phone's screen) and options will come up to pin, report, or delete the comment.
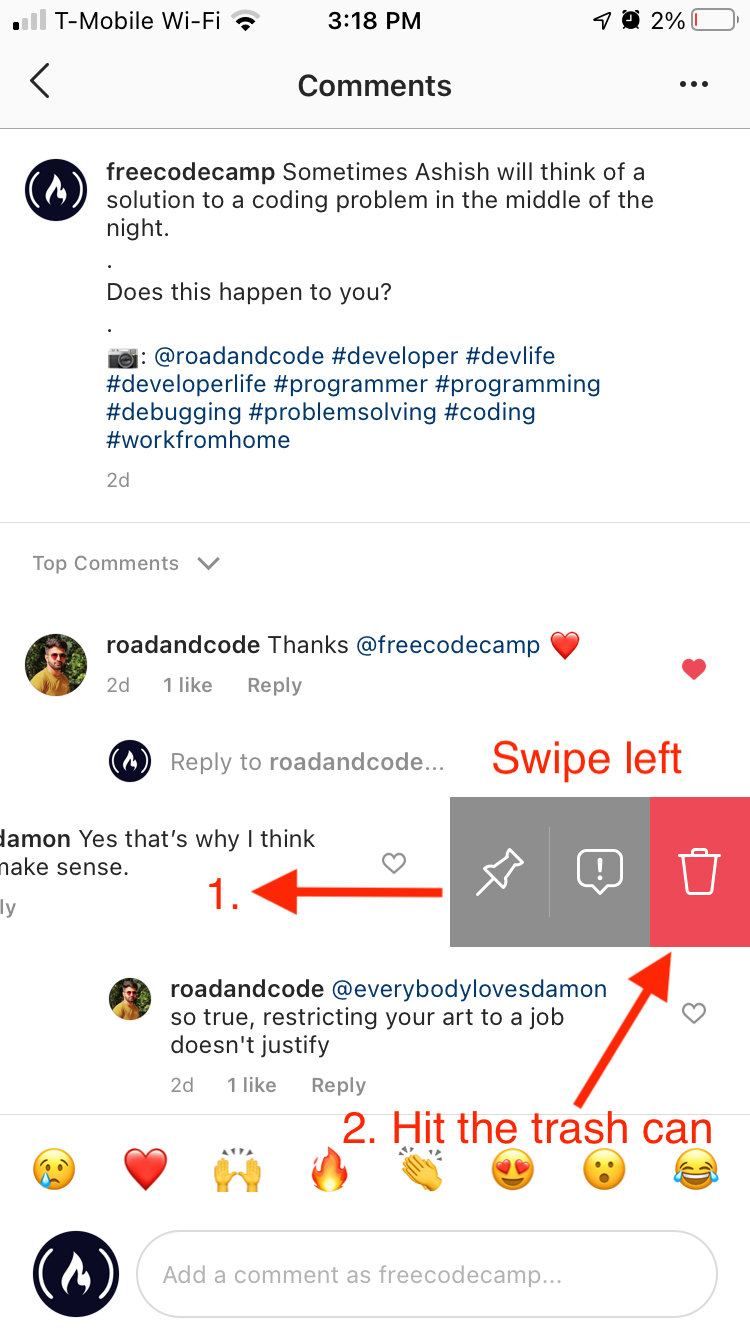 Swipe left from the edge of your phone screen (next to the comment), then select the delete icon.
Note: You can only delete a comment if you're the owner of the account. If you're not the owner, you can still report the comment by selecting the little speech bubble with the exclamation point in it.
How to edit or delete a post on Instagram
Maybe you forgot to @mention someone. Maybe you came up with better wording. Or maybe you just really need to remove a post. You can do all that and more.
Just find the three horizontal dots at the top of your post (upper right, opposite your name) and click them.
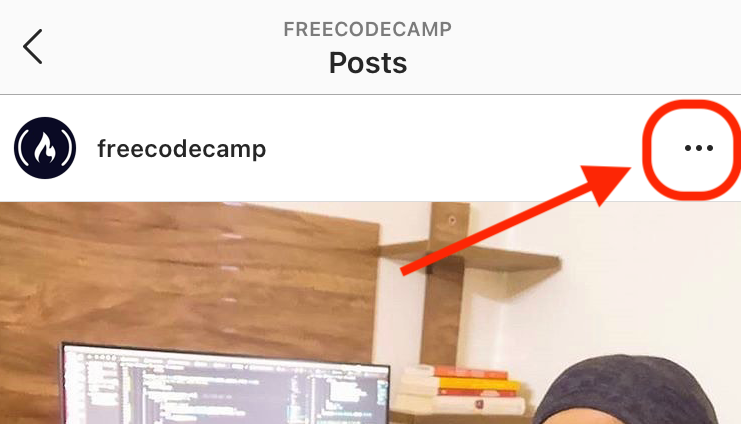 Click those three little dots above/to the right of the photo.
You'll see a whole lot of options, like "Delete," "Turn Off Commenting," "Edit," and so on.
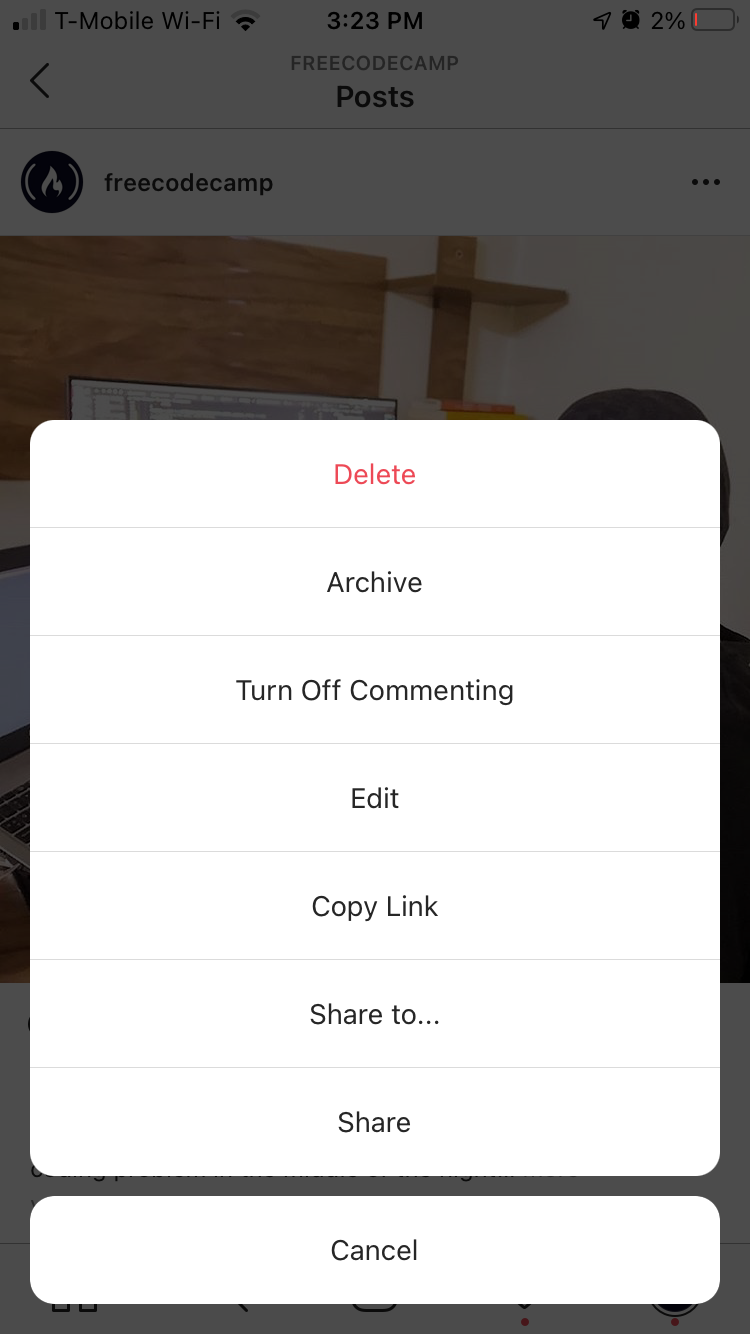 All the options that come up from those three little dots.
Click any one of those buttons to perform the action you need to perform.
If you want to edit, for example, just click "Edit" and it'll take you to your post in draft mode, so to speak.
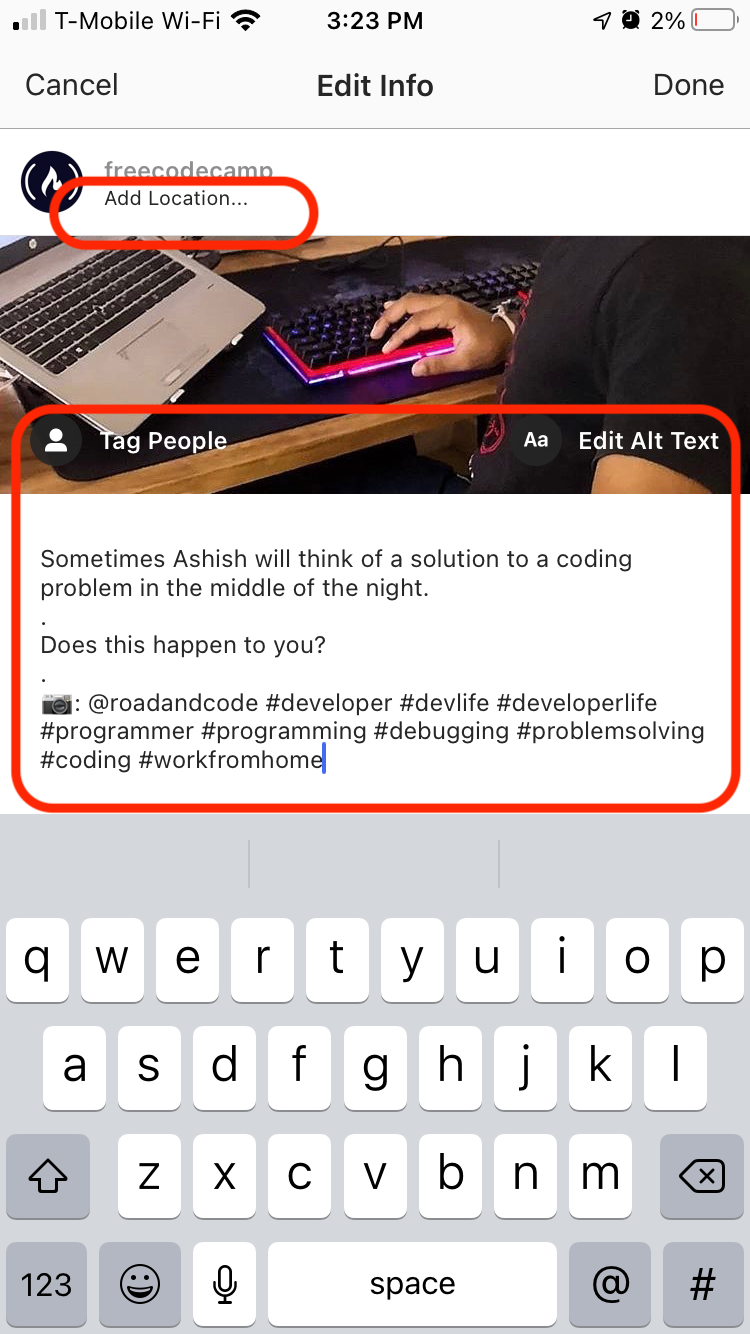 You can edit your text, hashtags, location, add tags, and add alt text. You can't change the photo(s).
Then click into where you want to edit (your hashtags, the text, and so on) and make your changes. You can't add or remove images, but the text is changeable.
How to see your account's activity on Instagram
Notifications are a nice way to keep track of who's engaging with your posts and how they're doing it.
If you want to see who's liking your photos, following you, commenting on your photos, and otherwise interacting with your content, just visit your notifications.
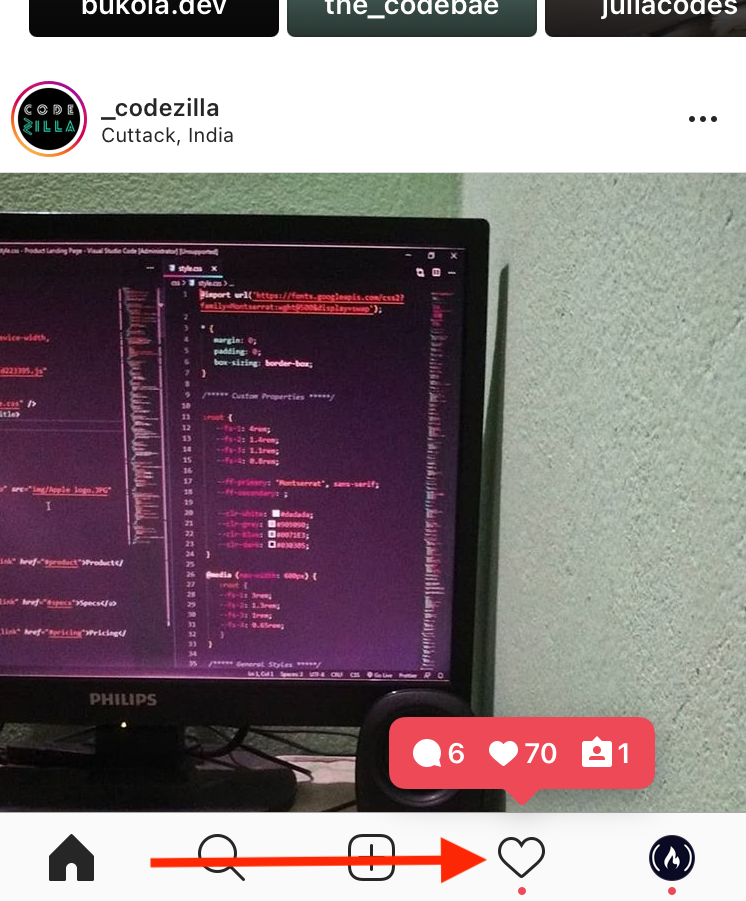 Click the little heart to view your notifications.
You'll see a heart icon on the bottom menu. Click it and all your notifications will show up. You can follow people back, or click on the notification to be taken to their comment or profile, and so on.
Your notifications appear in reverse chronological order, from most recent to least recent.
How to find/edit your profile on Instagram
Sometimes you might want to update your profile photo or change the information you have in your profile.
To do that, simply click the profile photo in the bottom right of your screen and you'll be taken to your profile.
 Click your profile photo icon to visit your profile.
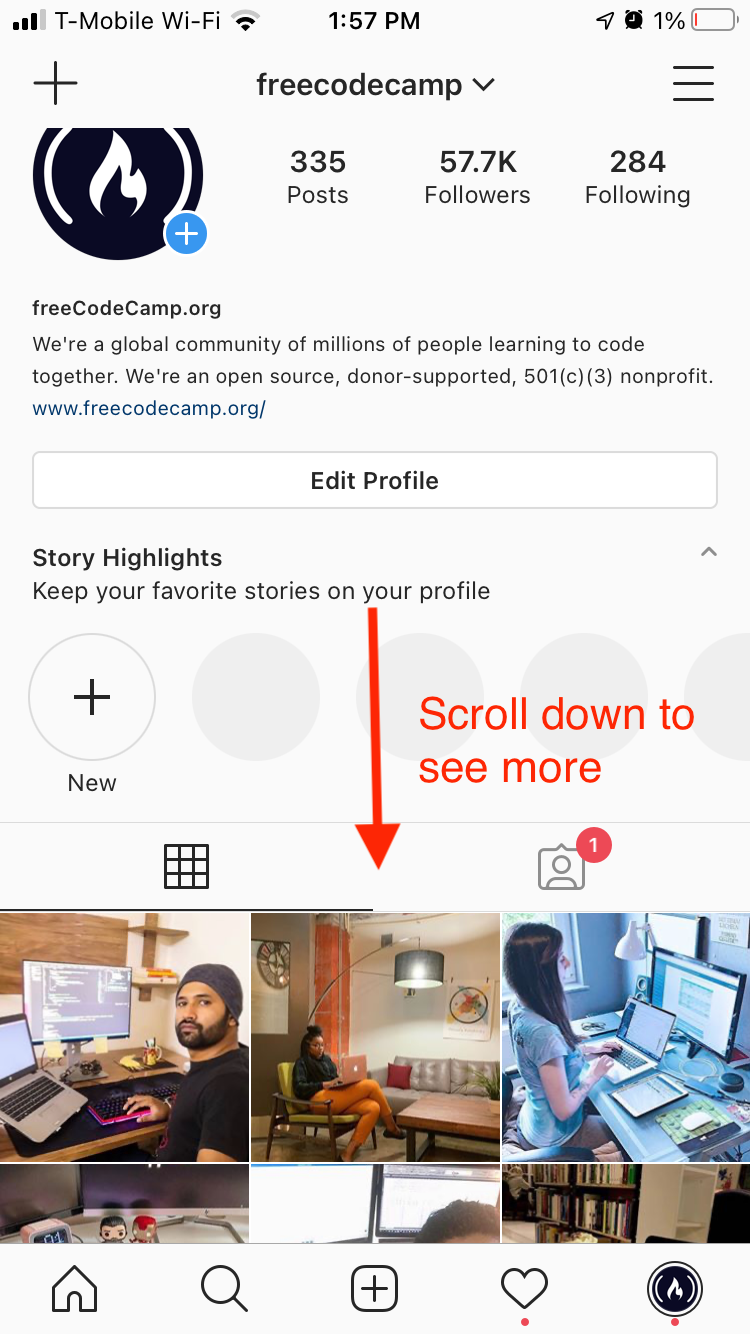
There you'll see how many posts you've made, how many people are following you, and how many people you're following.
You'll also see any stories you've saved ("Highlights"), the photos you've posted (under the 9-square grid icon, left) and the photos you've been tagged in (under the little person icon, right).
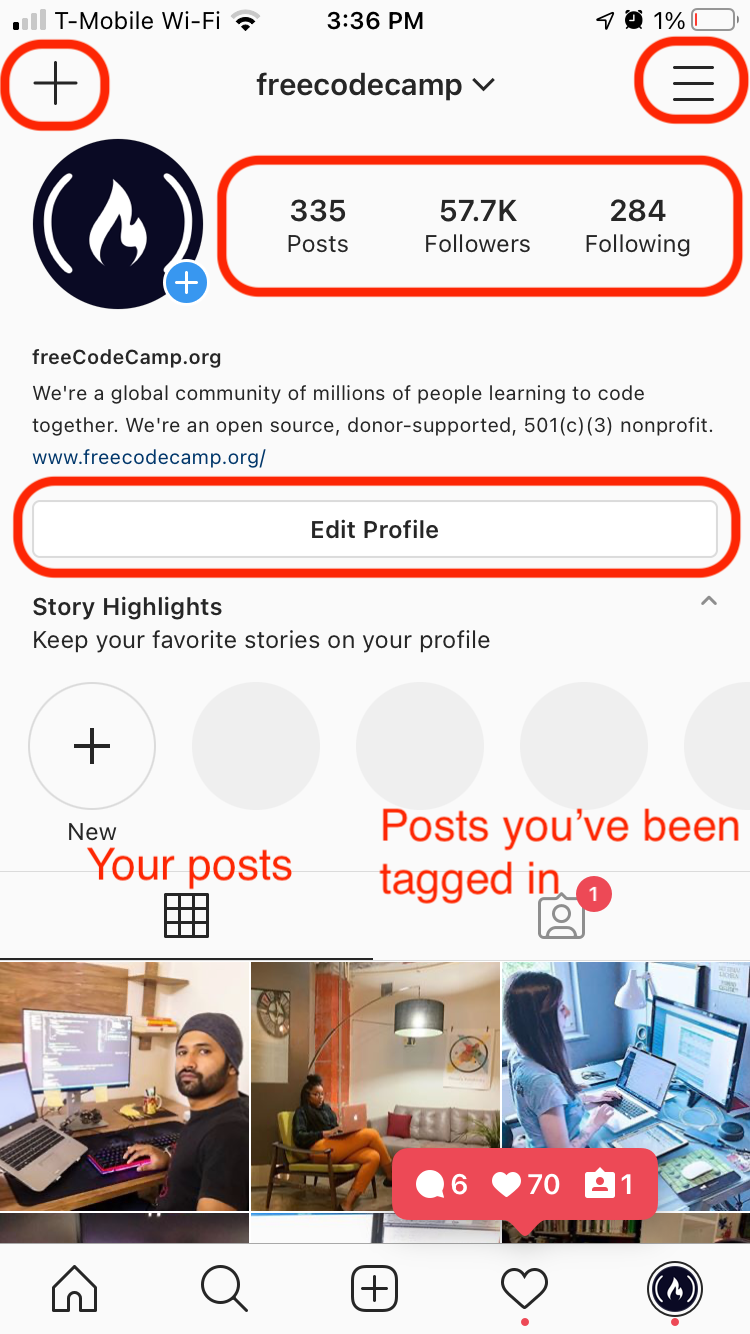 Your profile contains a lot of features...check 'em out.
You'll also see a hamburger menu in the top right corner that contains all sorts of useful information (like your settings, archive, saved items, and more).
There's also a little plus (+) icon at the top left. Click that and you can post a photo, story, video, or reel right from there.
You can edit any of your info by clicking the big "Edit Profile" button in the center of your profile screen.
How to Use Instagram Like a Pro
If you want to go beyond basic posting and commenting, there are a number of ways you can engage with the app on a higher level.
How to share other people's photos (repost) on your Instagram account
Instagram isn't like Twitter - you can't just share someone's photo by clicking a single button.
There are a couple ways to share someone else's photo. But before you do, it's a good idea to get permission from the person first.
To do this, you can simply send them a message on Instagram (or elsewhere if you know their Twitter handle, and so on) and ask if you can repost with credit.
You can also @mention them in the photo's comments and ask if you can repost.
Instagram's community guidelines recommend that you do this to avoid any copyright issues – so it's best to wait until you hear back before reposting.
Now, back to the methods: you can always screenshot the photo, crop out what you don't want, and then share that screen shot (with proper credit, of course).
But if you want to download the photo (better quality) it takes a couple extra steps. You can find a detailed overview in this excellent guide (for desktop/laptop, not your mobile device).
There are also a number of free reposting apps, like Repost+ for iOS, or Regram for Android. These also help you if you want to include the caption/hashtags from the original post (so you don't have to retype everything).
Again – always remember to seek permission and give credit when you share someone else's work.
How to send messages on Instagram
Let's say you find someone you know on Instagram and want to send them a message about their content, or about life in general. If you don't want to comment publicly on one of their posts, you can send them a private message directly.
From your home page, click on the little icon in the upper right corner of your screen (it'll either look like a paper airplane or a message bubble).
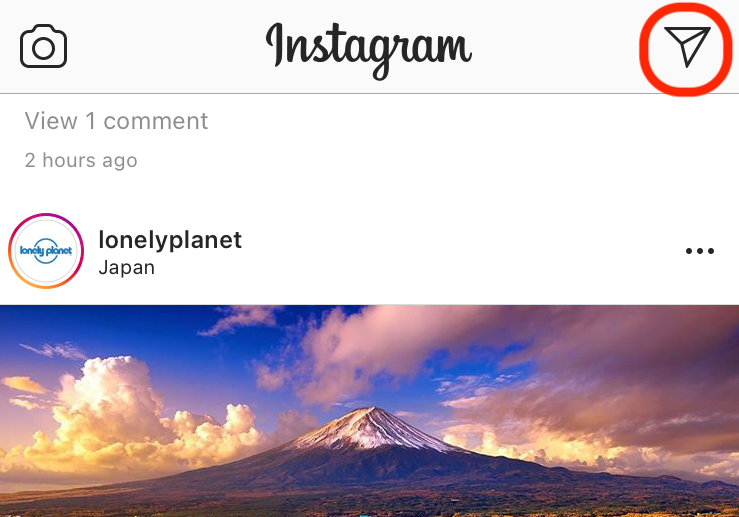
When you do, you'll be taken to your messages. If you already have messages waiting for you, you can just click on one to read it and respond.
If you want to write a new message, tap the notepad/pencil icon in the upper right corner. You'll need to choose to whom you're sending it (you can search, or choose from the list of people you follow that pops up).
Once you select a person, you'll click "Chat" in the upper right corner and you'll be taken to the messaging screen.
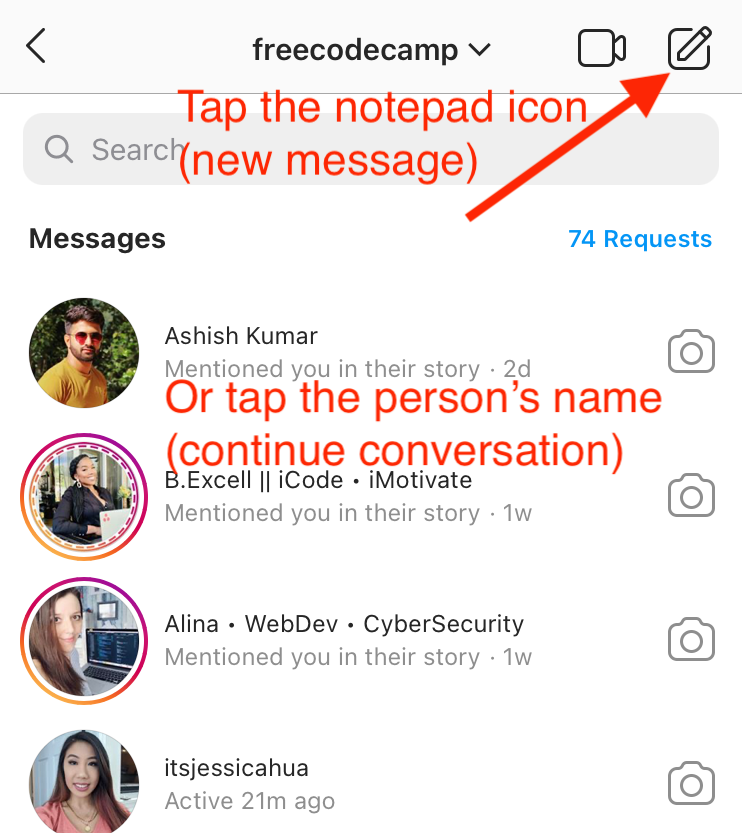 You can start a new convo or continue an old one.
If you want to continue a conversation, just click on the person's name in your list of conversations (as you can see above).
How to use Instagram Stories
Stories let you share photos and videos in a less permanent way. Any media you share there will stay for 24 hours before disappearing (unless you save it or share it to your feed).
So it's more like Snapchat, and lets you give your followers a quick glimpse at little moments in your life, quick messages you want to share, and so on.
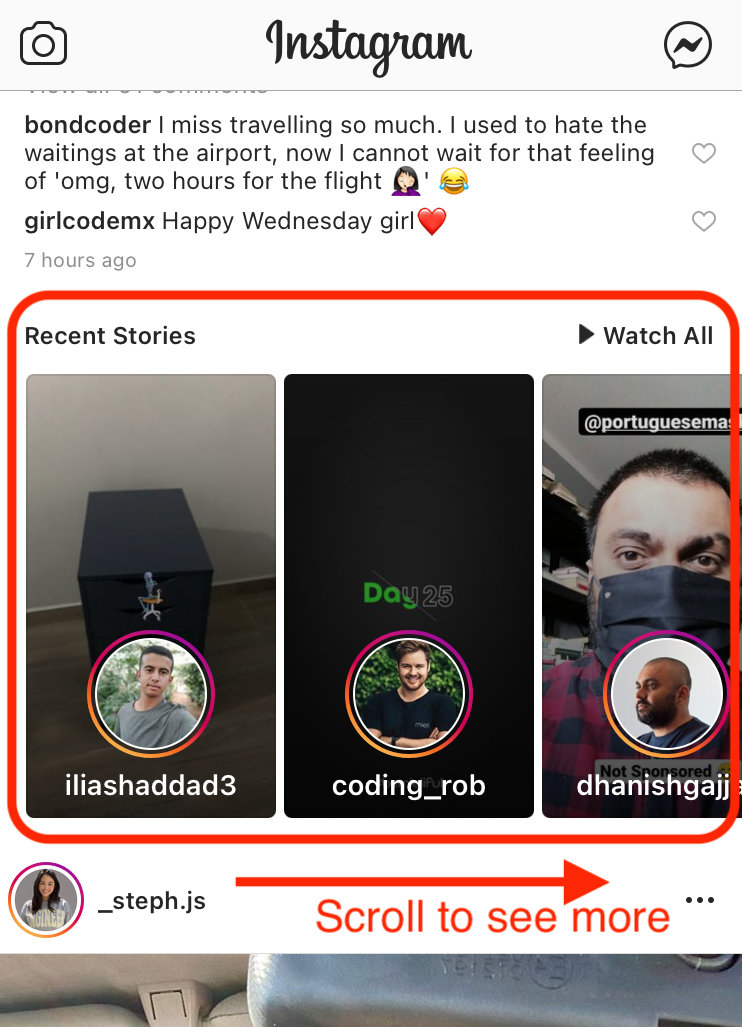 Recent stories will show up in your feed if you scroll down.
How to view other people's Instagram stories
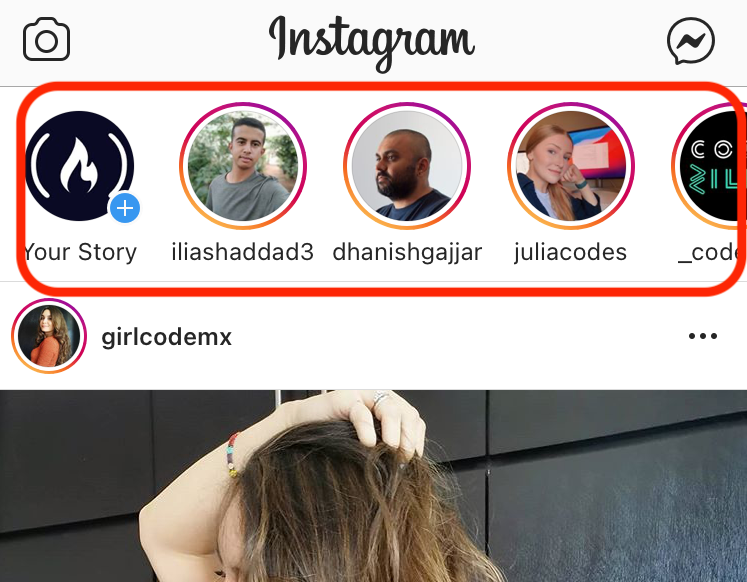
To view stories, either scroll through your feed until you see some (like above), or select someone's story from the top of your home page.
 Click on one of the users to see their recent stories. Scroll right for more.
If you just want to look at other people's stories, you can scroll through and browse them all. Or you can just click the "watch all" tab if you don't want to miss anything.
Once you click on a story, it'll scroll through however many story posts that person has made since you last checked (within the last 24 hours). Then, when you finish with their stories, it moves on to the next person's stories in the list.
If you want to scroll back and forth between one person's stories, or between different people (maybe you didn't get a good enough look at that last clip), just tap on the left and right of the screen to move between images/videos or people.
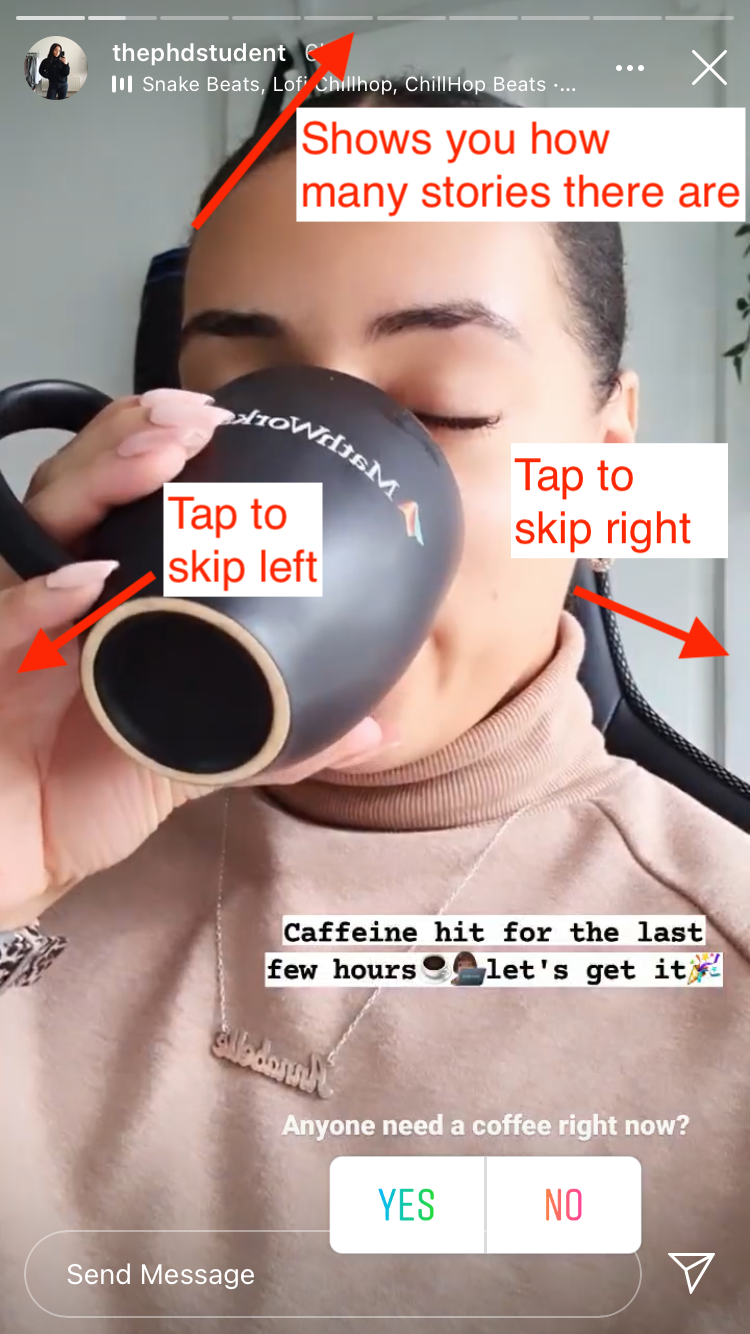 An example of someone's story.
To exit stories, just click the little X in the upper right corner.
How to create your own Instagram stories
To add your own stories to Instagram, go to the top of your home page. There, you'll see a "Your story" icon with your profile picture and a little "+" symbol on it. (To the right of your photo, you'll see other people who have recently shared stories.)
Click on your photo, and you'll be taken to the story interface.
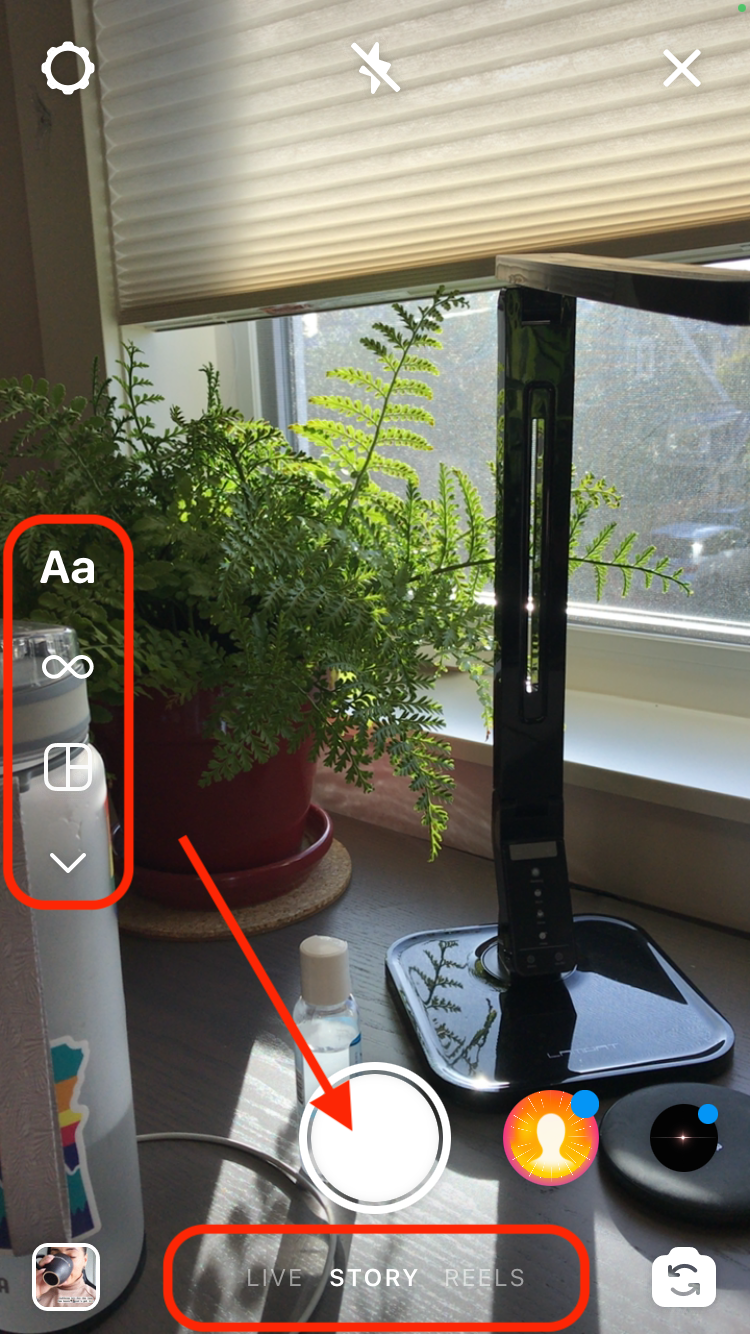 The stories interface.
When you first open it, it's set up to take a selfie. But you can flip the camera, or add photos or other content you already have on your phone. Just select the camera roll icon in the bottom left corner and it'll take you to your photos.
Select what you want to share (one or many images - there's a little "Select multiple" tab in the upper right corner if you want to share more than one thing) and you'll be taken to the customization screen (what you see above).
There, you can add text, markup the image, add effects, and more with the menu options on the top of the screen.
Tip: if you swipe right or left from the sides of your screen, different filters will be applied to your image.
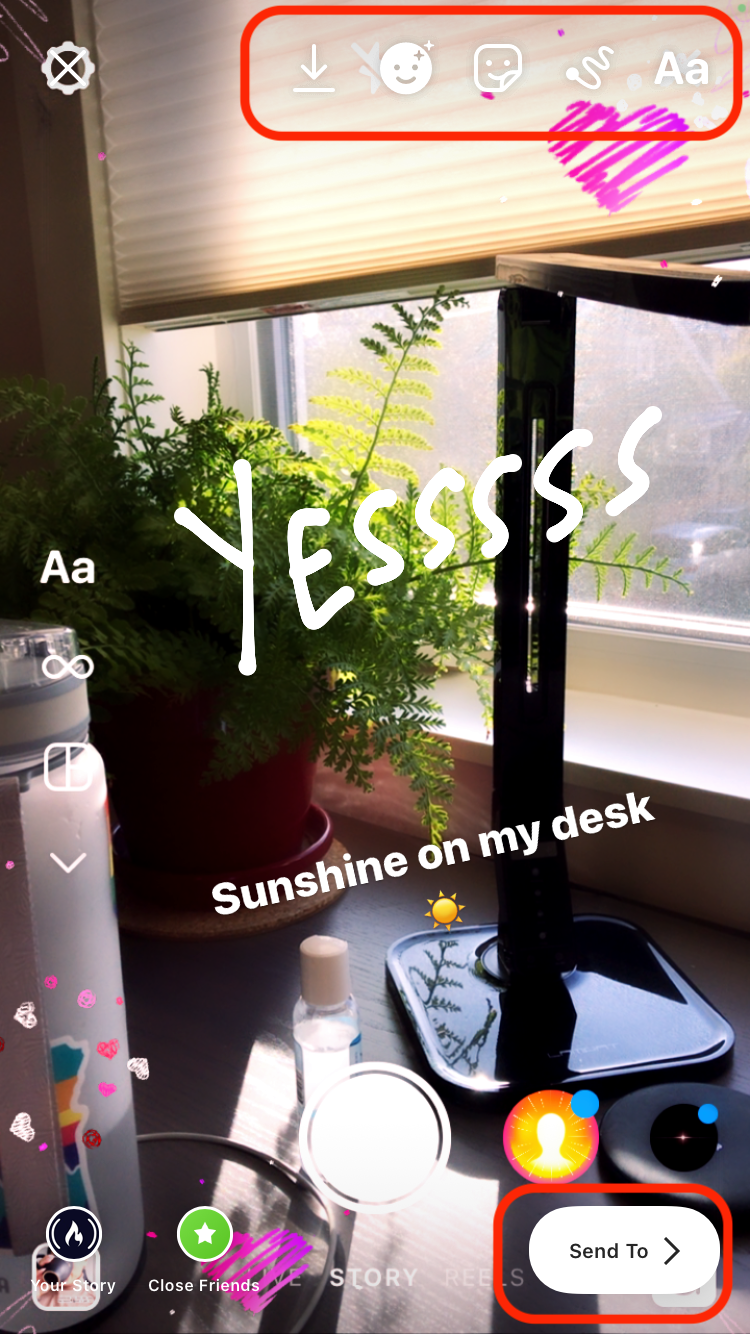 I added text, drew on it, and added the little heart effect (all from the menu at the top of the screen).
Once you've played around and made your image(s) or video(s) your own, just click the "Send to" button in the bottom right corner. You'll choose whether to show this story to everyone ("Your story"), just close friends, or certain people in particular.
Once you hit "Send", your story will be live for 24 hours.
Note: if you want to update your Story settings (like who can see them, where you share them, and so on), just click the settings gear in the upper right on the Stories screen.
How to broadcast live on Instagram
If you want to share something the moment it's happening, Instagram offers a "Live" feature. It's sort of like broadcasting your life live on camera for the world to see.
To access it, click on the "Your Story" icon at the top of your home screen. At the bottom of the stories screen, you'll see three options: Live, Story (which will be highlighted), and Reels.
Click on "Live" and you'll be taken to the recording screen.
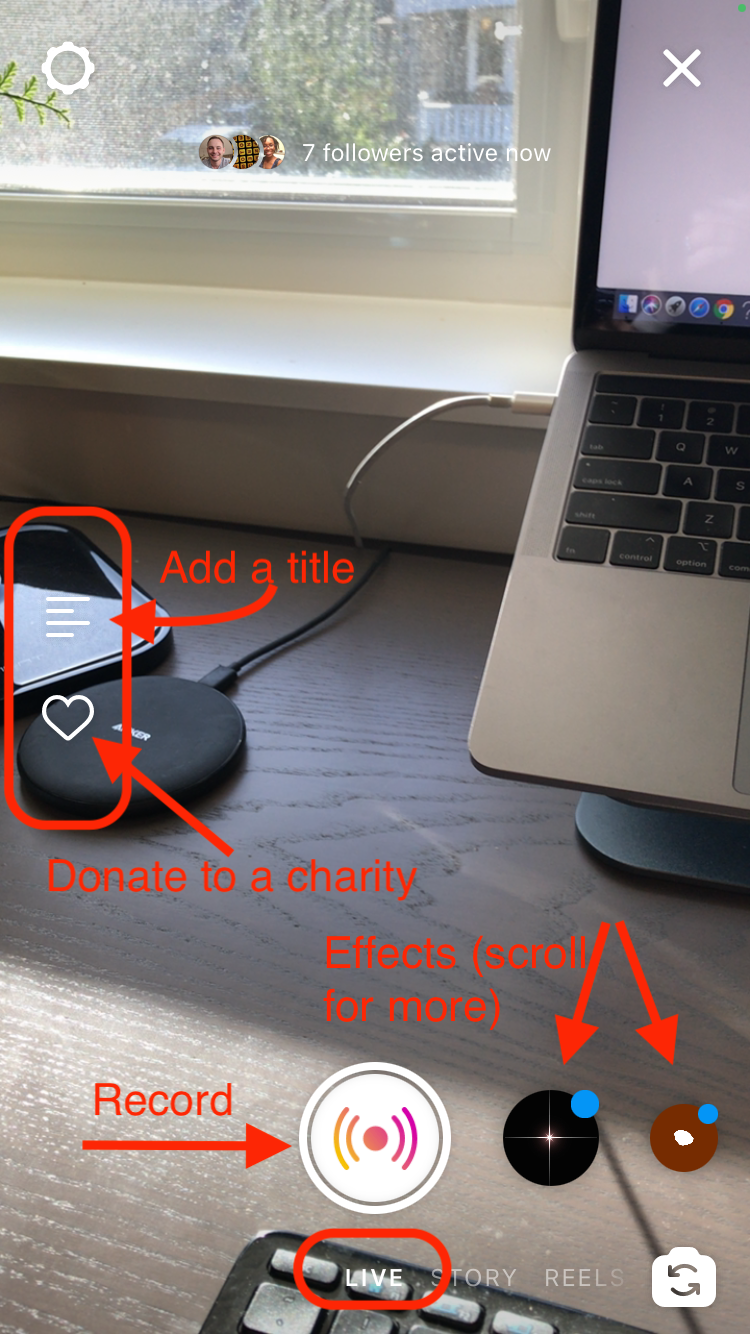 Your Live recording screen - effects and options included.
You'll see all kinds of little options: a place to add text, filters you can use, and settings in the upper left corner. You can either record yourself, or flip the camera around to show what you're looking at instead (with the little arrows at the bottom right).
Once you hit the round record button (bottom center of screen), Instagram will check your connection and then start broadcasting. When you're done, just hit "End" in the upper right. You'll see the option to share the live video or delete it.
How to use Instagram Reels
Reels are just another way to share videos on Instagram – but these videos are short clips (around 15 seconds long) that loop when you play them.
To create a reel, just select the "Reel" option from the Stories screen. When you press the round play button it'll record for up to 15 seconds (you can stop it earlier if you want by pressing the play button again).
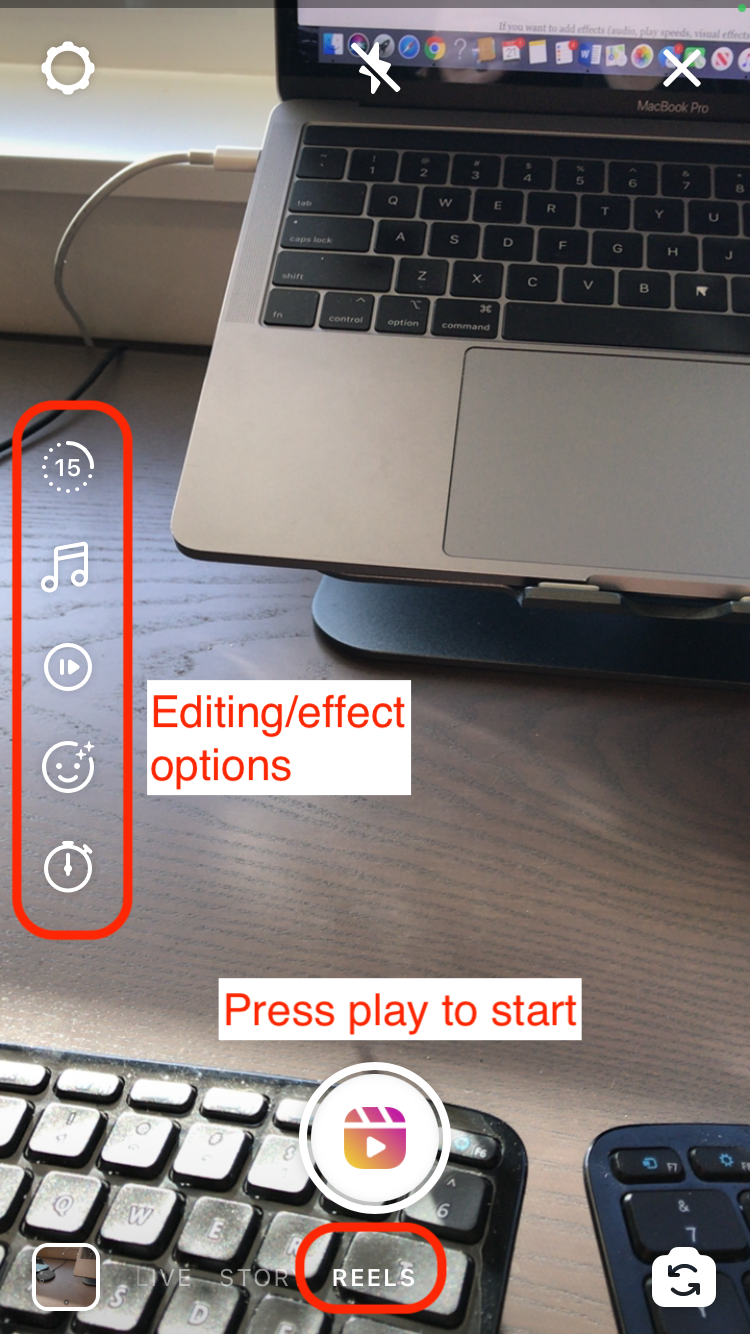 Your Reels recording screen.
Note: if you stop the reel before your 15 seconds are up, you'll see the editing/effects option on the left of the screen. If you let it go all 15 seconds, it'll start playing your clip on loop, and you won't see the effects.
To access the effects from there, just click the little back arrow in the upper left corner of the screen as your video loops. To just go ahead and post it, click the forward arrow in the bottom right.
When you hit that right arrow, and you'll see the option to "Share to Reels in Explore". You an also toggle on or off whether you want to share it to your feed, too. You can share it right away, or save it to a draft.
 Choose whether to save or share your Reel.
If you want to add effects (audio, play speeds, visual effects, a timer – that lets you select the part of your Reel to keep/share – and alignment options), just click on each and play around with them.
Once you're done touching up your Reel, click that right/next arrow to see a preview of your creation. When you're ready, click next again and you'll get the sharing options.
Instagram Etiquette – some do's and don'ts of posting
Do give credit where credit is due
Give credit if you want to share/repost someone else's image. Most people are happy to have their images, art, videos and so on shared by other people – as long as you give proper credit.
So how do you do that? As discussed above, reach out to the owner of the account via direct message and ask if you can repost their content (with credit).
If they say yes, make sure to @mention their account when you repost the content. It's as simple as typing the @ symbol followed by their account name. When you see it pop up, click on it and they'll be tagged. They'll get a notification that you've mentioned them.
If they say no, respect their wishes and just get personal inspiration from their posts.
Note: some account owners will say something about reposts in their profile – so it's a good idea to check there first.
Do use good hashtags
Do use appropriate hashtags to help people find your posts. Keep your hashtags related to what you've shared, and don't just add popular hashtags to try to get your posts to show up in searches.
For example, if you're sharing an image of you coding at your laptop, some helpful hashtags might be #coding, #programming, #webdevelopment, #softwaredevelopment, #javascript, #developer, and so on.
Don't just throw #photooftheday or #photography on there...unless you're a photographer.
Don't spam people about collabs or the latest money-making scheme
You might see comments on photos like "X person helped me make thousands of dollars. I'm so grateful for their help. You can do it too!" or something strange and irrelevant like that.
If you see those comments on your photos, you can remove them.
You'll also likely see comments asking the account owner to do a collaboration with them. While this is ok if it's a serious inquiry, you shouldn't reach out to people unless whatever they're doing is a good fit for whatever you're doing. Spammy comments or messages aren't appreciated.
Don't be mean
Instagram is a generally positive and supportive community. There are trolls, of course, like anywhere else, but don't be one of them.
If you have a judgey or negative comment or sentiment, keep it to yourself.
Now you can use Instagram like a pro!
Whether you just manage your personal account or share content for your company or employer, you should have the tools to make the most of Instagram and its many features.
Just keep in mind - there's more to the app than I've covered here. The best way to learn about Instagram is to play around with it. Click every icon, try out every effect. Learning by doing, right?
Happy 'Gramming!
Bonus: How to sign up for Instagram on your desktop or laptop
Step 1: Visit instagram.com
If you're on your desktop or a laptop, go to instagram.com where you'll find the following homepage:
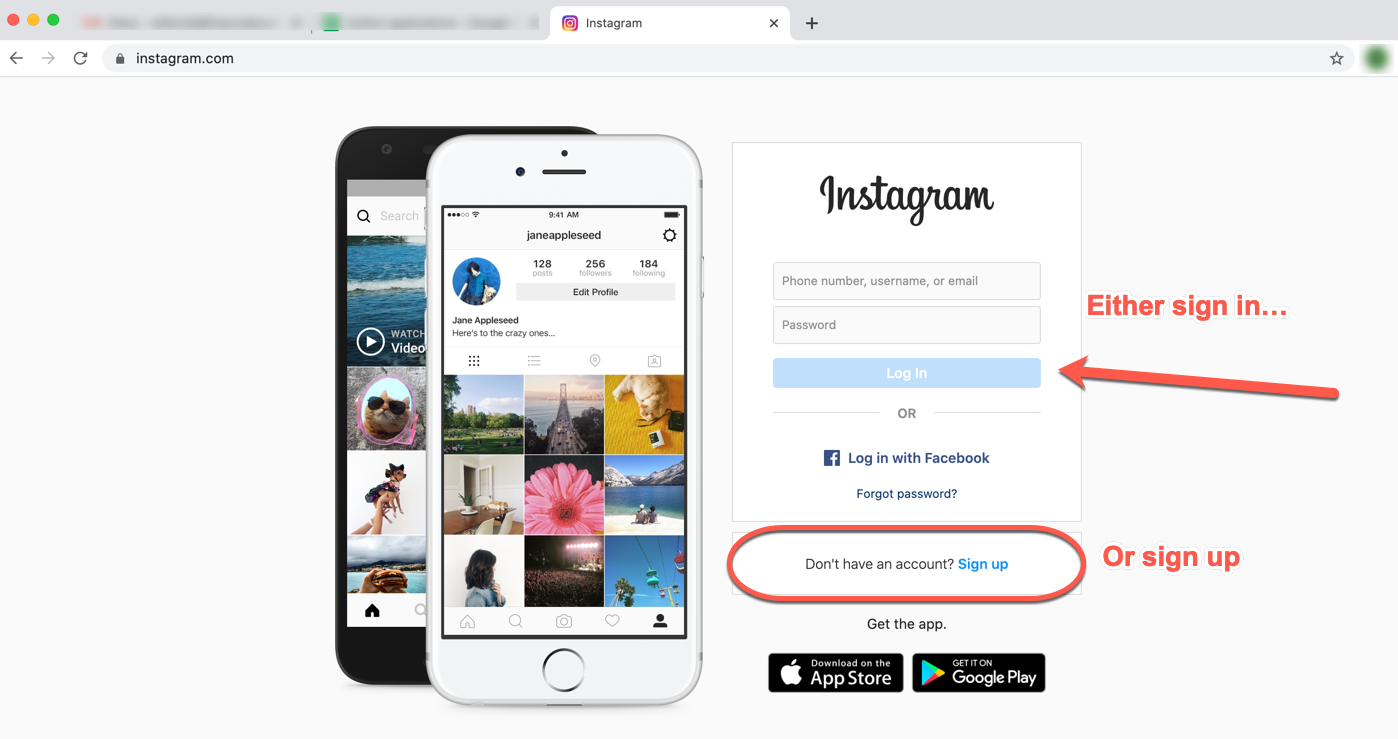 Instagram's homepage (if you're not signed in/don't have an account)
You'll see a few options. You can either:
- sign in (if you already have an account),
- login with Facebook (Instagram is owned by Facebook, so they chose that social sign-in option),
- or sign up if you don't have an account (towards the bottom).
Step 2: Sign up for an account
If you don't have an account, click "Sign up". You'll be taken to the following screen:
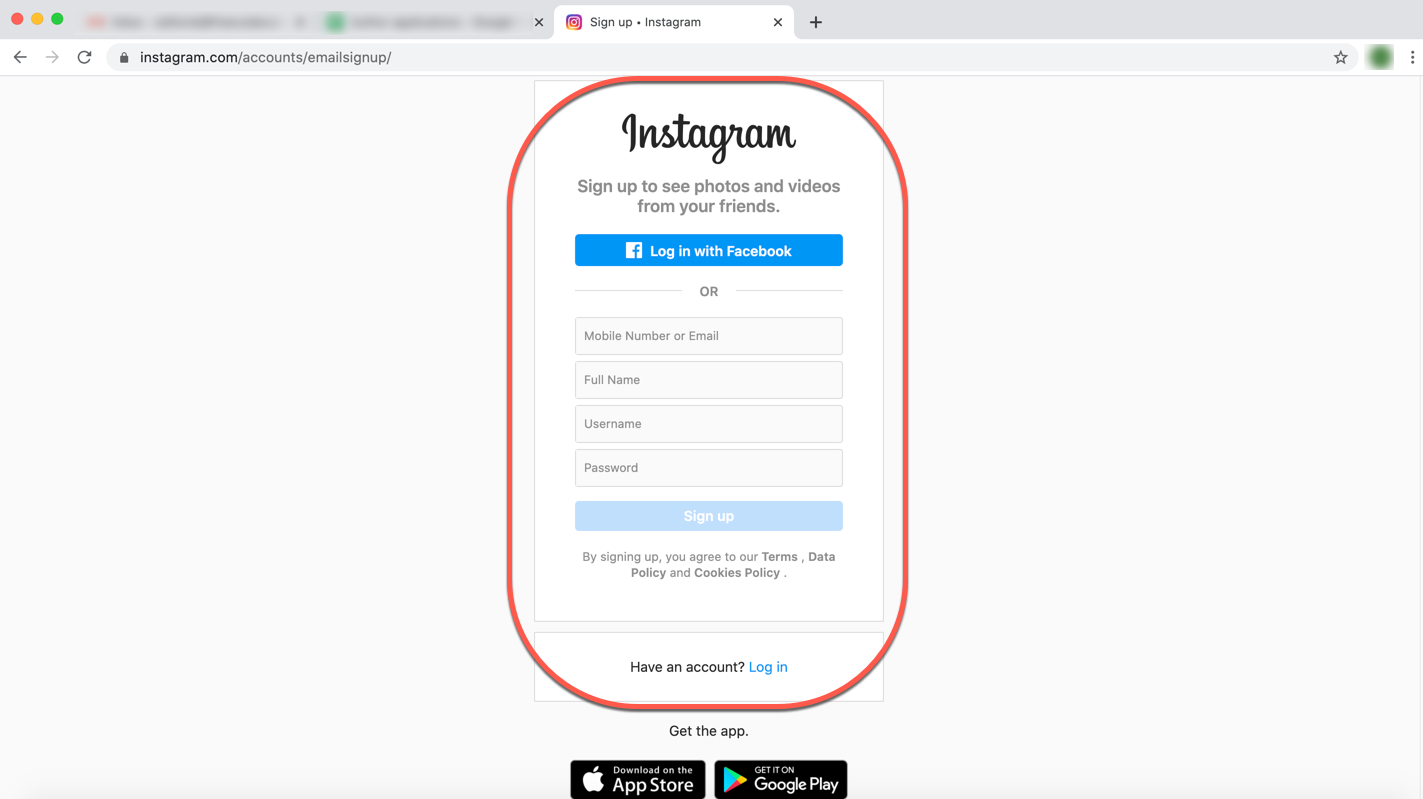 Sign in with Facebook, or sign up for an account
You'll notice you still have the option to sign in with Facebook. But if you don't want to do that, just fill out the requested info and hit "sign up".
Some tips:
- You do need to use a real email or mobile number (as Instagram will send a confirmation code there that you'll need to sign up). You can use a "test" email if you want - like jane+test@heremail.com or jane+instagram@heremail.com (as long as your email is actually jane@heremail.com).
- You don't have to use your full name if you don't want to – it can be your first name and last initial, or something else entirely.
- Choose a username that reflects who you are, what you'll be sharing, and so on. It has to be unique, and Instagram will tell you (with a little checkmark) if the one you picked works.
- Use a password generator to generate and save a secure password for you.
Step 3: Enter the confirmation code
Once you've hit "sign up", you'll be taken to the screen that requests the confirmation code, like the below:
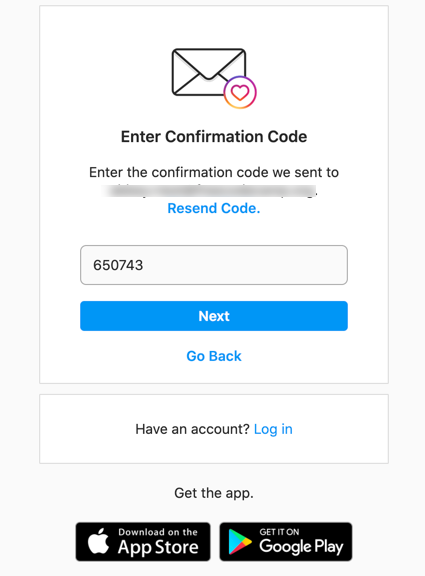 The code field will be blank - I've entered a sample code here :)
Check your email or mobile (whichever method you provided above) and enter the code sent there. Click Next.
Step 4: Follow some people to get started
Then you'll be taken to a page full of suggested people to follow:
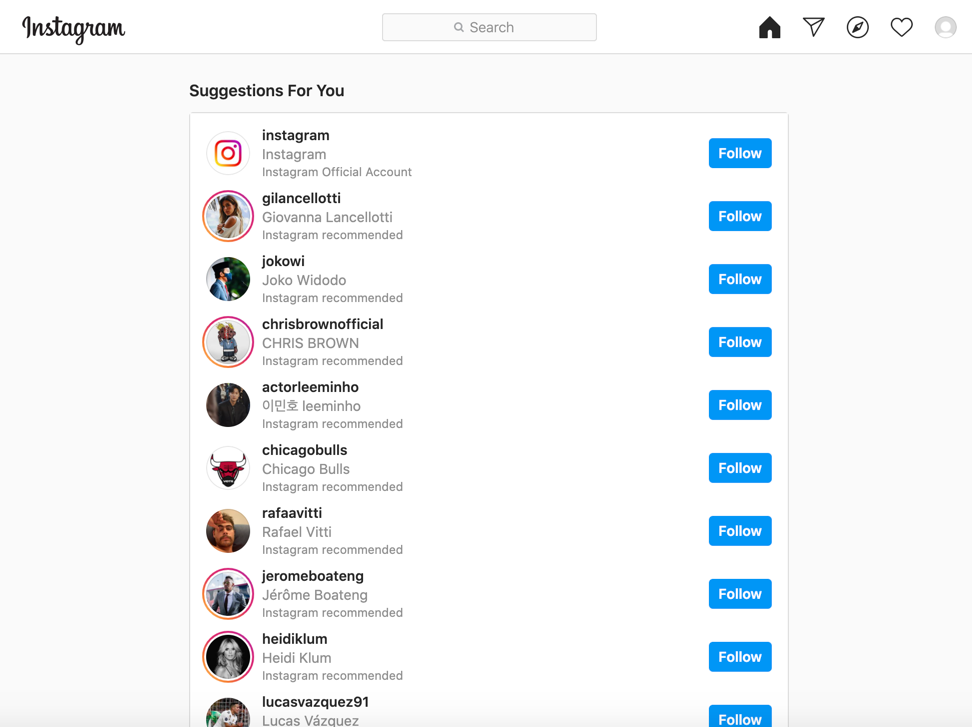 Instagram suggests some initial accounts for you to follow to get started. Pick a few and scroll down.
Pick a few (or at least one) from that list, click "Follow" and scroll all the way down. You'll see a blue "Get started" button at the bottom – click that.
Step 5: Finish entering your info
Finally, you'll be taken to your home page, which will look something like this:
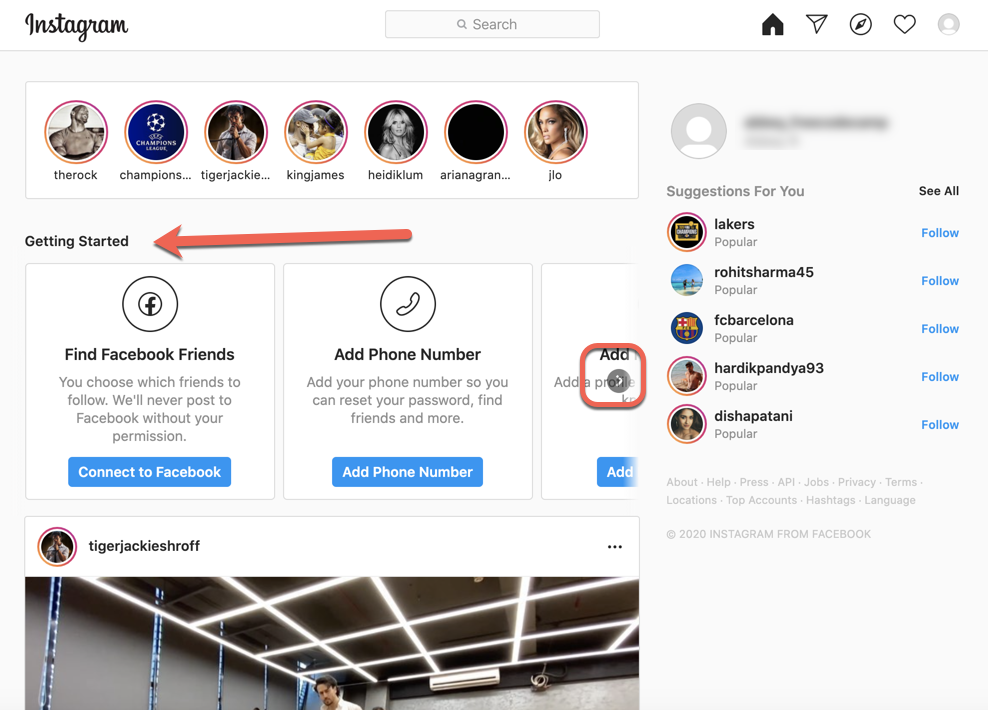 Click through the "getting started" suggestions - most importantly, add a profile picture (scroll to the right with the little arrow).
Note that your homepage will look different depending on whom you followed in the previous step.
In the "Getting started" section towards the top, you can find friends on Facebook who are on Instagram, add more info, but most importantly – add a profile photo.
Remember, your profile photo doesn't have to be an actual photo of yourself, but it can be helpful if you want people to know who you are.
If you don't, you can add any photo you like. But definitely add something.
Once you've added your photo (and any other info), that "Getting started" section will go away and you'll just see your homepage.