

Hello everyone! It's good to be back with another tutorial – this time on Java, one of the most popular programming languages out there today.
Java is used by developers and enterprises to build powerful applications that serve many different purposes. The object-oriented nature of Java makes writing clean, modular, reusable code very easy.
If you are not comfortable with Java yet, there are many great resources online that can help you get started. You can check out this collection of resources put together by one of our freeCodeCamp staff. Here's a beginner-friendly Java course. And here's another helpful tutorial to help you work on the basics. It's never too late!
In this tutorial, we are going to build a simple command-line application for a parking lot system. I'll start with the requirements first, then list down the classes needed and explain the workflow of the application. After this, I will show you how to implement each functionality.
Here's What We'll Cover:
How to Set Up the Project
You need to have Java 8 installed in your system. If you don't, then download it from here and follow this installation guide. Also, install Visual Studio Code and add the Language Support for Java extension on VS Code.
There's no need to set up a database connection, an external server, or a framework. We'll use an in-memory data structure to store the data. Also, we are not going to create a user interface, as the focus is only on the business logic.
With that out of the way, we are ready to start.
Project Requirements
Our goal is to create an application for a parking lot system. As everyone visualizes projects differently, there may be many features that come into your mind.
But before jumping into the implementation, we first need to lay down specific requirements. It's always important to start with the basic requirements first, so that's what we'll do here.
Here is a list of all the requirements:
A parking lot should have a parking lot ID, number of floors, and number of slots on each floor.
Each slot in the parking lot has a type of vehicle that can park there. Valid types are car, bike, and truck. You can include any vehicle type as per your needs. You can also decide which slots should go to each type. Here, I am assigning the first slot on each floor to a truck, the next two for bikes, and rest for cars.
When a vehicle pulls into the parking lot, the application takes the vehicle's type, registration number, and its color. You can also have additional details like the vehicle's name, the driver's name, and so on.
After that, a slot is assigned to the vehicle. The selection strategy could be anything you want. Here, we will choose the lowest floor and earliest available slot.
When a vehicle is assigned a slot, the app should return a ticket. The ticket should be a string of the form . For example, the vehicle parked on floor 2, slot 5 would be PR123_2_5.
To unpark the vehicle, the user should present the valid ticket. After that, the vehicle is removed from the slot.
The app should be able to display the number of available slots and a list of available and unavailable slots for a specific vehicle type.
Java Classes
Let's understand how we are going to design the application. Since it is a command line application, we are only going to write the business logic of a parking lot and display outputs on a console.
We will have separate classes representing the entities of our application: Vehicle and Slot. Then, we'll create a ParkingLot class that contains the core business logic of our application. Our main driver class will interact with this class for all the functionalities.
Now, let's define our classes. Each class will have a constructor to initialize their fields.
Vehicle class:
type,registration,color(All are of string type)
Slot class:
type(string)vehicle(Vehicle): type of vehicle parked in the slotticketId(string): ticket id assigned to the vehicle parked in this slot, initially null.
ParkingLot class:
Fields:
parkingLotId(string)slots(List<List>): This is a list of all the slots in the parking lot. The list of lists represents slots on multiple floors. The floors and slots are numbered according to the list index.
Constructor: ParkingLot(parkingLotId, nfloors, noOfSlotsPerFlr)
Methods:
parkVehicle(type, regNo, color): takes all the parameters of a vehicle, assigns a slot, and returns the ticketunPark(ticketId): takes the ticket id and removes the vehicle from the slotgetNoOfOpenSlots(type): returns the number of slots for vehicle typedisplayOpenSlots(type): displays all open slots for vehicle typedisplayOccupiedSlots(type): displays all occupied slots for vehicle type
This will contain our core business logic including the methods that will be exposed to the client i.e. the main method in our case. The initialization logic inside the constructor works differently as compared to the Vehicle and Slot class.
You will learn more about these classes in the implementation section.
Application Workflow
Now that we have our classes defined, let's understand the workflow of our application.
When a vehicle pulls into the parking lot, the system takes in the vehicle details and looks for an available slot. If it finds an open slot, it assigns that slot to the vehicle and returns a ticket.
This is handled by the parkVehicle() method. If a slot is not available, then the method prints an error message.
Now, if the vehicle wants to unpark, it has to show the ticket. The system parses the ticket, finds out which slot the vehicle is parked in and frees up the slot. The unPark() method takes in the ticket and frees up the corresponding slot.
Let's dive into the code now.
How to Build the Application
Let's first write our Vehicle and Slot classes with the fields mentioned previously:
public class Vehicle {
    String type;
    String registration;
    String color;
    public Vehicle(String type, String registration, String color) {
        this.type = type;
        this.registration = registration;
        this.color = color;
    }
}
public class Slot {
    String type;
    Vehicle vehicle;
    String ticketId;
    public Slot(String type) {
        this.type = type;
        this.vehicle=null;
        this.ticketId=null;
    }
}
Now, let's implement the ParkingLot class. We have discussed the fields and methods the class will contain. Let's write the fields first.
public class ParkingLot {
    String parkingLotId;
    List<List<Slot>> slots;

    ... constructor and methods ...
 }
I'll show you, step by step, how to implement each functionality.
Initialize the Class
Initialize the ParkingLot class through the constructor. This is where we build our parking lot. As mentioned before, the parking lot will have a given number of floors and number of slots per floor.
ParkingLot(String parkingLotId, int nfloors, int noOfSlotsPerFlr) {
        ... code here ...
    }
Start by setting the parking lot id.
this.parkingLotId=parkingLotId;
Then, initialize all the slots. On each floor, the first slot goes to truck, the next two go to bike, and the rest are for cars.
slots = new ArrayList<>();
for(int i=0;i<nfloors;i++){
    slots.add(new ArrayList<>());
    List<Slot> floorSlots = slots.get(i);
    floorSlots.add(new Slot("truck"));
    floorSlots.add(new Slot("bike"));
    floorSlots. add(new Slot("bike"));

    for(int j=3;j<noOfSlotsPerFlr;j++){
        slots.get(i).add(new Slot("car"));
    }
}
Here, we have done simple initialization for each Slot object in the list.
Park the Vehicle
Let's implement the parkVehicle() method now.
public String parkVehicle(String type, String regNo, String color) {
        ... Implementation here ...
    }
First, create a Vehicle object with the given details.
Vehicle vehicle = new Vehicle(type, regNo, color);
Loop over the entire slots list and find the first empty slot. To determine whether a slot is empty or not, check if the slot can take the given vehicle type and if the slot's vehicle field is null (meaning it is empty).
for(int i=0; i<slots.size();i++){
            for(int j=0;j<slots.get(i).size(); j++){
                Slot slot = slots.get(i).get(j);
                if(slot.type == type && slot.vehicle == null) {
                    ... assign the slot here ...
                }
            }
        }
To assign this slot to the vehicle, just set the vehicle field to the Vehicle object we created above. Then, generate and return a ticket using the floor and slot numbers.
slot.vehicle=vehicle;
slot.ticketId=generateTicketId(i+1, j+1);
return slot.ticketId;
private String generateTicketId(int flr, int slno){
        return parkingLotId + "_" + flr + "_" + slno;
    }
This method does not need to be exposed outside the class, so it's private.
If a slot is not available, return null or throw an exception. Do this after the for loop has ended.
System.out.println("NO slot available for given type");
return null;
Unpark the Vehicle
To unpark the vehicle, parse the ticket id to get the floor and slot number where the car is parked.
public void unPark(String ticketId){
        String[] extract = ticketId.split("_");
        int flr_idx=Integer.parseInt(extract[1])-1;
        int slot_idx=Integer.parseInt(extract[2])-1;

         ...
    }
Surround the parsing logic with a try-catch in case the user passes an invalid ticket id.
With the floor and slot number, find the slot where the vehicle is parked and un-assign the vehicle.
for(int i=0; i<slots.size();i++){
            for(int j=0;j<slots.get(i).size(); j++){
                if(i==flr_idx && j==slot_idx) {
                    Slot slot = slots.get(i).get(j);
                    slot.vehicle=null;
                    slot.ticketId=null;
                    System.out.println("Unparked vehicle");
                }
            }
        }
Display Parking Lot Information
We have defined three methods to display parking lot information in different forms.
Return the number of open slots for a vehicle type.
int getNoOfOpenSlots(String type){
        int count=0;
        for(List<Slot> floor: slots){
            for(Slot slot: floor){
                if(slot.vehicle == null && slot.type.equals(type)) count++;
            }
        }

        return count;
    }
Here, we loop over all the slots and check two conditions. First, we check if the vehicle field is null indicating an empty slot. And then we check if the type of the slot matches with the vehicle type requested by the client.
We then simply return the number of empty slots for the give type.
Display all the open slots for vehicle type:
void displayOpenSlots(String type){
        for(int i=0;i<slots.size();i++){
            for(int j=0;j<slots.get(i).size();j++){
                Slot slot=slots.get(i).get(j);
                if(slot.vehicle == null && slot.type.equals(type))
                    System.out.println("Floor " + (i+1) + " slot " + (j+1));
            }
        }
    }
This is an enhancement over the previous function. Instead of the count, we are returning the actual empty slots with floor and slot no.
Display all occupied slots for vehicle type:
void displayOccupiedSlots(String type){
        for(int i=0;i<slots.size();i++){
            for(int j=0;j<slots.get(i).size();j++){
                Slot slot=slots.get(i).get(j);
                if(slot.vehicle != null && slot.type.equals(type))
                    System.out.println("Floor " + (i+1) + " slot " + (j+1));
            }
        }
    }
Here, we check the opposite condition for the vehicle field. If it is not null, then that slot is occupied by a vehicle. We then check if the vehicle type matches with the requested type and then display the floor and slot no.
With this, we have our basic implementation of a parking lot. It is time to test out each functionality.
How to Test the App
Since we do not have a UI or a testing framework, we are going to test each functionality manually from the driver code. Just like any Java application, ours will also start from the main method.
First, let's create a ParkingLot object. Each functionality of the parking lot will be accessed through this object.
int nFloors=4;
int nSlotsPerFloor=6;
ParkingLot parkingLot = new ParkingLot("PR1234", nFloors, nSlotsPerFloor);
This creates a parking lot with 4 floors and 6 slots per floor, for a total of 24 slots.
parkingLot.getNoOfOpenSlots("car")

String ticket1 = parkingLot.parkVehicle("car", "MH-03", "red");
String ticket2 = parkingLot.parkVehicle("car", "MH-04", "purple");

parkingLot.displayOccupiedSlots("car");
First, we display the number of open slots available for a car. Then, we park two cars and get the tickets. After parking, we display the occupied slots.
To run the program, click the run button in the top right.
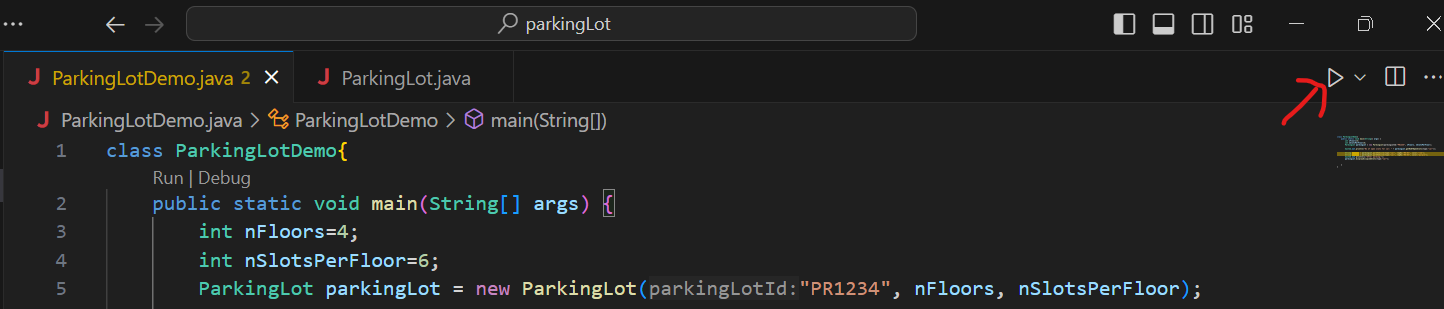
VS Code Editor
This gives the following output.
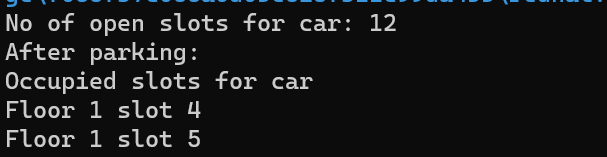
Output for the above test cases
Here, you can see the first available slots were assigned to the car.
Now, unpark the second vehicle and display the occupied slots.
parkingLot.unPark(ticket2);
parkingLot.displayOccupiedSlots("car");
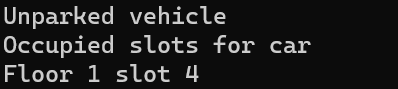
After Unparking
Let's try parking a truck now. Display available slots for a truck, park the truck, and display occupied slots.
parkingLot.displayOpenSlots("truck");
parkingLot.parkVehicle("truck", "MH-01", "black");
parkingLot.displayOccupiedSlots("truck");
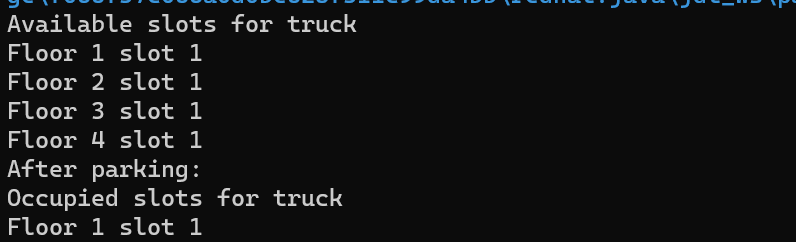
Output after parking a truck
I'll park three more trucks and then try parking another one. Since there are no more truck slots available, it shows the following message:

Output if the parking lot is full
Future Scope
In this article, we have created a very basic command-line application for a parking lot. The application only does one thing – assigning and un-assigning a vehicle from a parking slot. But there are many other things you can add to this basic app:
Use encapsulation wherever possible. Technically, this should not come under future scope. I have not used encapsulation here as I only wanted to focus on the design and logical part. But while working on actual applications, remember to encapsulate all the fields and access them through getters and setters.
Implement proper exception handling for scenarios where a slot is not available, a vehicle type is not allowed, or the ticket is invalid.
You can add more types of vehicles to the parking lot and use a different strategy to assign slot types.
You can use a different strategy to find out the first available slot.
You can expose all the logic we have discussed here as a backend service and create a UI for your parking lot with a database as well.
You can find the code on GitHub here.
Conclusion
In this post, we created a simple command-line application with Java from the requirements. From the list of requirements, we determined the design of the application and defined the classes needed. Then, we understood the workflow of our application.
After finalizing the design and the workflow, we jumped into the implementation. This simple application was an example of how you outline the requirements and based on those requirements, figure out the design and workflow of your application.
Before writing the code, you should know what classes you are going to use and the purpose of each class. This is true no matter how small or big an application you want to make. I hope this helps in your future projects.
If you are unable to understand the content or find the explanation unsatisfactory, comment your thoughts below. New ideas are always appreciated! Feel free to connect with me on Twitter. Until then, goodbye!
Helpful resources
workat.tech has abundant resources on cracking interviews at top product-based companies. This post is inspired by one such resource.
Here's a Java handbook for beginners that'll teach you a lot of foundational concepts.
And here's a more advanced Java handbook that covers more advanced object-oriented programming concepts.