
By Krish Jaiswal
Hello everyone 👋 In this tutorial, you'll learn how to make a simple Task Manager CLI (Command Line Interface) tool. This means you can use commands to Create, View, Update, or Delete your todos.
We will be building this CLI tool using NodeJS. We'll also use MongoDB as the database to store all our to-dos. Finally, we'll use a few helpful packages from npm:
- commander: This helps us to build the CLI tool.
- chalk: This makes messages in the terminal colorful and easy to read.
- inquirer: This lets us ask the user for input.
- ora: This makes the terminal show nice spinning animations.
Before we dive in, I want you to know that you can find the complete code for this project on GitHub. If you're ever unsure about something in the code, you can always refer to the final version there.
Here is the link to the Repository: Task Manager CLI Tool Repo.
Table Of Contents:
- Project Setup
- How to create the
package.jsonfile - How to install dependencies
- How to convert CommonJS modules to ES modules
- How to create the folder structure
- How to Connect to the Database
- How to obtain a MongoDB connection string
- Code for connecting to the database
- How to Create a Mongoose Model
- Working on CRUD Operations
- How to create Todos
- How to reading Todos
- How to deleting Todos
- How to update Todos
- How to Write the CLI Entry Point using Commander
- How to Test the CLI tool
- Conclusion
Project Setup
Welcome to the first section of this handbook! Here, we will be setting up our project.
This involves a few simple steps: creating a new directory, setting up the package.json file, and installing necessary npm packages like chalk, inquirer, commander, and others we'll talk about soon. We'll also organize the project by creating folders.
Before we dive in, let's ensure you have NodeJS installed on your system. You can get the latest LTS version from this website: https://nodejs.org/en.
To check if Node is properly installed, type this command: node --version. If you see a version number, you're all set! If not, you need to troubleshoot the errors.
Once NodeJS is up and running, create a new folder named "todo." You can use your favorite code editor (I prefer Visual Studio Code) or follow these steps in your terminal:
- Make a new folder:
mkdir todo - Go inside the folder:
cd todo - Open it in your code editor:
code .
How to Create the package.json File
The first and foremost step is setting up the package.json file. But don't worry about doing it manually. You can save time by using this command:
npm init --yes
Once this step is done, let's move on to the next step and get all the necessary things for our project.
How to Install Dependencies
To build this project, we'll need some packages. Just run this simple command to get them all:
npm i commander inquirer chalk ora mongoose nanoid dotenv
How to Convert CommonJS Modules to ES Modules
Before you continue, let's make a little change in the package.json file. Remove this line: "main": "index.js", and add these two lines instead:
"exports": "./index.js",
 "type": "module",
With these changes, we're converting our project from CommonJS Modules to ES Modules. This means we'll use import instead of require() to bring in modules, and export instead of module.exports to share things between files.
If you want to dive deeper into different types of modules in JavaScript and how they work, check out this tutorial on FreeCodeCamp: Modules in JavaScript - CommonJS and ESmodules Explained.
How to Create the Folder Structure
Now, let's organize our project by setting up a smart folder structure. This means we'll make folders to neatly hold our JavaScript files. This step's really important. It makes things easy to manage and develops smoothly.
We're creating 3 folders and 2 files in the main folder:
First folder: commands. Inside this folder, you'll create 4 files. The names of the files and the description of the code they will contain is mentioned below:
addTask.js: Code for Creating a new todo.deleteTask.js: Code for Deleting a todo.readTask.js: Code for Displaying all the todos.updateTask.js: Code for Updating a todo.
Second folder: db. Inside this folder, add a file named connectDB.js. This file will contain the code for connecting to the MongoDB database and disconnecting when needed.
Third folder: schema. Inside it, make a file named TodoSchema.js. This file stores the Mongoose Schema and Model. Basically, a blue print for our tasks, that is how our tasks will look.
First file: .env. Create this file inside the root directory / main folder of the project. This is where you'll put your MongoDB Connection string.
Second file: Create the index.js file in the root directory itself which will serve as the entry point of our project. It's like the project's front – where everything starts.
Once we are done, your project's folders should look something like this:
 Project folder structure
How to Connect to the Database
Now that you've successfully set up the project, it's time to dive into the exciting part.
How to Obtain a MongoDB Connection String
To keep track of all our todos, we need a place to store them. That's where MongoDB Atlas comes in. It's like a special service that handles databases for us. The best part? You can start using it for free (no credit card needed).
To connect to it, all you need is something called a connection string. If MongoDB Atlas is new to you, don't worry. Check out this easy-to-follow article: MongoDB Atlas Tutorial - How to Get Started. It gives you just enough info to start using Atlas. By the time you're done, you'll know how to get what you need, including the connection string.
Once you have that connection string, create a new thing called an "environment variable." It's like a secret code your project uses. Open the .env file and make a line like this: MONGO_URI=. After the =, put in your connection string.
Remember: Replace <password> with your actual password and <username> with the username of your database admin in the connection string. Also, add todos between /? in the string. When you're done, your .env file should look something like this:
MONGO_URI=mongodb+srv://<username>:<password>@cluster0.k5tmsld.mongodb.net/todos?retryWrites=true&w=majority
Code for Connecting to the Database
Now, let's dive into the code that connects our tool to the MongoDB database. Open up the ./db/connectDB.js file and let's write some code to make this connection happen.
First things first, we need to bring in the dotenv package that we grabbed earlier when we were setting up the project and invoke the config() method on dotenv. This helps us load environment variables from the .env file. Here's how you do it:
import dotenv from 'dotenv'
dotenv.config()
Next up, we want to import a few more packages that we'll use here. These are mongoose, ora, and chalk:
import mongoose from 'mongoose'
import ora from 'ora'
import chalk from 'chalk'
Note: mongoose is an Object Data Modeling (ODM) library for MongoDB. It provides a higher-level abstraction making it easier to do things like adding, reading, updating, and deleting stuff from the MongoDB database.
Now, let's get into the real action. We'll define two functions here: connectDB() and disconnectDB().
The connectDB() function will contain the code to help connect our NodeJS Application to the M0ngoDB Database using mongoose. It's like a phone call connecting them. If we don't establish a connection first, our app won't be able to interact with the database and perform the various CRUD operations.
The disconnectDB() function does the opposite. It's like hanging up the phone after our app is done talking to the database. If we don't disconnect, it's like keeping the call going even after we're done.
Failing to disconnect from the database after we are done interacting with it could cause resource leaks. These may cause your app to slow down or potentially crash over time.
Let me show you the code for both the functions:
export async function connectDB(){
    try {
        const spinner = ora('Connecting to the database...').start()
        await mongoose.connect(process.env.MONGO_URI)
        spinner.stop()
        console.log(chalk.greenBright('Successfully connected to database!!!'))
    } catch (error) {
        console.log(chalk.redBright('Error: '), error);
        process.exit(1)
    }
}

export async function disconnectDB(){
    try {
        await mongoose.disconnect()
        console.log(chalk.greenBright('Disconnected from the database.'))
    } catch(err) {
        console.log(chalk.redBright('Error: '), error);
        process.exit(1)
    }
}
This is a lot of code to digest at one time, so let me explain this for you:
In the connectDB() function, the line mongoose.connect(process.env.MONGO_URI) helps us actually connect to the database using the connection string.
Remember the .env file? We're using its info here. To load the MONGO_URI variable, we use the dotenv package and call the config() function and then we can access it using process.env.MONGO_URI.
Since mongoose.connect() returns a promise, we use the await keyword before it to make sure we proceed only when this returned promise gets resolved.
It is possible to encounter some errors while running this code, so we have wrapped the entire code in a try...catch() block to make sure any errors which pop up are handled properly in the catch() block.
The ora package helps us show a spinner while we connect to the database. Once successfully connected, we stop the spinner and show a happy message in green using chalk.
If you notice, we are doing the same thing in the disconnectDB() function. But, instead of connecting, we disconnect from the database using mongoose.disconnect(). We wrap it in a similar try-catch block, and again we show colorful messages using chalk.
We use export before these functions to let other parts of the project use them. Don't forget to add these two temporary lines at the end of the file for now:
connectDB()
disconnectDB()
Now, you can run the connectDB.js file using the command: node ./db/connectDB.js and expect to see this in the console:
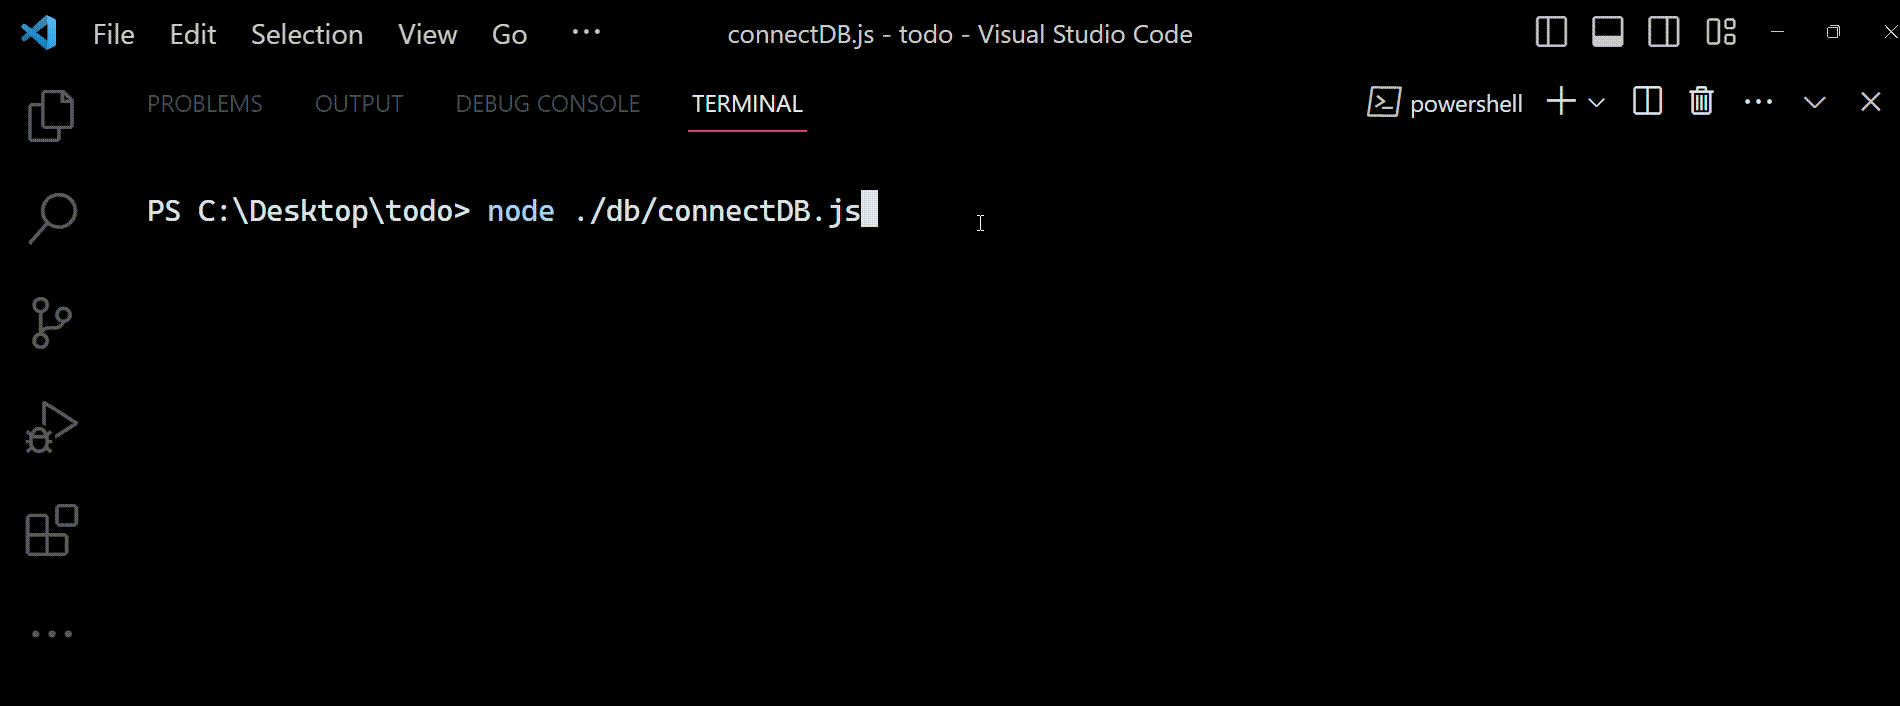 Output seen on the terminal when
 connectDB.js file is executed. It shows how our code successfully connects to the database and disconnects from it showing appropriate console messages when we invoke the connectDB() and disconnectDB() methods.
Connecting to the database is a big step, but you're making great progress! Before moving ahead, make sure you remove those 2 lines you added at the end because they were added just to check if our connection and disconnection functions are working as expected.
How to Create a Mongoose Model
A Mongoose model is like a tool that helps us talk to the database. With it, we can easily do things like add, read, update, and delete tasks. It's like a helpful assistant that understands how to communicate with the database.
To make this model, we need something called a Schema. It basically defines what each task should look like. Think of it as a blueprint or a set of instructions that guides how each task is created, what information it should have, and how that information is organized. It's like setting rules for how our tasks are stored in the database.
We're going to build this Schema in the ./schema/TodoSchema.js file. Open it up, and let's dive in. First, we need two special tools: mongoose and nanoid. We'll use nanoid to make short and unique IDs for each task.
Type these lines to import the tools:
import mongoose from 'mongoose'
import {nanoid} from 'nanoid'
Now, we use the mongoose.Schema() method to create our Schema. Here's the code for it:
const TodoSchema = new mongoose.Schema({
    name: {
        type: String,
        required: true,
        trim: true
    },
    detail: {
        type: String,
        required: true,
        trim: true
    },
    status: {
        type: String,
        required: true,
        enum: ['completed', 'pending'],
        default: 'pending',
        trim: true
    },
    code: {
        type: String,
        required: true,
        default: 'code',
        trim: true
    }
}, {timestamps: true})
Any task created using this Schema will have the following properties:
name: This is a short title for the task. Thetype: Stringemphasizes that it can only be text (a String). Therequired: truespecifies that we have to provide this when creating a task and thetrim: truespecifies that any extra spaces at the beginning or at the end of the task's name will be removed before saving it in the database.detail: This is a description of the task. It has exactly the same properties asname.status: This shows if the task is done or not. Theenum: ['completed', 'pending']property specifies that it can only becompletedorpending. Thedefault: 'pending'property specifies that if you do not set thestatusproperty while creating the task, it is assumed to bepending.code: This is a short and unique ID for the task. We are giving it a default value ofcode. This value is just a placeholder and doesn't have any real significance in terms of identifying the task. Don't worry, we'll change it soon.- The
{timestamps: true}is a configuration option that automatically adds timestamp fields likecreatedAtandupdatedAtto the tasks when they are created or modified.
We have successfully defined our Schema – but you may wonder if the code property was supposed to be unique for every task. Currently it stores the same value, that is "code", for every single task. Don't worry, we'll fix that. Add this code at the end:
TodoSchema.pre('save', function(next){
    this.code = nanoid(10)
    next()
})
Here, TodoSchema.pre('save', function(){....}) helps us defining a pre-save hook/function which runs every time before a task gets saved in the database.
Inside the function, we use nanoid(10) to create a unique, 10 character long ID for the task and put this generated id in the code field of the task (we can actually access any property/field of the task using the this keyword).
The last line of code: next() basically tells the computer that we are done and it can finally save the document now. With this, we generate a unique ID for every single task created using the nanoid package.
Lastly, we'll make a Todos model using this TodoSchema blueprint and export it. This is how:
const Todos = mongoose.model('Todos', TodoSchema)
export default Todos
And there you go! We've built our Schema and Model. Now let's proceed to the next section of this tutorial.
How to Work on CRUD Operations
Congrats for having successfully followed up till here. So far, we have done 3 things:
- We've set up the project
- We've connected to the MongoDB database, and
- We've created the Mongoose Model
Up next, we will be working on the various CRUD operations like Creating, Reading, Updating, and Deleting the tasks from our database.
How to Create Todos
Now, let's start with creating tasks in our project. At first, I planned for a simple process where you add one task to the database at a time. This means when you tell the tool to create a task, it asks you once for the task's details—like the name and description—and then it saves the task.
But then I realized, what if someone wants to add many tasks quickly? Doing it one by one isn't cool. There are two issues:
- If you have, say, 5 tasks in your mind, you'd have to type the create command 5 times—one for each task.
- After entering task details, you wait a bit because saving stuff to the database can take time, especially if the internet is slow.
These problems aren't fun at all! To fix this, we need a way to add multiple tasks in one go. Here's how we'll do it:
After you put in the task's name and description, we'll ask if you want to add more tasks. If you enter yes, we continue the process from the start (asking you to again enter the name and description of the next task). But if you enter no, the question prompting process will stop and all the entered tasks get saved to the database together. This way, you can create many tasks without the hassle of doing it one by one. It's all about making things smooth for you.
We'll be writing some code in the ./commands/addTask.js file. This is where the magic happens. Let's break it down step by step:
First, we import the necessary packages and functions we've created earlier. You can add these lines of code to do that:
import inquirer from "inquirer";
import { connectDB, disconnectDB } from '../db/connectDB.js'
import Todos from "../schema/TodoSchema.js";
import ora from "ora";
import chalk from "chalk";
Now, we create an asynchronous function called input() to gather the task's name and details from the user. Here's how it goes:
async function input(){
    const answers = await inquirer.prompt([
        { name: 'name', message: 'Enter name of the task:', type: 'input' },
        { name: 'detail', message: 'Enter the details of the task:', type: 'input' },
    ])

    return answers
}
In simple terms, input() uses inquirer to ask the user for the task's name and details. The answers are then returned as an object.
But wait, you might wonder what inquirer.prompt() is doing. It's a method in the inquirer package that asks questions and waits for responses. You provide an array of question objects, each containing details like the message to display to the user and the type of question. The function returns a Promise, so we use await to wait for the user's answers which get's returned as an object.
Here, { name: 'name', message: 'Enter name of the task:', type: 'input' } is the first question that will be asked to the user. The message property contains the question that will be displayed to the user. In our case, it is: Enter the name of the task. The user will be prompted to input some text (a String), since this question is of type: 'input'. The name: 'name' signifies that the user's answer to this question will be assigned to a property named – name in the answer's object.
The next object is the second question that will be asked to the user. In this case, a message will be displayed in the terminal: Enter the details of the task and the user's response will be assigned to a property called detail in the answer's object.
To see how the above code works, you can add these 2 lines of code at the end of the file:
const output = await input()
console.log(output)
Now, save the file and run the code using the command: node ./commands/addTask.js. This is what you will see when you run the code:
 Output seen on terminal when we just invoke the
 input() method and execute the code. It shows how inquirer.js returns user's answers after the question prompting process.
We can now proceed with the rest of the code and you can remove the last 2 lines which you just added.
Now, let's create a function named askQuestions() to gather multiple tasks. This is how it looks:
const askQuestions = async() => {

    const todoArray = []
    let loop = false

    do{
        const userRes = await input()
        todoArray.push(userRes)
        const confirmQ = await inquirer.prompt([{ name: 'confirm', message: 'Do you want to add more tasks?', type: 'confirm' }])
        if(confirmQ.confirm){
            loop = true
        } else {
            loop = false
        }
    } while(loop)

    return todoArray
}
In askQuestions(), we set up a loop that keeps asking for tasks until the user decides to stop. We gather each task from the user by calling the input() function, and the returned user's response gets pushed to the todoArray.
Then, we ask if the user wants to add more tasks using a confirmation question. If they say yes, we set loop to true and the loop continues – otherwise, loop becomes false, and the loop ends. Finally, we return the array of tasks, that is todoArray.
You can test this by adding these lines of code at the end of the file:
const output = await askQuestions()
console.log(output)
When you run the file using node ./commands/addTask.js, you'll see a similar result to what you see here:
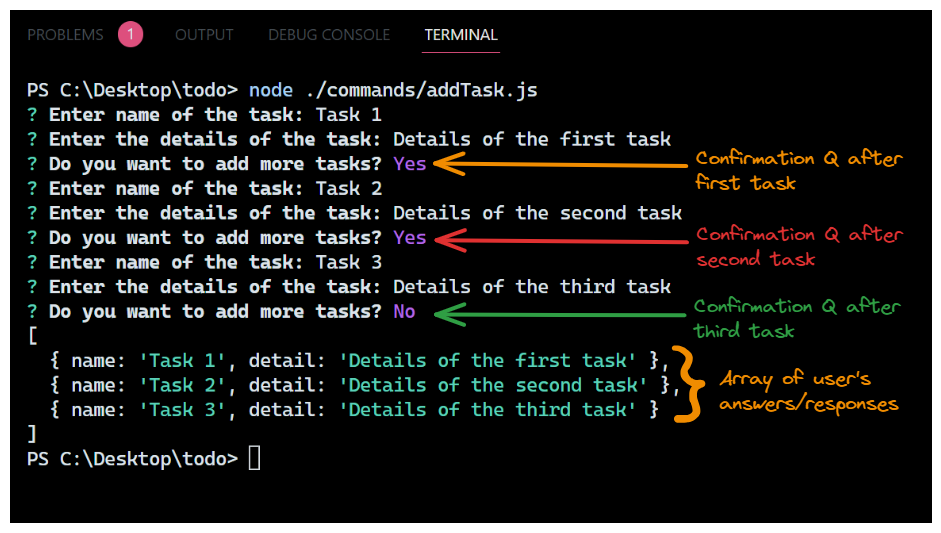 Output seen on terminal when we invoke the
 askQuestions() method and execute the code. It shows the array of tasks returned by the method when the user does not want to continue adding more tasks.
We are almost there! Before proceeding, do not forget to remove the last 2 lines you added just now. After you've done that, let's move ahead.
Up to this point, we have successfully managed to collect all the tasks the user wants to create.
Now, let's define the last piece of the puzzle: the addTask() function. This function brings everything together and completes the task creation process. Here's the full code:
export default async function addTask() {
    try {
        // calling askQuestions() to get array of todo's
        const userResponse = await askQuestions()

        // connecting to the database
        await connectDB()

        // Displaying a spinner with the following text message using ora
        let spinner = ora('Creating the todos...').start()

        // looping over every todo in the userResponse array
        // and saving each todo in the database
        for(let i=0; i<userResponse.length; i++){
            const response = userResponse[i]
            await Todos.create(response)
        }

        // Stopping the spinner and displaying the success message
        spinner.stop()
        console.log(
            chalk.greenBright('Created the todos!')
        )

        // disconnecting the database
        await disconnectDB()
    } catch (error) {
        // Error Handling
        console.log('Something went wrong, Error: ', error)
        process.exit(1)
    }
}
The addTask() function starts by calling the askQuestions() function to gather the array of tasks and assigning it to the userResponse variable. Then, it connects to the database using connectDB(), displays a spinner using ora to show the task creation process, loops through each task in the array, and saves it to the database using Todos.create(response).
Once all tasks are saved, the spinner stops, a success message is shown, and then it disconnects from the database using disconnectDB().
The entire code is wrapped in a try...catch block to handle any potential errors gracefully.
With this code, you've completed the task creation process. Nice work! This was probably the most complex piece of code in the entire project. Future operations such as reading, deleting and updating tasks are going to be fairly simple and easy by comparison. With that said, let's move to performing the Read operation.
How to Read Todos
Now we'll explore how to read tasks from the MongoDB database. The process is straightforward, and I'll guide you through the entire code in the ./commands/readTask.js file:
First, let's import the necessary packages and functions at the beginning of the file:
// Importing packages and functions
import { connectDB, disconnectDB } from '../db/connectDB.js'
import Todos from '../schema/TodoSchema.js'
import chalk from 'chalk'
import ora from 'ora'
Now, let's define an asynchronous function named readTask() which encapsulates the logic for reading tasks. The whole function is wrapped in a try...catch block for handling any potential errors:
export default async function readTask(){
    try {
        // connecting to the database
        await connectDB()

        // starting the spinner
        const spinner = ora('Fetching all todos...').start()

        // fetching all the todos from the database
        const todos = await Todos.find({})

        // stopping the spinner
        spinner.stop()

        // check if todos exist or not
        if(todos.length === 0){
            console.log(chalk.blueBright('You do not have any tasks yet!'))
        } else {
            todos.forEach(todo => {
                console.log(
                    chalk.cyanBright('Todo Code: ') + todo.code + '\n' +
                    chalk.blueBright('Name: ') + todo.name + '\n' +
                    chalk.yellowBright('Description: ') + todo.detail + '\n'
                )
            })
        }

        // disconnect from the database
        await disconnectDB()
    } catch (error) {
        // Error Handling
        console.log('Something went wrong, Error: ', error)
        process.exit(1)
    }
}

readTask()
Now, let's break down the code step by step:
- We establish a connection to the MongoDB database using
await connectDB(). - We start a spinner using
orato indicate that we are fetching all the todos. - We fetch all the todos from the database using
Todos.find({}). Once the process is complete, thetodosvariable will contain either an empty array (if no tasks exists in the database) or an array of tasks. - After fetching is complete, we stop the spinner using
spinner.stop(). - We check whether there are any todos by checking if
todos.lengthis equal to 0. If it is, we display a message in blue saying "You do not have any tasks yet!". If there are todos in the array (which means that the length of the array is not equal to 0), we loop through each todo in the array and print its code, name, and description usingchalkfor color formatting. - Finally, we disconnect from the database using
await disconnectDB().
In the last line of code, we call the readTask() function. This is only for testing purposes, and you can remove this line as instructed.
To run the code, use the command: node ./commands/readTask.js. When you execute this, you'll see something similar to the output shown here:
Note: I had created some random tasks before, so when I run the readTask.js file, I get to see this in my terminal:
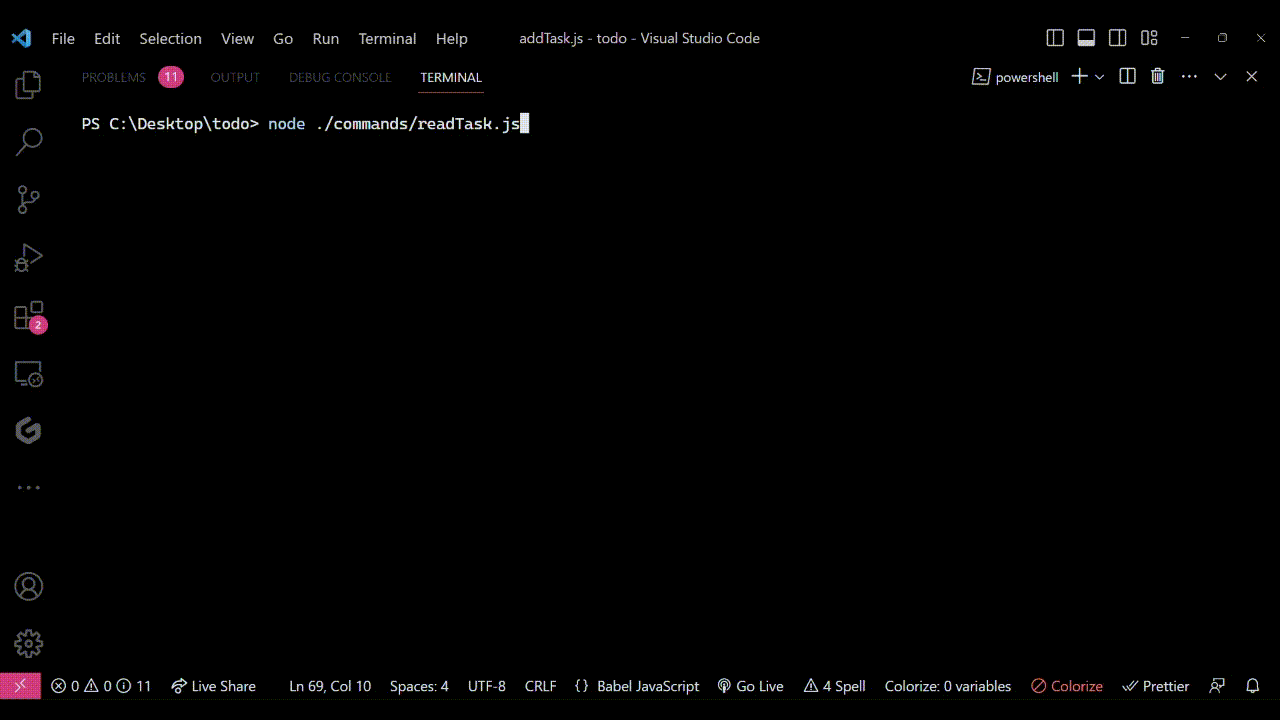 Output seen on terminal when
 readTask.js file is executed. It shows how the code successfully reads all the tasks from the database and prints it out in the terminal.
Before we proceed, don't forget to remove the last line of code in the readTask.js file because we won't be needing it in the future.
With this code, you've successfully implemented the read functionality for your task manager CLI tool. Great job! In the upcoming sections, we'll explore how to delete and update tasks.
How to Delete Todos
This section of the tutorial covers the simple process of deleting todos from the database. The logic is straightforward: users enter the Todo code of the todo they want to delete, and we remove that todo from the database.
Let's delve into the code to make this happen in the ./commands/deleteTask.js file.
The first step is to import necessary packages and functions at the beginning of the file, including inquirer, Todos model, connectDB(), disconnectDB(), ora, and chalk.
// Importing packages and functions
import inquirer from "inquirer";
import Todos from '../schema/TodoSchema.js'
import {connectDB, disconnectDB} from '../db/connectDB.js'
import ora from "ora";
import chalk from "chalk";
Up next, we will define an asynchronous function called getTaskCode(). The role of this function is to prompt the user to enter the code of the todo they want to delete using inquirer. The function then trims the code entered by the user using the trim() method and returns the trimmed code. The trimming process is necessary to remove the leading or trailing whitespace which the code might contain.
Here is the code for the getTaskCode() function:
export async function getTaskCode(){
    try {
        // Prompting the user to enter the todo code
        const answers = await inquirer.prompt([
            {name: 'code', 'message': 'Enter the code of the todo: ', type: 'input'},
        ])

        // Trimming user's response so that the todo code does not contain any starting or trailing white spaces
        answers.code = answers.code.trim()

        return answers
    } catch (error) {
        console.log('Something went wrong...\n', error)
    }
}
Now we will define the main function named deleteTask(). The entire code is below:
export default async function deleteTask(){
    try {
        // Obtaining the todo code provided by user
        const userCode = await getTaskCode()

        // Connecting to the database
        await connectDB()

        // Starting the spinner
        const spinner = ora('Finding and Deleting the todo...').start()

        // Deleting the task
        const response = await Todos.deleteOne({code: userCode.code})

        // Stopping the spinner
        spinner.stop()

        // Checking the delete operation
        if(response.deletedCount === 0){
            console.log(chalk.redBright('Could not find any todo matching the provided name. Deletion failed.'))
        } else {
            console.log(chalk.greenBright('Deleted Task Successfully'))
        }

        // Disconnecting from the database
        await disconnectDB()
    } catch (error) {
        // Error Handling
        console.log('Something went wrong, Error: ', error)
        process.exit(1)
    }
}
Let's break down this code step-by-step:
- We obtain the response object which includes the todo code entered by the user by calling the
getTaskCode()function defined above. We then assign this object to theuserCodevariable. - We connect to the database using
await connectDB(). - We start a spinner using
orato indicate that we're finding and deleting the todo. - We use
Todos.deleteOne({ code: userCode.code })to search for and delete the todo with a matching code. The response will indicate if any document was deleted or not. - After the operation is complete, we stop the spinner using
spinner.stop(). - We use an if...else condition to check the
deletedCountproperty in the response. If it's 0, we print a message indicating that the task with the provided code wasn't found and deletion failed. IfdeletedCountis greater than 0, we print a success message. - We disconnect from the database using
await disconnectDB().
If I call the function: deleteTask() and then proceed to run the code using node /commands/deleteTask.js command, I get to see this in my console:
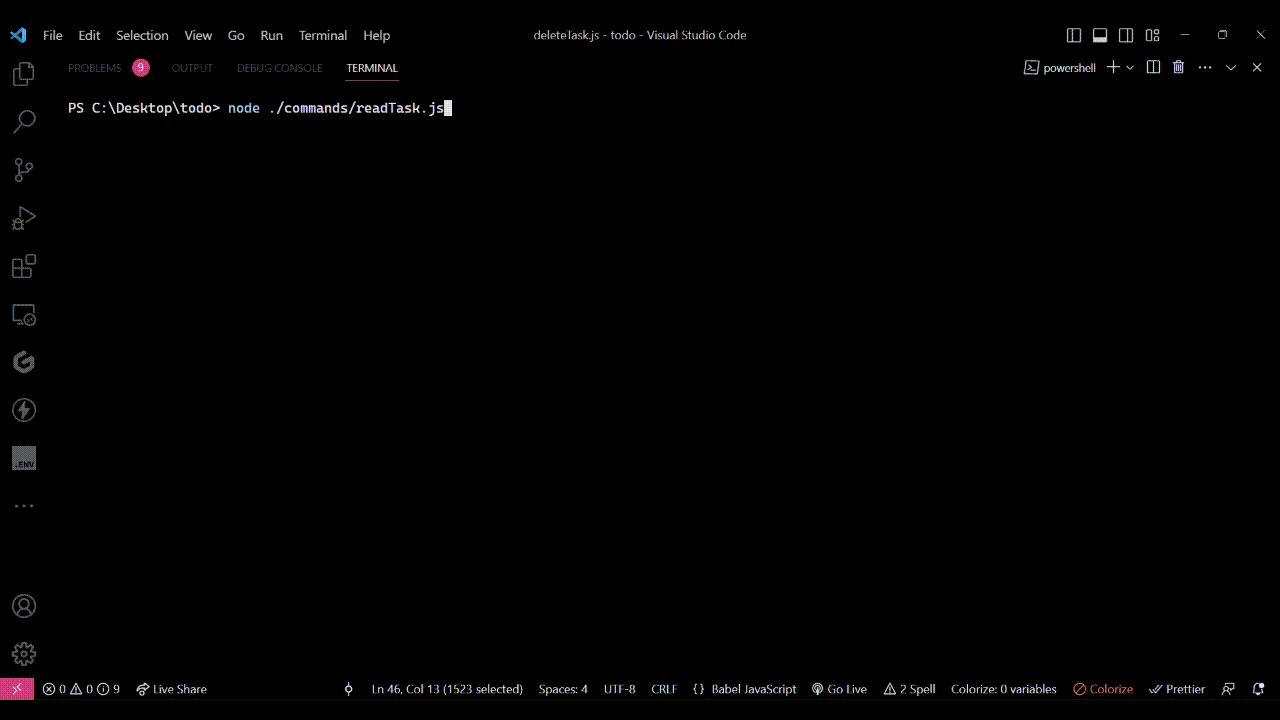 Output seen on terminal when
deleteTask.js file is executed. It shows how the code successfully deletes a single task from the database.
As you can see in the above GIF, the code will prompt you to enter a Todo code for the task you want to delete. Upon deletion, you'll receive a confirmation message in the console. When we read all our tasks after the deletion process, we don't get to see the deleted task. This implies that our code is successful in doing what it is supposed to do!
How to Update Todos
In this section, we will be looking at the code to update a specific todo. Updating a todo is a bit more involved compared to the previous operations. The process unfolds as follows:
- Prompt the user to input the code of the todo to be updated.
- Connect to the database.
- Find the task whose code property matches the user's input.
- If the task doesn't exist, display a message indicating the failure to find a matching todo.
- If the task exists, prompt the user to update the
name,descriptionandstatusof the task. - If the user sets the status property of a task to "completed," then that task is deleted. If set to "pending," the task's name and description are updated in the database.
- Display a success message in the console after the update operation.
Let's start coding! The first thing you need to do is to import all the packages and functions we will need to perform this job.
// Importing packages and functions
import {connectDB, disconnectDB} from '../db/connectDB.js'
import { getTaskCode } from './deleteTask.js'
import inquirer from 'inquirer'
import Todos from '../schema/TodoSchema.js'
import ora from 'ora'
import chalk from 'chalk'
Before we start working on our updateTask() function, we will create a small function in the same file named askUpdateQ(). The role of this function is to prompt the user to enter the updated values of the task like the task name, description, and status. At the end, this function will return the response object.
Here is the code for it:
async function askUpdateQ(todo){
    try {
        // Prompting the user to update the todo data
        const update = await inquirer.prompt([
            {name: 'name', message: 'Update the name?', type: 'input', default: todo.name},
            {name: 'detail', message: 'Update the Description?', type: 'input', default: todo.detail},
            {name: 'status', message: 'Update the status', type: 'list', choices: ['pending', 'completed'], default: todo.status}
        ])

        return update
    } catch (error) {
        console.log('Something went wrong... \n', error)
    }
}
Two things are to be noted here:
todois the original task object (the task which the user wants to update). This will be passed to theaskUpdateQ()function by theupdateTask()function.- Each question object within the array passed to
inquirer.prompt()contains a default property set to the original values of the task. This ensures that if the user skips a question, the default value remains unchanged.
With that said, now let's look at the code for the updateTask() function:
export default async function updateTask(){
    try {
        // Obtaining the task code entered by user by calling getTaskCode() method
        const userCode = await getTaskCode()

        // Connecting to the database
        await connectDB()

        // Starting the spinner
        const spinner = ora('Finding the todo...').start()

        // Finding the todo which the user wants to update
        const todo = await Todos.findOne({code: userCode.code})

        // Stopping the spinner
        spinner.stop()

        // Checking if the todo exists or not
        if(!todo){
            console.log(chalk.redBright('Could not find a Todo with the code you provided.'))
        } else{
            console.log(chalk.blueBright('Type the updated properties. Press Enter if you don\'t want to update the data.'))

            // Get the user's response of the updated data by calling askUpdateQ() method
            const update = await askUpdateQ(todo)

            // If user marked status as completed, we delete the todo else we update the data
            if(update.status === 'completed'){
                // Changing spinner text and starting it again
                spinner.text = 'Deleting the todo...'
                spinner.start()

                // Deleting the todo
                await Todos.deleteOne({_id : todo._id})

                // Stopping the spinner and display the success message
                spinner.stop()
                console.log(chalk.greenBright('Deleted the todo.'))
            } else {
                // Update the todo
                spinner.text = 'Updating the todo'
                spinner.start()
                await Todos.updateOne({_id: todo._id}, update, {runValidators: true})
                spinner.stop()
                console.log(chalk.greenBright('Updated the todo.'))
            }
        }
        // Disconnecting from the database
        await disconnectDB()
    } catch (error) {
        // Error Handling
        console.log('Something went wrong, Error: ', error)
        process.exit(1)
    }
}
Here's a breakdown of the above code:
- Obtain the code of the task which the user wants to update. For this, we are utilizing the
getTaskCode()function defined in the./commands/deleteTask.jsfile. We simply call the function and assign the returned response object to theuserCodevariable. - Connect to the database using
await connectDB(). - Start a spinner to indicate that the code is finding the todo.
- Use
Todos.findOne({ code: userCode.code })to find the task the user wants to update and assign it to thetodovariable. We are doing this because we will need the original values of the task. - Stop the spinner.
- If no matching task is found, display a message using
chalkindicating that the task wasn't found. - If the task is found, prompt the user to input updated properties by calling the
askUpdateQ()function and pass thetodoobject (original task) in the function. Assign the returned object toupdatevariable. - If the user marks the status as "completed," the task is deleted from the database using
deleteOne(). If marked as "pending," the task's name and description are updated usingupdateOne().
updateOne() method takes in 3 parameters – Query Object, Update Object, and the Options object. Here, {_id: todo._id} is the Query Object. Mongoose searches the entire collection for a task whose id property matches with todo_.id. On finding the task, it replaces the task with the update object, that is update in our case. The third parameter, { runValidators: true }, ensures that Mongoose validates the update object against the schema's rules before executing it. If the validation fails, the update will be rejected, and you'll receive an error. If the validation is successful, the document will be updated successfully in the database.
Both in case of the Delete and Update Operation, we change the text of the spinner using spinner.text and start it before performing the operation and once the operation is completed, we stop the spinner.
- Display appropriate success messages in the console based on the operation performed.
- Disconnect from the database using
await disconnectDB().
If I call the updateTask() function and run the code using the command: node ./commands/updateTask.js, I get to see something like this in my console:
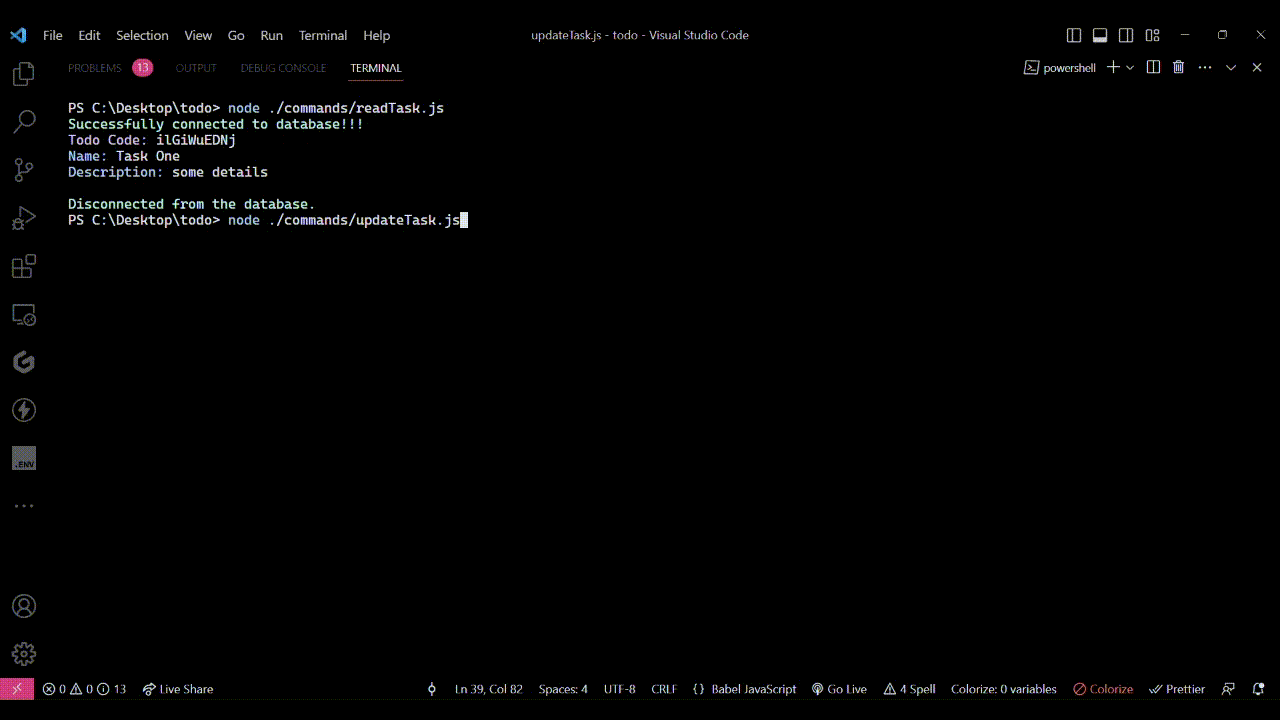 Output seen on terminal when
 updateTask.js file is executed. It shows how the code successfully fetches the original task and successfully replaces it with the updated values provided by the user.
With this, you've successfully implemented all CRUD operations. Now, let's use the commander library to bring everything together and create a fully functional CLI tool.
How to Write the CLI Entry Point using Commander
In the final stages of our project, we're going to leverage the power of the commander library to craft a user-friendly CLI interface. With commander, we can neatly define different commands – such as read, add, update, and delete – in an organized and intuitive manner.
Our code will reside in the index.js file, which serves as the entry point of our application. Below is the complete code:
#!/usr/bin/env node

// Importing the required functions for each command
import addTask from './commands/addTask.js'
import deleteTask from './commands/deleteTask.js'
import readTask from './commands/readTask.js'
import updateTask from './commands/updateTask.js'

// Importing the Command class from Commander.js library
import { Command } from 'commander'

// Creating an instance of the Command class
const program = new Command()

// Setting the name and description of the CLI tool
program
.name('todo')
.description('Your terminal task manager!')
.version('1.0.0')

// Defining a command called 'add'
program
.command('add')
.description('Create a new todo.')
.action(addTask)

// Defining a command called 'read'
program
.command('read')
.description('Reads all the todos.')
.action(readTask)

// Defining a command called 'update'
program
.command('update')
.description('Updates a todo.')
.action(updateTask)

// Defining a command called 'delete'
program
.command('delete')
.description('Deletes a todo.')
.action(deleteTask)

// Parsing the command-line arguments and executing the corresponding actions
program.parse()
- The very first line,
#!/usr/bin/env node, is a "shebang." It informs the system to execute the script using the Node.js interpreter. This enables us to run the script directly from the command line without explicitly typingnodebefore the script filename. - Next, we import all the required functions that contain the logic for each command.
- The line
import { Command } from 'commander'imports theCommandclass from the Commander.js library. The subsequent line,const program = new Command(), creates an instance of theCommandclass. This instance is essential for defining and managing commands for our CLI tool. - We then set the CLI tool's information. The
.name(),.description(), and.version()methods set the name, description, and version of our CLI tool. These details are displayed when users invoke the tool with specific flags such as--helpor--version. - Next, we define the various commands. Each
program.command()block defines a command for our CLI tool. Within each block, the command's name is set using a string argument (for example,'add','read'). The.description()method provides the command's description, while the.action()method associates a function (for example,addTask,readTask) with a specific command. When a user enters a command in the terminal, this associated function is executed. - The
program.parse()line is essential for parsing the command-line arguments provided by the user. Based on the command entered, Commander.js will execute the associated action function.
How to Test the CLI Tool
We're now nearly at the finish line of creating our Task Manager CLI tool! Before we can install and utilize the tool, we just need to make a small adjustment to the package.json file. Simply add the following entry to the JSON file:
"bin": {
  "todo": "index.js"
}
If you've ever built a CLI tool and wish for users to access it from the command line in a manner similar to commands like node or npm, then the "bin" property comes into play.
The "bin" property in the package.json file enables you to specify commands that become globally accessible once your package is installed. In simpler terms, it lets you create shortcuts for running specific scripts or functions from the command line.
The provided code instructs Node.js to execute the script defined in index.js whenever someone enters todo in the terminal. In essence, this transforms your script into a globally accessible command-line tool.
The final step before you can start using the tool is to install it globally on your system! Run the following command to do so:
npm i -g .
Conclusion
Congratulations if you've followed along this far! You're now fully equipped to begin using your Task Manager CLI tool.
Here are the commands you can use to operate the tool:
todo add– Create a new tasktodo read– Read all your pending taskstodo update– Update a specific tasktodo delete– Delete a task
You can also use these 2 options using the tool:
todo --versionortodo -V– To know the version number of this tooltodo --helportodo -h– To display help for command
And that wraps up this handbook. I hope you've found it enjoyable and informative.
I encourage you to share your learning journey on Twitter and LinkedIn using the hashtag #LearnInPublic. Also, be sure to follow freeCodeCamp for more informative coding tutorials.
If you are facing any issues while following along with this tutorial, you can always refer to the entire code available on GitHub - Task Manager CLI GitHub Repo. You can also connect with me on Twitter (X) - @Krish4856. My DM's are open!
See you next time! 👋 ❤️ ✨