
Hi everyone! In this article you're going to learn about CI/CD (continuous integration and continuous deployment).
We're going to review what this practice is about, how it compares to the previous approach in the software development industry, and finally see a practical example of how we can implement it in our projects.
Let's go!
Table of Contents
Intro
Continuous Integration and Continuous Delivery (CI/CD) is a software development approach that aims to improve the speed, efficiency, and reliability of software delivery. This approach involves frequent code integration, automated testing, and continuous deployment of software changes to production.
Before the adoption of CI/CD in the software development industry, the common approach was a traditional, waterfall model of software development.
In this approach, developers worked in silos, with each stage of the software development life cycle completed in sequence. The process typically involved gathering requirements, designing the software, coding, testing, and deployment.
The disadvantages of this traditional approach include:
Slow Release Cycles: Since each stage of the software development life cycle was completed in sequence, the release cycle was slow, which made it difficult to respond quickly to changing customer needs.
High Failure Rates: Software projects were prone to failure due to a lack of automated testing, which meant that developers had to rely on manual testing, leading to errors and bugs in the code.
Limited Collaboration: The traditional approach did not encourage collaboration between developers, testers, and other stakeholders, which made it difficult to identify and fix issues.
High Cost: The manual nature of software development meant that it was expensive, with high costs associated with testing, debugging, and fixing errors.
Limited Agility: Since the traditional approach was linear, it was not possible to make changes to the software quickly or respond to customer needs in real-time.
CI/CD emerged as a solution to these disadvantages, by introducing a more agile and collaborative approach to software development. CI/CD enables teams to work together, integrating their code changes frequently, and automating the testing and deployment process.
How CI/CD Works
CI/CD is an automated process that involves frequent code integration, automated testing, and continuous deployment of software changes to production.
Let's explain each step in a little more detail:
Code Integration
The first step in the CI/CD pipeline is code integration. In this step, developers commit their code changes to a remote repository (like GitHub, GitLab or BitBucket), where the code is integrated with the main codebase.
This step aims to ensure that the code changes are compatible with the rest of the codebase and do not break the build.
Automated Testing
Once the code is integrated, the next step is automated testing. Automated testing involves running a suite of tests to ensure that the code changes are functional, meet the expected quality standards, and are free of defects.
This step helps identify issues early in the development process, allowing developers to fix them quickly and efficiently.
If you're not familiar with the topic of testing, you can refer to this article I wrote a while ago.
Continuous Deployment
After the code changes pass the automated testing step, the next step is continuous deployment. In this step, the code changes are automatically deployed to a staging environment for further testing.
This step aims to ensure that the software is continuously updated with the latest code changes, delivering new features and functionality to users quickly and efficiently.
Production Deployment
The final step in the CI/CD pipeline is production deployment. In this step, the software changes are released to end-users. This step involves monitoring the production environment, ensuring that the software is running smoothly, and identifying and fixing any issues that arise.
The four steps of a CI/CD pipeline work together to ensure that software changes are tested, integrated, and deployed to production automatically. This automation helps to reduce errors, increase efficiency, and improve the overall quality of the software.
By adopting a CI/CD pipeline, development teams can achieve faster release cycles, reduce the risk of software defects, and improve the user experience.
Keep in mind that the pipeline stages might look different given the specific project or company we're talking about. Meaning, some teams might or might not use automated testing, some teams might or might not have a "staging" environment, and so on.
The key parts that make up the CI/CD practice are integration and deployment. This means that the code has to be continually integrated in a remote repository, and that this code has to be continually deployed to a given environment after each integration.
The Key Benefits of CI/CD
The key benefits of CI/CD include:
Faster Release Cycles: By automating the testing and deployment process, CI/CD enables teams to release software more frequently, responding quickly to customer needs.
Improved Quality: Automated testing ensures that software changes do not introduce new bugs or issues, improving the overall quality of the software.
Increased Collaboration: Frequent code integration and testing require developers to work closely together, leading to better collaboration and communication.
Reduced Risk: Continuous deployment allows developers to identify and fix issues quickly, reducing the risk of major failures and downtime.
Cost-Effective: CI/CD reduces the amount of manual work required to deploy software changes, saving time and reducing costs.
In summary, CI/CD emerged as a solution to the limitations of the traditional, linear approach to software development. By introducing a more agile and collaborative approach to software development, CI/CD enables teams to work together, release software more frequently, and respond quickly to customer needs.
Tools for CI/CD
There are several tools available for implementing CI/CD pipelines in software development. Each tool has its unique features, pros, and cons. Here are some of the most commonly used tools in CI/CD pipelines today:
Jenkins
Jenkins is an open-source automation server that is widely used in CI/CD pipelines. It is highly customizable and supports a wide range of plugins, making it suitable for various development environments. Some of its key features include:
Pros:
Highly customizable with a wide range of plugins
Supports integration with various tools and technologies
Provides detailed reporting and analytics
Cons:
Requires some technical expertise to set up and maintain
Can be resource-intensive, especially for large projects
Lack of a centralized dashboard for managing multiple projects
If you want to learn more about Jenkins, here's a full course for you.
Travis CI
Travis CI is a cloud-based CI/CD platform that provides automated testing and deployment for software projects. It supports several programming languages and frameworks, making it suitable for various development environments. Some of its key features include:
Pros:
Easy to set up and use
Cloud-based, so there's no need to set up and maintain infrastructure
Supports a wide range of programming languages and frameworks
Provides detailed reporting and analytics
Cons:
Limited customization options
Not suitable for large projects with complex requirements
Limited support for on-premise installations
Here's a helpful tutorial about how to automate deployment on GitHub Pages with Travis CI.
GitHub actions
GitHub Actions is a powerful CI/CD tool that allows developers to automate workflows, run tests, and deploy code directly from their GitHub repositories.
Pros:
Integrated with GitHub
Easy to use
Provides large ecosystem and good documentation
Cons:
Limited build minutes
Complex YAML syntax
Side comment: I mention GitHub actions here because it's a popular tool – but keep in mind that other online repository providers like GitLab and BitBucket also provide very similar options to GitHub actions.
Built-in CI/CD features by hosts
Popular hosts such as Vercel or Netlify have built-in in CI/CD features that allow you to link an online repository to a given site, and deploy to that site after a given event occurs in that repo.
Pros:
- Very simple to set up and use
Cons:
- Limited customization options
Each of these tools has its unique features, pros, and cons. The choice of tool will depend on the specific requirements of your project, your team's technical expertise, and your budget.
Here's a tutorial about how to deploy a front-end app with Netlify. And in this tutorial, you'll learn how to use Vercel to deploy a Next.js app.
How to Set Up a CI/CD Pipeline with GitHub Actions
Cool, so now that we have a clear idea of what CI/CD is, let's see how we can implement a simple example with an actual project using GitHub actions.
Initializing the Project
We'll start with a very basic React app built with Vite. You can do that by running yarn create vite in your console.
We'll focus on the CI/CD pipeline here, so there will be no complexity in the actual app code. But just to have an idea, the app.jsx component will have this code:
import './App.css';

function App() {

    return (
        <div className='App'>
            <h1>Vite + Reactooooo</h1>
        </div>
    );
}

export default App;
And then we'll have a test file that will check for that text to render:
import { describe, expect, it } from 'vitest';
import { render, screen } from './utils/test-utils/test-utils.jsx';

import App from 'src/App.jsx';

describe('App', async () => {
    it('should render while authenticating', () => {
        render(<App />);

        expect(screen.getByText('Vite + Reactooooo')).toBeInTheDocument();
    });
});
This test will run each time we run the yarn test command.
Next step should be to push our code to a GitHub repo. Then, let's talk a bit more about what GitHub actions are and how they work.
What are GitHub Actions and How Do They Work?
GitHub Actions is a CI/CD (Continuous Integration/Continuous Deployment) service provided by GitHub. It allows developers to automate workflows by defining custom scripts, known as "actions", that can be triggered by events such as pushes to a repository, pull requests, or issues.
Actions are defined in a YAML file, also known as a "workflow", which specifies the steps required to complete a task. GitHub Actions workflows can run on Linux, Windows, and macOS environments and support a wide range of programming languages and frameworks.
When an event triggers a GitHub Actions workflow, the service creates a fresh environment, installs dependencies, and runs the defined steps in the order specified. This can include tasks such as building, testing, packaging, and deploying code.
GitHub Actions also provides several built-in actions that can be used to simplify common tasks, such as checking out code, building and testing applications, publishing releases, and deploying to popular cloud providers like AWS, Azure, and Google Cloud.
GitHub Actions workflows can be run on a schedule, manually, or automatically when a specific event occurs, such as a pull request being opened or a new commit being pushed to a branch.
Setting Up Our Workflow
Great, so as we've seen, basically GitHub actions are a feature that allows us to define workflows four our projects. These workflows are nothing but a series of tasks or steps that will execute on GitHub's cloud after a given event we declare.
The way GitHub reads and executes these workflows is by automatically reading files within the .github/workflows directory in the root of our project. These workflow files should have the .yaml extension and use the YAML syntax.
To create a new workflow we just have to create a new YAML file within that directory. We'll call ours prod.yaml since we'll use it to deploy the production branch of our project.
Keep in mind a single project can have many different workflows that run different tasks on different occasions. For example, we could have a workflow for dev and staging branches as well, as those environments could require different tasks to execute and will probably deploy on different sites.
After creating this file, let's drop the following code in it:
# Name of our workflow
name: Production deploy

# Trigger the workflow on push to the main branch
on:
  push:
    branches:
      - main

# List of jobs
# A "job" is a set of steps that are executed on the same runner
jobs:
  # Name of the job
  test-and-deploy-to-netlify:
    # Operating system to run on
    runs-on: ubuntu-latest

    # List of steps that make up the job
    steps:
    # Checks-out your repository under $GITHUB_WORKSPACE, so your job can access it
    - name: Checkout code
      uses: actions/checkout@v2

    # Setup Node.js environment
    - name: Use Node.js 16.x
      uses: actions/setup-node@v2
      with:
        node-version: '16.x'

    # Install dependencies
    - name: Install dependencies
      run: yarn install

    # Run tests
    - name: Run tests
      run: yarn test

    # Deploy to Netlify
    - name: Netlify Deploy
      uses: jsmrcaga/action-netlify-deploy@v2.0.0
      with:
        # Auth token to use with netlify
        NETLIFY_AUTH_TOKEN: ${{ secrets.NETLIFY_AUTH_TOKEN }}
        # Your Netlify site id
        NETLIFY_SITE_ID:  ${{ secrets.NETLIFY_SITE_ID }}
        # Directory where built files are stored
        build_directory: './dist'
        # Command to install dependencies
        install_command: yarn install
        # Command to build static website
        build_command: yarn build
So our workflow has the following tasks declared:
"Checkout code" step that checks out the latest commit on the current branch.
"Use Node.js 16.x" step that sets up the Node.js environment to version 16.x.
"Install dependencies" step that installs the project dependencies using the Yarn package manager.
"Run tests" step that runs the project's tests using the Yarn package manager.
"Netlify Deploy" step that deploys the project to Netlify using the jsmrcaga/action-netlify-deploy action. This step uses the Netlify authentication token and site ID secrets stored in the GitHub repository's secrets. The build directory, install command, and build command are also specified.
You probably noticed the first and last steps have the keyword uses. This keyword allows you to use actions or workflows developed by other GitHub users, and it's one of the best features of GitHub actions.
What's great is that by using this third party actions we can execute complex tasks such as deploying to an external host or building complex cloud infrastructure without the need to write every single line of necessary code.
As these tasks tend to be repetitive and frequently executed in many projects, we can just use a workflow developed by an official company account (such as Azure or AWS for example) or an independent open-source developer. Think about it as using a third party library. It's the same idea but taken to CI/CD workflows. Very convenient.
Another important thing to mention here is that in GitHub actions workflows tasks run sequentially, one after the other. And if a given task fails or throws and error, the next one won't execute. This is important because if we have a problem when installing our dependencies or a test fails, we don't want that code to be deployed.
Before we can push this code and see how the magic works, we first need to create a site on Netlify and get the NETLIFY_AUTH_TOKEN and NETLIFY_SITE_ID. This is quite straight forward even if you don't have previous experience with Netlify, so give it a try and Google a bit if you can't figure it out. ;)
Once you have these two tokens, you need to declare them as repository secrets in your GitHub repo. You can do this from the "settings" tab:

Configure both Netlify secret tokens in your repo
With this in place, now our prod.yaml file will be able to read these two tokens and execute the Netlify deploy action.
The Magic
Now that we have everything in place, let's push our code and see how it goes.
After pushing, if we go to the "actions" tabs of our repo, on the left we'll see a list of all the workflows we have in our repo. And on the right we'll see a list of each execution of the selected workflow. Since our workflow executes after each push, we should see a new execution each time we push.

A workflow execution
When the execution has a yellow light to the left of it, it means it's still running (executing tasks). If it has a green light it means it finished executing successfully and if the light is red, you know something went wrong, haha...
After clicking on the execution we can see a list of the workflow's jobs (we only had a single one).
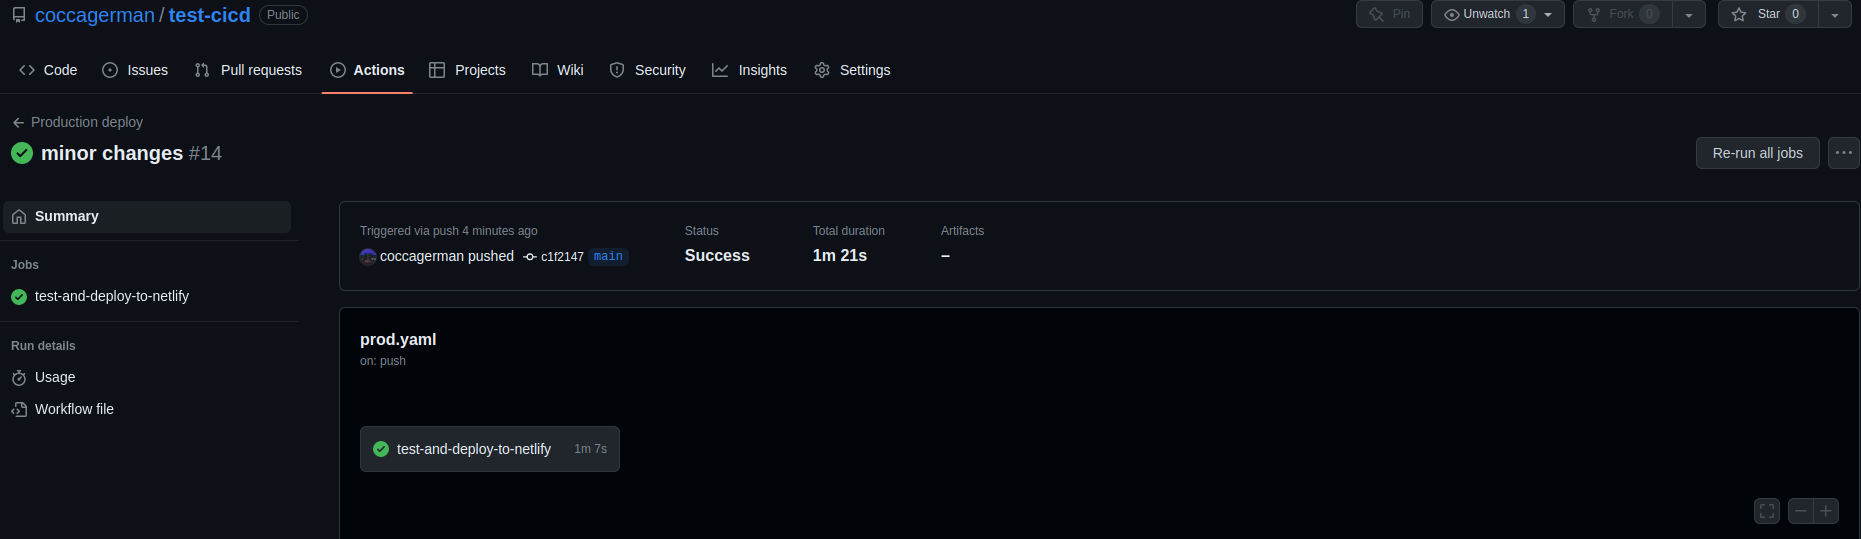
The workflow's jobs
And after clicking on the job we can see a list of the job's tasks.

The tasks of the job
Each task is expansible and within it we can see logs corresponding to that task's execution. This is quite useful for debugging purposes. ;)
Now if we go to our previously set up Netlify site, we should see our app up and running!
And now that we have our CI/CD pipeline in place, we can deploy our app after each push to the main branch, all without lifting another finger. =D
Wrapping Up
CI/CD is a software development approach that provides several benefits to software development teams, including faster time-to-market, improved quality, increased collaboration, reduced risk, and cost-effectiveness.
By automating the software delivery pipeline, teams can quickly deploy new features and bug fixes, while reducing the risk of major failures and downtime.
With the availability of several CI/CD tools, it has become easier for teams to implement this approach and improve their software delivery process.
Well everyone, as always, I hope you enjoyed the article and learned something new.
If you want, you can also follow me on LinkedIn or Twitter. See you in the next one!