

Welcome to the world of Wi-Fi hacking, everybody. 💻.
In my previous article, we talked about some basic Linux skills and tricks. In this article you are going to learn a basic Wi-Fi hacking procedure using those skills.
You'll learn things such as how to:
- Monitor Wi-Fi networks around you
- Perform a DOS attack
- Protect yourself against Wi-Fi attacks
Disclaimer: This is strictly for educational purposes only (and, of course, for a little fun). Do not under any circumstances, conditions, or influence of unwise friends use the hacks you learn here on organisations, individuals, or your probably annoying neighbour. You would be committing a crime and you'll either be fined, sent to jail, or just get your parents embarrassed.
And now that we have that lovely introduction out of the way, let’s proceed.🙃
What We'll Cover:
Here's a basic rundown of what this tutorial contains:
- Introduction
- What is a Packet?
- How to Crack WPA2
- Prerequisites
- How to put the network card into monitor mode
- How to look for the target
- How to capture the handshake packets
- How to perform a DOS attack
- How to obtain the password (hopefully)
- Mitigations Against WiFi Attacks
- Conclusion
Introduction
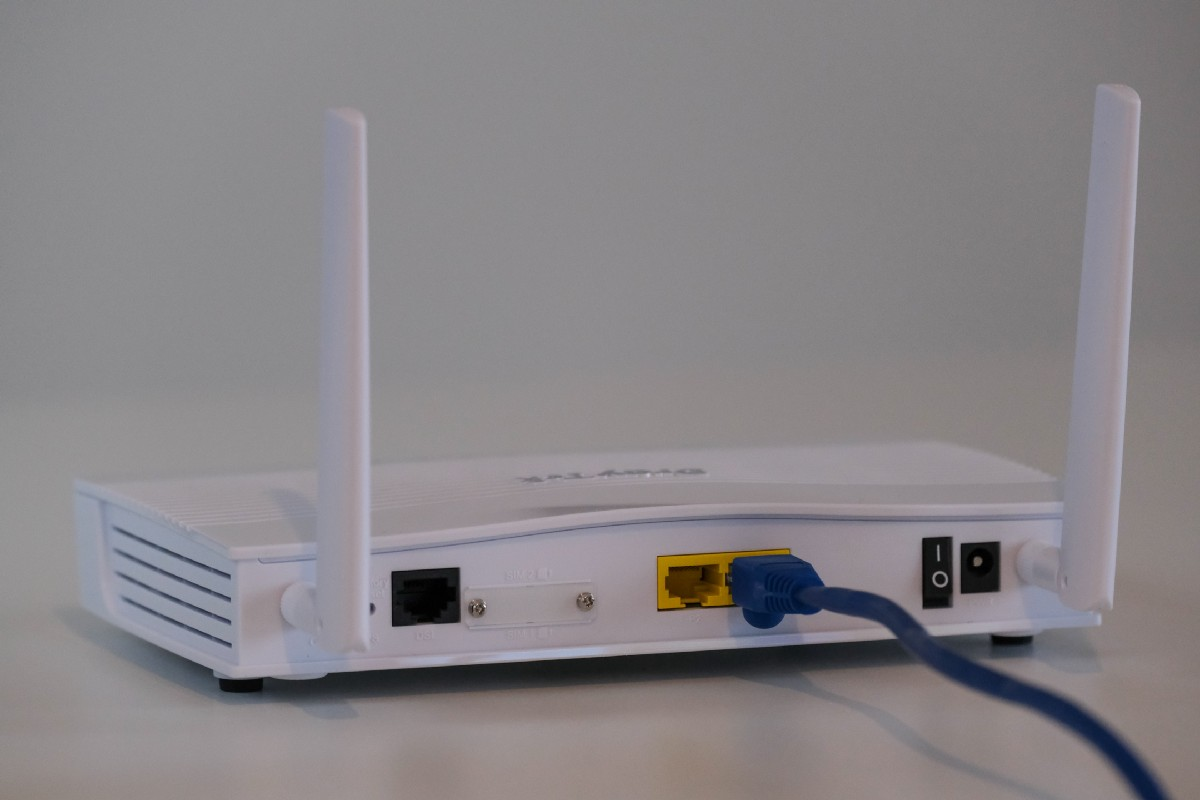 A router ¦ Credit: Unsplash.com
Wireless Fidelity (Wi-Fi) is a common technology many of us use in our daily lives. Wether it's at school, home, or simply bingeing Netflix, it’s increasingly rare to see anyone carry out Internet related activities without it.
But have you ever tried to hack Wi-Fi? 🤔 (I’m sure you’ve been tempted 😏).
In order to hack something, you need to know how it works. This means you need to understand how the tech works in the first place. So let’s start from the basics: The Packet.
What is a Packet?
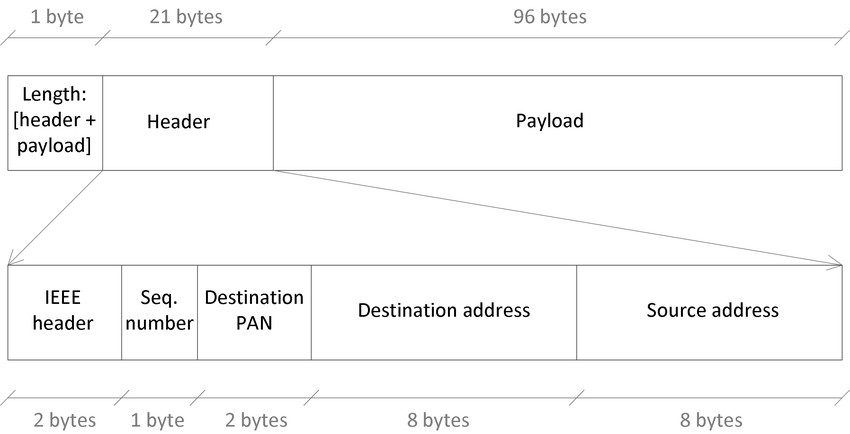 A Basic Packet. Credit: ResearchGate.com
A Packet is the basic unit/building block of data in a computer network. When data is transferred from one computer to another, it is broken down and sent in packets.
Think of packets like Lego building blocks. You (the computer) receive the complete set (the complete data) in pieces (packets) from the seller (another computer). You will then assemble the blocks together to build up the figure based on the instructions given in order to enjoy it (or in this case, for the whole data to make sense).
A packet, also known as a datagram, is made up of two basic parts:
- A Header
- The Payload/Data
The Header contains information about the packet. This helps the network and the receiving computer know what to do with it, such as the source and destination IP addresses.
The Payload is the main content the packet contains. It’s also worth mentioning that packets can be encrypted so that their data can't be read if gotten by an attacker.
In a network, packets are a requirement for packet switching. Packet switching means breaking down data into packets and sending them to various computers using different routes. When received, the computers can then assemble these packets to make sense of it all. The Internet is the largest known packet switching network on earth.
Now let's see how we can apply this knowledge to wireless networks.
How to Crack WPA2
 A bunch of random code. Credit: Unsplash.com
Wi-Fi can use a number of various protocols to give you a secure internet connection. From the least to most secure, they are:
- Open
- WEP (Wired Equivalent Privacy)
- WPA2 (Wi-Fi Protected Access 2)
- WPA3 (Wi-Fi Protected Access 3)
An open network is pretty much as the name implies – open. It has no password and practically anyone can connect to it.
WEP is an old protocol, rarely in use and requires a password like its successors.
WPA2 is the most commonly used protocol around the world. WPA3 is a newest and the most secure protocol known till date. But it is rarely used and only available on newer devices.
Prerequisites
Wi-Fi works by constantly sending packets of data to your authenticated device. In order to hack it, you’ll need:
- A Linux machine (Preferably Kali Linux)
- A wireless adapter
To install Kali from scratch, you can follow this tutorial.
If you haven’t already, you’ll need to install a tool called Aircrack-ng on your machine. To install it, just type in the command below.
sudo apt install aircrack-ng
How to Put the Network Card into Monitor Mode
You first want to get information about the target. This is what hackers call reconnaissance.
In order to do that you need to first change your wireless card from ‘managed’ mode to ‘monitor’ mode. This will turn it from a mere network card to a wireless network reader.
First you need to find out the name of your wireless card. Plug in your adapter and run the iwconfig command to find out. It’s usually the last one on the list.
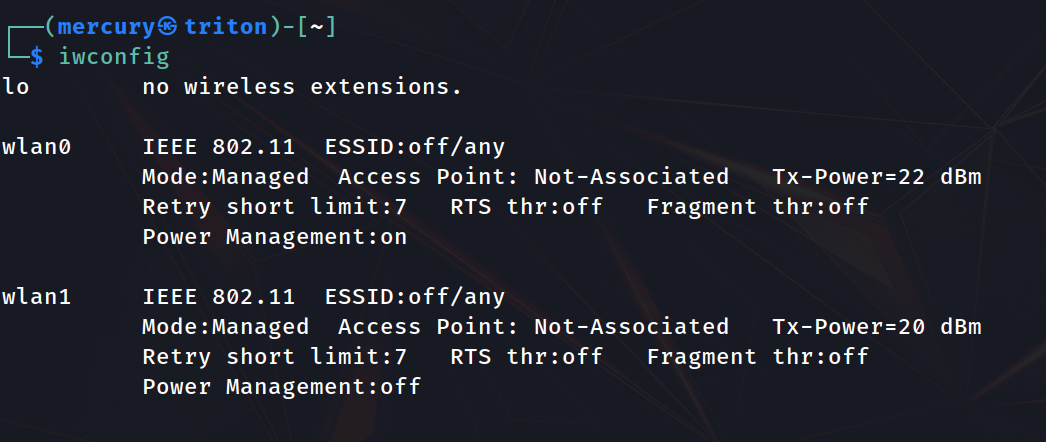 iwconfig. Credit: Daniel Iwugo
As you can see, mine is wlan1. Now run the following commands:
sudo airmon-ng check rfkillsudo
airmon-ng start <network interface>
sudo indicates the need for root privileges, check rfkill stops processes that could hinder the card from going into monitor mode, and start tells airmon-ng which network card to execute on. Replace the <network interface> with the name of your wireless card.
airmon-ng is a script that instantly changes your card to monitor mode. You actually can do this manually or make a script of your own but I personally prefer something rather simple.
How to Look for the Target
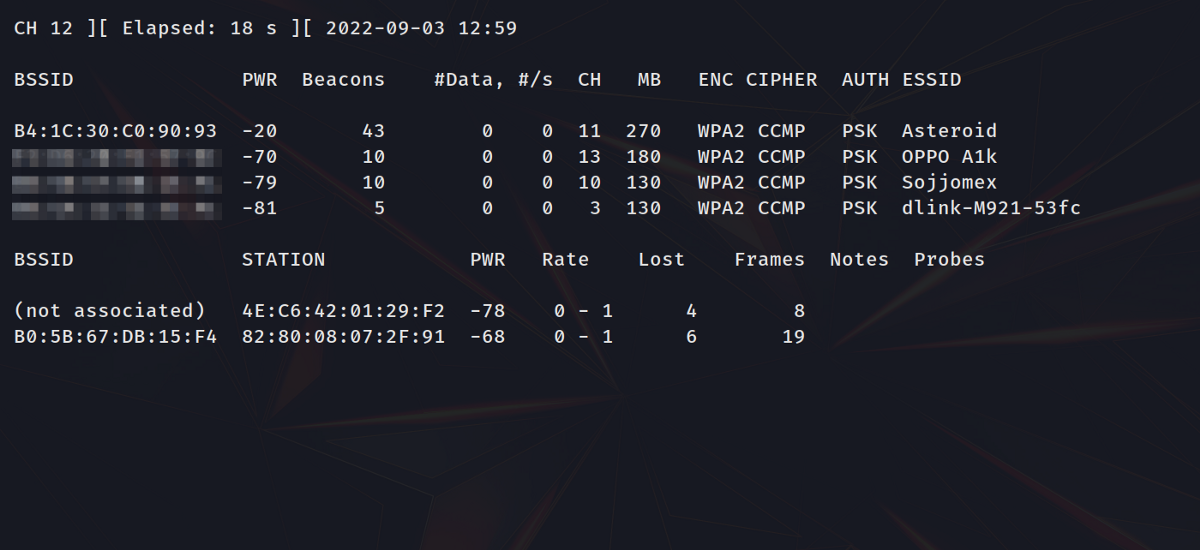
To see what networks are around you, run the following command:
sudo airodump-ng <network interface>
 Airodump. Credit: Daniel Iwugo
airodump-ng is a part of the aircrack-ng suite that allows a network card to view the wireless traffic around it.
As you can see we get a lot of information. But let's take a quick look at the ESSID (Extended Service Set Identifier) column. Also known as the AP (Access Point) name, this column shows the name of the target network, which in my case will be ‘Asteroid’.
You want to concentrate on the target AP and ignore the rest. To do this, press Ctrl+C to cancel the current scan and this time, append the bssid of the network with the bssid flag as shown below.
sudo airodump-ng <network interface> --bssid <AP>
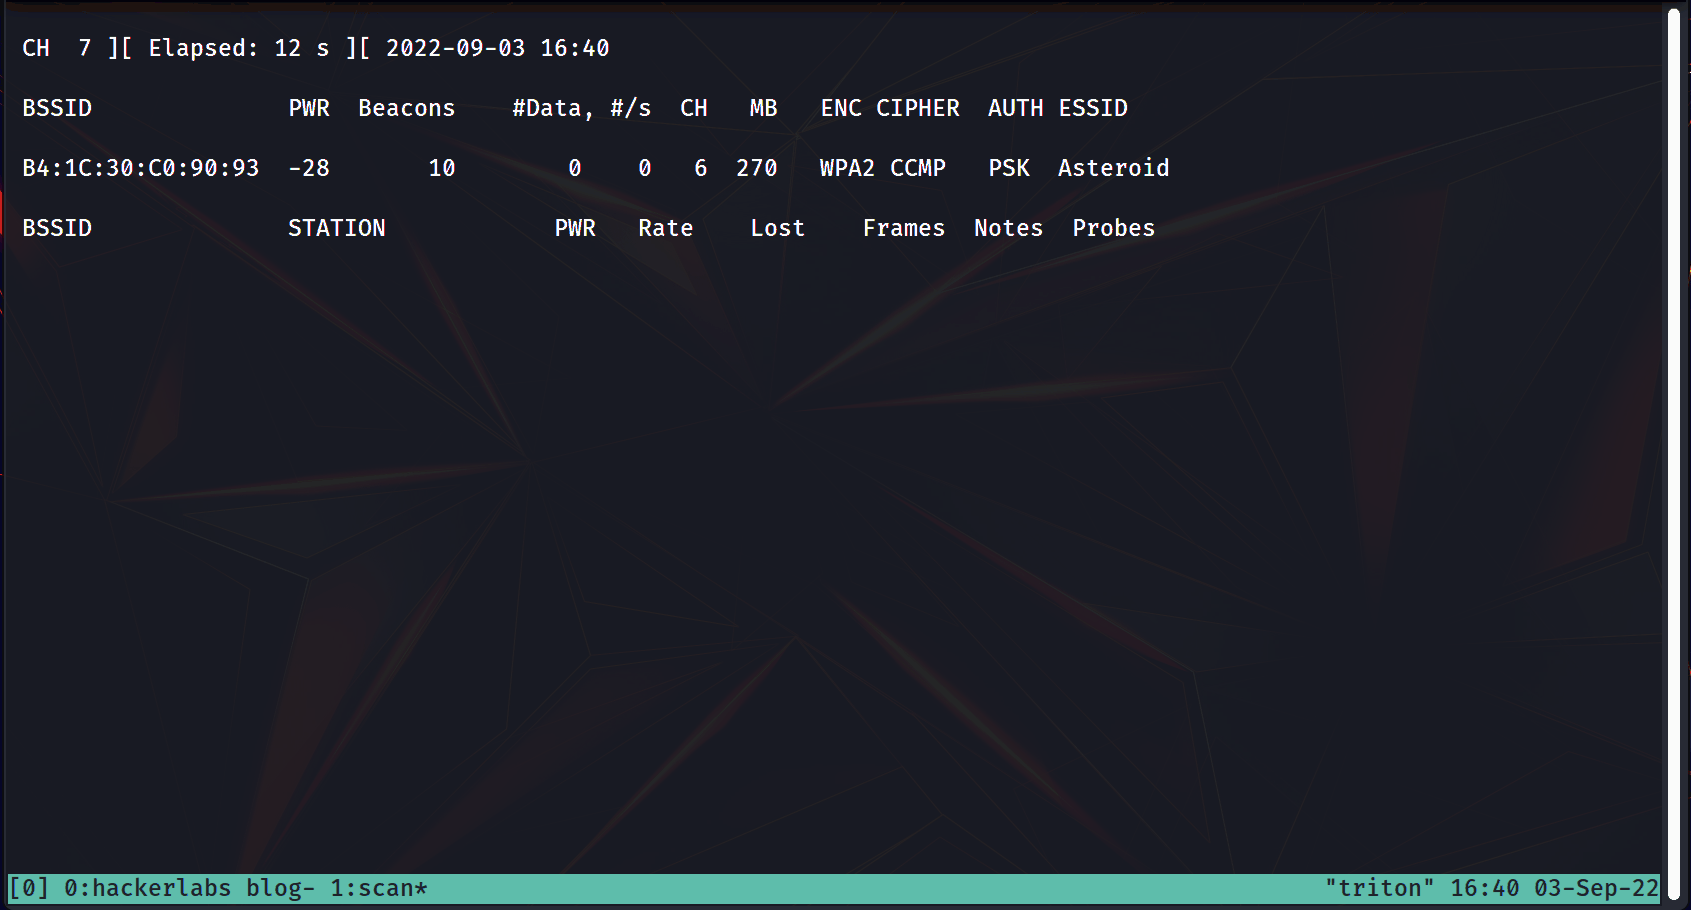 Airodump in action. Credit: Daniel Iwugo
The BSSID stands for Basic Service Set Identifier, a fancy name for the MAC address of the device. You use it to identify the device on a network, along with the ESSID (Name of the AP). Technically, you could just use the ESSID flag instead but different APs could have the same name. However, no two APs can ever have the same BSSID.
Below is a code snippet of what you would type to get info about the AP using the ESSID only.
sudo airodump-ng <network interface> --bssid <AP ESSID>
Note: If the name has a space, enclose it with quotes. For example, --bssid “Asteroid 1” .
You’ll notice I highlighted the MAC address of a client connected to the AP under the ‘Station’ column. To its left is the MAC address of the AP it is connected to.
How to Capture the Handshake Packets
The next step is to capture the handshake packets (Remember packets? 👀). Handshake packets are the first four packets sent from the AP when an authenticated device connects to an AP.
This means we have two options:
- Wait for a device to connect to the AP
- De-authenticate the device and then let it connect to the AP
The second one sounds a lot more fun so let’s go for it.
 An LED keyboard. Credit: Unsplash.com
How to Perform a DOS Attack
You can use aireplay-ng or mdk4 to disconnect devices from APs for a time. This is called a de-authentication attack or a wireless DOS (Denial-Of-Service) attack.
Now here’s the game plan:
- Setup airodump-ng to capture packets and save them
- De-authenticate the device for some time while airodump-ng is running
- Capture the handshake
Got all that? Good. Let’s roll. 👨💻👩💻
First, run the command to capture and save packets:
sudo airodump-ng -c <channel number> --bssid <AP BSSID> <network interface> -w <path for saved packets file>
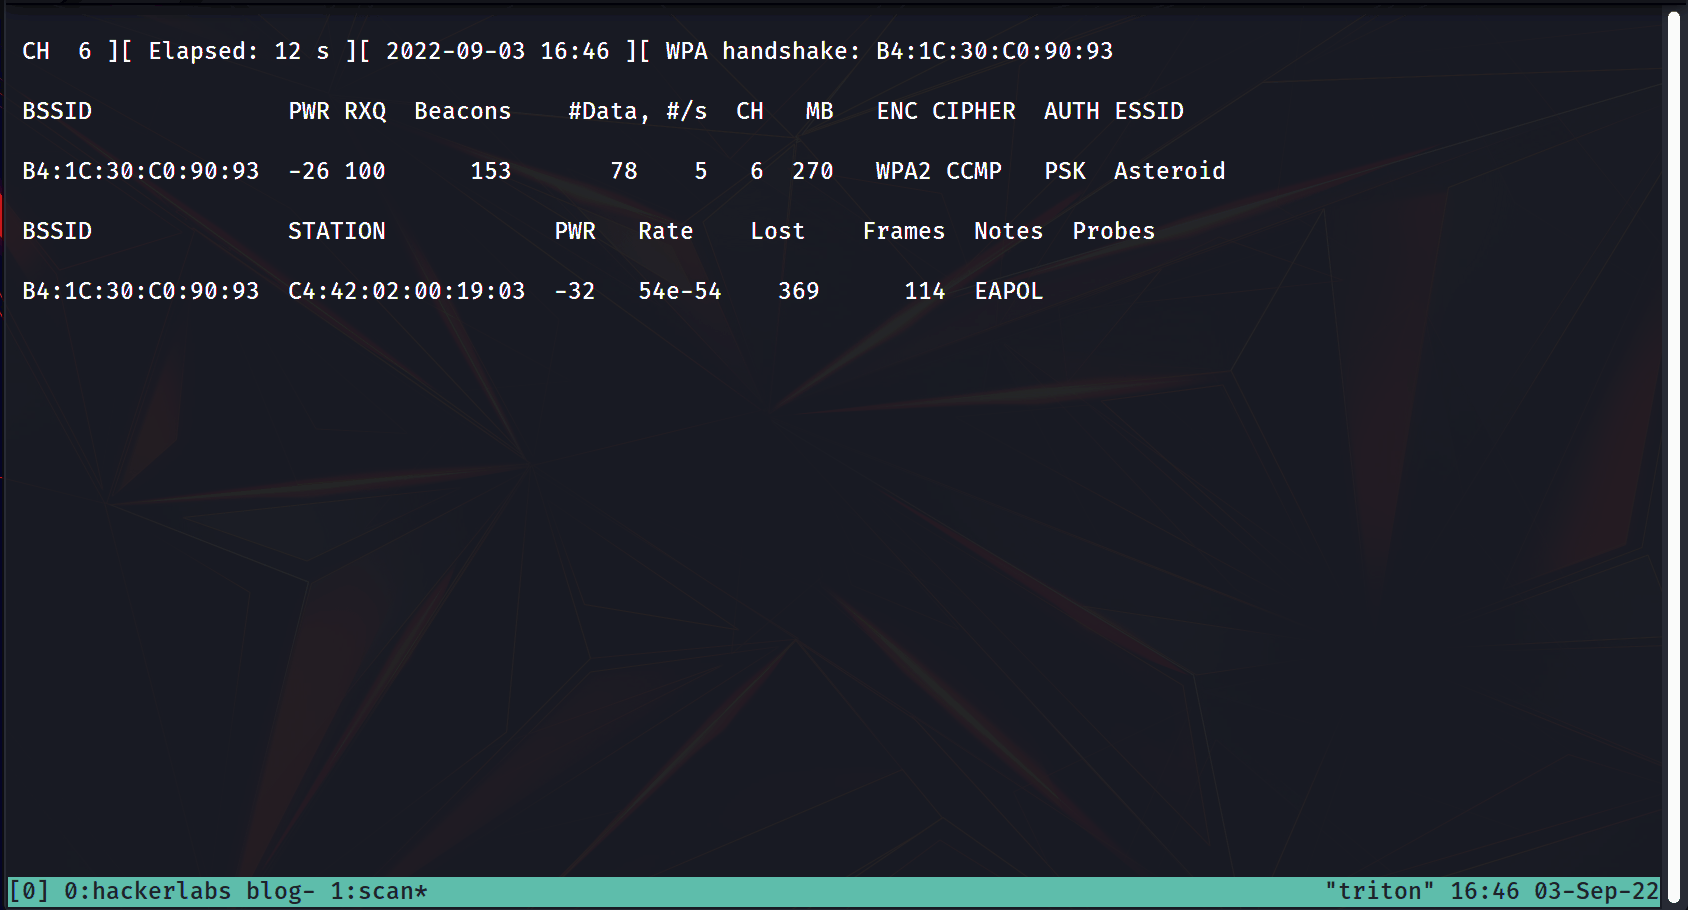 Airodump capturing packets. Credit: Daniel Iwugo
Here, we're using the -c flag to specify the channel to search, the --bssid flag for the MAC address of the AP, and the -w flag to give a path you want to save the captured packets to.
Quick lesson: Channels reduce the chances of APs interfering with each other. When running airodump-ng, you can identify the channel number under the CH column.
While that is running, you’re going to run your de-authentication attack against the device connected to it using the command:
sudo aireplay-ng -a <BSSID of the AP> --deauth <time> <network interface>
The -a flag specifies the MAC address of the AP, --deauth specifies how long you want the attack to run in seconds, followed up by the network card.
A de-authentication attack involves using your own network card to send packets to interrupt communication between the AP and the client. It’s not perfect and sometimes the client may connect back, but only for a short time.
If your Wi-Fi is acting crazy and you seem to be disconnecting and connecting randomly back to it, you may be experiencing a de-authentication attack.
In the command above, you’re targeting the AP and running the attack. Note that you can instead attack any device connected to the AP and you should get the same result. All you need to do is to change the -a flag to the MAC address of any device connected.
While the DOS attack is underway, check on your airodump scan. You should see at the right top : WPA handshake: <mac address>. Once you have verified that, you can stop the replay attack and the airodump-ng scan.
 Carrying out the replay attack to get the handshake. Credit: Daniel Iwugo
How to Obtain the Password (Hopefully)
In the final steps, you are going to run a bunch of generated Pairwise Master Keys (PMKs) against the captured packets to get the password. Let me break it down.
A PMK is basically an algorithmic combination of a word and the APs name. Our intention is to continuously generate PMKs using a wordlist against the handshake. If the PMK is valid, the word used to generate it is the password. If the PMK is not valid, it skips to the next word on the list.
I’m going to use the rockyou wordlist located in the /usr/share/wordlists directory. I think this is only found in Kali so if you have a different OS, you might make one of your own manually or generate one using crunch.
If it isn’t already extracted, just run the command:
sudo gunzip /usr/share/wordlists/rockyou.txt.gz
Quick history lesson: The rockyou wordlist is a bunch of passwords gotten from one of the most infamous cybersecurity data breaches that affected a company of the same name. It contains approximately 14 million unique passwords that were used in over 32 million accounts and as such, is one of the most dependable wordlists on the planet.
Now run the command:
sudo aircrack-ng <captured file with .cap> -w <path to wordlist>
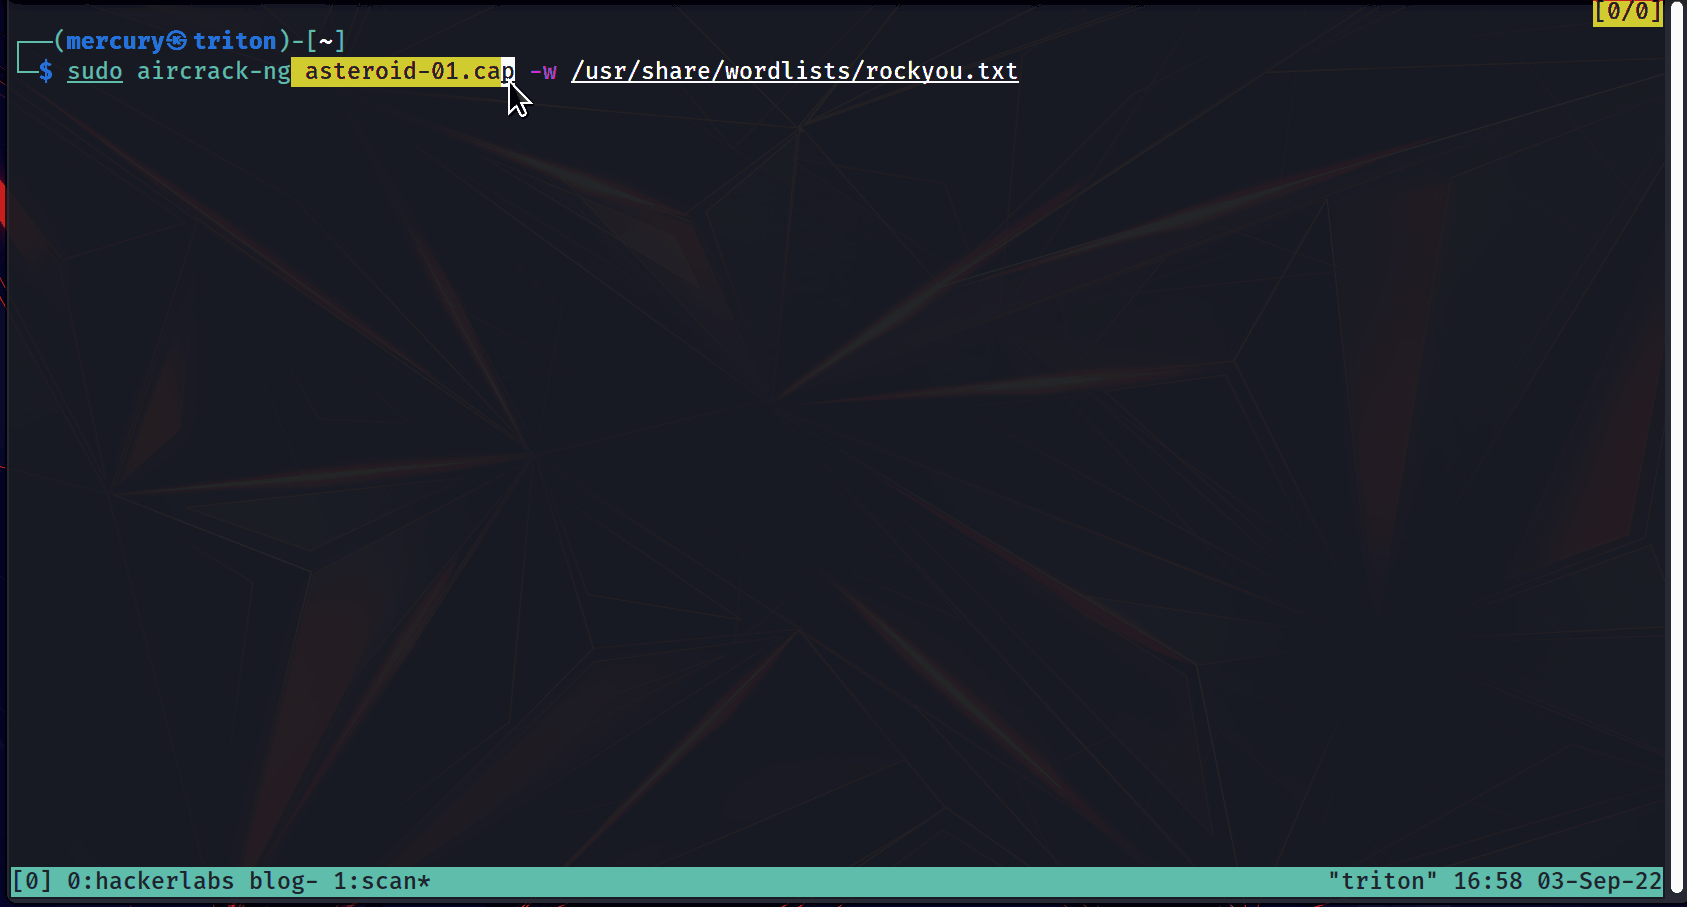 Password cracking. Credit: Mercury
Alright, everyone – mission accomplished 😎.
The password was, well… ‘password’. Pretty disappointing from a security perspective, but I set this network up just for fun for the purposes of this tutorial. In reality, this could take minutes to hours depending on the length and strength of the password.
To clean up, simply remove the file captures, close your terminals, and run the command service NetworkManager restart to change your network card back to managed mode so you can connect to the Wi-Fi.
Mitigations Against WiFi Attacks
 A basic personal workspace setup ¦ Credit: Wallpaperflare.com
Basic Wi-Fi security should cover this attack from a defensive perspective. Using WPA3 which is a newer protocol is your best bet against such an attack. To mitigate against de-authentication attacks, use an ethernet connection if possible.
Assuming that option is not on the table, you can use a strong passphrase (not a password) to minimise the attackers chances of getting it. A passphrase is a string of words simply used as a password. Passphrases tend to be longer than passwords, easier to remember, and are a rarer practice. Therefore, they will hardly be found in wordlists.
For example, ‘mercury’ is more likely to be found in a wordlist than ‘mercurylovespluto’. The later is a 15-character passphrase and as simple as it is, it would be hard for an attacker to find, guess, or generate.
Another mitigation would be to disable WPS (Wi-Fi Protected Setup) and avoid under any circumstance using a router that uses the WEP protocol. You’d just be asking for unwanted attention as it’s a lot easier to hack both of these than WPA2.
Conclusion
Let’s summarise what you’ve learned:
- Change the wireless adaptor to monitor mode using airmon-ng
- Scan for the target AP using airodump-ng and capture the packets
- Perform a DOS attack on the AP to get the handshake packets
- End the DOS once you have verified you captured the necessary packet
- Use aircrack-ng to generate PMKs to run against the handshake packets
Sometimes, the password may not be in the wordlist. In that case, there are many other ways to get the password such as an Evil Twin Attack or variations of what you have learned here. I also encourage you to practice this and many other attacks you discover out there, as this helps make you a master hacker.
Remember, this is strictly for educational purposes. Only perform this on others with their consent, or on your own devices.
And with that, we have come to the end of this article. Hope you enjoyed it. And as I always say, Happy hacking! 🙃
Resources
Acknowledgements
Thanks to Anuoluwapo Victor, Chinaza Nwukwa, Holumidey Mercy, Favour Ojo, Georgina Awani, and my family for the inspiration, support and knowledge used to put this post together. You’re my unsung heroes.
Cover photo credit: Lego Gentlemen working on a router from Wallpaperflare.com