
![Gitting Things Done – A Visual and Practical Guide to Git [Full Book]](https://www.freecodecamp.org/news/content/images/size/w2000/2023/12/Gitting-Things-Done-Cover-with-Photo.png)
Introduction
Git is awesome.
Most software developers use Git on a daily basis. But how many truly understand Git? Do you feel like you know what's going on under the hood as you use Git to perform various tasks?
For example, what happens when you use git commit? What is stored between commits? Is it just a diff between the current and previous commit? If so, how is the diff encoded? Or is an entire snapshot of the repository stored each time?
Most people who use Git don't know the answers to the questions posed above. But does it really matter? Do you really have to know all of those things?
I'd argue that it does matter. As professionals, we should strive to understand the tools we use, especially if we use them all the time, like Git.
Even more acutely, I've found that understanding how Git actually works is useful in many scenarios — whether resolving merge conflicts, looking to conduct an interesting rebase, or even just when something goes slightly wrong.
So many times have I received questions about Git from experienced, highly skilled software engineers. I have seen wonderful developers react in fear when something happened in their commit history, and they just didn't know what to do. It doesn't have to be this way.
By reading this book, you will gain a new perspective of Git. You will feel confident when working with Git, and you will understand Git's underlying mechanisms, at least those that are useful to understand. You will Git it. You will be Gitting things done.
Table of Contents
- Introduction
- Part 1 - Main Objects and Introducing Changes
- Part 2 - Branching and Integrating Changes
- Part 3 - Undoing Changes
- Part 4 - Amazing and Useful Git Tools
- Summary
- Appendixes
Who Is This Book For?
Any software developer who wants to deepen their knowledge about Git.
If you are experienced with Git - I am sure you will be able to deepen your knowledge. Even if you are new to Git - I will start with an overview of the mechanisms of Git, and the terms used throughout this book.
This book is for you. I wrote it so you can learn more about Git, and also come to appreciate, or even love Git.
You will also notice that I use a casual style throughout the book. I believe that learning Git should be insightful and fun. Learning new things is always hard, and I felt like writing in a less casual style wouldn't really make a good service. And as I already mentioned - this book is for you.
Who Am I?
This book is about you, and your journey with Git. But I would like to tell you a bit about why I think I can contribute to your journey.
I am the CTO and one of the co-founders of Swimm.io, a knowledge management tool for code. Part of what we do is linking parts from code in Git repositories to parts of the documentation, and then tracking changes in the repository to update the documentation if needed.
At Swimm, I got to dissect parts of Git, understand its underlying mechanisms and also gain intuition about why Git is implemented the way it is.
Before founding Swimm I practiced teaching in many different environments - among them, managing the Cyber track of Israel Tech Challenge, founding Check Point Security Academy, and writing a full text book.
This book is my attempt to make the most of both worlds - my teaching experience as well as my in-depth hands-on experience with Git, and give you the best learning experience I can.
The Approach of This Book
This is definitely not the first book about Git. When sitting down to write it, I had three principles in mind.
- Practical - in this book, you will learn how to accomplish things in Git. How to introduce changes, how to undo them, and how to fix things when they go wrong. You will understand how Git works not just for the sake of understanding, but with a practical mindset. I sometimes refer to this as the "practicality principle" - which guides me in deciding whether to include certain topics, and to what extent.
- In depth - you will dive deep into Git's way of operating, to understand its mechanisms. You will build your understanding gradually, and always link your knowledge to real scenarios you might face in your work. In order to achieve an in-depth understanding, I almost always prefer the command line over graphical interfaces, so you can really see what commands are running.
- Visual - as I strive to provide you with intuition, the chapters will be accompanied by visual aids.
Why Is This Book Publicly Available?
I think everyone should have access to high quality content about Git, and I'd like this book to get to as many people as possible.
If you would like to support this book, you are welcome to buy the Paperback version, an E-Book version, or buy me a coffee. Thank you!
Accompanying Videos
I have covered many topics from this book on my YouTube channel - Brief (https://www.youtube.com/@BriefVid). You are welcome to check them out as well.
Get Your Hands Dirty
Throughout this book, I will mostly use the second person singular - and directly write to you. I will ask you to get your hands dirty, run the commands yourself, so you actually get to feel what it's like to use do things with Git, not just read about it.
Git's Feelings
Throughout the book, I sometimes refer to Git with words such as "believes", "thinks", or "wants". As you may argue, Git is not a human, and it doesn't have feelings or beliefs. Well, that's true, but in order for us to enjoy playing around with Git, and to help you enjoy reading (and me writing) this book, I feel like referring to Git as more than just code makes it all so much more enjoyable.
My Setup
I will include screenshots. There's no need for your setup to match mine, but if you're curious about my setup, then:
- I am using Ubuntu 20.04 (WSL).
- For my terminal, I use Oh My Zsh
- I also use plugins for Oh My Zsh, you can follow this tutorial on freeCodeCamp.
- git-graph (my alias is
gg)
Feedback Is Welcome
This book has been created to help you and people like you learn, understand Git, and apply that knowledge in real life.
Right from the beginning, I asked for feedback and was lucky to receive it from great people (see Acknowledgments) to make sure the book achieves these goals. If you liked something about this book, felt that something was missing, or that something needed improvement - I would love to hear from you. Please reach out at gitting.things@gmail.com.
Note
This book is provided for free on freeCodeCamp as described above and according to Creative Commons Attribution-NonCommercial-ShareAlike 4.0 International.
If you would like to support this book, you are welcome to buy the Paperback version, an E-Book version, or buy me a coffee. Thank you!
Part 1 - Main Objects and Introducing Changes
Chapter 1 - Git Objects
It's time to start your journey into the depths of Git. In this chapter - starting with the basics - you will learn about the most important Git objects, and adopt a way of thinking about Git. Let's get to it!
Git as a System for Maintaining a File System
While there are different ways to use Git, I'll adopt here the way I've found to be the most clear and useful: Viewing Git as a system maintaining a file system, and specifically - snapshots of that file system over time.
A file system begins with a root directory (in UNIX-based systems, /), which usually contains other directories (for example, /usr or /bin). These directories contain other directories, and/or files (for example, /usr/1.txt). On a Windows machine, a root directory of a drive would be C:\, and a subdirectory could be C:\users. I will adopt the convention of UNIX-based systems throughout this book.
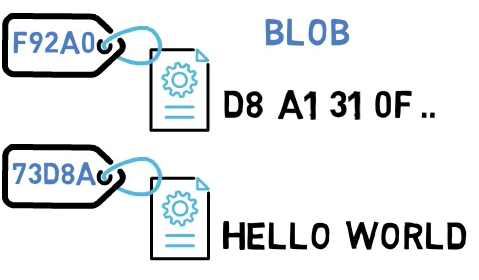
Blobs
In Git, the contents of files are stored in objects called blobs, short for binary large objects.
The difference between blobs and files is that files also contain meta-data. For example, a file "remembers" when it was created, so if you move that file from one directory into another directory, its creation time remains the same.
Blobs, in contrast, are just binary streams of data, like a file's contents. A blob does not register its creation date, its name, or anything other than its contents.
Every blob in Git is identified by its SHA-1 hash. SHA-1 hashes consist of 20 bytes, usually represented by 40 characters in hexadecimal form. Throughout this book I will sometimes show just the first characters of that hash. As hashes, and specifically SHA-1 hashes are so ubiquitous within Git, it is important you understand the basic characteristics of hashes.
Hashes
A hash is a deterministic, one-way mathematical function.
Deterministic means that the same input will provide the same output. That is - you take a stream of data, run a hash function on that stream, and you get a result.
For example, if you provide the SHA-1 hash function with the stream hello, you will get 0xaaf4c61ddcc5e8a2dabede0f3b482cd9aea9434d. If you run the SHA-1 hash function again, from a different machine, and provide it the same data (hello), you will get the same value.
Git uses SHA-1 as its hash function in order to identify objects. It relies on it being deterministic, such that an object will always have the same identifier.
A one-way function is a function that is hard to invert given an output. That is, it is impossible (or at least, very hard) to tell, given the result of the hash function (for example 0xaaf4c61ddcc5e8a2dabede0f3b482cd9aea9434d), what input yielded that result (in this example, hello).
Back to Git
Back to Git - Blobs, just like other Git objects, have SHA-1 hashes associated with them.
 Blobs have corresponding SHA-1 values
As I said in the beginning, Git can be viewed as a system to maintain a file system. File systems consist of files and directories. A blob is the Git object representing the contents of a file.
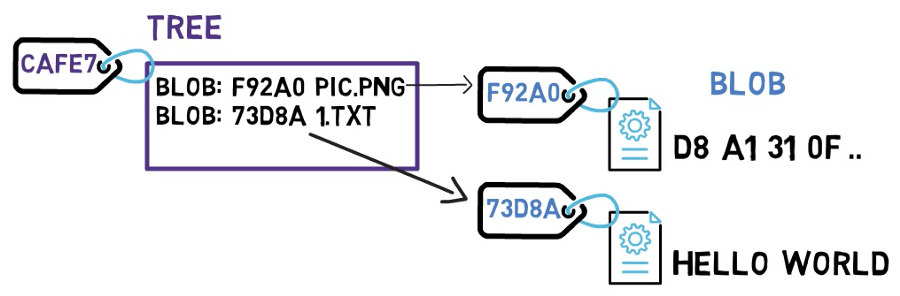
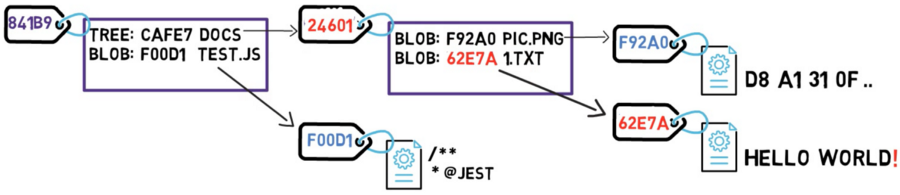
Trees
In Git, the equivalent of a directory is a tree. A tree is basically a directory listing, referring to blobs, as well as other trees.
Trees are identified by their SHA-1 hashes as well. Referring to these objects, either blobs or other trees, happens via the SHA-1 hash of the objects.
 A tree is a directory listing
Consider the drawing above. Note that the tree CAFE7 refers to the blob F92A0 as the file pic.png. In another tree, that same blob may have another name - but as long as the contents are the same, it will still be the same blob object, and still have the same SHA-1 value.
 A tree may contain sub-trees, as well as blobs
The diagram above is equivalent to a file system with a root directory that has one file at /test.js, and a directory named /docs consisting of two files: /docs/pic.png, and /docs/1.txt.
Commits
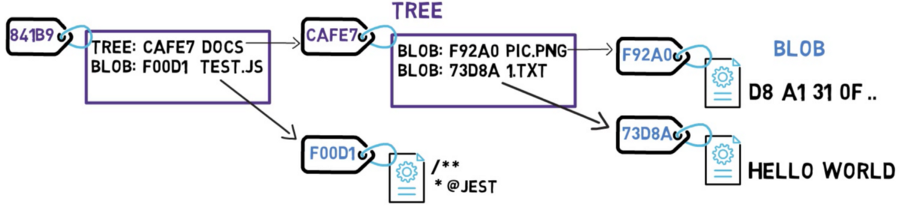
Now it's time to take a snapshot of that file system — and store all the files that existed at that time, along with their contents.
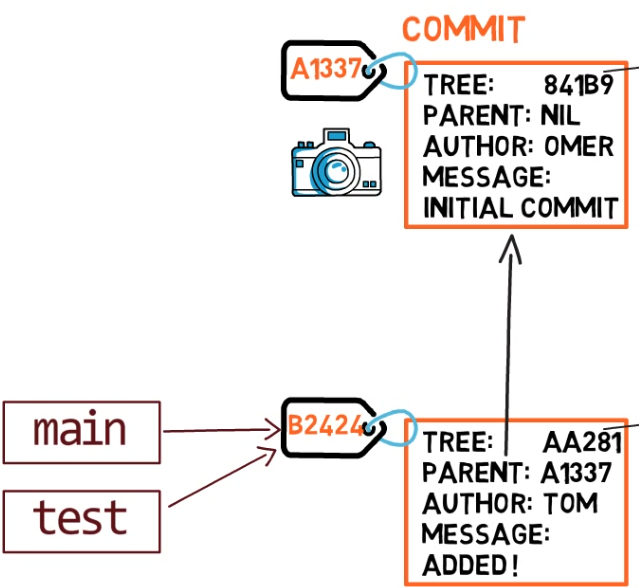
In Git, a snapshot is a commit. A commit object includes a pointer to the main tree (the root directory of the file system), as well as other meta-data such as the committer (the user who authored the commit), a commit message, and the commit time.
In most cases, a commit also has one or more parent commits — the previous snapshot (or snapshots). Of course, commit objects are also identified by their SHA-1 hashes. These are the hashes you are probably used to seeing when you use commands such as git log.
 A commit is a snapshot in time. It refers to the root tree. As this is the first commit, it has no parents
Every commit holds the entire snapshot, not just differences between itself and its parent commit or commits.
How can that work? Doesn't that mean that Git has to store a lot of data for every commit?
Examine what happens if you change the contents of a file. Say that you edit the file 1.txt, and add an exclamation mark — that is, you changed the content from HELLO WORLD, to HELLO WORLD!.
Well, this change means that Git creates a new blob object, with a new SHA-1 hash. This makes sense, as sha1("HELLO WORLD") is different from sha1("HELLO WORLD!").
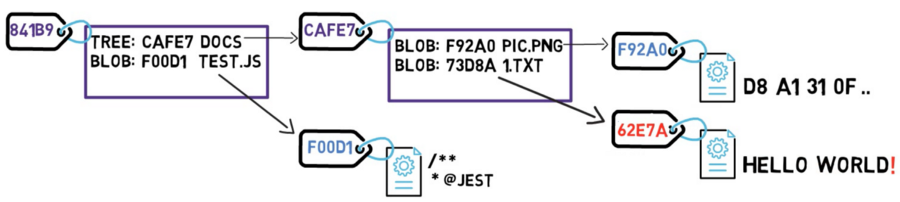 Changing the blob results in a new SHA-1
Since you have a new hash, then the tree's listing should also change. After all, your tree no longer points to blob 73D8A, but rather blob 62E7A instead. Since you change the tree's contents, you also change its hash.
 The tree that points to the changed blob needs to change as well
And now, since the hash of that tree is different, you also need to change the parent tree — as the latter no longer points to tree CAFE7, but rather to tree 24601. Consequently, the parent tree will also have a new hash.
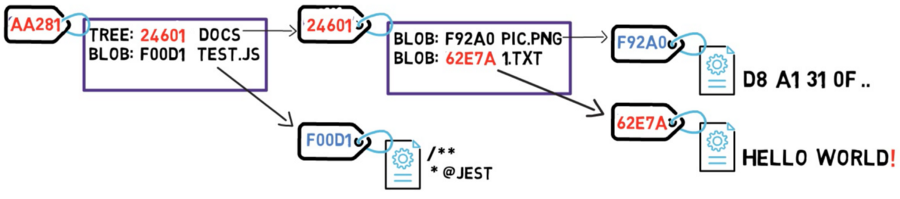 The root tree also changes, and so does its hash
Almost ready to create a new commit object, and it seems like you are going to store a lot of data — the entire file system, once more! But is that really necessary?
Actually, some objects, specifically blob objects, haven't changed since the previous commit — the blob F92A0 remained intact, and so did the blob F00D1.
So this is the trick — as long as an object doesn't change, Git doesn't store it again. In this case, Git doesn't need to store blob F92A0 or blob F00D1 once more. Git can refer to them using only their hash values. You can then create your commit object.
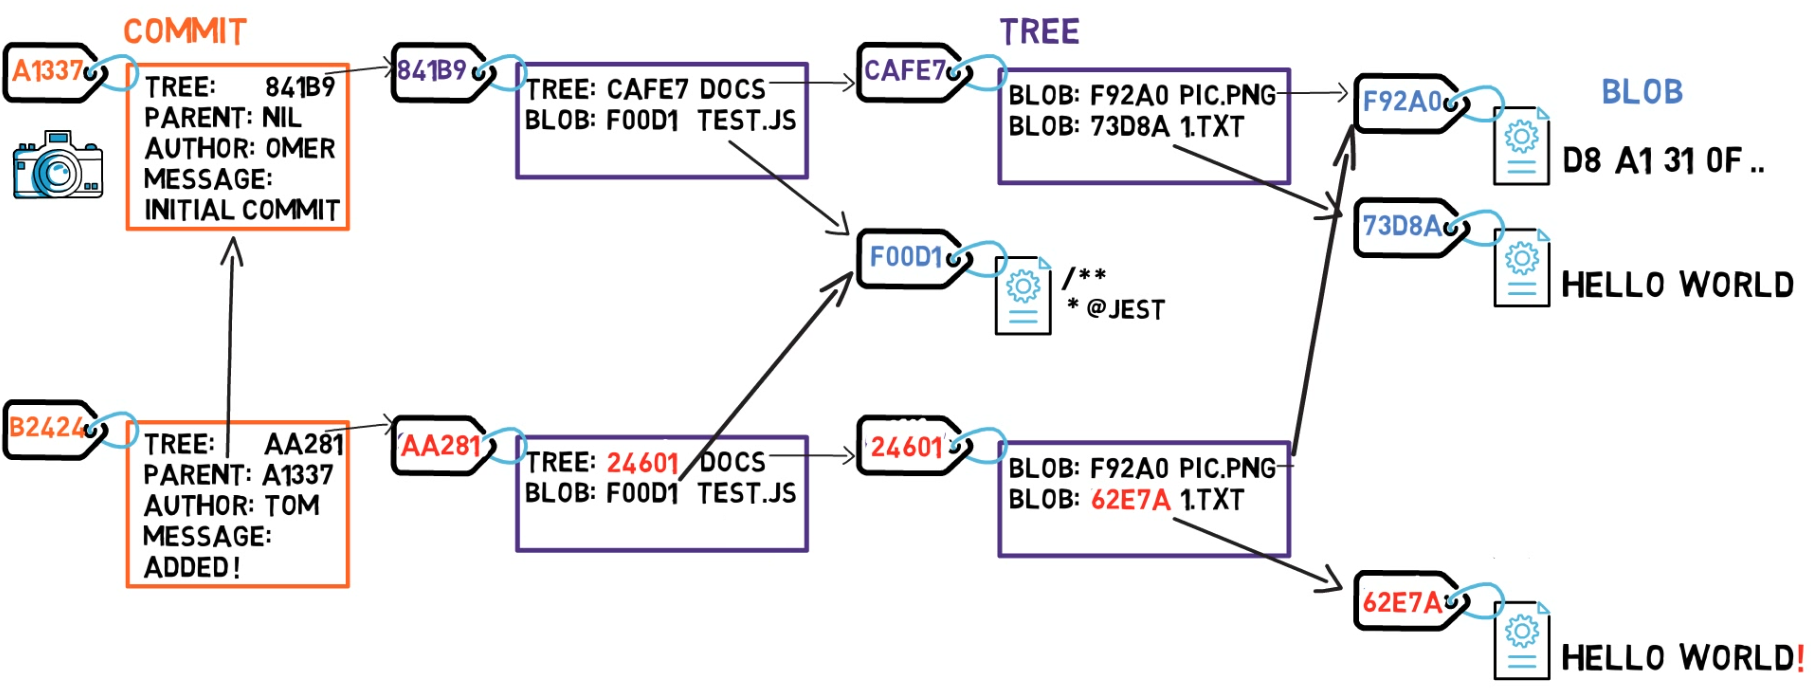 Blobs that remained intact are referenced by their hash values
Since this commit is not the first commit, it also has a parent commit — commit A1337.
Considering Hashes
After introducing blobs, trees, and commits - consider the hashes of these objects. Assume I wrote the string Git is awesome!, and created a blob object from it. You did the same on your system. Would we have the same hash?
The answer is — Yes. Since the blobs consist of the same data, they'll have the same SHA-1 values.
What if I made a tree that references the blob of Git is awesome!, and gave it a specific name and metadata, and you did exactly the same on your system. Would we have the same hash?
Again, yes. Since the tree objects are the same, they would have the same hash.
What if I created a commit pointing to that tree with the commit message Hello, and you did the same on your system? Would we have the same hash?
In this case, the answer is — No. Even though our commit objects refer to the same tree, they have different commit details — time, committer, and so on.
How Are Objects Stored?
You now understand the purpose of blobs, trees, and commits. In the next chapters, you will also create these objects yourself. Despite being interesting, understanding how these objects are actually encoded and stored is not vital to your understanding, and for gitting things done.
Short Recap - Git Objects
To recap, in this section we introduced three Git objects:
- Blob — contents of a file.
- Tree — a directory listing (of blobs and trees).
- Commit — a snapshot of the working tree.
In the next chapter, we will understand branches in Git.
Chapter 2 - Branches in Git
In the previous chapter, I suggested that we should view Git as a system for maintaining a file system.
One of the wonders of Git is that it enables multiple people to work on that file system, in parallel, (mostly) without interfering with each other's work. Most people would say that they are "working on branch X." But what does that actually mean?
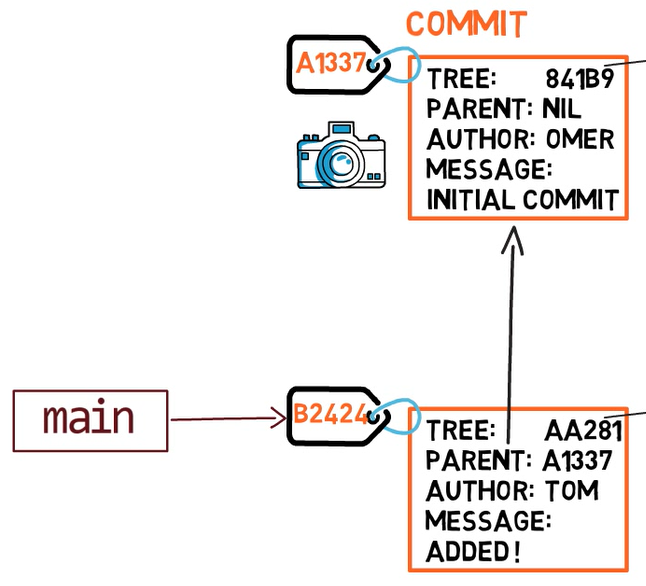
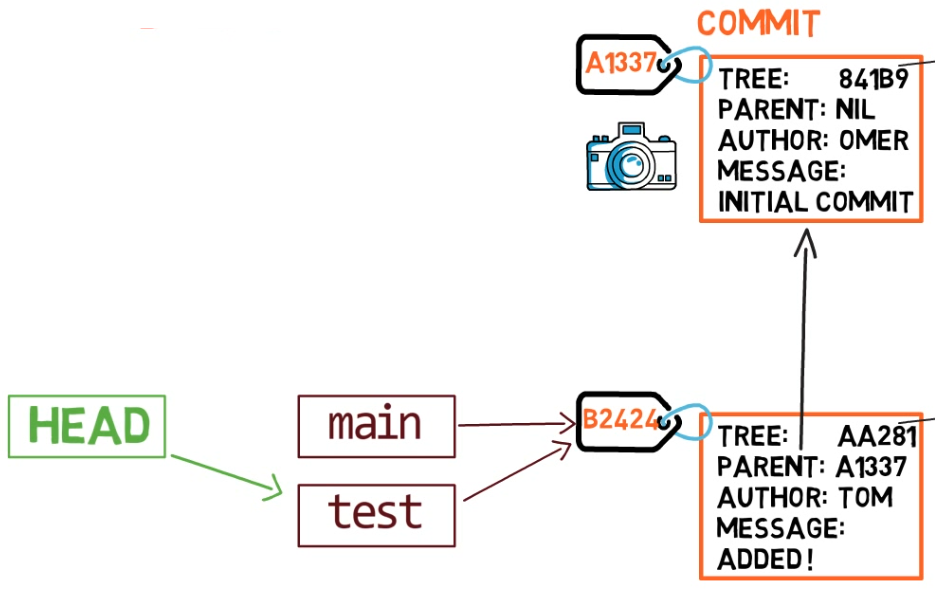
A branch is just a named reference to a commit.
You can always reference a commit by its SHA-1 hash, but humans usually prefer other ways to name objects. A branch is one way to reference a commit, but it's really just that.
In most repositories, the main line of development is done in a branch called main. This is just a name, and it's created when you use git init, making it widely used. However, you could use any other name you'd like.
Typically, the branch points to the latest commit in the line of development you are currently working on.
 A branch is just a named reference to a commit
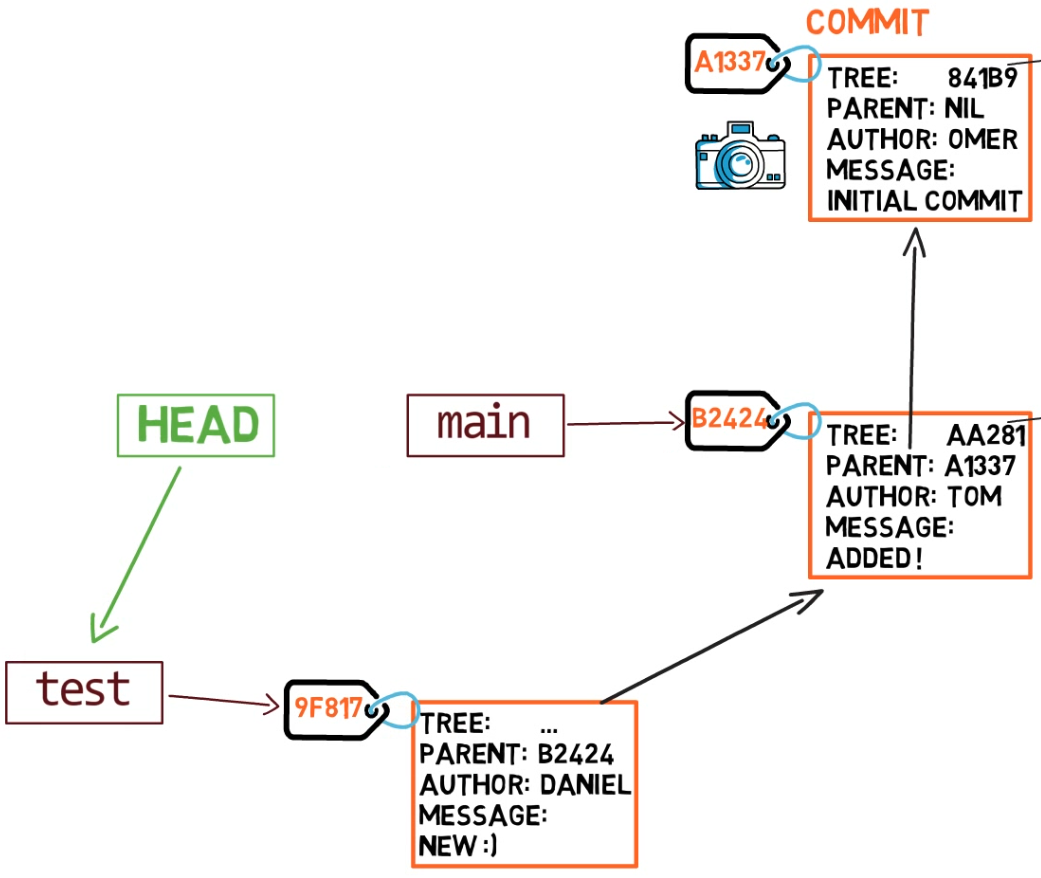
To create another branch, you can use the git branch command. When you do that, Git creates another pointer. If you created a branch called test, by using git branch test, you would be creating another pointer that points to the same commit as the branch you are on:
 Using
Using git branch creates another pointer
How does Git know which branch you're currently on? It keeps another designated pointer, called HEAD. Usually, HEAD points to a branch, which in turns points to a commit. In the case described, HEAD might point to main, which in turn points to commit B2424. In some cases, HEAD can also point to a commit directly.

HEAD points to the branch you are currently on
To switch the active branch to be test, you can use the command git checkout test, or git switch test. Now you can already guess what this command actually does — it just changes HEAD to point to test.
git checkout test changes where HEAD points
You could also use git checkout -b test before creating the test branch, which is the equivalent of running git branch test to create the branch, and then git checkout test to move HEAD to point to the new branch.
At the point represented in the drawing above, what would happen if you made some changes and created a new commit using git commit? Which branch will the new commit be added to?
The answer is the test branch, as this is the active branch (since HEAD points to it). Afterwards, the test pointer will move to the newly added commit. Note that HEAD still points to test.
 Every time we use
 git commit, the branch pointer moves to the newly created commit
If you go back to main by using git checkout main, Git will move HEAD to point to main again.
 The resulting state after using
 git checkout main
Now, if you create another commit, which branch will it be added to?
That's right, it will be added to the main branch (and its parent would be commit B2424).
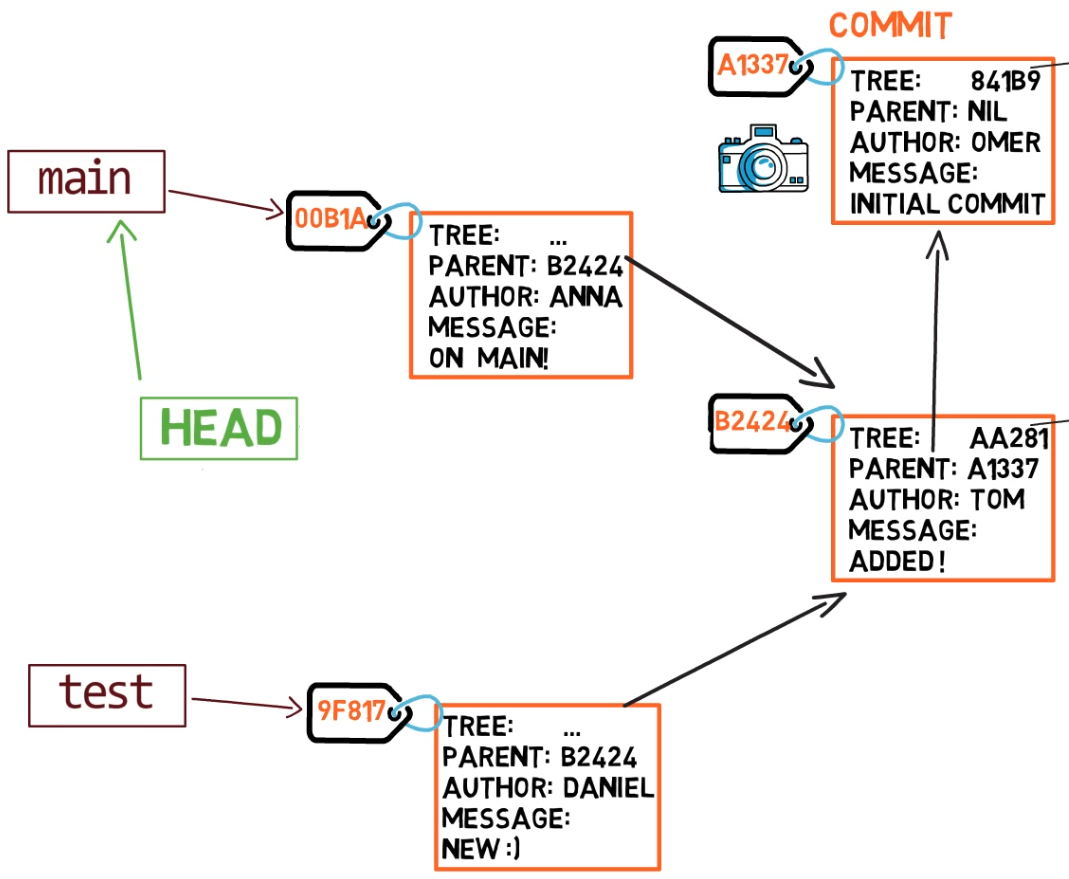 The resulting state after creating another commit on the
 main branch
Short Recap - Branches
- A branch is a named reference to a commit.
- When you use
git commit, Git creates a commit object, and moves the branch to point to the newly created commit. HEADis a special pointer telling Git which branch is the active branch (in rare cases, it can point directly to a commit).
In the next chapters, you will learn how to introduce changes to Git. You will create a repository from scratch — without using git init, git add, or git commit. This will allow you to deepen your understanding of what is happening under the hood when you work with Git. You will also create new branches, switch branches, and create additional commits — all without using git branch or git checkout. I don't know about you, but I am excited already!
Chapter 3 - How to Record Changes in Git
So far, we've learned about four different entities in Git:
- Blob — contents of a file.
- Tree — a directory listing (of blobs and trees).
- Commit — a snapshot of the working tree, with some meta-data such as the time or the commit message.
- Branch — a named reference to a commit.
The first three are objects, whereas the fourth is one way to refer to objects (specifically, commits).
Now, it's time to understand how to introduce changes in Git.
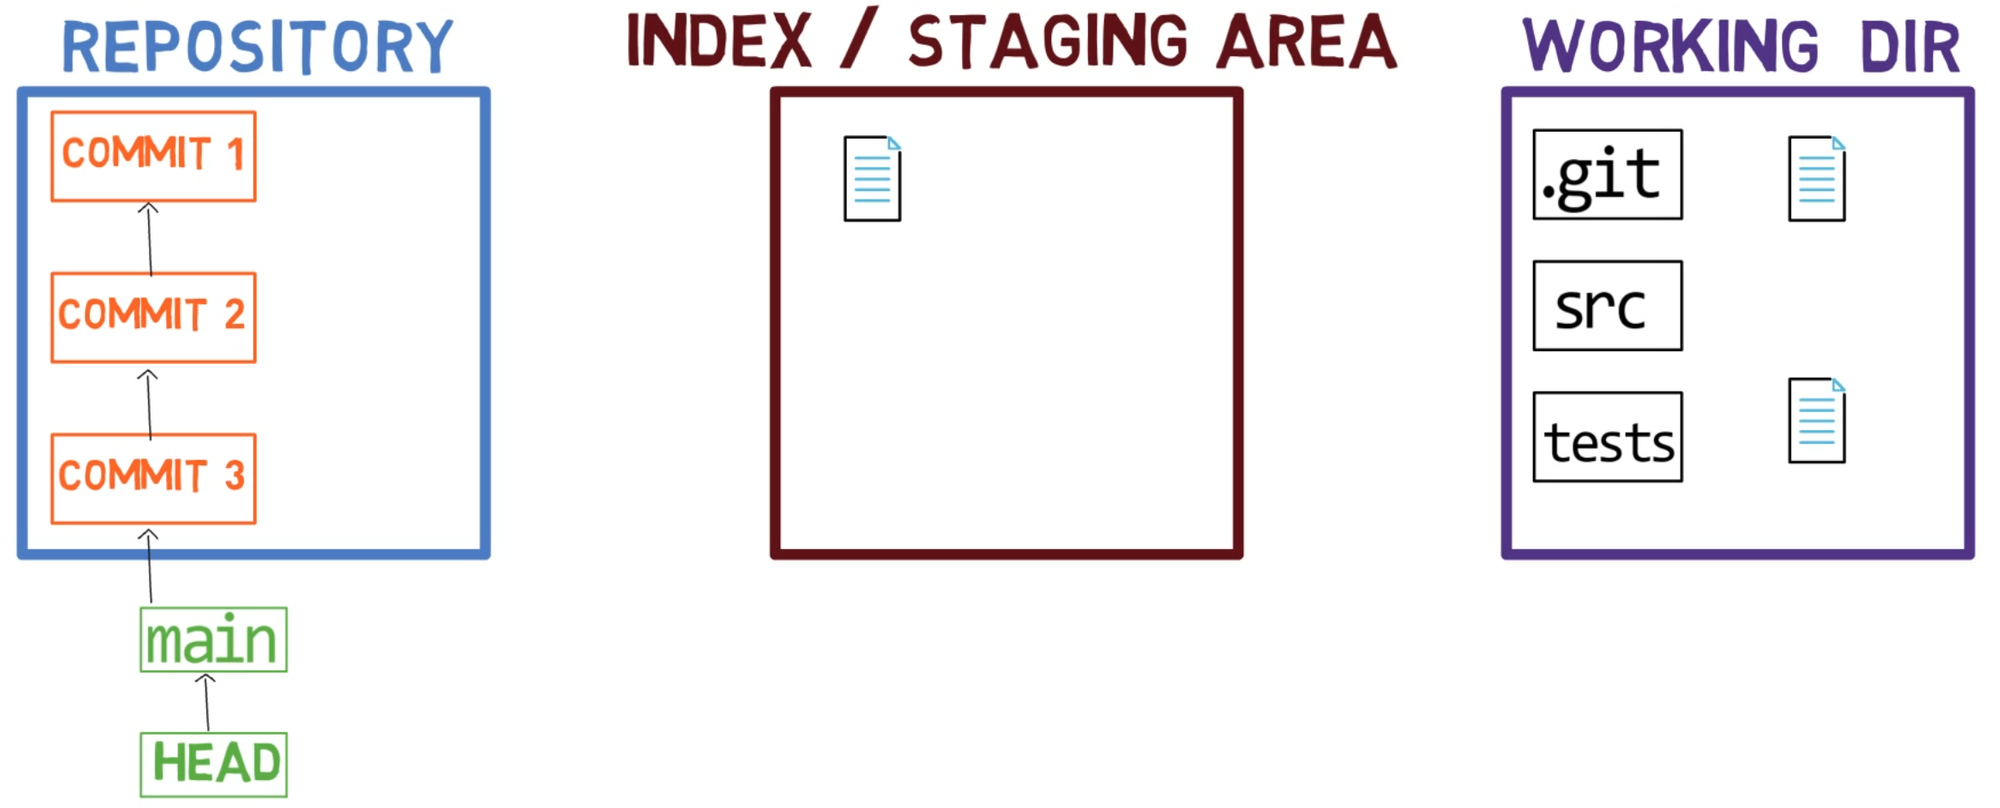
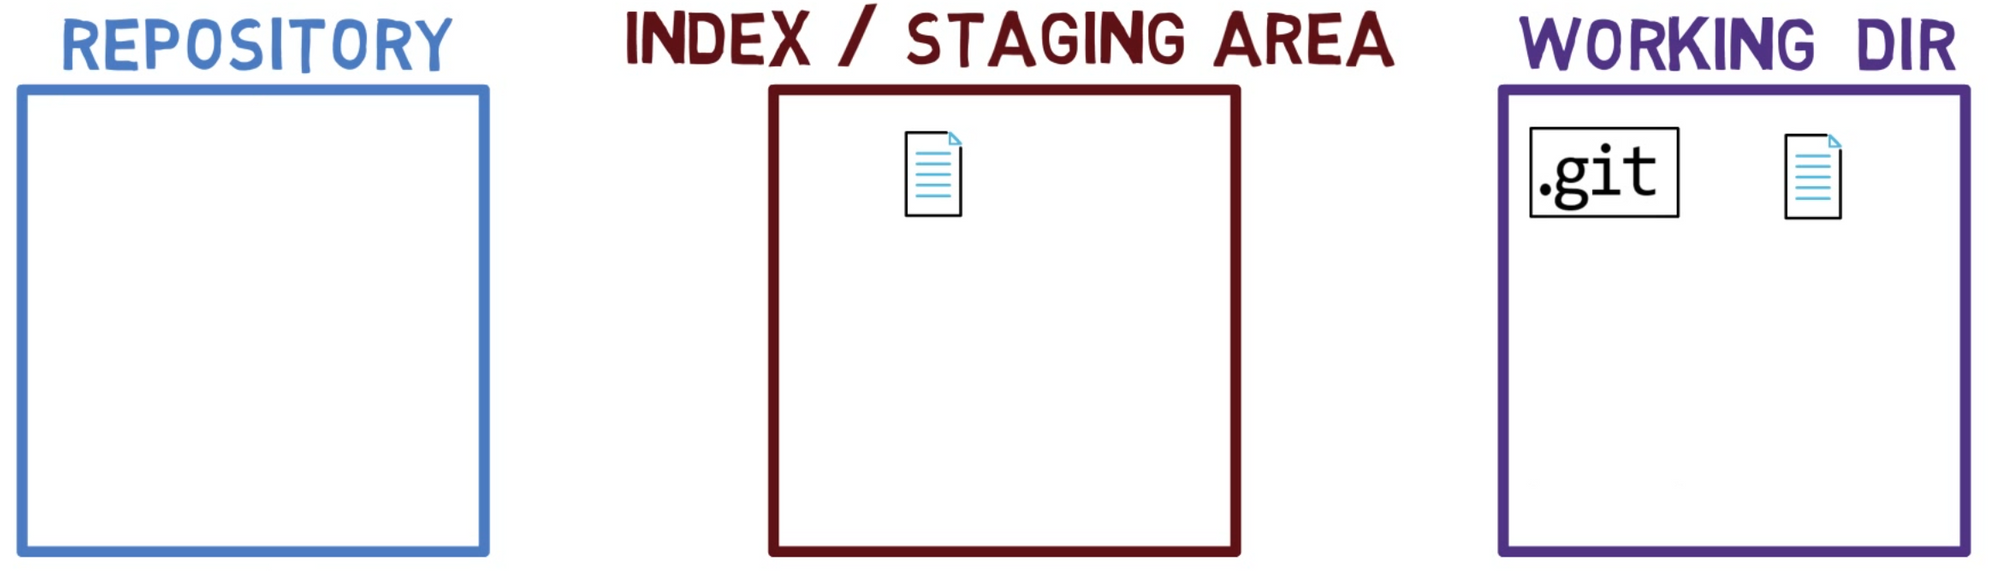
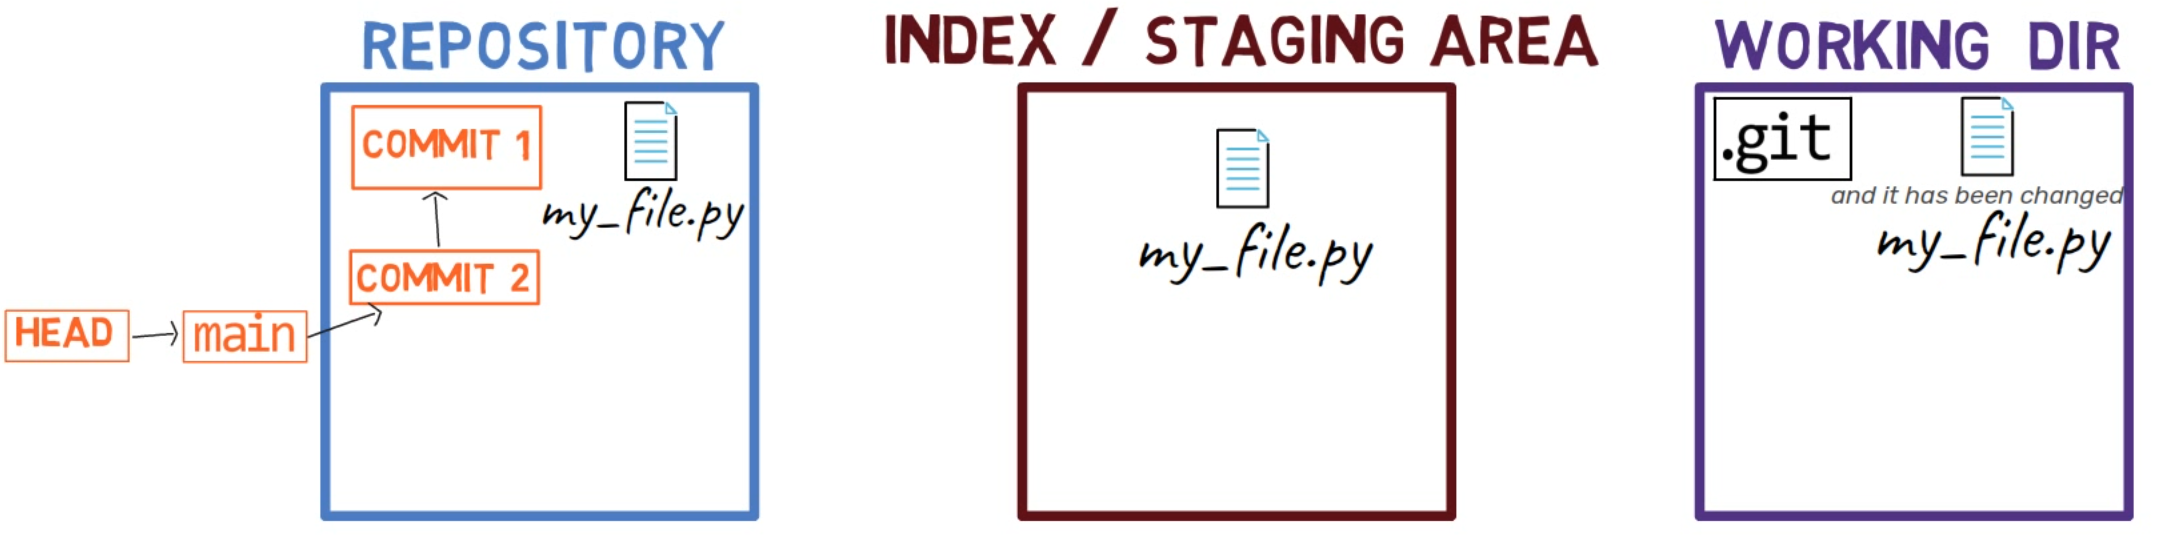
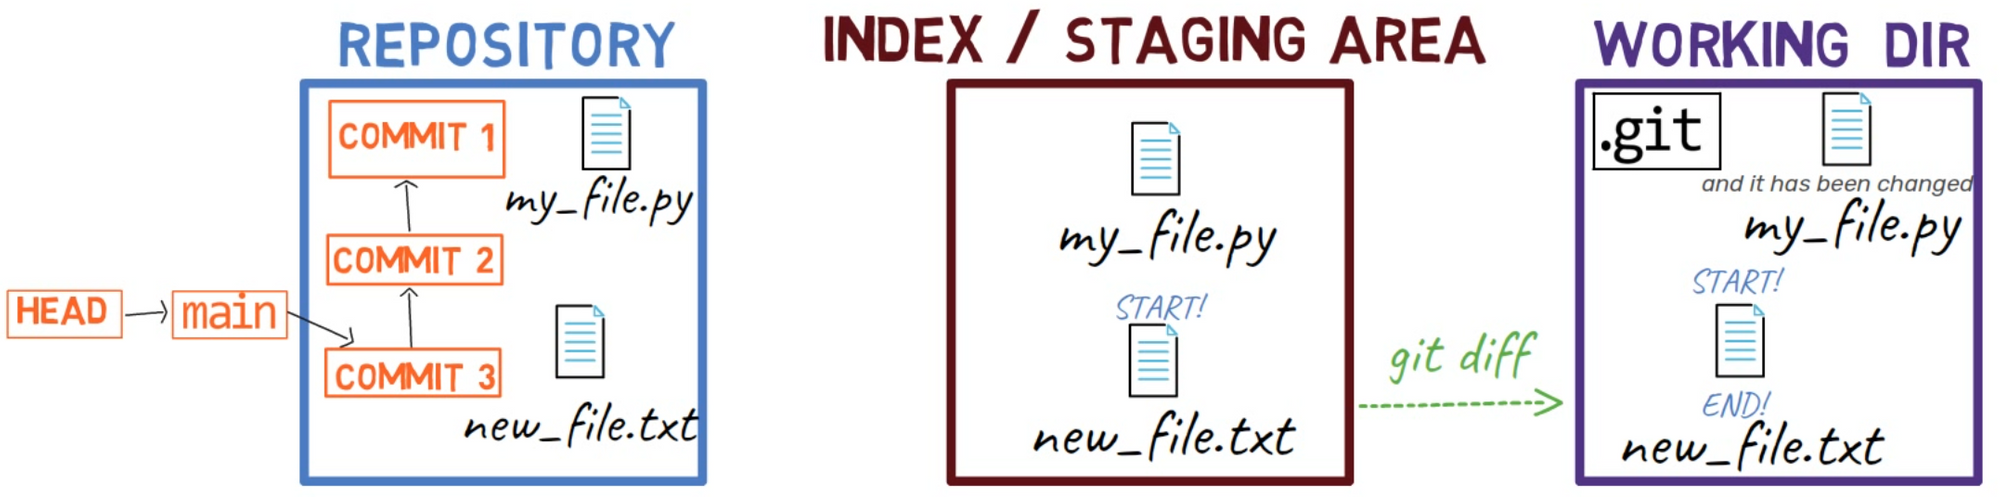
When you work on your source code, you work from a working dir. A working dir(ectory) (also called "working tree") is any directory on your file system which has a repository associated with it. It contains the folders and files of your project, and also a directory called .git that we will talk more about later. Remember that we said that Git is a system to maintain a file system. The working directory is the root of the file system for Git.
After you make some changes, you might want to record them in your repository. A repository (in short: "repo") is a collection of commits, each of which is an archive of what the project's working tree looked like at a past date, whether on your machine or someone else's. That is, as I said before, a commit is a snapshot of the working tree.
A repository also includes things other than your code files, such as HEAD and branches.
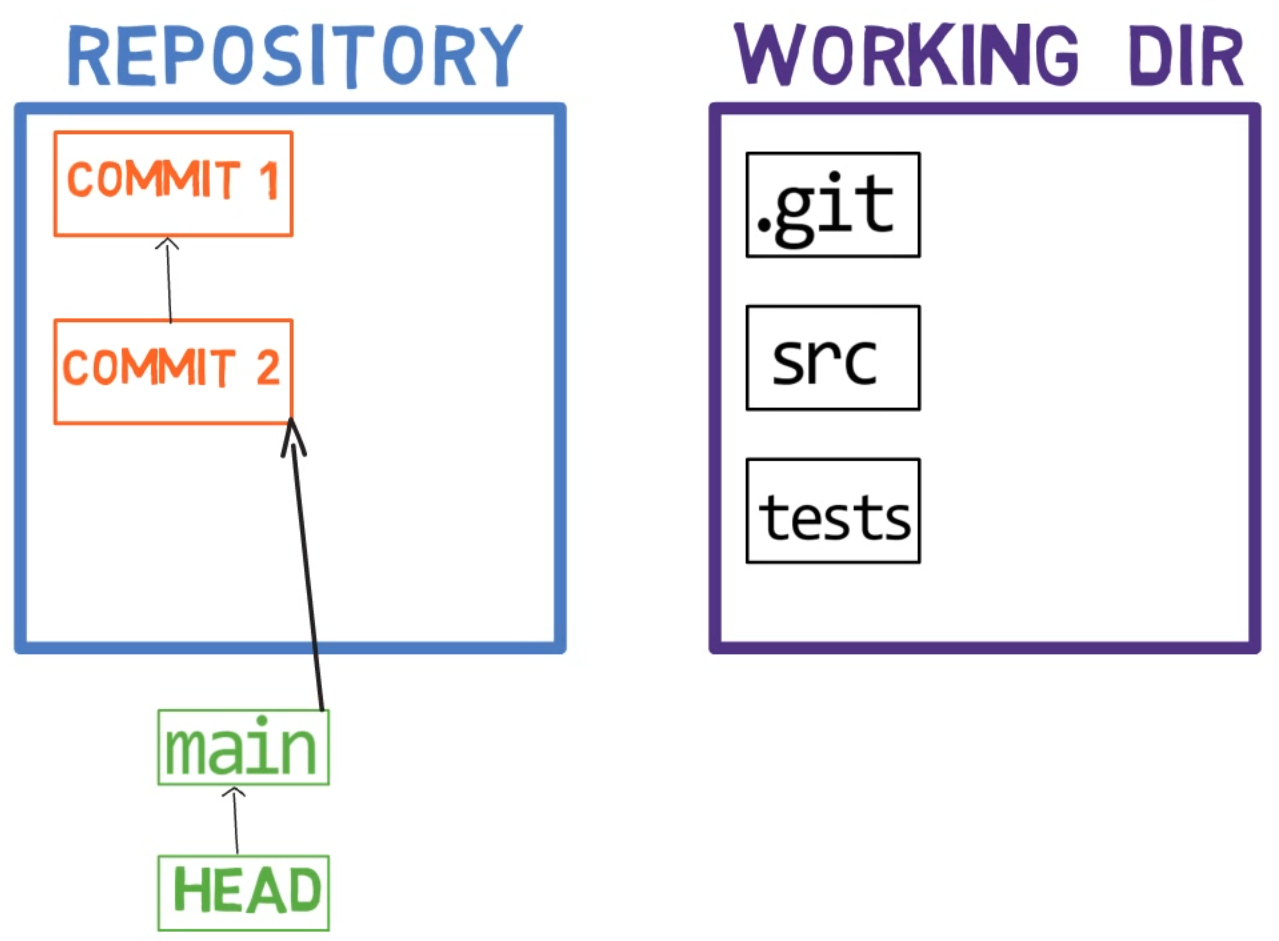 A working dir alongside the repository
Note regarding the drawing conventions I use: I include .git within the working directory, to remind you that it is a folder within the project's folder on the filesystem. The .git folder actually contains the objects of the repository, as we will see in chapter 4.
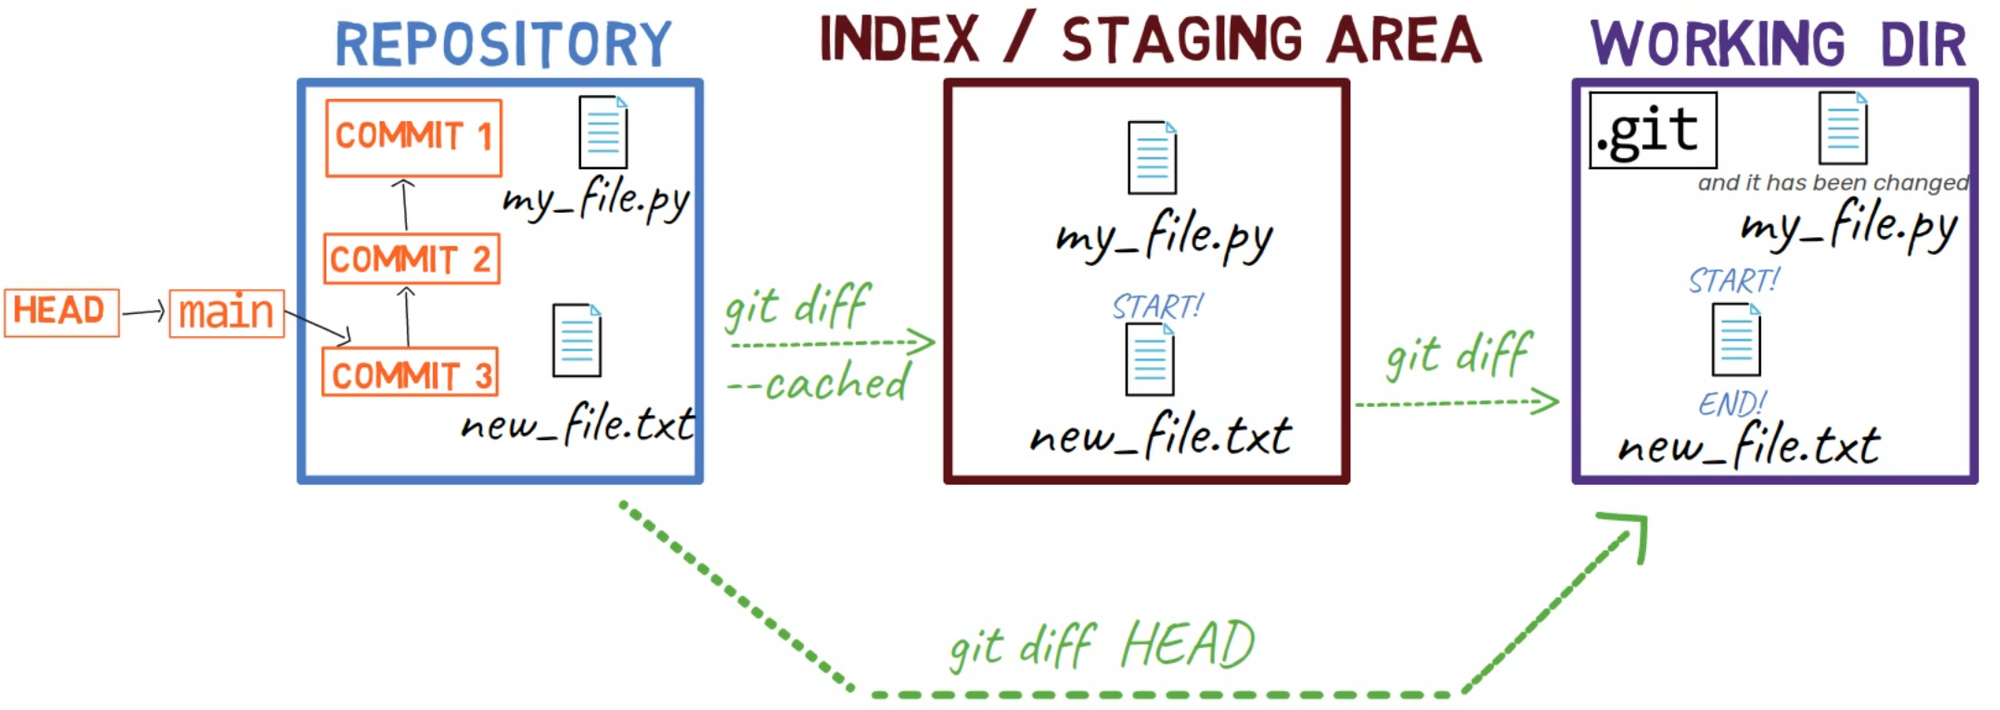
There are other version control systems where changes are committed directly from the working dir to the repository. In Git, this is not the case. Instead, changes are first registered in something called the index, or the staging area.
Both of these terms refer to the same thing, and they are used often in Git's documentation. I will use these terms interchangeably throughout this book, as you should feel comfortable with both of them.
You can think of adding changes to the index as a way of "confirming" your changes, one by one, before creating a commit (which records all your approved changes at once).
When you checkout a branch, Git populates the index and the working dir with the contents of the files as they exist in the commit that branch is pointing to. When you use git commit, Git creates a new commit object based on the state of the index.
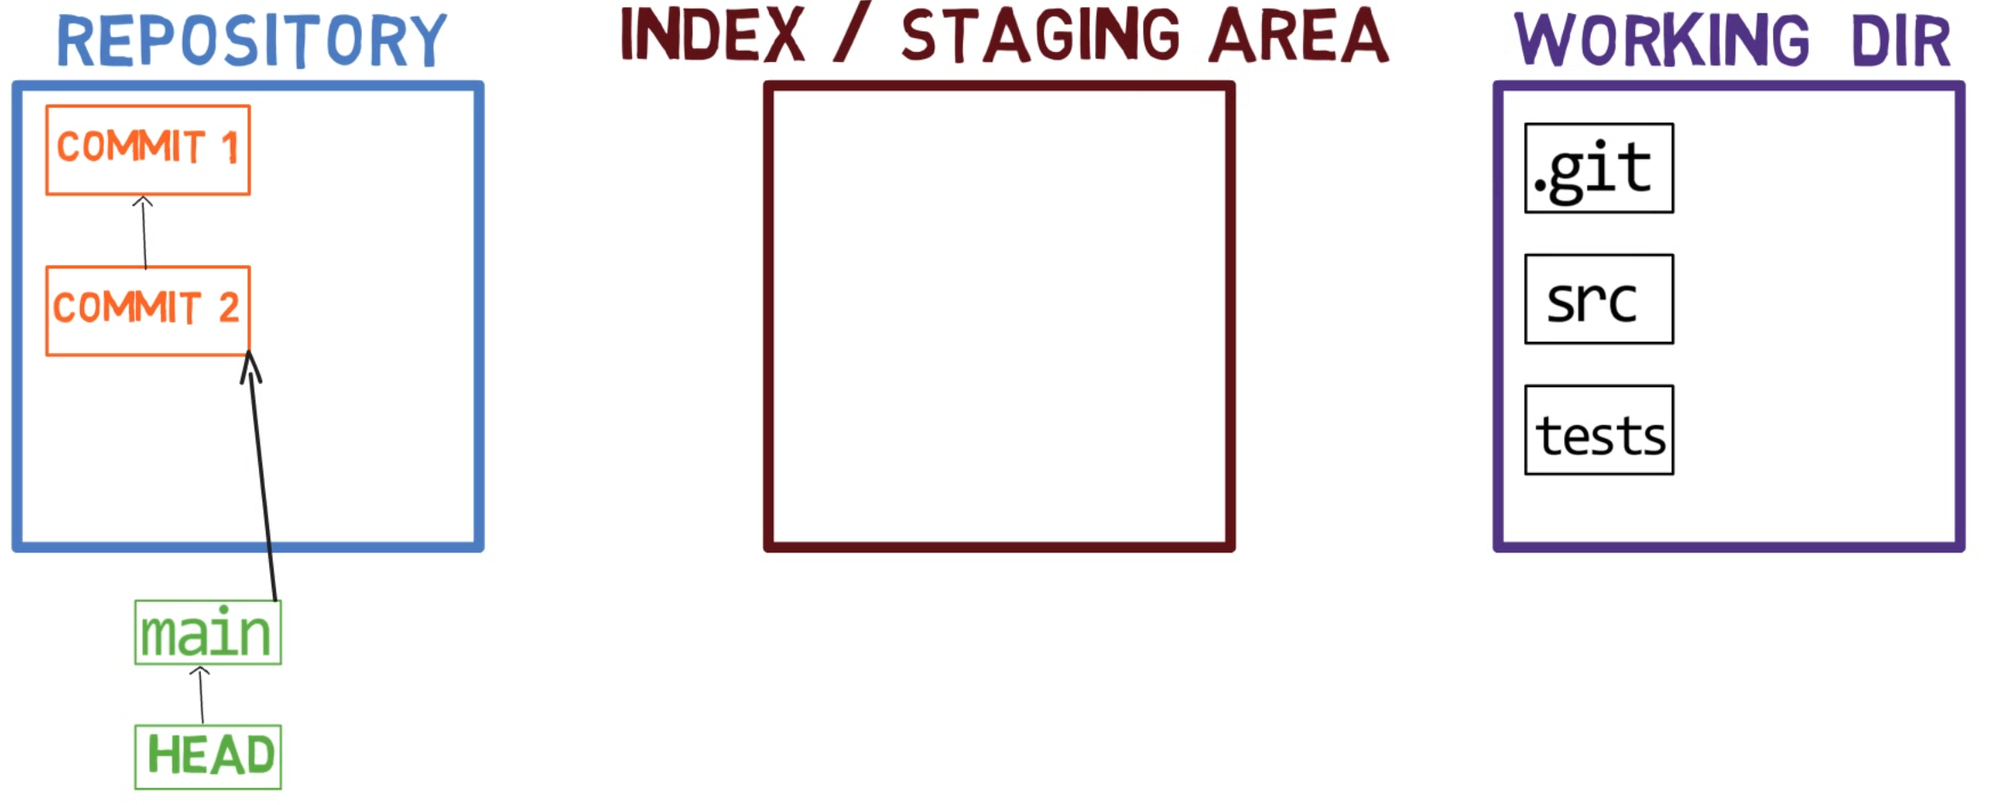 The three "states" - working dir, index, and repository
Using the index allows you to carefully prepare each commit. For example, you may have two files with changes in your working dir:
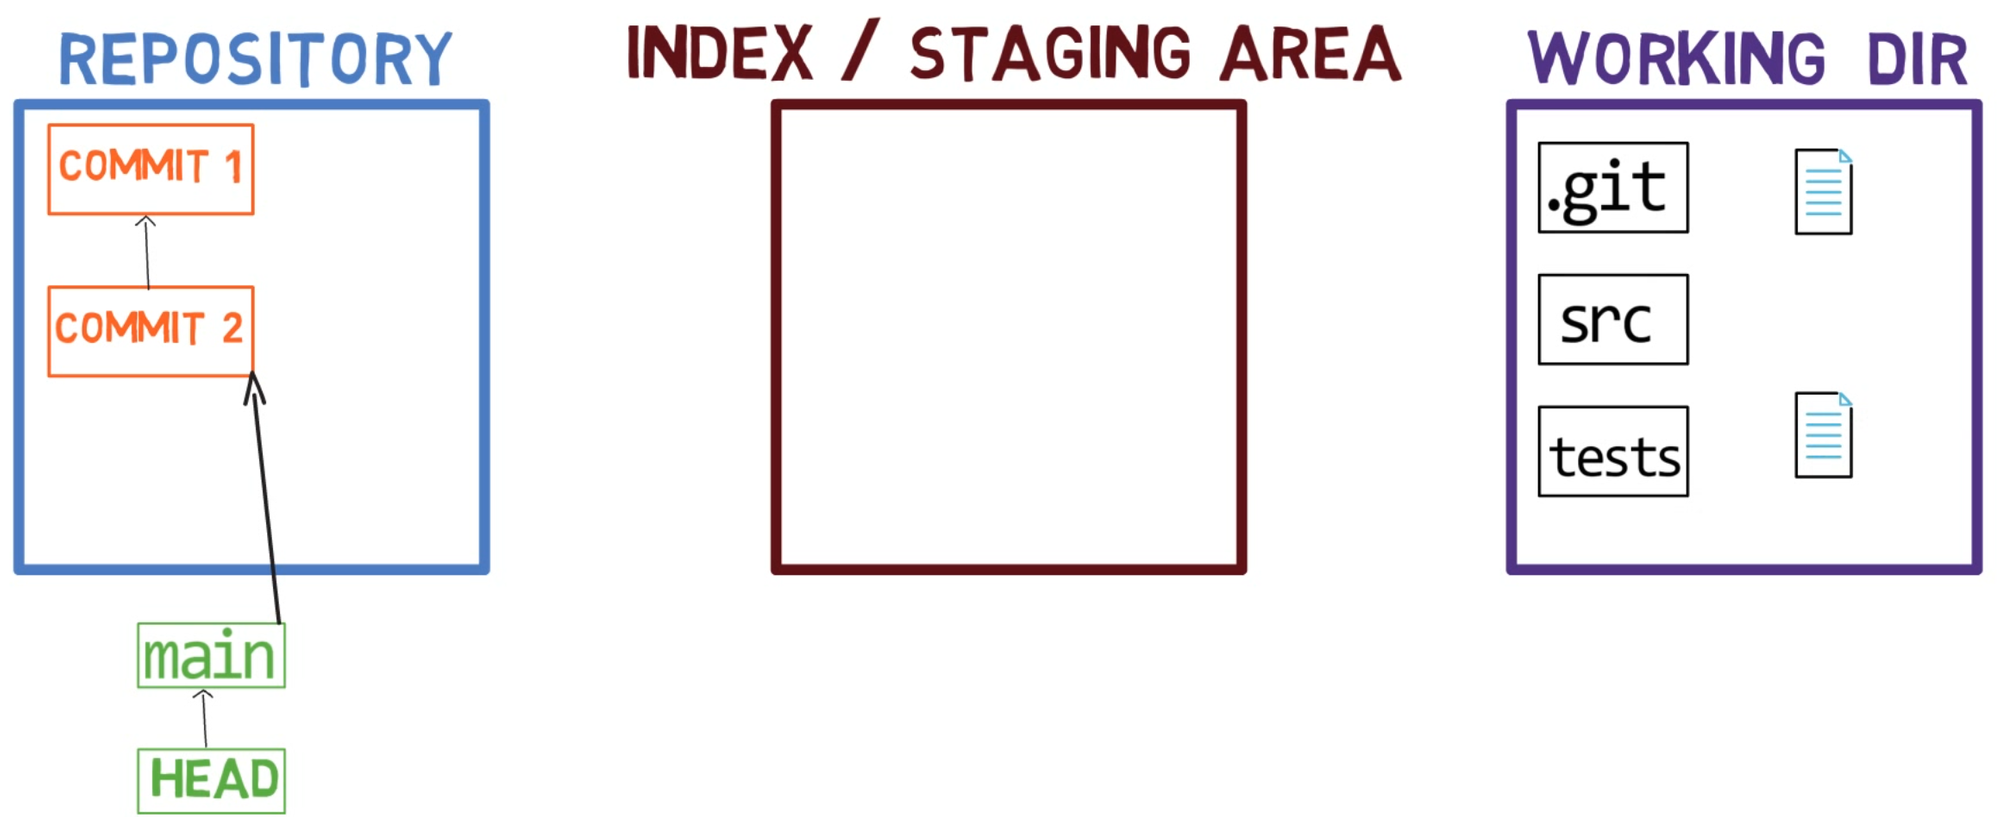 Working dir includes two files with changes
For example, assume these two files are 1.txt and 2.txt. It is possible to only add one of them (for instance, 1.txt) to the index, by using git add 1.txt:
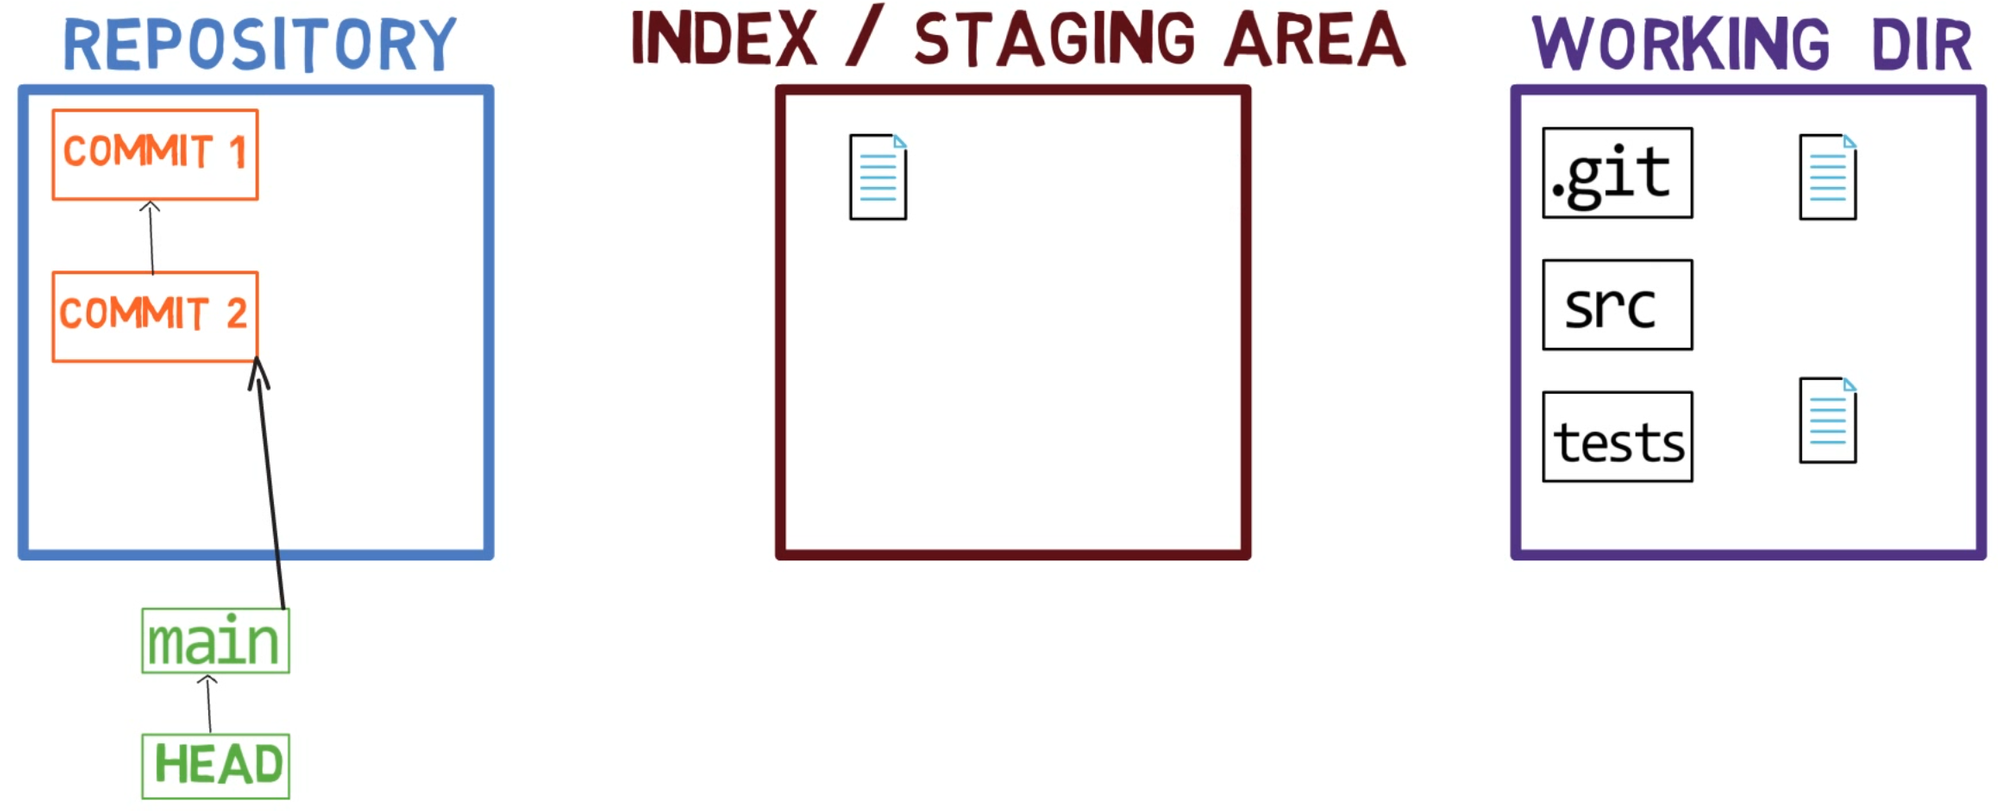 The state after staging
 1.txt
As a result, the state of the index matches the state of HEAD (in this case, "Commit 2"), with the exception of the file 1.txt, which matches the state of 1.txt in the working directory. Since you did not stage 2.txt, the index does not include the updated version of 2.txt. So the state of 2.txt in the index matches the state of 2.txt in "Commit 2".
Behind the scenes - once you stage a version of a file, Git creates a blob object with the file's contents. This blob object is then added to the index. As long as you only modify the file on the working directory, without staging it, the changes you make are not recorded in blob objects.
When considering the previous figure, note that I do not draw the staged version of the file as part of the "repository", as in this representation, the "repository" refers to a tree of commits and their references, and this blob has not been a part of any commit.
Now, you can use git commit to record the change to 1.txt only:
 The state after using
 git commit
Using git commit performs two main operations:
- It creates a new commit object. This commit object reflects the state of the index when you ran the
git commitcommand. - Updates the active branch to point to the newly created commit. In this example,
mainnow points to "Commit 3", the new commit object.
How to Create a Repo — The Conventional Way
Let's make sure that you understand how the terms we've introduced relate to the process of creating a new repository. This is a quick high-level view, before diving much deeper into this process.
Initialize a new repository using git init my_repo, and then change your directory to that of the repository using cd my_repo:

git init
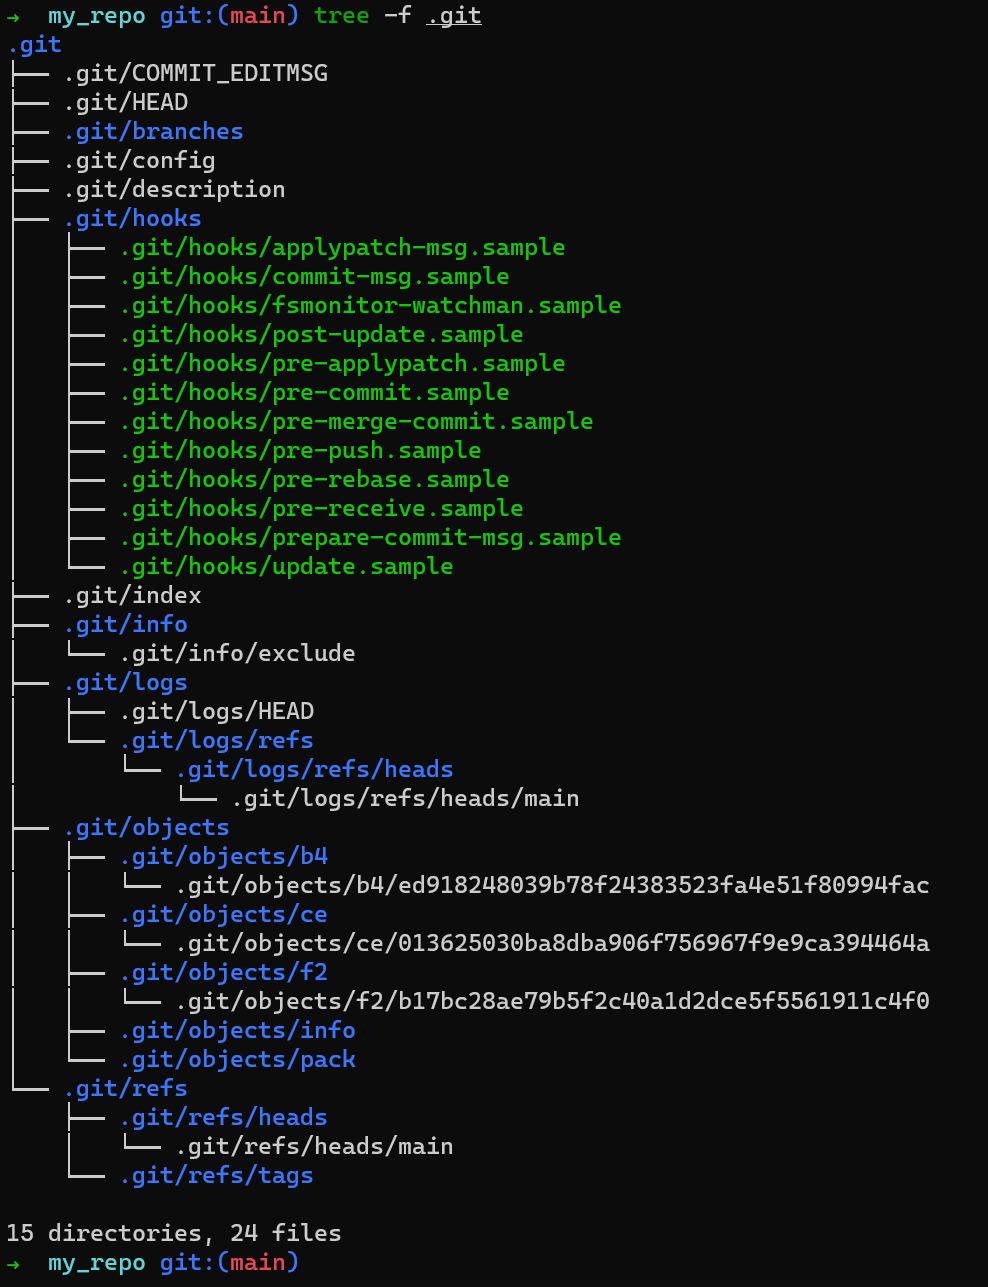
By using tree -f .git you can see that running git init my_repo resulted in quite a few sub-directories inside .git. (The flag -f includes files in tree's output).
Note: if you're using Windows, run tree /f .git.
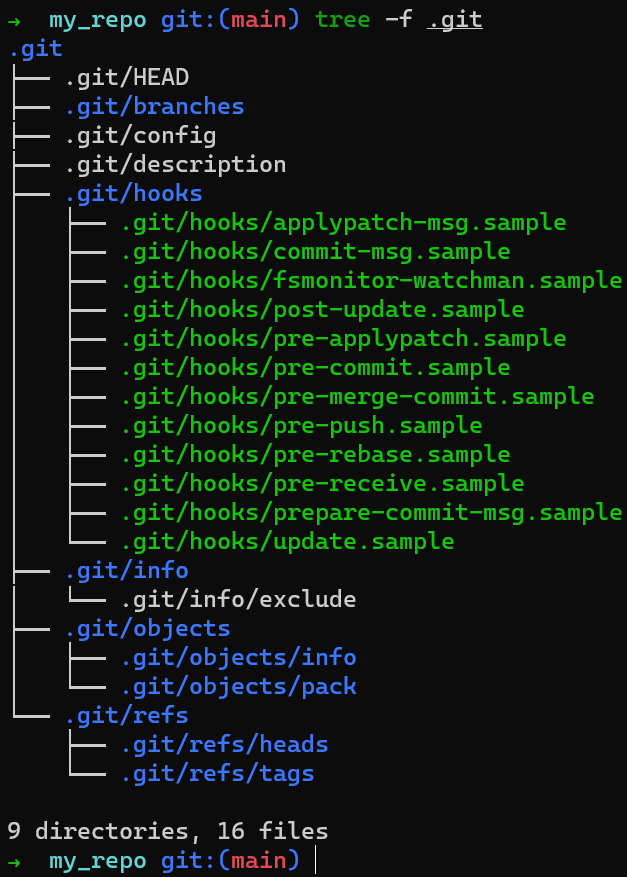 The output of
 tree -f .git after using git init
Create a file inside the my_repo directory:
 Creating
 f.txt
This file is within your working directory. If you run git status, you'll see this file is untracked:
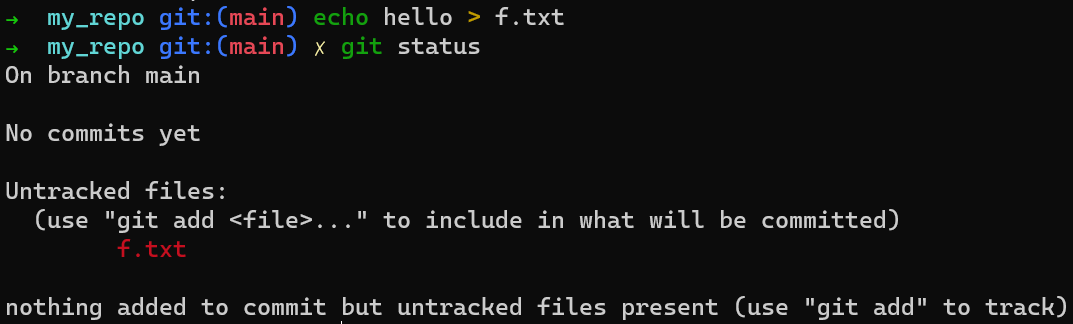 The result of
 git status
Files in your working directory can be in one of two states: tracked or untracked.
Tracked files are files that Git "knows" about. They either were in the last commit, or they are staged now (that is, they are in the staging area).
Untracked files are everything else — any files in your working directory that were not in your last commit, and are not in your staging area.
The new file (f.txt) is currently untracked, as you haven't added it to the staging area, and it hasn't been included in a previous commit.
f.txt is in the working directory (and untracked)
You can now add this file to the staging area (also referred to as staging this file) by using git add f.txt. You can verify that it has been staged by running git status:
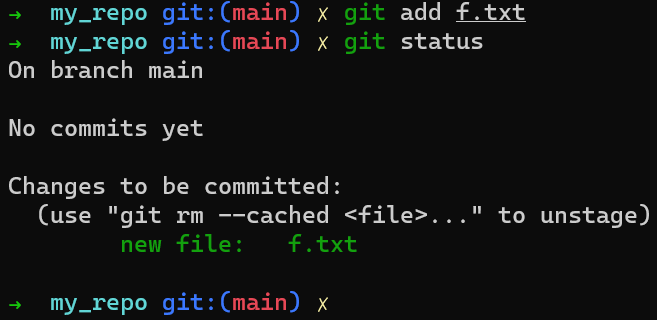 Adding the new file to the staging area
So now the state of the index matches that of the working dir:
 The state after adding the new file
You can now create a commit using git commit:
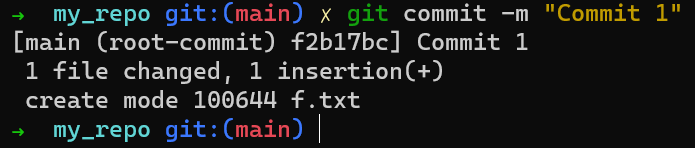 Committing an initial commit
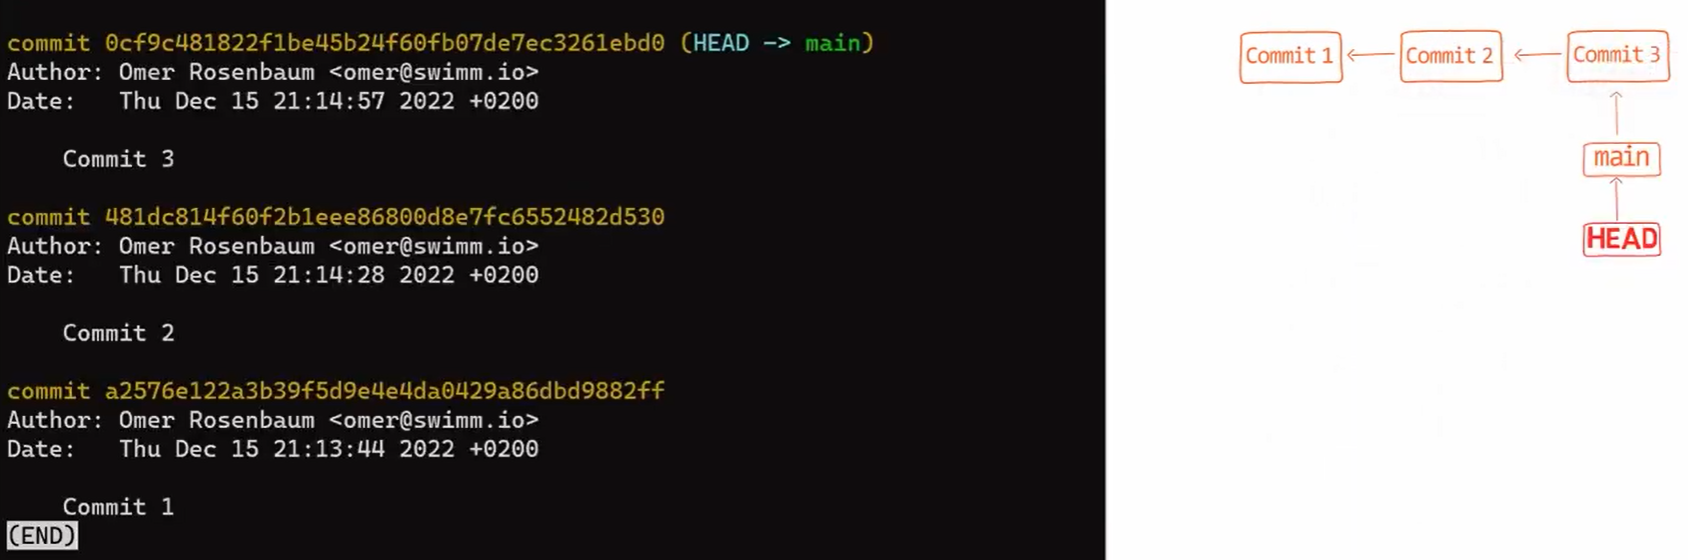
If you run git status again, you'll see that the status is clean - that is, the state of HEAD (which points to your initial commit) equals the state of the index, and also the state of the working dir. By using git log you will see indeed that HEAD points to main which in turn points to your new commit:
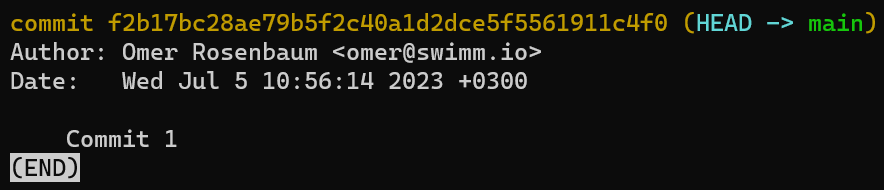 The output of
 git log after introducing the first commit
Has something changed within the .git directory? Run tree -f .git to check:
 A lot of things have changed within
 .git
Apparently, quite a lot has changed. It's time to dive deeper into the structure of .git and understand what is going on under the hood when you run git init, git add or git commit. That's exactly what the next chapter will cover.
Recap - How to Record Changes in Git
You learned about the three different "states" of the file system that Git maintains:
- Working dir(ectory) (also called "working tree") - any directory on your file system which has a repository associated with it.
- Index, or the Staging Area - a playground for the next commit.
- Repository (in short: "repo") - a collection of commits, each of which is a snapshot of the working tree.
When you introduce changes in Git, you almost always follow this order:
- You change the working directory first
- Then you stage these changes (or some of them) to the index
- And finally, you commit these changes - thereby updating the repository with a new commit. The state of this new commit matches the state of the index.
Ready to dive deeper?
Chapter 4 - How to Create a Repo From Scratch
So far we've covered some Git fundamentals, and now you should be ready to really Git going (I can't seem to get enough of that pun).
In order to deeply understand how Git works, you will create a repository, but this time — you will build it from scratch. As in other chapters, I encourage you to try out the commands alongside this chapter.
How to Set Up .git
Create a new directory, and run git status within it:

git status in a new directory
Alright, so Git seems unhappy as you don't yet have a .git folder. The natural thing to do would be to create that directory and try again:
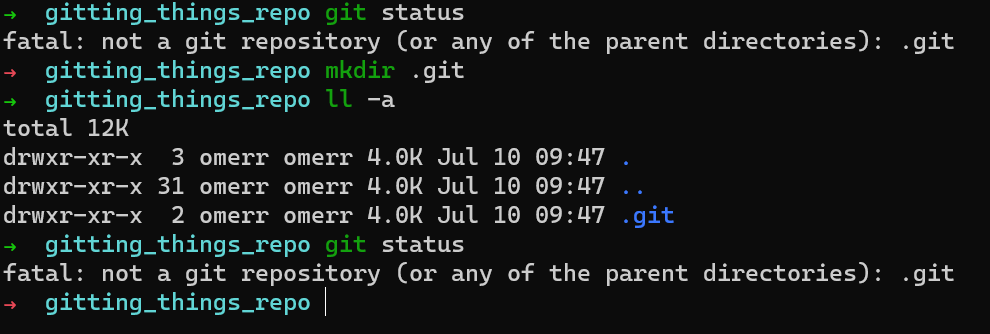
git status after creating .git
Apparently, creating a .git directory is just not enough. You need to add some content to that directory.
A Git repository has two main components:
- A collection of objects — blobs, trees, and commits.
- A system of naming those objects — called references.
A repository may also contain other things, such as hooks, but at the very least — it must include objects and references.
Create a directory for the objects at .git/objects, and a directory for the references (in short: "refs") at .git/refs (on Windows systems — .git\ objects and .git\refs, respectively).
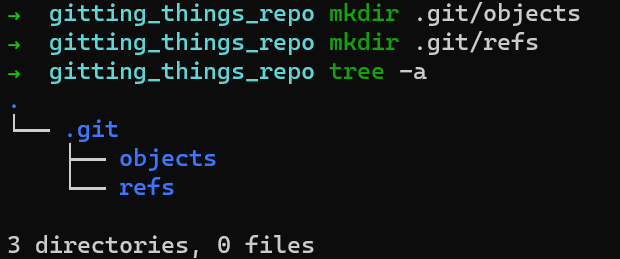 Considering the directory tree
One type of reference is branches. Internally, Git calls branches by the name heads. Create a directory for branches — .git/refs/heads.
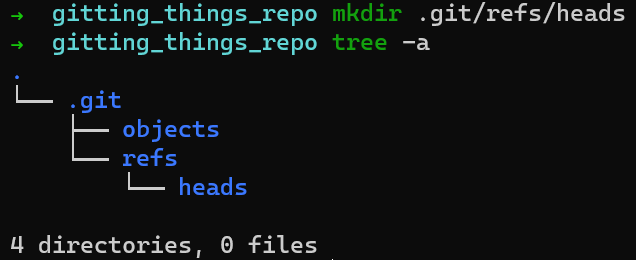 The directory tree
This still doesn't change the result of git status:
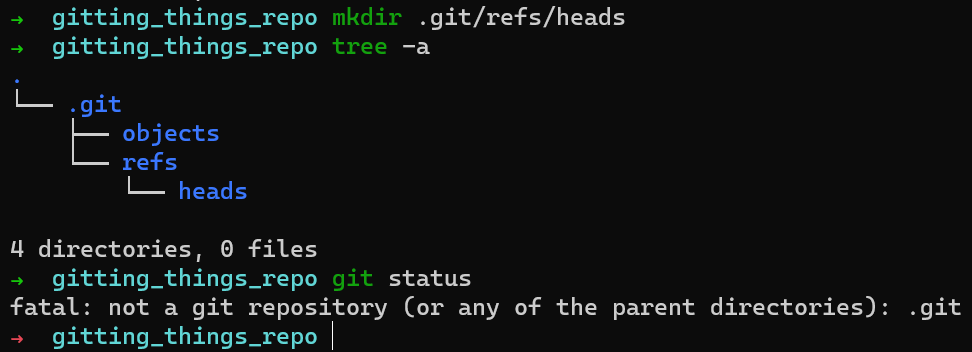
git status after creating .git/refs/heads
How does Git know where to start when looking for a commit in the repository? As I explained earlier, it looks for HEAD, which points to the current active branch (or commit, in some cases).
So, you need to create HEAD, which is just a file residing at .git/HEAD. You can apply the following:
On UNIX:
echo "ref: refs/heads/main" > .git/HEAD
On Windows:
echo ref: refs/heads/main > .git\HEAD
So you now know how HEAD is implemented — it is simply a file, and its contents describe what it points to.
Following the command above, git status seems to change its mind:
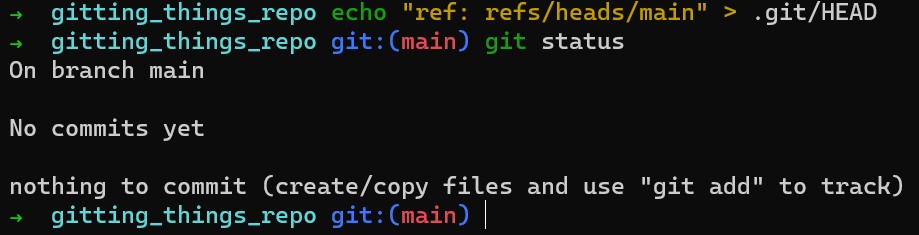
HEAD is just a file
Notice that Git "believes" you are on a branch called main, even though you haven't created this branch. main is just a name. You can also make Git believe you are on a branch called banana if you wish:
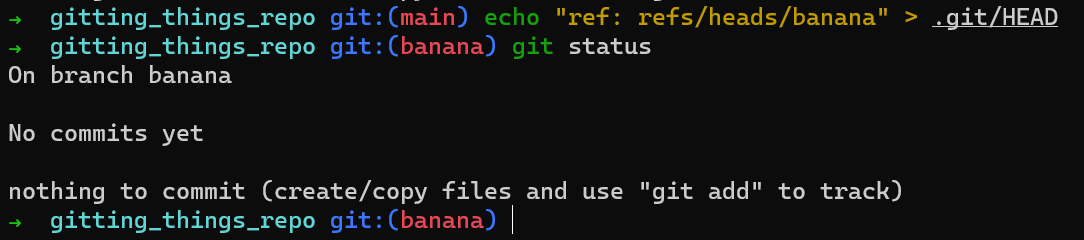 Creating a branch named
 banana
Switch back to main, as you will keep working from (mostly) there throughout this chapter, just to adhere to the regular convention:
echo "ref: refs/heads/main" > .git/HEAD
Now that you have your .git directory ready, you can work your way to make a commit (again, without using git add or git commit).
Plumbing vs Porcelain Commands in Git
At this point, it would be helpful to make a distinction between two types of Git commands: plumbing and porcelain. The application of the terms oddly comes from toilets, traditionally made of porcelain, and the infrastructure of plumbing (pipes and drains).
The porcelain layer provides a user-friendly interface to the plumbing. Most people only deal with the porcelain. Yet, when things go (terribly) wrong, and someone wants to understand why, they would have to roll up their sleeves and deal with the plumbing.
Git uses this terminology as an analogy to separate the low-level commands that users don't usually need to use directly ("plumbing" commands) from the more user-friendly high level commands ("porcelain" commands).
So far, you have dealt with porcelain commands — git init, git add or git commit. It's time to go deeper, and get yourself acquainted with some plumbing commands.
How to Create Objects in Git
Start by creating an object and writing it into the objects database of Git, residing within .git/objects. To know the SHA-1 hash value of a blob, you can git hash-object (yes, a plumbing command), in the following way:
On UNIX:
echo "Git is awesome" | git hash-object --stdin
On Windows:
> echo Git is awesome | git hash-object --stdin
By using --stdin you are instructing git hash-object to take its input from the standard input. This will provide you with the relevant hash value:
 Getting a blob's SHA-1
In order to actually write that blob into Git's object database, you can add the -w switch for git hash-object. Then, you check the contents of the .git folder, and see that they have changed:
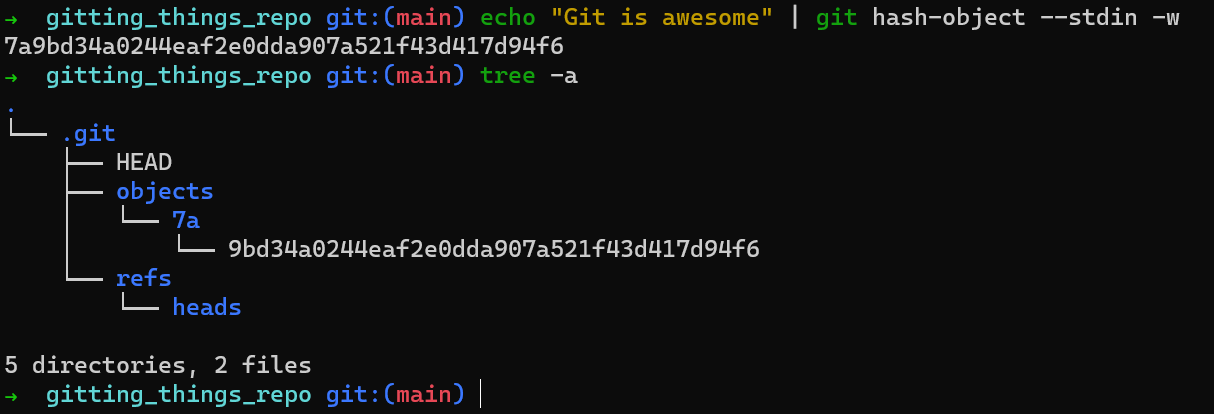 Writing a blob to the objects' database
You can see that the hash of your blob is 7a9bd34a0244eaf2e0dda907a521f43d417d94f6. You can also see that a directory has been created under .git/objects, a directory named 7a, and within it, a file by the name of 9bd34a0244eaf2e0dda907a521f43d417d94f6.
What Git did here is take the first two characters of the SHA-1 hash, and use them as the name of a directory. The remaining characters are used as the filename for the file that actually contains the blob.
Why is that so? Consider a fairly big repository, one that has 400,000 objects (blobs, trees, and commits) in its database. Looking up a hash inside that list of 400,000 hashes might take a while. Thus, Git simply divides that problem by 256.
To look up the hash above, Git would first look for the directory named 7a inside the directory .git/objects, which may have up to 256 directories (00 through FF). Then, it will search within that directory, narrowing down the search as it goes.
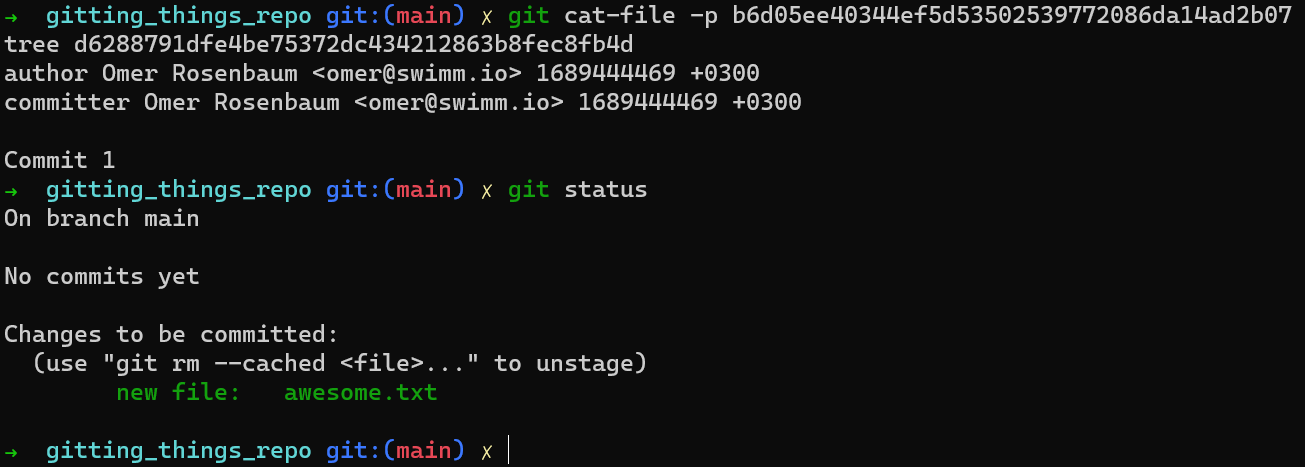
Back to the process of generating a commit. You have just created an object. What is the type of that object? You can use another plumbing command, git cat-file -t (-t stands for "type"), to check that out:
 _Using
 git cat-file -t <object_sha> reveals the type of the Git object_
Not surprisingly, this object is a blob. You can also use git cat-file -p (-p stands for "pretty-print") to see its contents:

git cat-file -p
This process of creating a blob object under .git/objects usually happens when you add something to the staging area — that is, when you use git add. So blobs are not created every time you save a file to the file system (the working dir), but only when you stage it.
Remember that Git creates a blob of the entire file that is staged. Even if a single character is modified or added, the file has a new blob with a new hash (as in the example in chapter 1 where you added ! at the end of a line).
Will there be any change to git status?
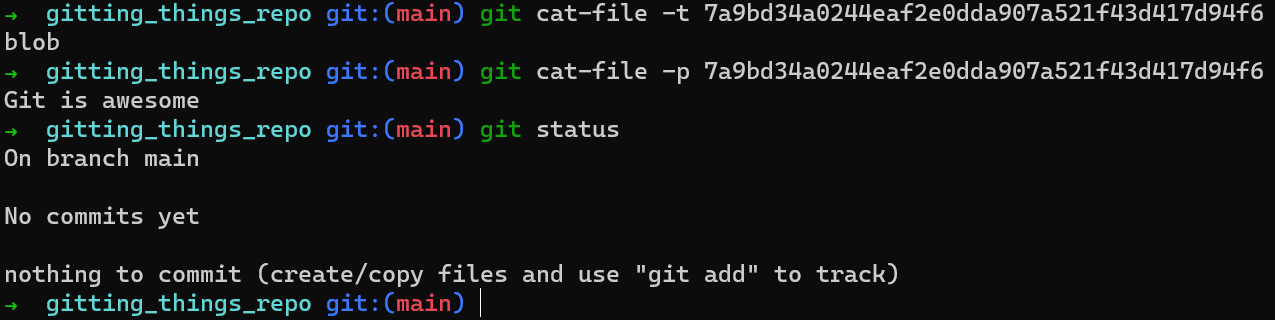
git status after creating a blob object
Apparently, no. Adding a blob object to Git's internal database does not change the status, as Git does not know of any tracked (or untracked) files at this stage.
You need to track this file — add it to the staging area. To do that, you can use another plumbing command, git update-index, like so:
git update-index --add --cacheinfo 100644 <blob-hash> <filename>
Note: The cacheinfo is a 16-bit file mode as stored by Git, following the layout of POSIX types and modes. This is not within the scope of this book, as it is really not important for you to Git things done.
Running the command above will result in a change to .git's contents:
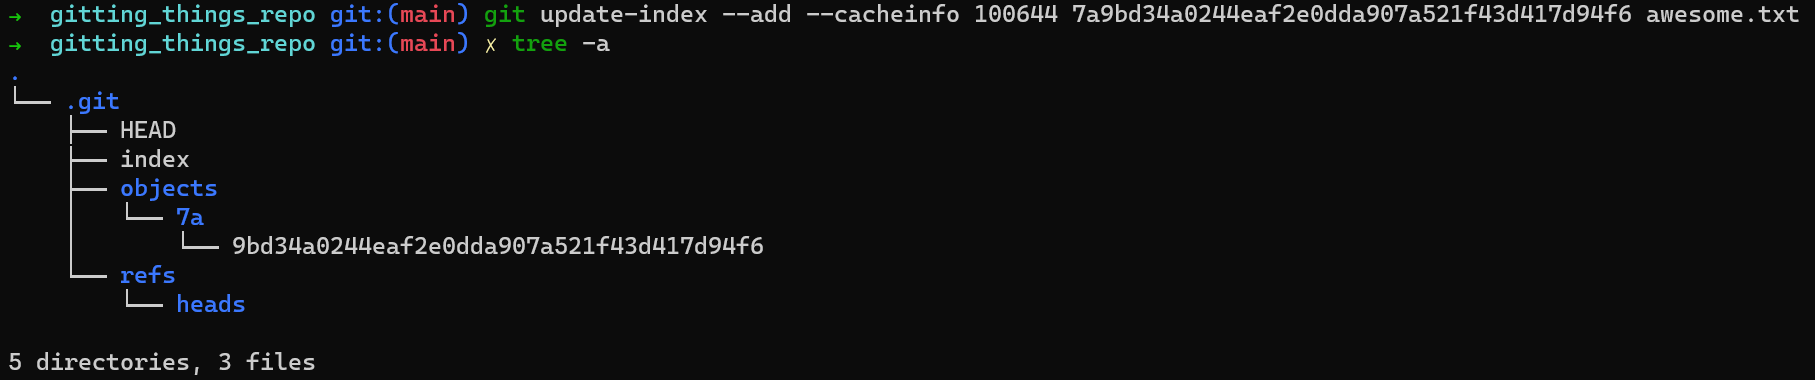 The state of
 .git after updating the index
Can you spot the change? A new file by the name of index has been created. This is it — the famous index (or staging area), is basically a file that resides within .git/index.
So now that your blob has been added to the index, do you expect git status to look different?
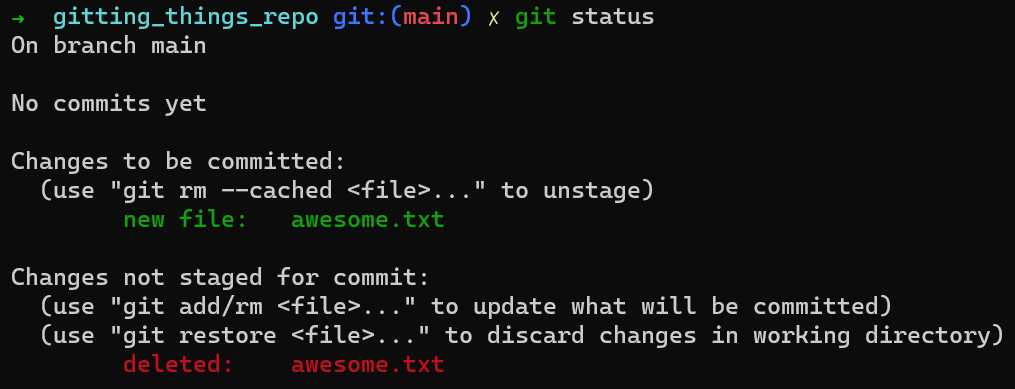
git status after using git update-index
That's interesting! Two things happened here.
First, you can see that awesome.txt appears in green, in the "Changes to be committed" area. That is so because the index now includes awesome.txt, waiting to be committed.
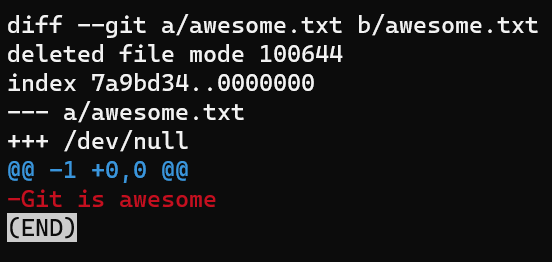
Second, we can see that awesome.txt appears in red — because Git believes the file awesome.txt has been deleted, and the fact that the file has been deleted is not staged.
(Note: You may have noticed that I sometimes refer to Git with words such as "believes", "thinks", or "wants". As I explained in the introduction of this book - in order for us to enjoy playing around with Git, and reading (and writing) this book, I feel like referring to Git as more than just code makes it all so much more enjoyable.)
This happens as you added the blob with the contents Git is awesome to the objects' database, and updated the index that the file awesome.txt holds the contents of that blob, but you never actually created that file on disk.
You can easily solve this by taking the contents of the blob and writing them to our file system, to a file called awesome.txt:
echo "Git is awesome" > awesome.txt
As a result, it will no longer appear in red by git status:
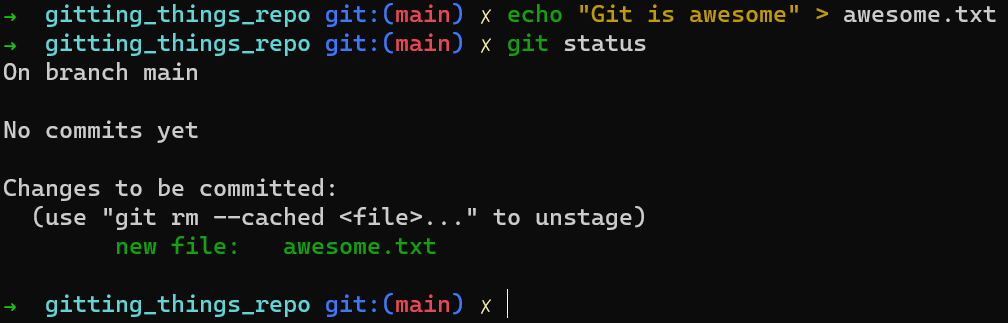
git status after creating awesome.txt on disk
So now it's time to create a commit object from your staging area. As explained in chapter 1, a commit object has a reference to a tree, so you need to create a tree.
You can achieve this using the command git write-tree, which records the contents of the index in a tree object. Of course, you can use git cat-file -t to see that it's indeed a tree:
 Creating a tree object with the contents of the index
And you can use git cat-file -p to see its contents:

git cat-file -p to see the tree's contents
Great, so you created a tree, and now you need to create a commit object that references this tree. To do that, you can use the command:
git commit-tree <tree-hash> -m <commit message>
 Committing using the tree object
You should now feel comfortable with the commands used to check the created object's type, and print its contents:
 Creating a commit object
Note that this commit object doesn't have a parent, because it is the first commit. When you add another commit you will probably want to declare its parent — don't worry, you will do so later.
The last hash that we got — b6d05ee40344ef5d53502539772086da14ad2b07 – is a commit's hash. You should actually be used to using these hashes — you probably look at them all the time (when using git log, for instance). Note that this commit object points to a tree object, with its own hash, which you rarely specify explicitly.
Will something change in git status?
git status after creating a commit object
No, nothing has changed. Why is that?
Well, to know that your file has been committed, Git needs to know about the latest commit. How does Git do that? It goes to the HEAD:
 Looking at the contents of
 HEAD
HEAD points to main, but what is main? You haven't really created it yet.
As we explained earlier in chapter 2, a branch is simply a named reference to a commit. And in this case, we would like main to refer to the commit object with the hash b6d05ee40344ef5d53502539772086da14ad2b07.
You can achieve this by creating a file at .git/refs/heads/main, with the contents of this hash, like so:
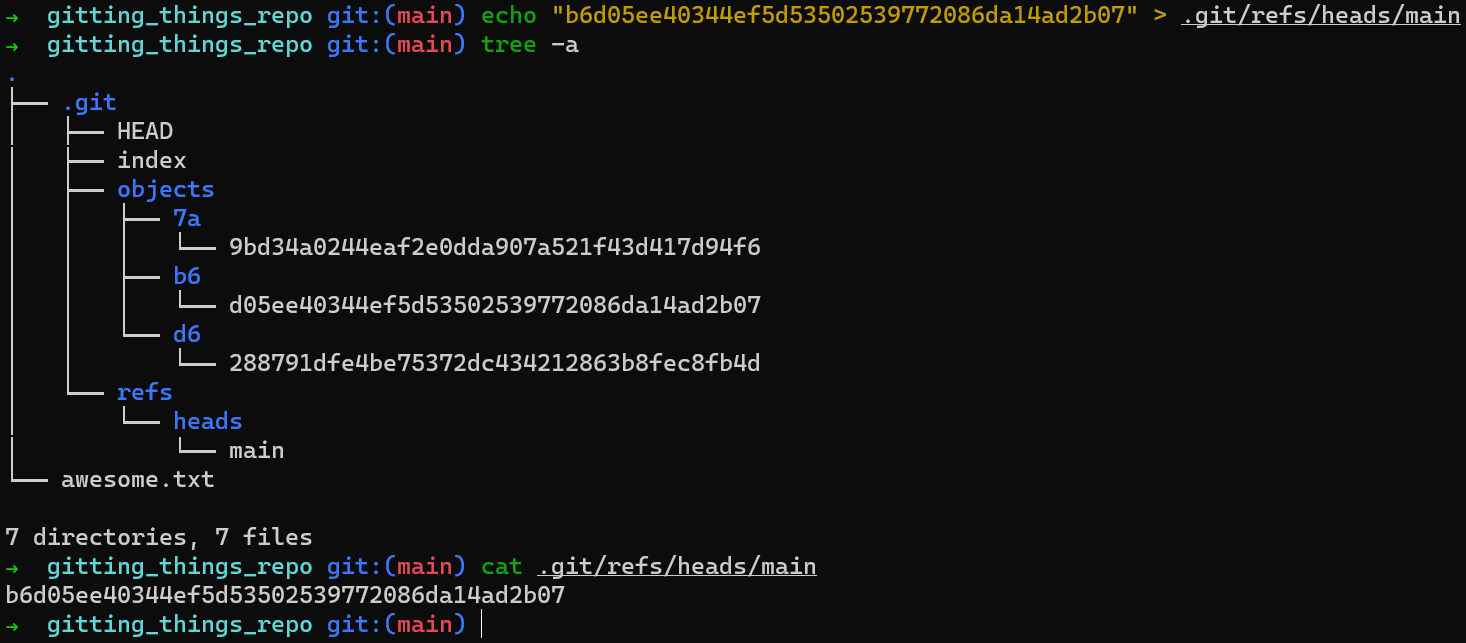 Creating
 main
In sum, a branch is just a file inside .git/refs/heads, containing a hash of the commit it refers to.
Now, finally, git status and git log seem to appreciate our efforts:

git status

git log
You have successfully created a commit without using porcelain commands! How cool is that?
Recap - How to Create a Repo From Scratch
In this chapter, you fearlessly deep-dived into Git. You stopped using porcelain commands and switched to plumbing commands.
By using echo and low-level commands such as git hash-object, you were able to create a blob, add it to the index, create a tree of the index, and create a commit object pointing to that tree.
You also learned that HEAD is a file, located in .git/HEAD. Branches are also files, located under .git/refs/heads. When you understand how Git operates, those abstract notions of HEAD or "branches" become very tangible.
The next chapter will deepen your understanding of how branches work under the hood.
Chapter 5 - How to Work with Branches in Git — Under the Hood
In the previous chapter you created a repository and a commit without using git init, git add or git commit. In this chapter, you we will create and switch between branches without using porcelain commands (git branch, git switch, or git checkout).
It's perfectly understandable if you are excited, I am too!
Continuing from the previous chapter - you only have one branch, named main. To create another one with the name test (as the equivalent of git branch test), you would need to create a file named test within .git/refs/heads, and the contents of that file would be the same commit's hash as the main branch points to.
 Creating
 test branch
If you use git log, you can see that this is indeed the case — both main and test point to this commit:

git log after creating test branch
(Note: if you run this command and don't see a valid output, you may have written something other than the commit's hash into .git/refs/heads/test.)
Next, switch to our newly created branch (the equivalent of git checkout test). How would you do that? Try to answer for yourself before moving on to the next paragraph.
To change the active branch, you should change HEAD to point to your new branch:
 Switching to branch
 test by changing HEAD
As you can see, git status confirms that HEAD now points to test, which is, therefore, the active branch.
You can now use the commands you have already used in the previous chapter to create another file and add it to the index:
 Writing and staging another file
Following the commands above, you:
- Create a blob with the content of
Another File(usinggit hash-object). - Add it to the index by the name
another_file.txt(usinggit update-index). - Create a corresponding file on disk with the contents of the blob (using
git cat-file -p). - Create a tree object representing the index (using
git write-tree).
It's now time to create a commit referencing this tree. This time, you should also specify the parent of this commit — which would be the previous commit. You specify the parent using the -p switch of git commit-tree:
 Creating another commit object
We have just created a commit, with a tree as well as a parent, as you can see:
 Observing the new commit object
(Note: the SHA-1 value of your commit object will be different than the one shown in the screenshot above, as it includes the timestamp of the commit, and also author's details - which would be different on your machine.)
Will git log show us the new commit?

git log after creating "Commit 2"
As you can see, git log doesn't show anything new. Why is that?
Remember that git log traces the branches to find relevant commits to show. It shows us now test and the commit it points to, and it also shows main which points to the same commit.
That's right — you need to change test to point to the new commit object. You can do that by changing the contents of .git/refs/heads/test:
echo 22267a945af8fde78b62ee7f705bbecfdd276b3d > .git/refs/heads/test
And now if you run git log:
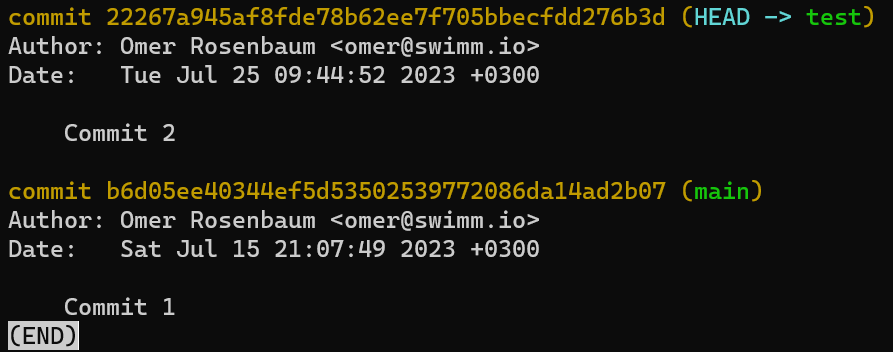
git log after updating test branch
It worked!
git log goes to HEAD, which tells Git to go to the branch test, which points to commit 222..3d, which links back to its parent commit b6d..07.
Feel free to admire the beauty, I Git you. 😊
By inspecting your repository's folder, you can see that you have six different objects under the folder .git/objects - these are the two blobs you created (one for awesome.txt and one for file.txt), two commit objects ("Commit 1" and "Commit 2"), and the tree objects - each pointed to by one of the commit objects.
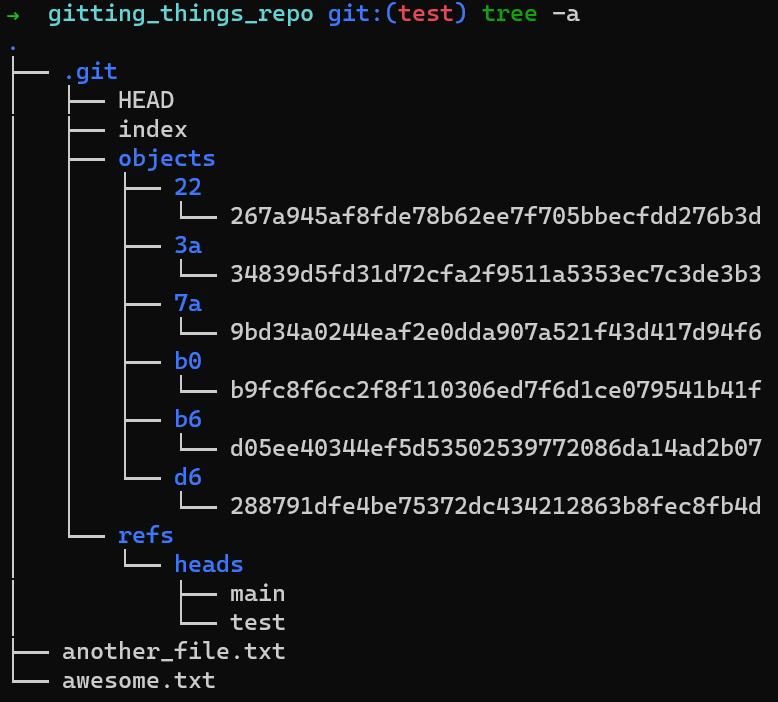 The tree listing after creating "Commit 2"
You also have .git/HEAD that points to the active branch or commit, and two branches - within .git/refs/heads.
Recap - How to Work with Branches in Git — Under the Hood
In this chapter you understood how branches actually work in Git.
The main things we covered:
- A branch is a file under
.git/refs/heads, where the content of the file is a SHA-1 value of a commit. - To create a new branch, Git simply creates a new file under
.git/refs/headswith the name of the branch - for example,.git/refs/heads/my_branchfor the branchmy_branch. - To switch the active branch, Git modifies the contents of
.git/HEADto refer to the new active branch..git/HEADmay also point to a commit object directly. - When committing using
git commit, Git creates a commit object, and also moves the current branch (that is, the contents of the file under.git/refs/heads) to point to the newly created commit object.
Part 1 - Summary
This part introduced you to the internals of Git. We started by covering the basic objects — blobs, trees, and commits.
You learned that a blob holds the contents of a file. A tree is a directory-listing, containing blobs and/or sub-trees. A commit is a snapshot of our working directory, with some meta-data such as the time or the commit message.
You learned about branches, seeing that they are nothing but a named reference to a commit.
You learned the process of recording changes in Git, and that it involves the working directory, a directory that has a repository associated with it, the staging area (index) which holds the tree for the next commit, and the repository, which is a collection of commits and references.
We clarified how these terms relate to Git commands we know by creating a new repository and committing a file using the well-known git init, git add, and git commit.
Then you created a new repository from scratch, by using echo and low-level commands such as git hash-object. You created a blob, added it to the index, created a tree object representing the index, and even created a commit object pointing to that tree.
You were also able to create and switch between branches by modifying files directly. Kudos to those of you who tried this on your own!
All together, after following along through this part, you should feel that you've deepened your understanding of what is happening under the hood when working with Git.
The next part will explore different strategies for integrating changes when working in different branches in Git - specifically, merge and rebase.
Part 2 - Branching and Integrating Changes
Chapter 6 - Diffs and Patches
In Part 1 you learned how Git works under the hood, the different Git objects, and how to create a repo from scratch.
When teams work with Git, they introduce sequences of changes, usually in branches, and then they need to combine different change histories together. To really understand how this is achieved, you should learn how Git treats diffs and patches. You will then apply your knowledge to understand the process of merge and rebase.
Many of the interesting processes in Git like merging, rebasing, or even committing are based on diffs and patches. Developers work with diffs all the time, whether using Git directly or relying on the IDE's diff view. In this chapter, you will learn what Git diffs and patches are, their structure, and how to apply patches.
As a reminder from the chapter on Git Objects, a commit is a snapshot of the working tree at a certain point in time, in addition to some meta-data.
Yet, it is really hard to make sense of individual commits by looking at the entire working tree. Rather, it is more helpful to look at how different a commit is from its parent commit, that is, the diff between these commits.
So, what do I mean when I say "diff"? Let's start with some history.
Git Diff's History
Git's diff is based on the diff utility on UNIX systems. diff was developed in the early 1970's on the Unix operating system. The first released version shipped with the Fifth Edition of Unix in 1974.
git diff is a command that takes two inputs, and computes the difference between them. Inputs can be commits, but also files, and even files that have never been introduced to the repository.
 Git diff takes two inputs, which can be commits or files
This is important - git diff computes the difference between two strings, which most of the time happen to consist of code, but not necessarily.
Time to Get Hands-On
As always, you are encouraged to run the commands yourself while reading this chapter. Unless noted otherwise, I will use the following repository:
https://github.com/Omerr/gitting_things_repo.git
You can clone it locally and have the same starting point I am using for this chapter.
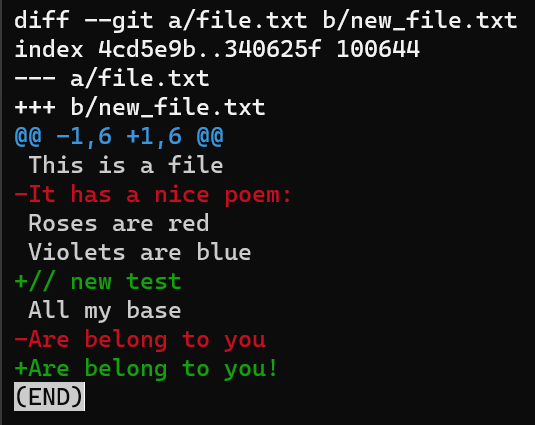
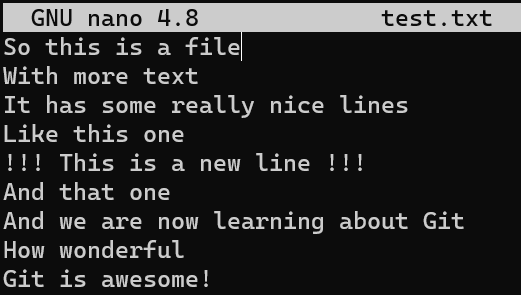
Consider this short text file on my machine, called file.txt, which consists of 6 lines:
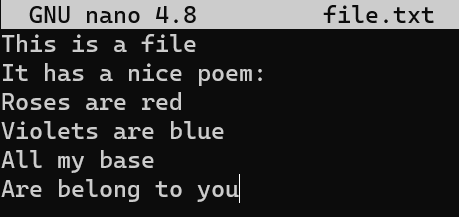
file.txt consists of six lines
Now, modify this file a bit. Remove the second line, and insert a new line as the fourth line. Add an exclamation mark (!) to the end of the last line, so you get this result:
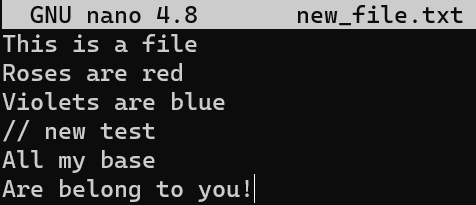 After modifying
 file.txt, we get different six lines
Save this file with a new name, new_file.txt.
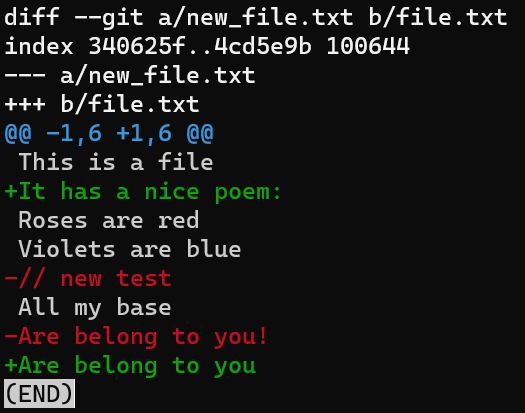
Now you can run git diff to compute the difference between the files like so:
git diff --no-index file.txt new_file.txt
(I will explain the --no-index switch of this command later. For now it's enough to understand it allows us to compare between two files that are not part of a Git repository.)
 _The output of
 git diff --no-index file.txt new_file.txt_
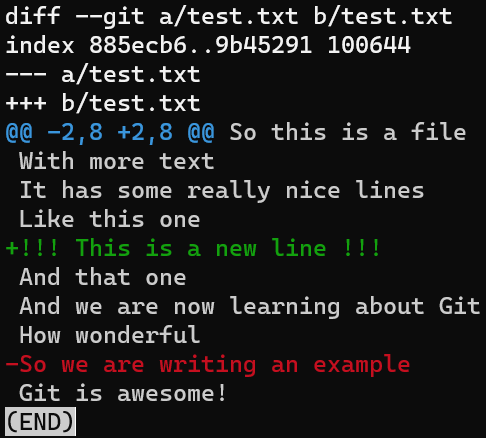
The output of git diff shows quite a lot of things.
Focus on the part starting with This is a file. You can see that the added line (// new test) is preceded by a + sign. The deleted line is preceded by a - sign.
Interestingly, notice that Git views a modified line as a sequence of two changes - erasing a line and adding a new line instead. So the patch includes deleting the last line, and adding a new line that's equal to that line, with the addition of a !.
 Addition lines are preceded by
 +, deletion lines by -, and modification lines are sequences of deletions and additions
Now would be a good time to discuss the terms "patch" and "diff". These two are often used interchangeably, although there is a distinction, at least historically.
A diff shows the differences between two files, or snapshots, and can be quite minimal in doing so. A patch is an extension of a diff, augmented with further information such as context lines and filenames, which allow it to be applied more widely. It is a text document that describes how to alter an existing file or codebase.
These days, the Unix diff program, and git diff, can produce patches of various kinds.
A patch is a compact representation of the differences between two files. It describes how to turn one file into another.
In other words, if you apply the "instructions" produced by git diff on file.txt - that is, remove the second line, insert // new test as the fourth line, remove the last line, and add instead a line with the same content and ! - you will get the content of new_file.txt.
Another important thing to note is that a patch is asymmetric: the patch from file.txt to new_file.txt is not the same as the patch for the other direction. Generating a patch between new_file.txt and file.txt, in this order, would mean exactly the opposite instructions than before - add the second line instead of removing it, and so on.
 A patch consists of asymmetric instructions to get from one file to another
Try it out:
git diff --no-index new_file.txt file.txt
 Running git diff in the reverse direction yields the reverse instructions - add a line instead of removing it, and so on
The patch format uses context, as well as line numbers, to locate differing file regions. This allows a patch to be applied to a somewhat earlier or later version of the first file than the one from which it was derived, as long as the applying program can still locate the context of the change. We will see exactly how these are used.
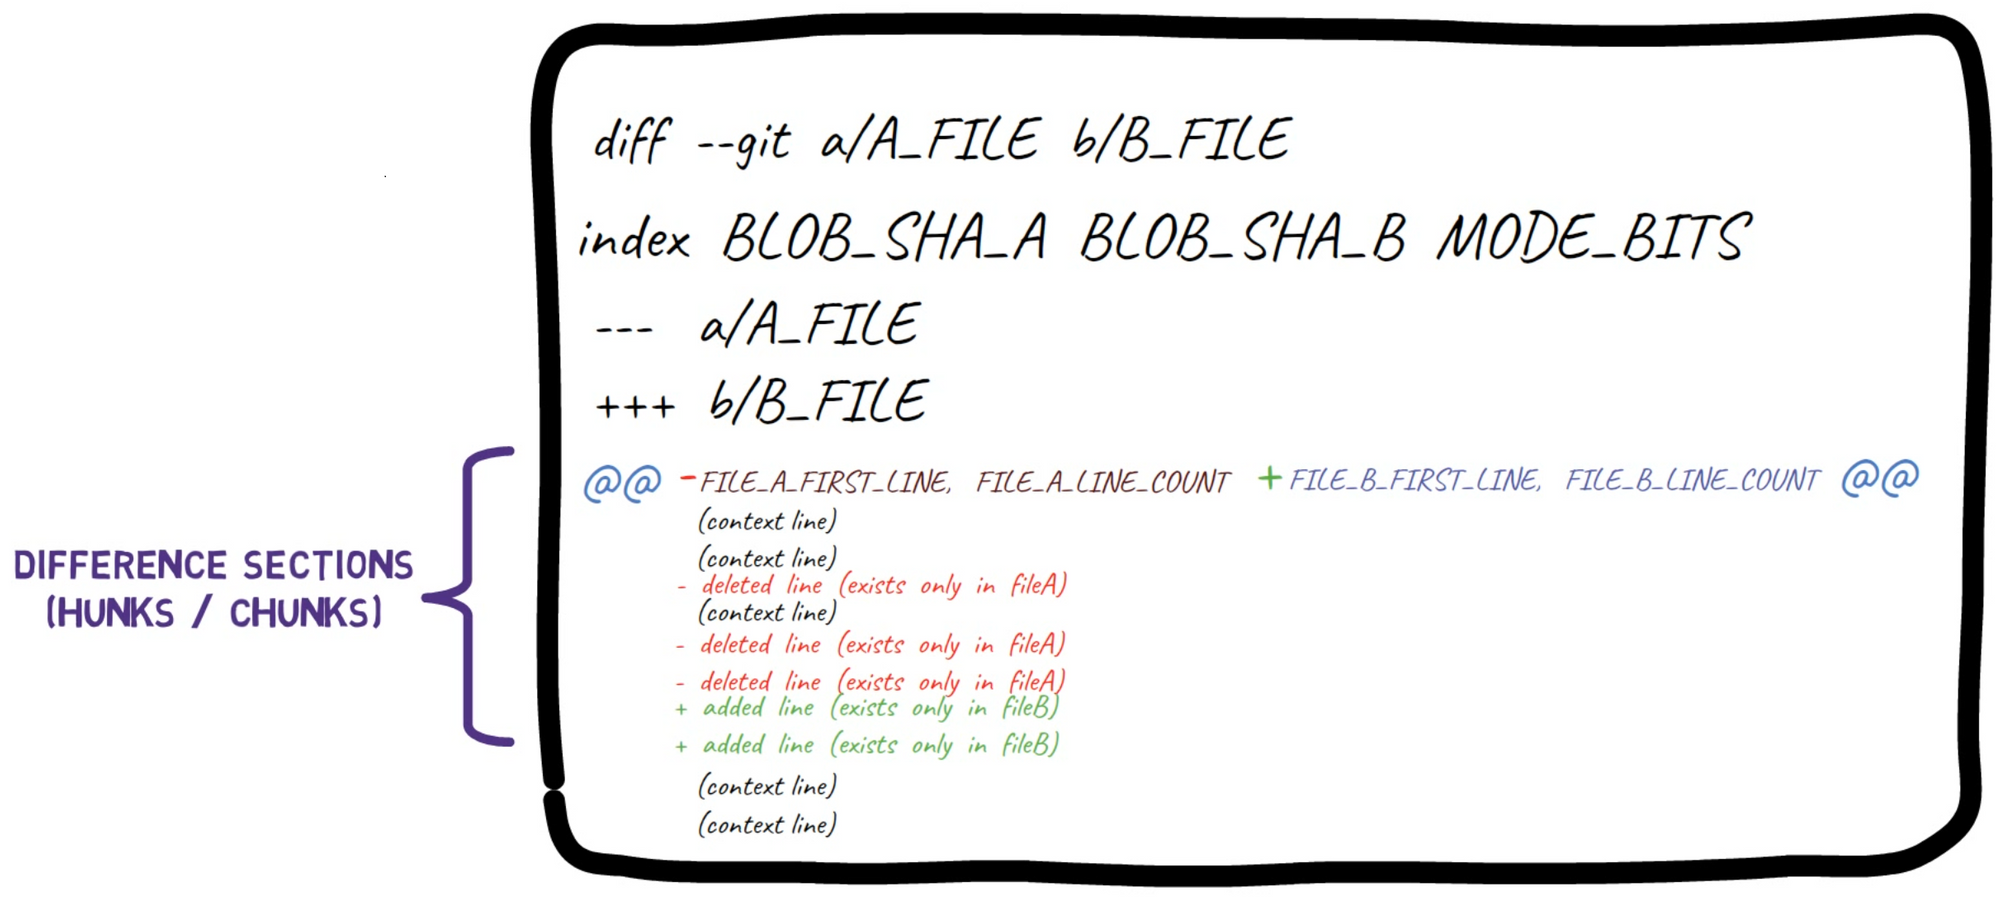
The Structure of a Diff
It's time to dive deeper.
Generate a diff from file.txt to new_file.txt again, and consider the output more carefully:
git diff --no-index file.txt new_file.txt
 _The output of
 git diff --no-index file.txt new_file.txt_
The first line introduces the compared files. Git always gives one file the name a, and the other the name b. So in this case file.txt is called a, whereas new_file.txt is called b.
 The first line in
 diff's output introduces the files being compared
Then the second line, starting with index, includes the blob SHAs of these files. So even though in our case they are not even stored within a Git repo, Git shows their corresponding SHA-1 values.
The third value in this line, 100644, is the "mode bits", indicating that this is a "regular" file: not executable and not a symbolic link.
The use of two dots (..) here between the blob SHAs is just as a separator (unlike other cases where it's used within Git).
 The second line in
 diff's output includes the blob SHAs of the compared files, as well as the mode bits
Other header lines might indicate the old and new mode bits if they've changed, old and new filenames if the files were being renamed, and so on.
The blob SHAs (also called "blob IDs") are helpful if this patch is later applied by Git to the same project and there are conflicts while applying it. You will better understand what this means when you learn about the merges in the next chapter.
After the blob IDs, we have two lines: one starting with - signs, and the other starting with + signs. This is the traditional "unified diff" header, again showing the files being compared and the direction of the changes: - signs show lines in the A version that are missing from the B version, and + signs show lines missing in the A version but present in B.
If the patch were of this file being added or deleted in its entirety, then one of these would be /dev/null to signal that.
- signs show lines in the A version but missing from the B version, and + signs, lines missing in A version but present in B
Consider the case where you delete a file:
rm awesome.txt
And then use git diff:
git diff's output for a deleted file
The A version, representing the state of the index, is currently awesome.txt, compared to the working dir where this file does not exist, so it is /dev/null. All lines are preceded by - signs as they exist only in the A version.
For now, undo the deleting (more on undoing changes in Part 3):
git restore awesome.txt
Going back to the diff we started with:
 _The output of
 git diff --no-index file.txt new_file.txt_
After this unified diff header, we get to the main part of the diff, consisting of "difference sections", also called "hunks" or "chunks" in Git. Note that these terms are used interchangeably, and you may stumble upon either of them in Git's documentation and tutorials, as well as Git's source code.
Every hunk begins with a single line, starting with two @ signs. These signs are followed by at most four numbers, and then a header for the chunk - which is an educated guess by Git. Usually, it will include the beginning of a function or a class, when possible.
In this example it doesn't include anything as this is a text file, so consider another example for a moment:
git diff --no-index example.py example_changed.py
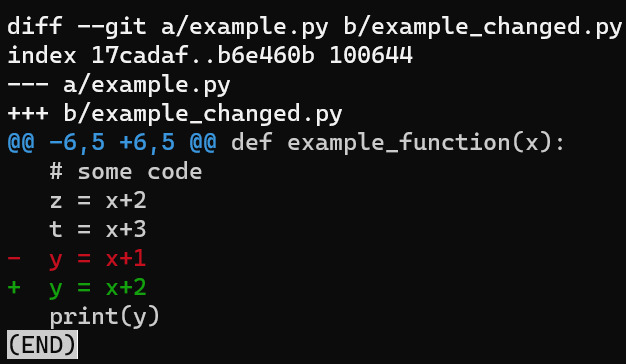 When possible, Git includes a header for each hunk, for example a function or class definition
In the image above, the hunk's header includes the beginning of the function that includes the changed lines - def example_function(x).
Back to our previous example then:
 Back to the previous diff
After the two @ signs, you'll find four numbers:
The first numbers are preceded by a - sign as they refer to file A. The first number represents the line number corresponding to the first line in file A that this hunk refers to. In the example above, it is 1, meaning that the line This is a file corresponds to line number 1 in version file A.
This number is followed by a comma (,), and then the number of lines this chunk consists of in file A. This number includes all context lines (the lines preceded with a space in the diff), or lines marked with a - sign, as they are part of file A, but not lines marked with a + sign, as they do not exist in file A.
In our example, this number is 6, counting the context line This is a file, the - line It has a nice poem:, then the three context lines, and lastly Are belong to you.
As you can see, the lines beginning with a space character are context lines, which means they appear as shown in both file A and file B.
Then, we have a + sign to mark the two numbers that refer to file B. First, there's the line number corresponding to the first line in file B, followed by the number of lines this chunk consists of in file B.
This number includes all context lines, as well as lines marked with the + sign, as they are part of file B, but not lines marked with a - sign.
These four numbers are followed by two additional @ signs.
After the header of the chunk, we get the actual lines - either context, -, or + lines.
Typically and by default, a hunk starts and ends with three context lines. For example, if you modify lines 4-5 in a file with ten lines:
- Line 1 - context line (before the changed lines)
- Line 2 - context line (before the changed lines)
- Line 3 - context line (before the changed lines)
- Line 4 - changed line
- Line 5 - another changed line
- Line 6 - context line (after the changed lines)
- Line 7 - context line (after the changed lines)
- Line 8 - context line (after the changed lines)
- Line 9 - this line will not be part of the hunk
So by default, changing lines 4-5 results in a hunk consisting of lines 1-8, that is, three lines before and three lines after the modified lines.
If that file doesn't have nine lines, but rather six lines - then the hunk will contain only one context line after the changed lines, and not three. Similarly, if you change the second line of a file, then there would be only one line of context before the changed lines.
 The patch format by
 git diff
How to Produce Diffs
The last example we considered shows a diff between two files. A single patch file can contain the differences for any number of files, and git diff produces diffs for all altered files in the repository in a single patch.
Often, you will see the output of git diff showing two versions of the same file and the difference between them.
To demonstrate, consider the state in another branch called diffs:
git checkout diffs
Again, I encourage you to run the commands with me - make sure you clone the repository from:
https://github.com/Omerr/gitting_things_repo.git
At the current state, the active directory is a Git repository, with a clean status:

git status
Take an existing file, my_file.py:
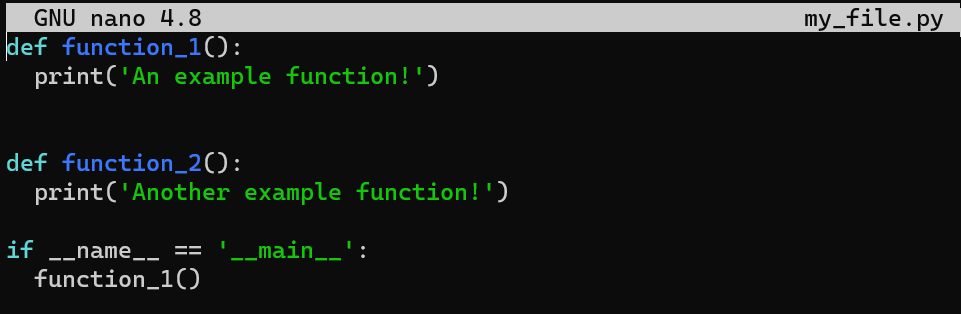 _An example file -
 my_file.py_
And change the second line from print('An example function!') to print('An example function! And it has been changed!'):
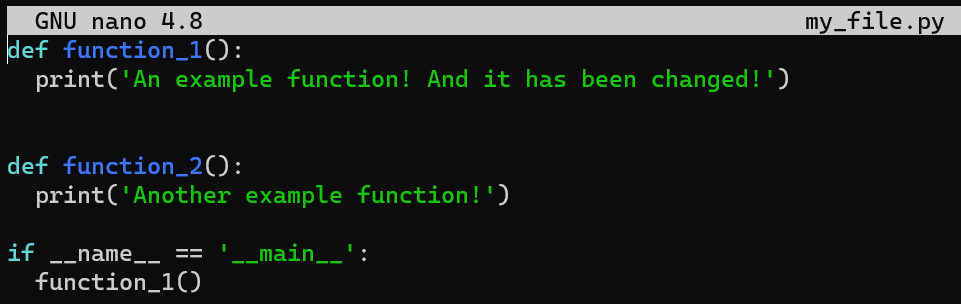 _The contents of
 my_file.py after modifying the second line_
Save your changes, but don't stage or commit them. Next, run git diff:
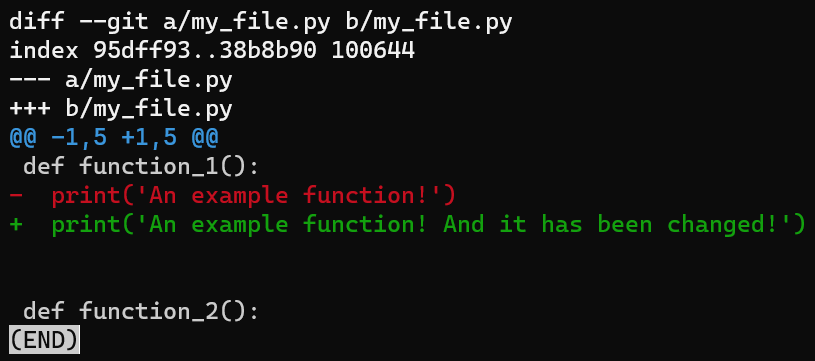 _The output of
 git diff for my_file.py after changing it_
The output of git diff shows the difference between my_file.py's version in the staging area, which in this case is the same as the last commit (HEAD), and the version in the working directory.
I covered the terms "working directory", "staging area", and "commit" in the Git objects chapter, so check it out in ccase you would like to refresh your memory. As a reminder, the terms "staging area" and "index" are interchangeable, and both are widely used.
 At this state, the status of the working dir is different from the status of the index. The status of the index is the same as that of
 HEAD
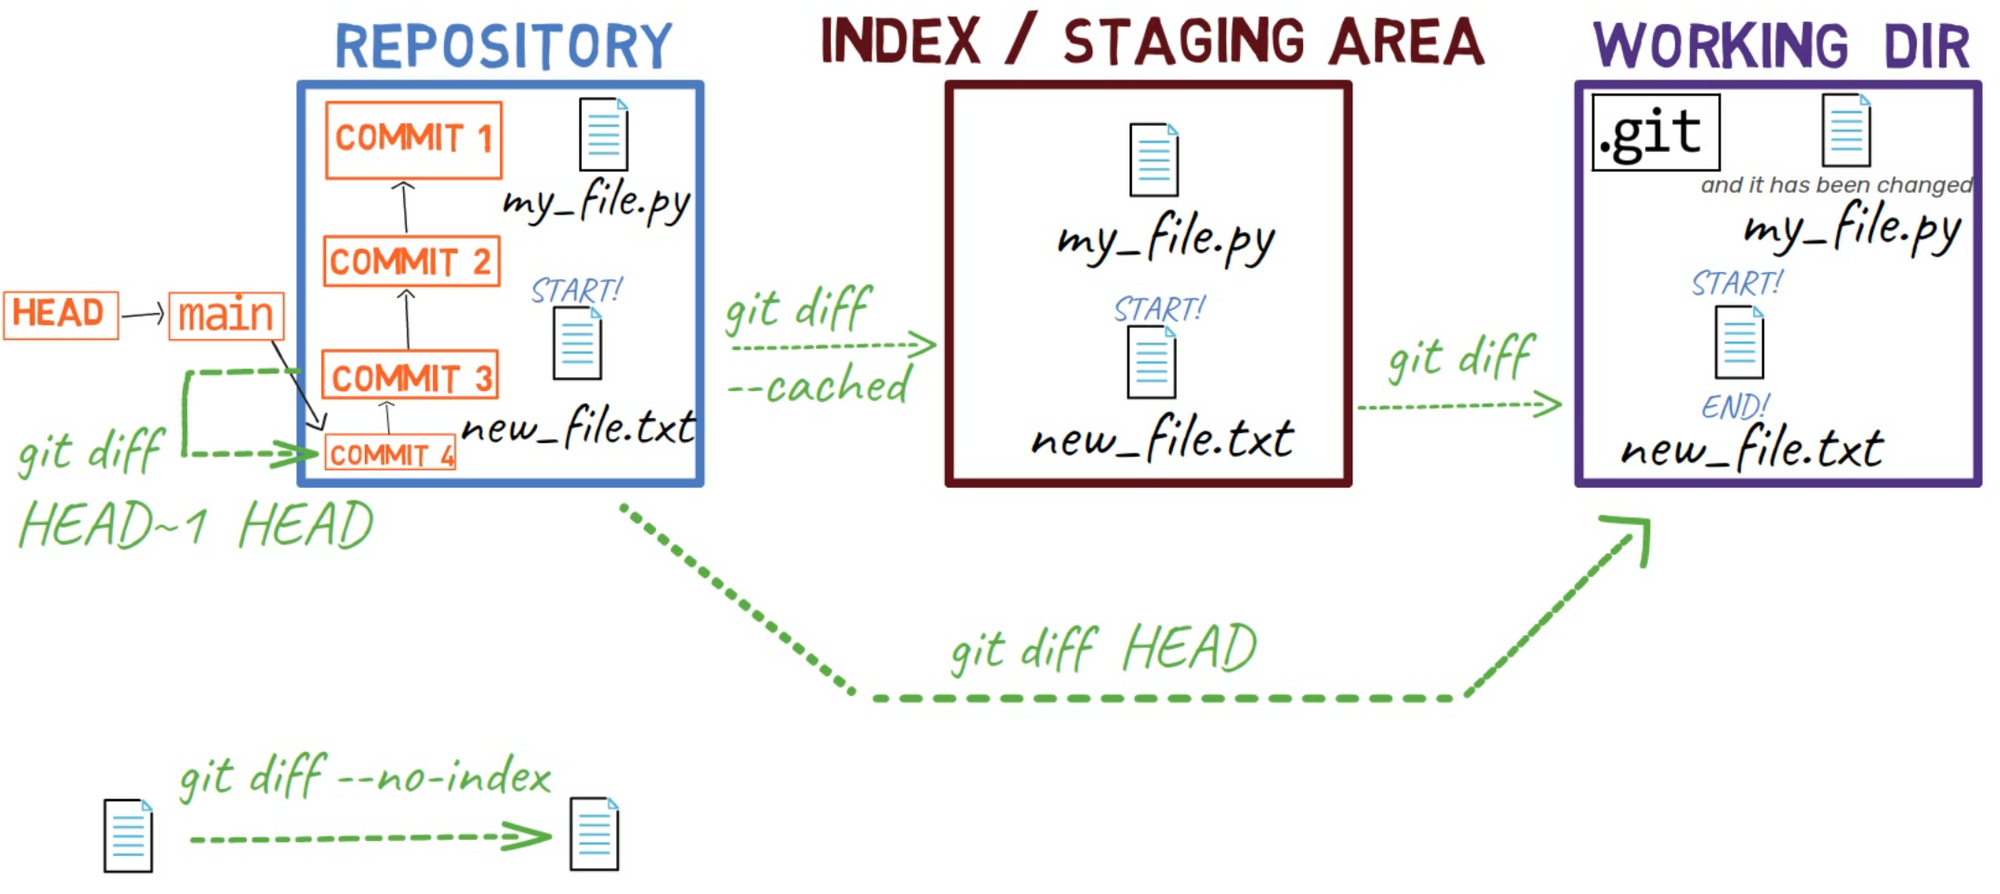
To see the difference between the working dir and the staging area, use git diff, without any additional flags.
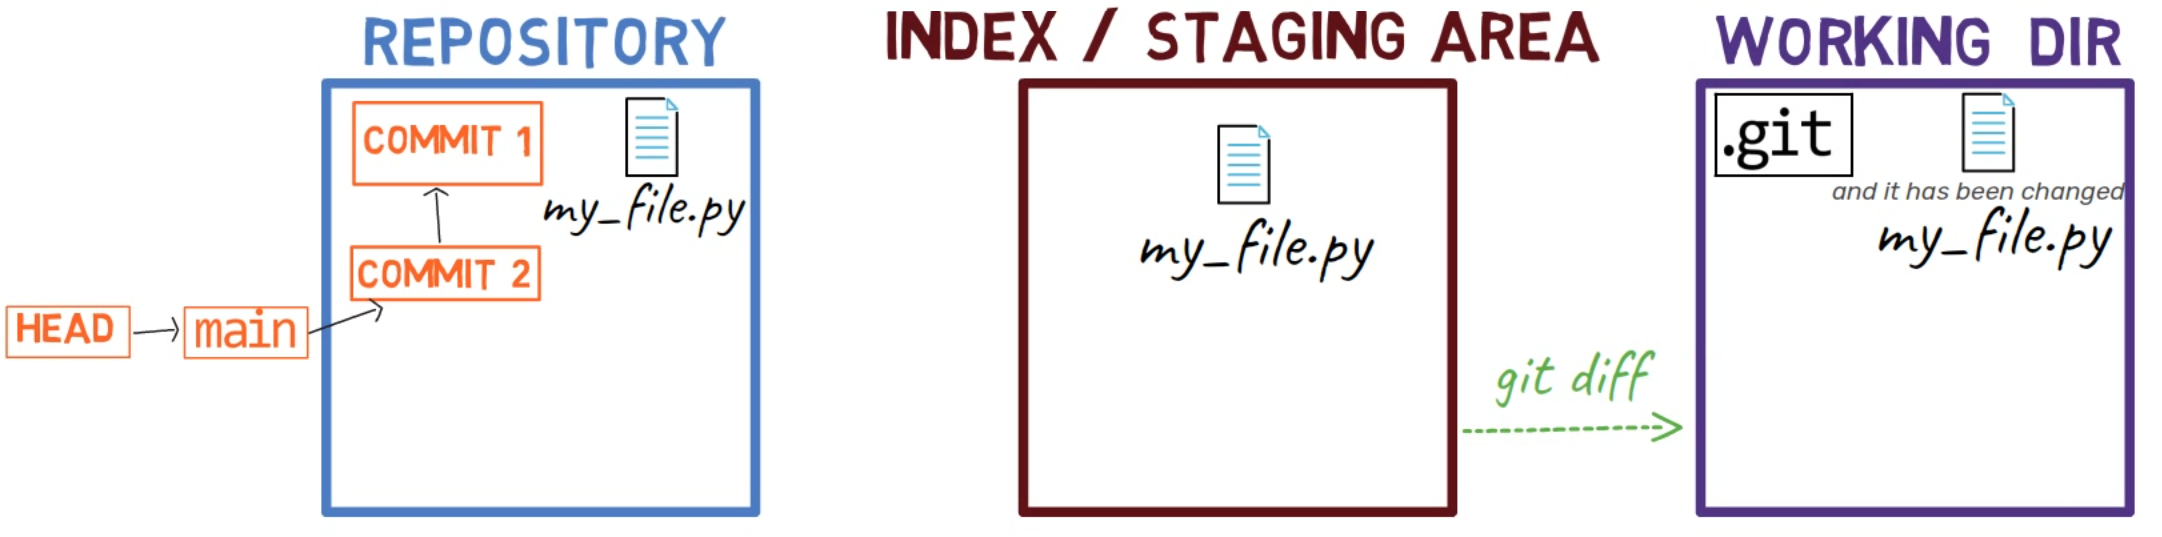 Without switches,
 git diff shows the difference between the staging area and the working directory
As you can see, git diff lists here both file A and file B pointing to my_file.py. file A here refers to the version of my_file.py in the staging area, whereas file B refers to its version in the working dir.
Note that if you modify my_file.py in a text editor, and don't save the file, then git diff will not be aware of the changes you've made. This is because they haven't been saved to the working dir.
We can provide a few switches to git diff to get the diff between the working dir and a specific commit, or between the staging area and the latest commit, or between two commits, and so on.
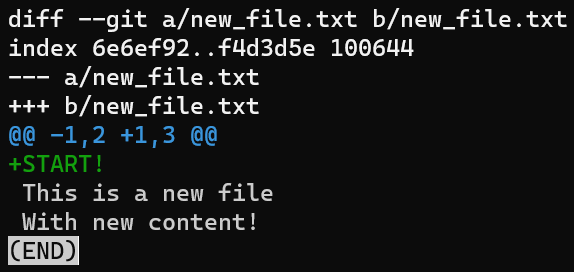
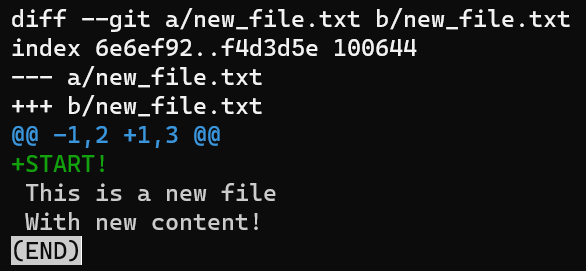
First create a new file, new_file.txt, and save it:
 _A simple new file saved as
 new_file.txt_
Currently the file is in the working dir, and it is actually untracked in Git.
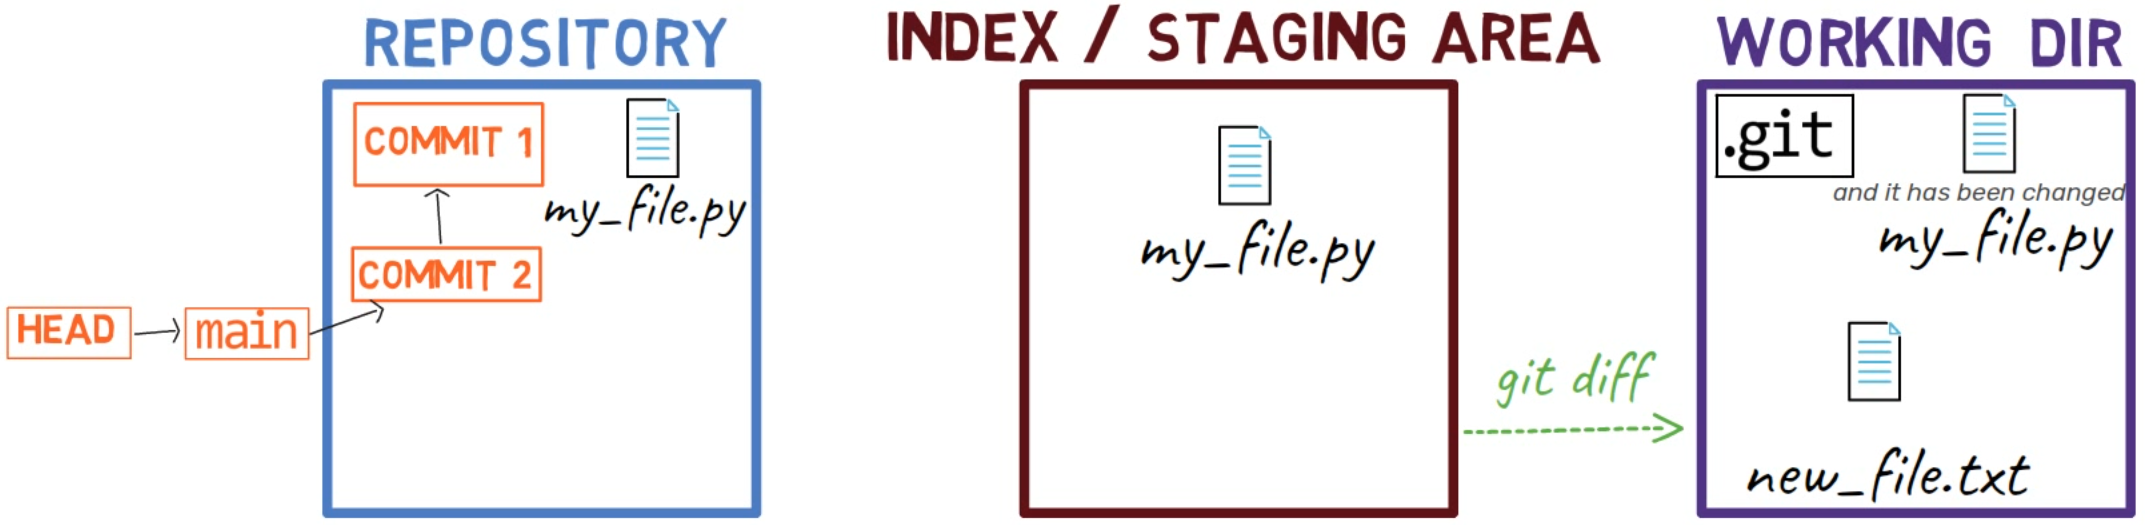 A new, untracked file
Now stage and commit this file:
git add new_file.txt
git commit -m "Commit 3"
Now, the state of HEAD is the same as the state of the staging area, as well as the working tree:
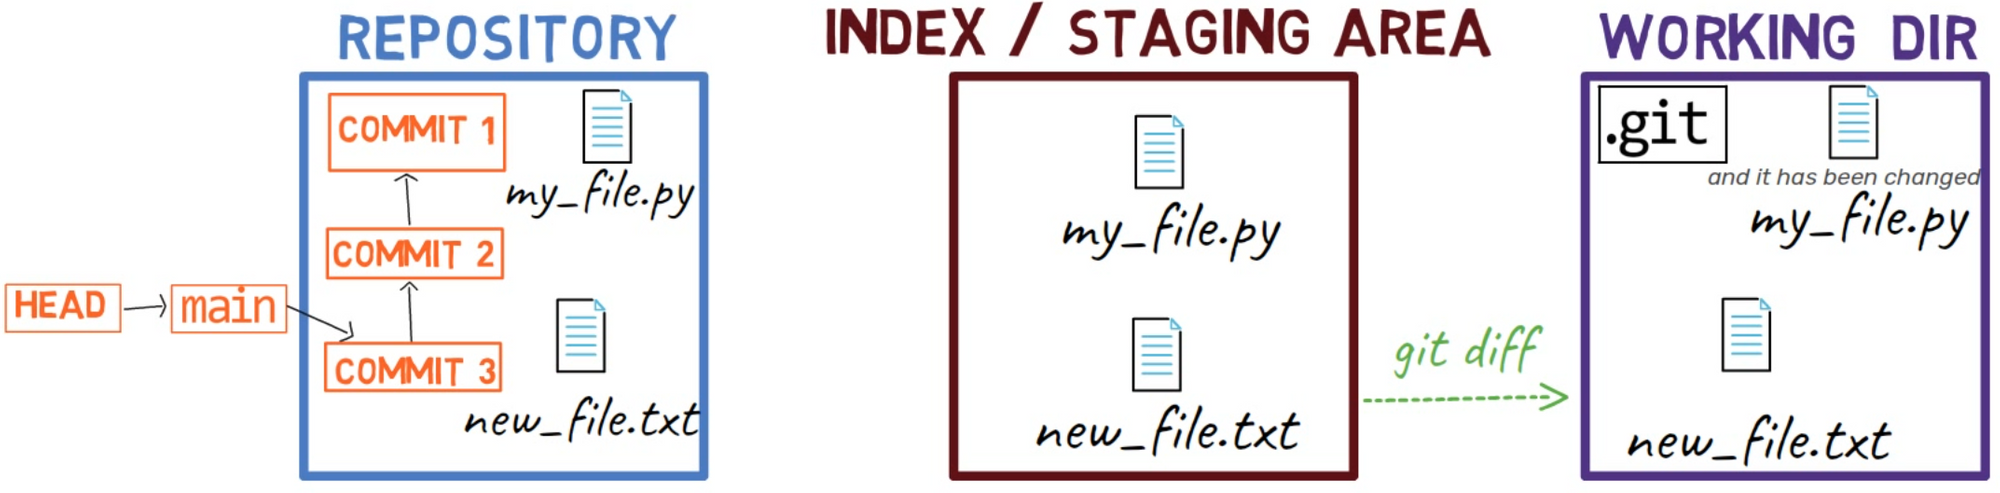 The state of
 HEAD is the same as the index and the working dir
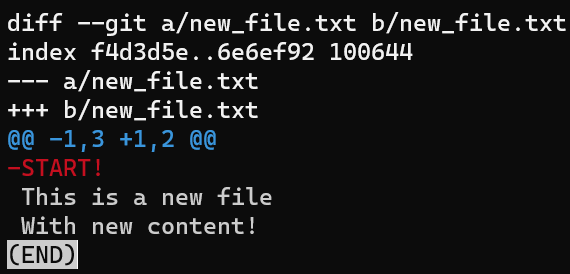
Next, edit new_file.txt by adding a new line at the beginning and another new line at the end:
 _Modifying
 new_file.txt by adding a line in the beginning and another in the end_
As a result, the state is as follows:
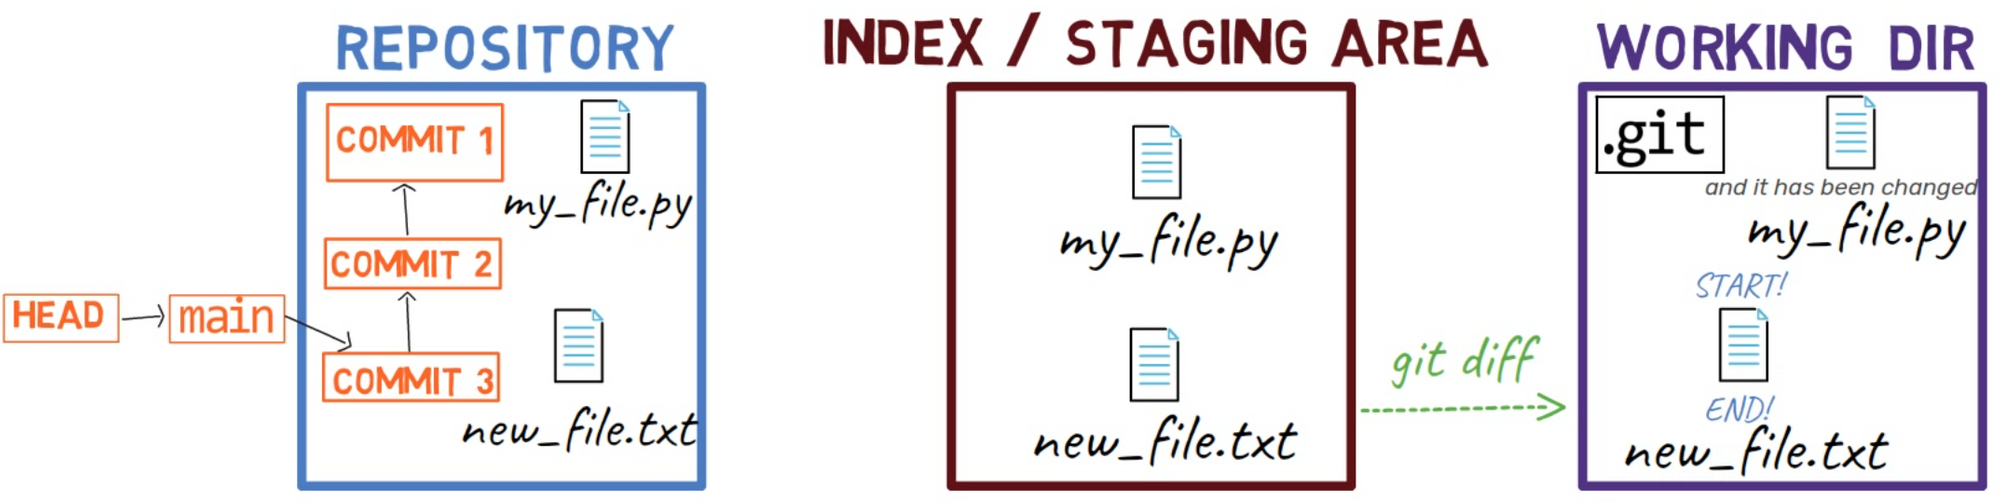 After saving, the state in the working dir is different than that of the index or
 HEAD
A nice trick would be to use git add -p, which allows you to split the changes even within a file, and consider which ones you'd like to stage.
In this case, add the first line to the index, but not the last line. To do that, you can split the hunk using s, then accept to stage the first hunk (using y), and not the second part (using n).
If you are not sure what each letter stands for, you can always use a ? and Git will tell you.
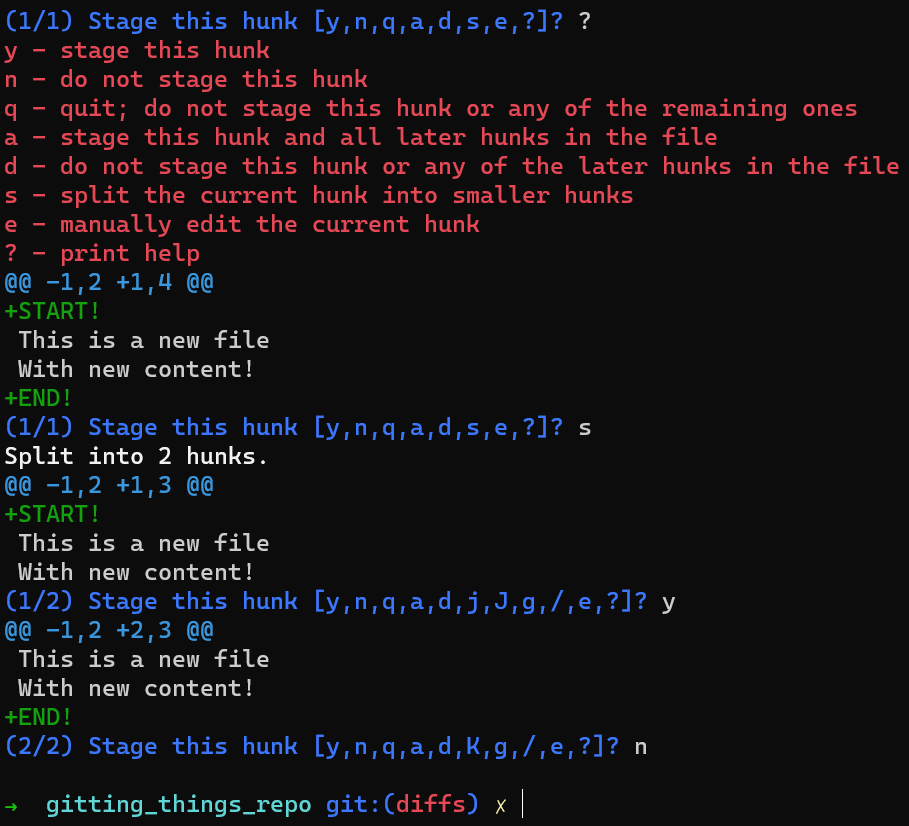 Using
Using git add -p, you can stage only the first change
So now the state in HEAD is without either of those new lines. In the staging area you have the first line but not the last line, and in the working dir you have both new lines.
 The state after staging only the first line
If you use git diff, what will happen?
git diff shows the difference between the index and the working dir
Well, as stated before, you get the diff between the staging area and the working tree.
What happens if you want to get the diff between HEAD and the staging area? For that, you can use git diff --cached:
git diff --cached shows the difference between HEAD and the index
And what if you want the difference between HEAD and the working tree? For that you can run git diff HEAD:
git diff HEAD shows the difference between HEAD and the working dir
To summarize the different switches for git diff we have seen so far, here's a diagram:
 Different switches for
 git diff
As a reminder, at the beginning of this chapter you used git diff --no-index. With the --no-index switch, you can compare two files that are not part of the repository - or of any staging area.
Now, commit the changes you have in the staging area:
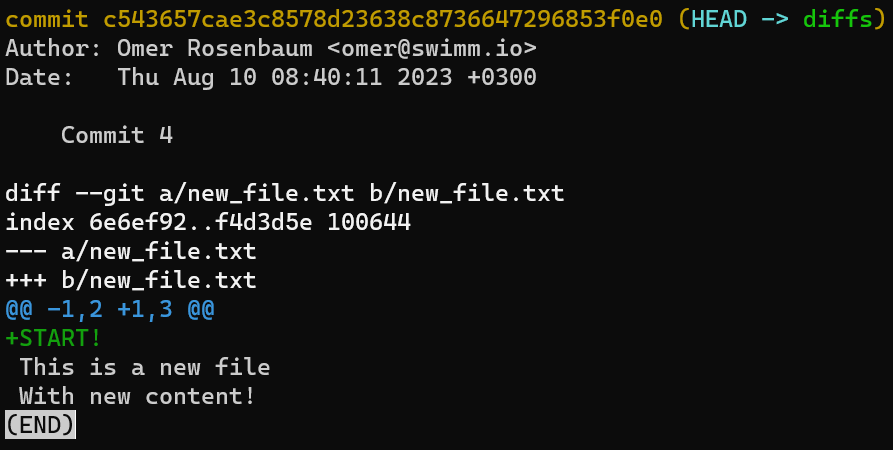
git commit -m "Commit 4"
To observe the diff between this commit and its parent commit, you can run the following command:
git diff HEAD~1 HEAD
 The output of
 git diff HEAD~1 HEAD
By the way, you can omit the 1 above and write HEAD~, and get the same result. Using 1 is the explicit way to state you are referring to the first parent of the commit.
Note that writing the parent commit here, HEAD~1, first results in a diff showing how to get from the parent commit to the current commit. Of course, I could also generate the reverse diff by writing:
git diff HEAD HEAD~1
 The output of
 git diff HEAD HEAD~1 generates the reverse patch
To summarize all the different switches for git diff we covered in this section, see this diagram:
 The different switches for
 git diff
A short way to view the diff between a commit and its parent is by using git show, for example:
git show HEAD
git show HEAD
This is the same as writing:
git diff HEAD~ HEAD
We can now update our diagram:
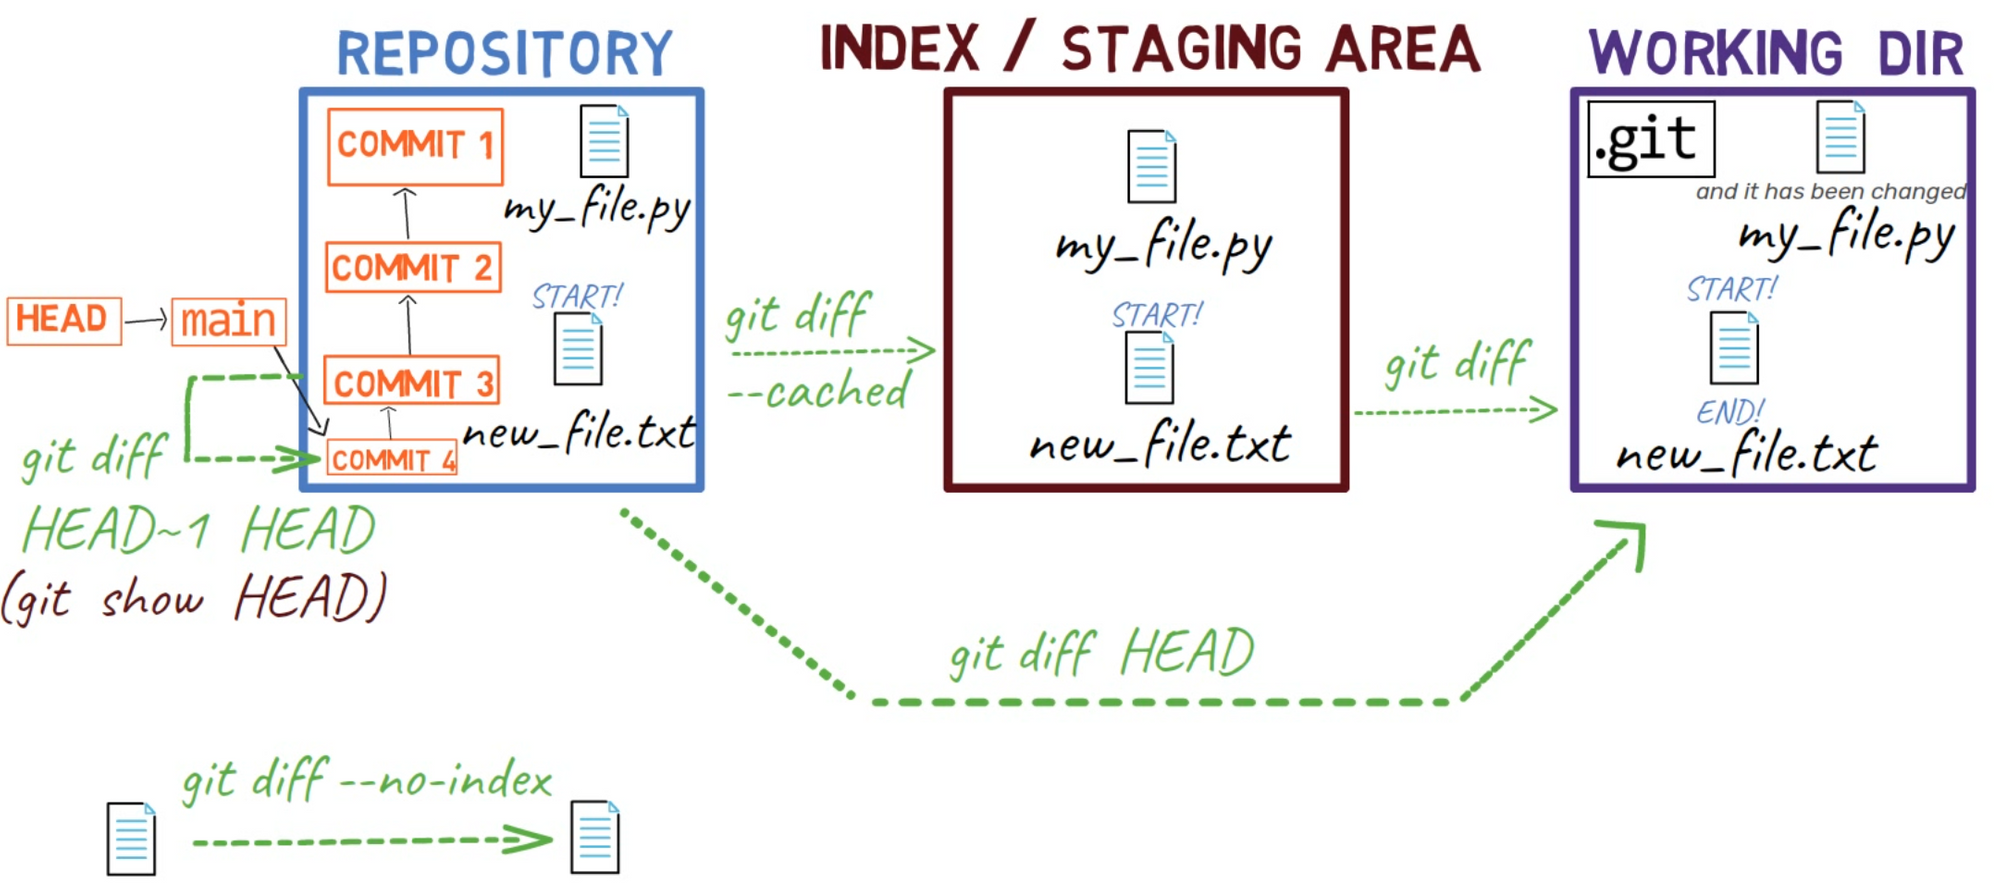
git diff HEAD~ HEAD is used to show the difference between commits
You can go back to this diagram as a reference when needed.
As a reminder, Git commits are snapshots - of the entire working directory of the repository, at a certain point in time. Yet, it's sometimes not useful to regard a commit as a whole snapshot, but rather by the changes this specific commit introduced. In other words, by the diff between a parent commit to the next commit.
As you learned in the Git Objects chapter, Git stores the entire snapshots. The diff is dynamically generated from the snapshot data - by comparing the root trees of the commit and its parent.
Of course, Git can compare any two snapshots in time, not just adjacent commits, and also generate a diff of files not included in a repository.
How to Apply Patches
By using git diff you can see a patch Git generates, and you can then apply this patch using git apply.
Historical Note
Actually, sharing patches used to be the main way to share code in the early days of open source. But now - virtually all projects have moved to sharing Git commits directly through pull requests (called "merge requests" on some platforms).
The biggest problem with using patches is that it is hard to apply a patch when your working directory does not match the sender's previous commit. Losing the commit history makes it difficult to resolve conflicts. You will better understand this as you dive deeper into the process of git apply, especially in the next chapter where we cover merges.
A Simple Patch
What does it mean to apply a patch? It's time to try it out!
Take the output of git diff:
git diff HEAD~1 HEAD
And store it in a file:
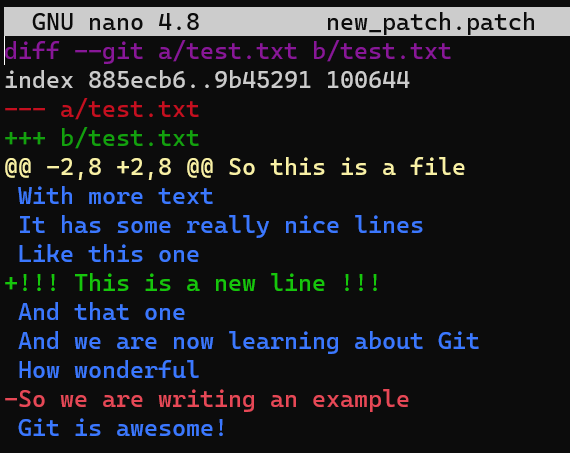
git diff HEAD~1 HEAD > my_patch.patch
Use reset to undo the last commit:
git reset --hard HEAD~1
Don't worry about the last command - I'll explain it in detail in Part 3, where we discuss undoing changes. In short, it allows us to "reset" the state of where HEAD is pointing to, as well as the state of the index and of the working dir. In the example above, they are all set to the state of HEAD~1, or "Commit 3" in the diagram.
So after running the reset command, the contents of the file are as follows (the state from "Commit 3"):
nano new_file.txt
 _
_new_file.txt_
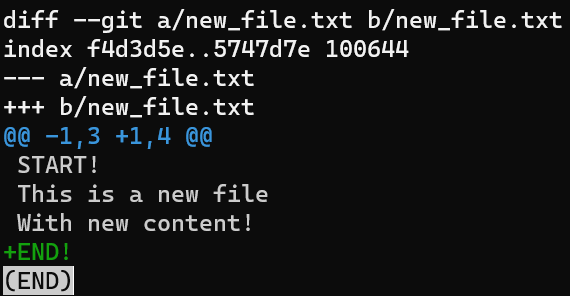
And you will apply this patch that you've just saved:
nano my_patch.patch
 The patch you are about to apply, as generated by git diff
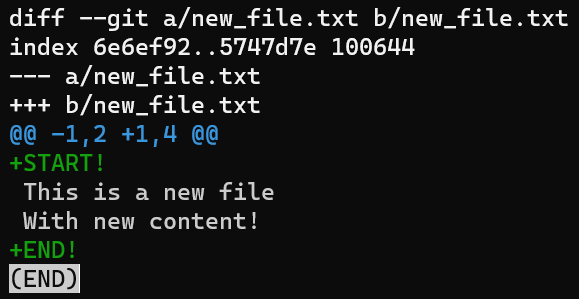
This patch tells Git to find the lines:
This is a new file
With new content!
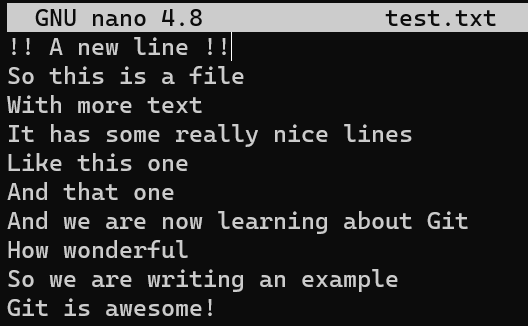
Those lines used to be line number 1 and line number 2 in new_file.txt, and add a line with the content START! right above them.
Run this command to apply the patch:
git apply my_patch.patch
And as a result, you get this version of your file, just like the commit you have created before:
nano new_file.txt
 _The contents of
 new_file.txt after applying the patch_
Understanding the Context Lines
To understand the importance of context lines, consider a more advanced scenario. What happens if line numbers have changed since you created the patch file?
To test, start by creating another file:
nano test.text
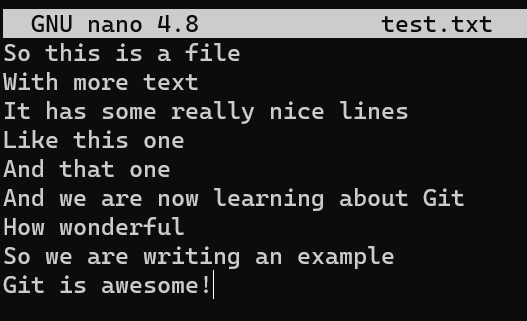 Creating another file -
 test.txt
Stage and commit this file:
git add test.txt

git commit -m "Test file"
Now, change this file by adding a new line, and also erasing the line before the last one:
 Changes to
 test.txt
Observe the difference between the original version of the file and the version including your changes:
git diff -- test.txt
 The output for
 git diff -- test.txt
(Using -- test.txt tells Git to run the command diff, taking into consideration only test.txt, so you don't get the diff for other files.)
Store this diff into a patch file:
git diff -- test.txt > new_patch.patch
Now, reset your state to that before introducing the changes:
git reset --hard
If you were to apply new_patch.patch now, it would simply work.
Let's now consider a more interesting case. Modify test.txt again by adding a new line at the beginning:
 Adding a new line at the beginning of
 test.txt
As a result, the line numbers are different from the original version where the patch has been created. Consider the patch you created before:
 _
_new_patch.patch_
It assumes that the line With more text is the second line in test.txt, which is no longer the case. So...will git apply work?
git apply new_patch.patch
It worked!
By default, Git looks for 3 lines of context before and after each change introduced in the patch - as you can see, they are included in the patch file. If you take three lines before and after the added line, and three lines before and after the deleted line (actually only one line after, as no other lines exist) - you get to the patch file. If these lines all exist - then applying the patch works, even if the line numbers changed.
Reset the state again:
git reset --hard
What happens if you change one of the context lines? Try it out by changing the line With more text to With more text!:
 Changing the line
 With more text to With more text!
And now:
git apply new_patch.patch

git apply doesn't apply the patch
Well, no. The patch does not apply. If you are not sure why, or just want to better understand the process Git is performing, you can add the --verbose flag to git apply, like so:
git apply --verbose new_patch.patch
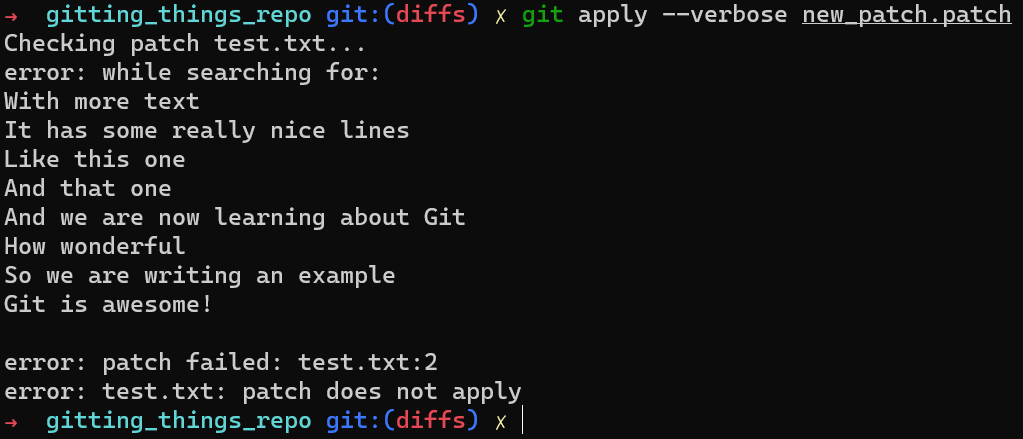
git apply --verbose shows the process Git is taking to apply the patch
It seems that Git searched lines from the file, including the line "With more text", right before the line "It has some really nice lines". This sequence of lines no longer exists in the file. As Git cannot find this sequence, it cannot apply the patch.
As mentioned earlier, by default, Git looks for 3 lines of context before and after each change introduced in the patch. If the surrounding three lines do not exist, Git cannot apply the patch.
You can ask Git to rely on fewer lines of context, using the -C argument. For example, to ask Git to look for 1 line of the surrounding context, run the following command:
git apply -C1 new_patch.patch
The patch applies!
 _
_git apply -C1 new_patch.patch_
Why is that? Consider the patch again:
 _
_new_patch.patch_
When applying the patch with the -C1 option, Git is looking for the lines:
Like this one
And that one
in order to add the line !!!This is the new line!!! between these two lines. These lines exist (and, importantly, they appear one right after the other). As a result, Git can successfully add the line between them, even though the line numbers changed.
Similarly, Git would look for the lines:
How wonderful
So we are writing an example
Git is awesoome!
As Git can find these lines, Git can erase the middle one.
If we changed one of these lines, say, changed "How wonderful" to "How very wondeful", then Git would not be able to find the string above, and thus the patch would not apply.
Recap - Git Diff and Patch
In this chapter, you learned what a diff is, and the difference between a diff and a patch. You learned how to generate various patches using different switches for git diff. You also learned what the output of git diff looks like, and how it is constructed. Ultimately, you learned how patches are applied, and specifically the importance of context.
Understanding diffs is a major milestone for understanding many other processes within Git - for example, merging or rebasing, that we will explore in the next chapters.
Chapter 7 - Understanding Git Merge
By reading this chapter, you are going to really understand git merge, one of the most common operations you'll perform in your Git repositories.
What is a Merge in Git?
Merging is the process of combining the recent changes from several branches into a single new commit. This commit points back to these branches.
In a way, merging is the complement of branching in version control: a branch allows you to work simultaneously with others on a particular set of files, whereas a merge allows you to later combine separate work on branches that diverged from a common ancestor commit.
OK, let's take this bit by bit.
Remember that in Git, a branch is just a name pointing to a single commit. When we think about commits as being "on" a specific branch, they are actually reachable through the parent chain from the commit that the branch is pointing to.
That is, if you consider this commit graph:
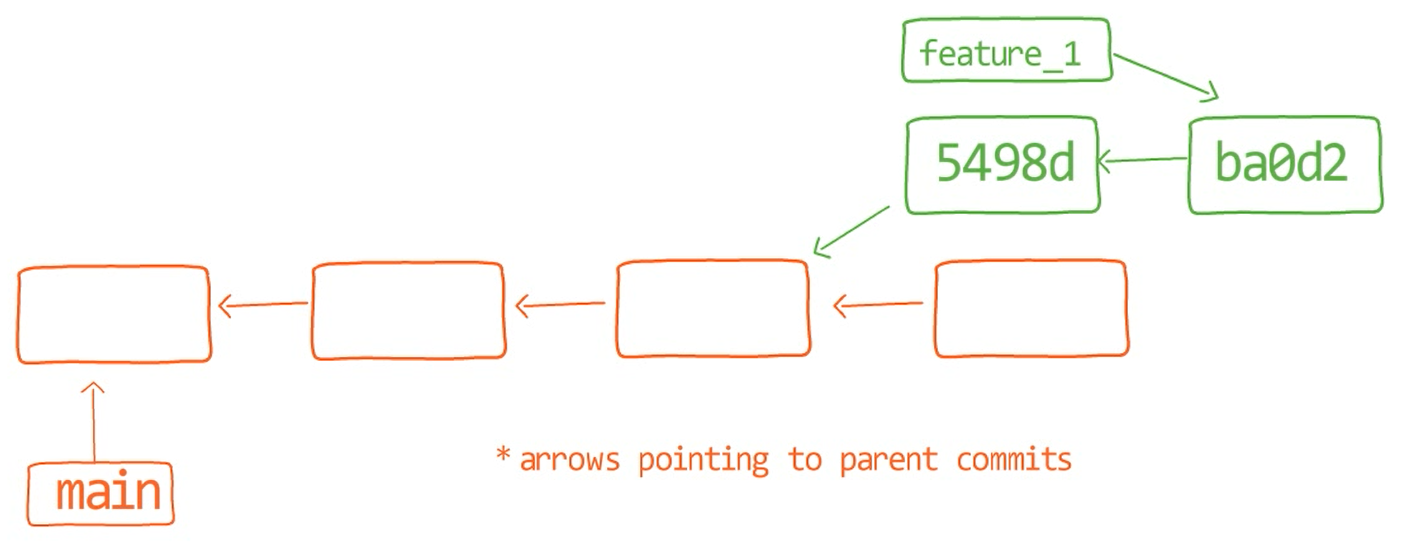 _Commit graph with
 feature_1_
You see the branch feature_1, which points to a commit with the SHA-1 value of ba0d2. As in previous chapters, I only write the first 5 digits of the SHA-1 value for brevity.
Notice that commit 54a9d is also "on" this branch, as it is the parent commit of ba0d2. So if you start from the pointer of feature_1, you get to ba0d2, which then points to 54a9d. You can go on the chain of parents, and all these reachable commits are considered to be "on" feature_1.
When you merge with Git, you merge commits. Almost always, we merge two commits by referring to them with the branch names that point to them. Thus we say we "merge branches" - though under the hood, we actually merge commits.
Time to Get Hands-on
For this chapter, I will use the following repository:
https://github.com/Omerr/gitting_things_merge.git
As in previous chapters, I encourage you to clone it locally and have the same starting point I am using for this chapter.
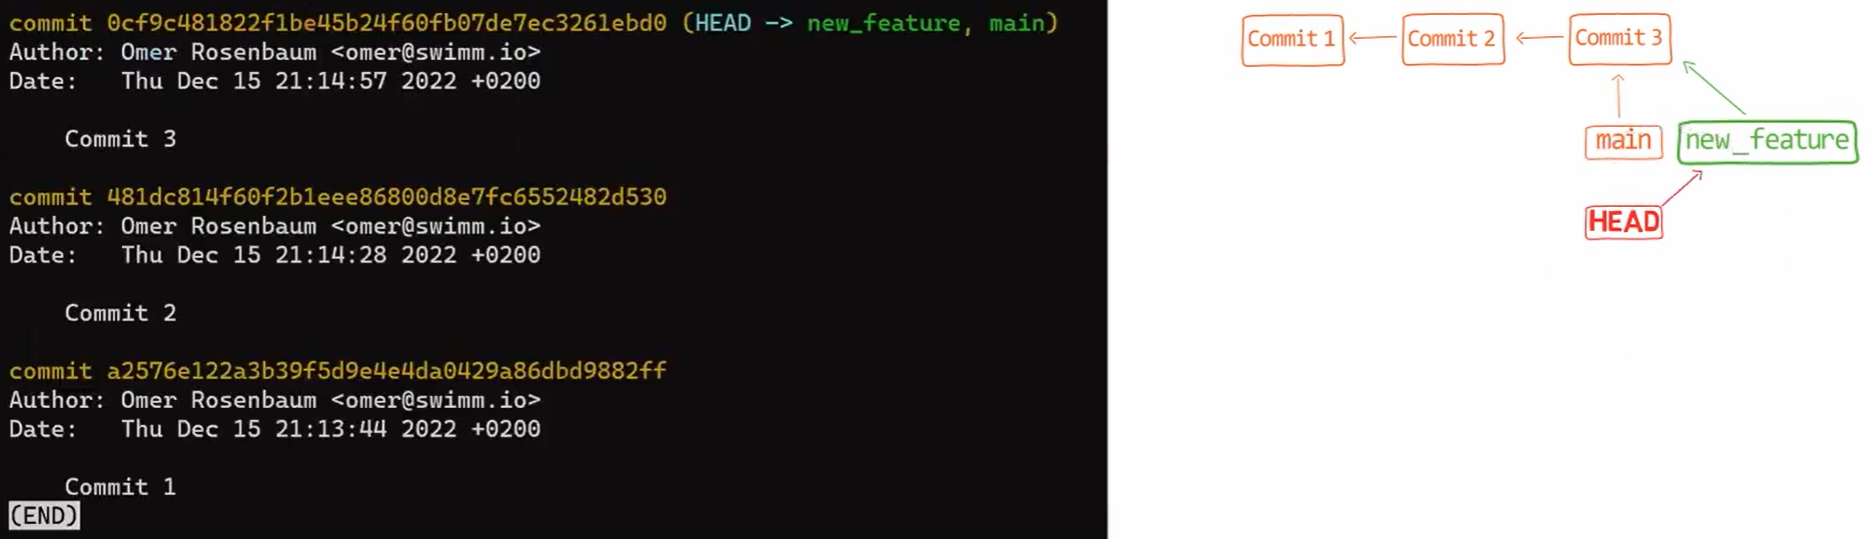
OK, so let's say I have this simple repository here, with a branch called main, and a few commits with the commit messages of "Commit 1", "Commit 2", and "Commit 3":
 A simple repository with three commits
Next, create a feature branch by typing git branch new_feature:
 Creating a new branch with
 git branch
And switch HEAD to point to this new branch, by using git checkout new_feature (or git switch new_feature). You can look at the outcome by using git log:
 _The output of
 git log after using git checkout new_feature_
As a reminder, you could also write git checkout -b new_feature, which would both create a new branch and change HEAD to point to this new branch.
If you need a reminder about branches and how they're implemented under the hood, please check out chapter 2. Yes, check out. Pun intended 😇
Now, on the new_feature branch, implement a new feature. In this example, I will edit an existing file that looks like this before the edit:
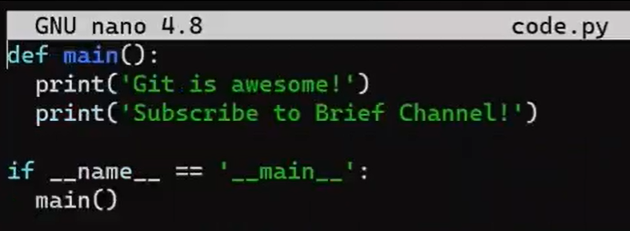
code.py before editing it
And I will now edit it to include a new function:
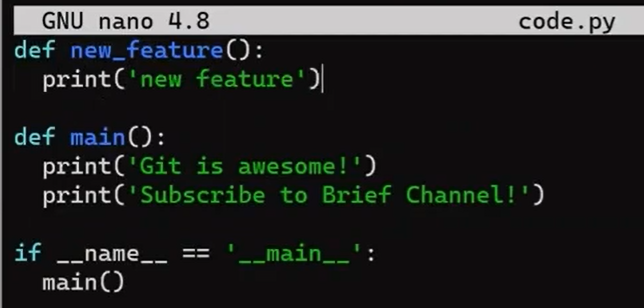 _Implementing
 new_feature_
And luckily, this is not a programming book, so this function is legit 😇
Next, stage and commit this change:
git add code.py

git commit -m "Commit 4"
Looking at the history, you have the branch new_feature, now pointing to "Commit 4", which points to its parent, "Commit 3". The branch main is also pointing to "Commit 3".
 The history after committing "Commit 4"
Time to merge the new feature! That is, merge these two branches, main and new_feature. Or, in Git's lingo, merge new_feature into main. This means merging "Commit 4" and "Commit 3". This is pretty trivial, as after all, "Commit 3" is an ancestor of "Commit 4".
Check out the main branch (with git checkout main), and perform the merge by using git merge new_feature:
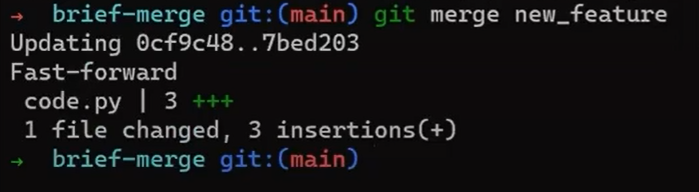 _Merging
 new_feature into main_
Since new_feature never really diverged from main, Git could just perform a fast-forward merge. So what happened here? Consider the history:
 The result of a fast-forward merge
Even though you used git merge, there was no actual merging here. Actually, Git did something very simple - it reset the main branch to point to the same commit as the branch new_feature.
In case you don't want that to happen, but rather you want Git to really perform a merge, you could either change Git's configuration, or run the merge command with the --no-ff flag.
First, undo the last commit:
git reset --hard HEAD~1
Reminder: if this way of using reset is not clear to you, don't worry - we will cover it in detail in Part 3. It is not crucial for this introduction of merge, though. For now, it's important to understand that it basically undoes the merge operation.
Just to clarify, now if you checked out new_feature again:
git checkout new_feature
The history would look just like before the merge:
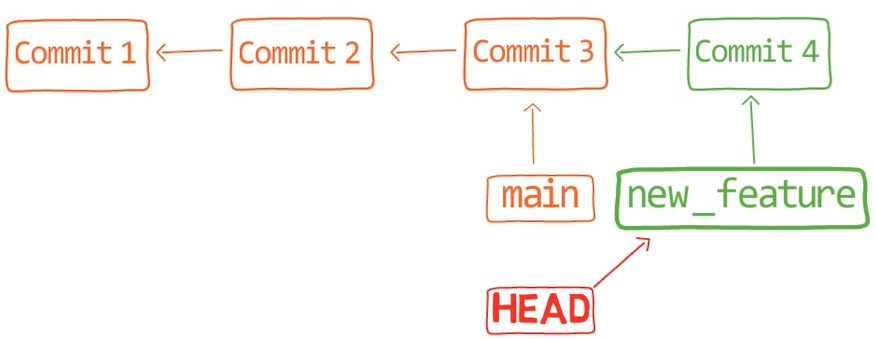 The history after using
 git reset --hard HEAD~1
Next, perform the merge with the --no-fast-forward flag (--no-ff for short):
git checkout main
git merge new_feature --no-ff
Now, if we look at the history using git lol:
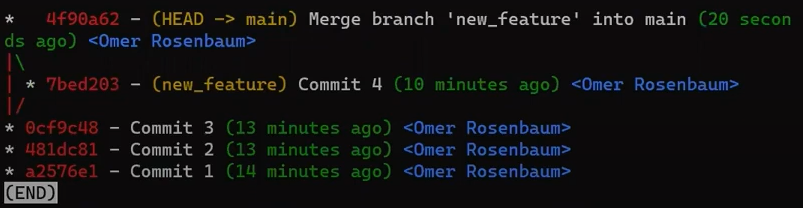 History after merging with the
 --no-ff flag
(Reminder: git lol is an alias I added to Git to visibly see the history in a graphical manner. You can find it, along with the other components of my setup, at the My Setup part of the Introduction chapter.)
Considering this history, you can see Git created a new commit, a merge commit.
If you consider this commit a bit closer:
git log -n1
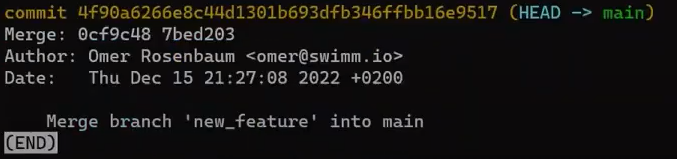 The merge commit has two parents
You will see that this commit actually has two parents - "Commit 4", which was the commit that new_feature pointed to when you ran git merge, and "Commit 3", which was the commit that main pointed to.
A merge commit has two parents: the two commits it merged.
The merge commit shows us the concept of merge quite well. Git takes two commits, usually referenced by two different branches, and merges them together.
After the merge, as you started the process from main, you are still on main, and the history from new_feature has been merged into this branch. Since you started with main, then "Commit 3", which main pointed to, is the first parent of the merge commit, whereas "Commit 4", which you merged into main, is the second parent of the merge commit.
Notice that you started on main when it pointed to "Commit 3", and Git went quite a long way for you. It changed the working tree, the index, and also HEAD and created a new commit object. At least when you use git merge without the --no-commit flag and when it's not a fast-forward merge, Git does all of that.
This was a super simple case, where the branches you merged didn't diverge at all. We will soon consider more interesting cases.
By the way, you can use git merge to merge more than two commits - actually, any number of commits. This is rarely done, and to adhere to the practicality principle of this book, I won't delve into it.
Another way to think of git merge is by joining two or more development histories together. That is, when you merge, you incorporate changes from the named commits, since the time their histories diverged from the current branch, into the current branch. I used the term "branch" here, but I am stressing this again - we are actually merging commits.
Time For a More Advanced Case
Time to consider a more advanced case, which is probably the most common case where we use git merge explicitly - where you need to merge branches that did diverge from one another.
Assume we have two people working on this repo now, John and Paul.
John created a branch:
git checkout -b john_branch
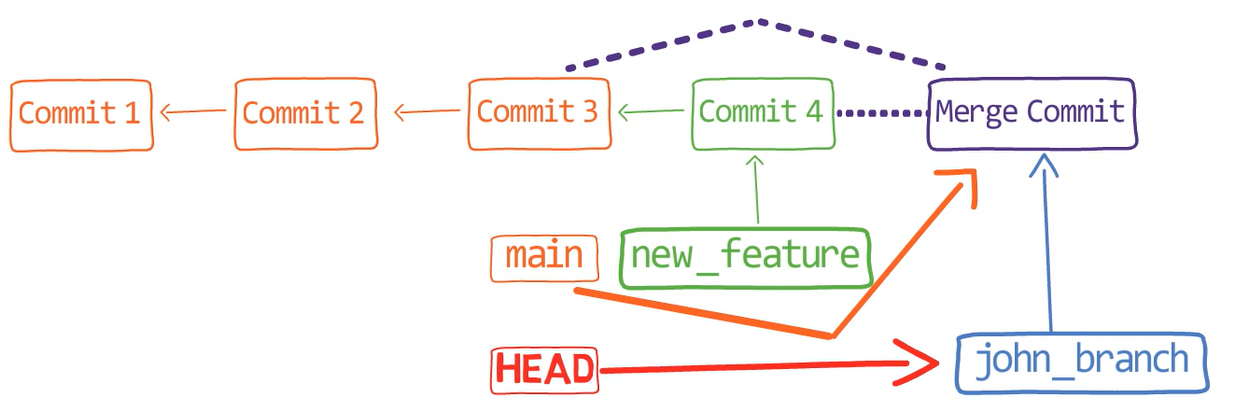 _A new branch,
 john_branch_
And John has written a new song in a new file, lucy_in_the_sky_with_diamonds.md. Well, I believe John Lennon didn't really write in Markdown format, or use Git for that matter, but let's pretend he did for this explanation.
git add lucy_in_the_sky_with_diamonds.md
git commit -m "Commit 5"
While John was working on this song, Paul was also writing, on another branch. Paul had started from main:
git checkout main
And created his own branch:
git checkout -b paul_branch
And Paul wrote his song into a file called penny_lane.md. Paul staged and committed this file:
git add penny_lane.md
git commit -m "Commit 6"
So now our history looks like this - where we have two different branches, branching out from main, with different histories:
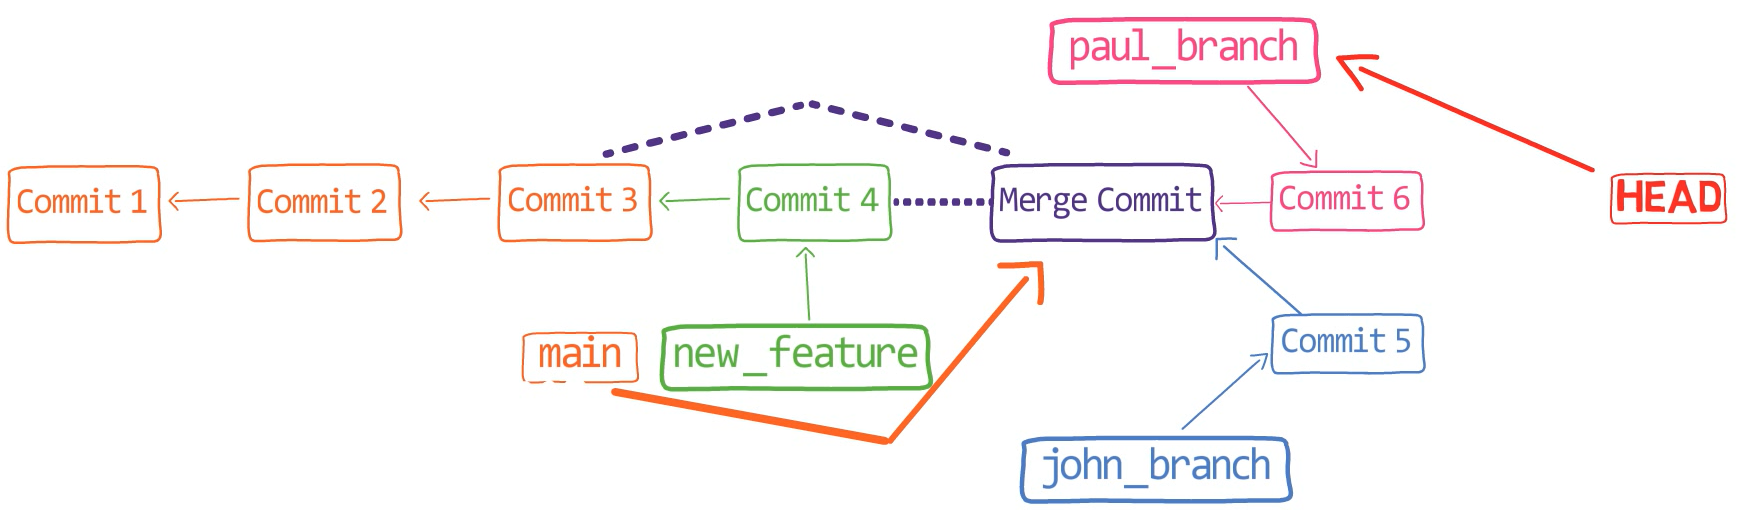 The history after John and Paul committed
John is happy with his branch (that is, his song), so he decides to merge it into the main branch:
git checkout main
git merge john_branch
Actually, this is a fast-forward merge, as we have learned before. You can validate that by looking at the history (using git lol, for example):
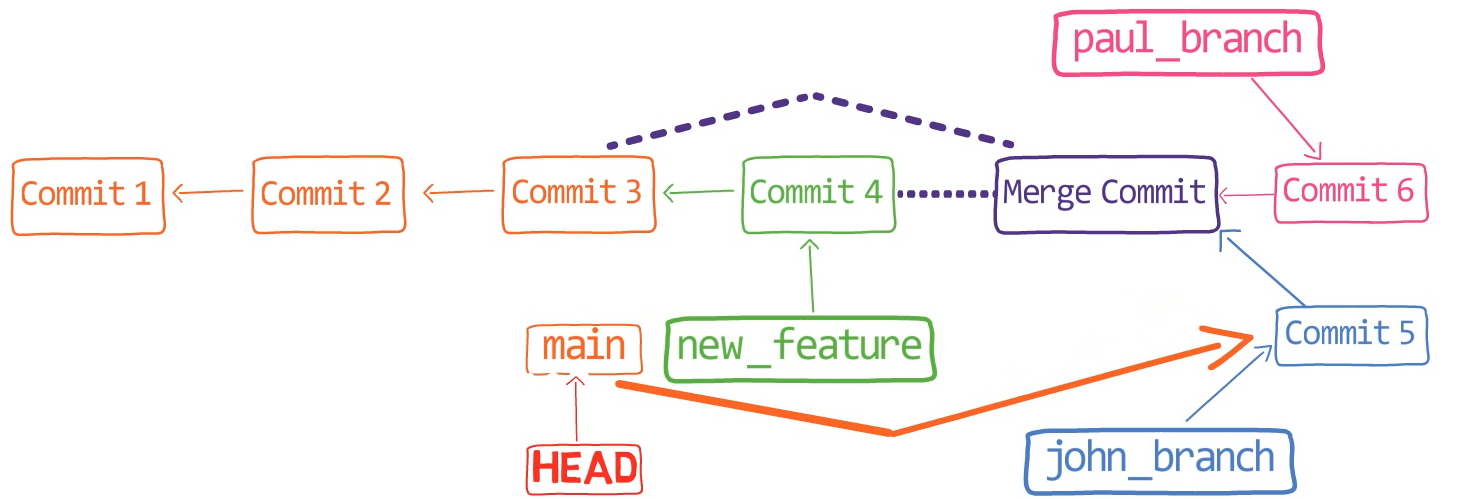 _Merging
 john_branch into main results in a fast-forward merge_
At this point, Paul also wants to merge his branch into main, but now a fast-forward merge is no longer relevant - there are two different histories here: the history of main's and that of paul_branch's. It's not that paul_branch only adds commits on top of main branch or vice versa.
Now things get interesting. 😎😎
First, let Git do the hard work for you. After that, we will understand what's actually happening under the hood.
git merge paul_branch
Consider the history now:
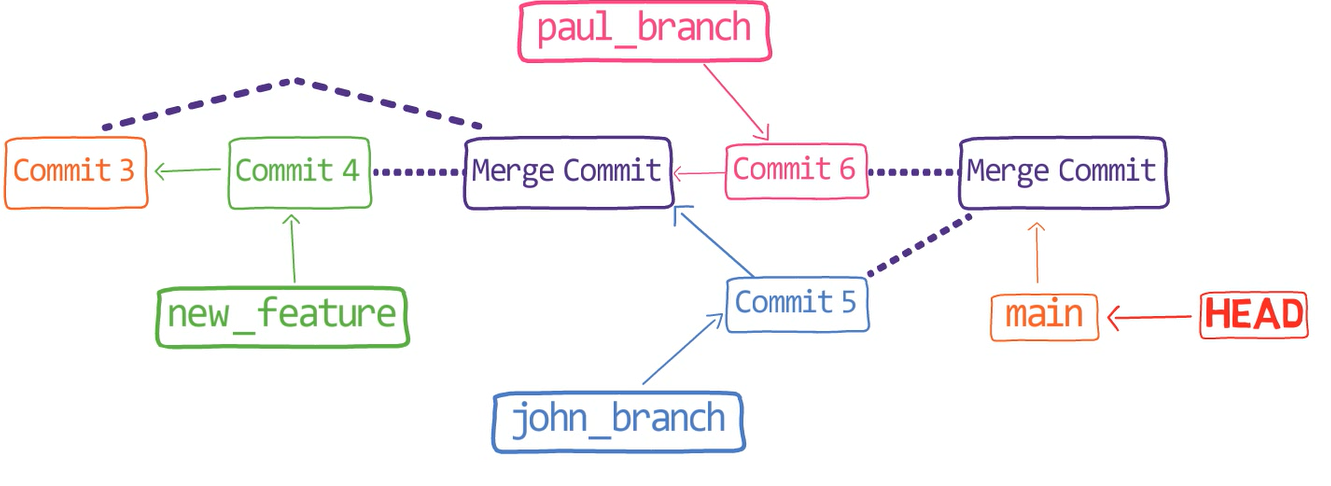 _When you merge
 paul_branch, you get a new merge commit_
What you have is a new commit, with two parents - "Commit 5" and "Commit 6".
In the working dir, you can see that both John's song as well as Paul's song are there (if you use ls, you will see both files in the working dir).
Nice, Git really did merge the changes for you. But how does that happen?
Undo this last commit:
git reset --hard HEAD~
How to Perform a Three-way Merge in Git
It's time to understand what's really happening under the hood. 😎
What Git has done here is it called a 3-way merge. In outlining the process of a 3-way merge, I will use the term "branch" for simplicity, but you should remember you could also merge two (or more) commits that are not referenced by a branch.
The 3-way merge process includes these stages:
First, Git locates the common ancestor of the two branches. That is, the common commit from which the merging branches most recently diverged. Technically, this is actually the first commit that is reachable from both branches. This commit is then called the merge base.
Second, Git calculates two diffs - one diff from the merge base to the first branch, and another diff from the merge base to the second branch. Git generates patches based on those diffs.
Third, Git applies both patches to the merge base using a 3-way merge algorithm. The result is the state of the new merge commit.
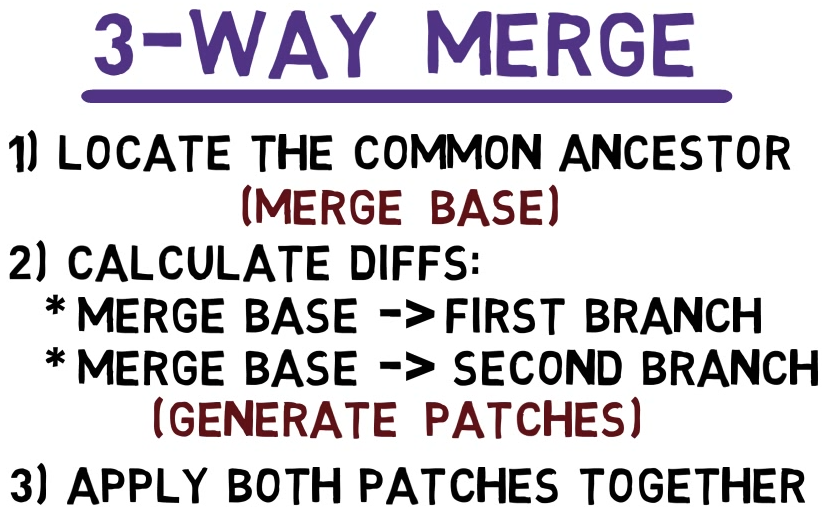 The three steps of the 3-way merge algorithm: (1) locate the common ancestor (2) calculate diffs from the merge base to the first branch, and from the merge base to the second branch (3) apply both patches together
So, back to our example.
In the first step, Git looks from both branches - main and paul_branch - and traverses the history to find the first commit that is reachable from both. In this case, this would be… which commit?
Correct, the merge commit (the one with "Commit 3" and "Commit 4" as its parents).
If you are not sure, you can always ask Git directly:
git merge-base main paul_branch
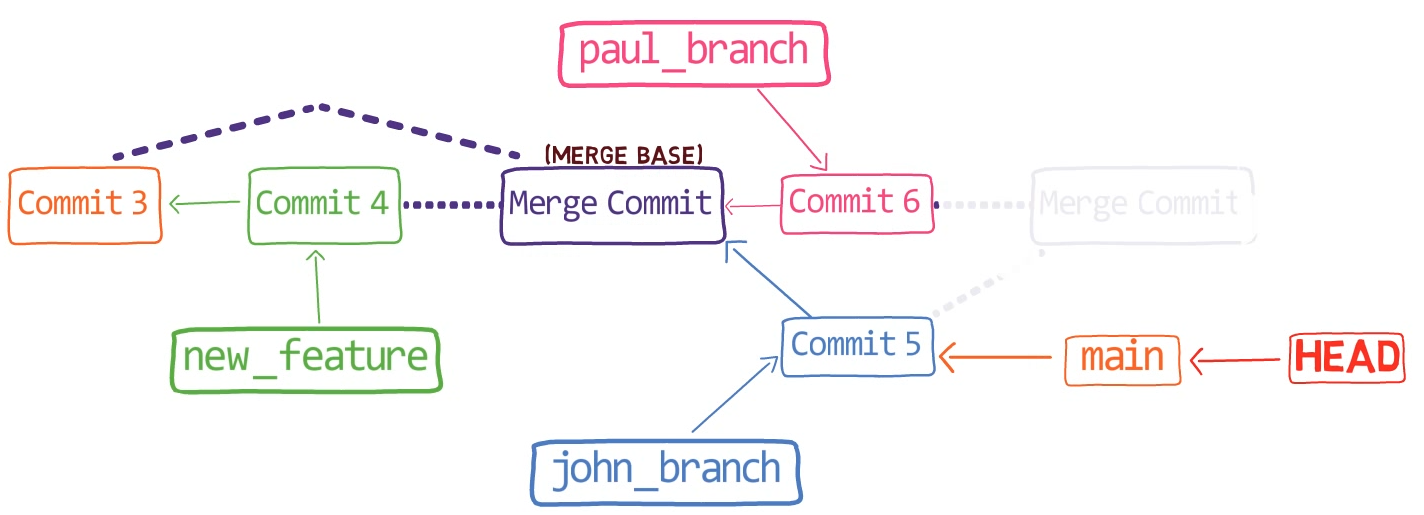 The merge base is the merge commit with "Commit 3" and "Commit 4" as its parents. Note: the previous commit merge is blurred as it is not reachable via the current history following the
 reset command
By the way, this is the most common and simple case, where we have a single obvious choice for the merge base. In more complicated cases, there may be multiple possibilities for a merge base, but this is not within our focus.
In the second step, Git calculates the diffs. So it first calculates the diff between the merge commit and "Commit 5":
git diff 4f90a62 4683aef
(The SHA-1 values will be different on your machine.)
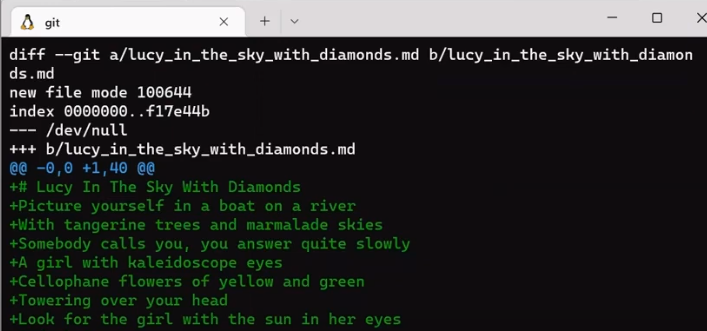 The diff between the merge commit and "Commit 5"
If you don't feel comfortable with the output of git diff, you can read the previous chapter where I described it in detail.
You can store that diff to a file:
git diff 4f90a62 4683aef > john_branch_diff.patch
Next, Git calculates the diff between the merge commit and "Commit 6":
git diff 4f90a62 c5e4951
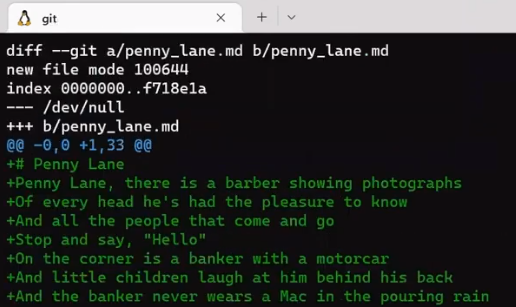 The diff between the merge commit and "Commit 6"
Write this one to a file as well:
git diff 4f90a62 c5e4951 > paul_branch_diff.patch
Now Git applies those patches on the merge base.
First, try that out directly - just apply the patches (I will walk you through it in a moment). This is not what Git really does under the hood, but it will help you gain a better understanding of why Git needs to do something different.
Checkout the merge base first, that is, the merge commit:
git checkout 4f90a62
And apply John's patch first (as a reminder, this is the patch shown in the image with the caption "The diff between the merge commit and "Commit 5""):
git apply --index john_branch_diff.patch
Notice that for now there is no merge commit. git apply updates the working dir as well as the index, as we used the --index switch.
You can observe the status using git status:
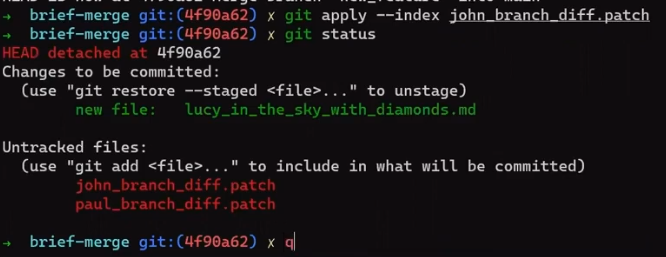 Applying John's patch on the merge commit
So now John's new song is incorporated into the index. Apply the other patch:
git apply --index paul_branch_diff.patch
As a result, the index contains changes from both branches.
Now it's time to commit your merge. Since the porcelain command git commit always generates a commit with a single parent, you would need the underlying plumbing command - git commit-tree.
If you need a reminder about porcelain vs plumbing commands, check out chapter 4 where I explained these terms, and created an entire repo from scratch.
Remember that every Git commit object points to a single tree. So you need to record the contents of the index in a tree:
git write-tree
Now you get the SHA-1 value of the created tree, and you can create a commit object using git commit-tree:
git commit-tree <TREE_SHA> -p <COMMIT_5> -p <COMMIT_6> -m "Merge commit!"
 Creating a merge commit
Great, so you have created a commit object!
Recall that git merge also changes HEAD to point to the new merge commit object. So you can simply do the same:
git reset --hard db315a
If you look at the history now:
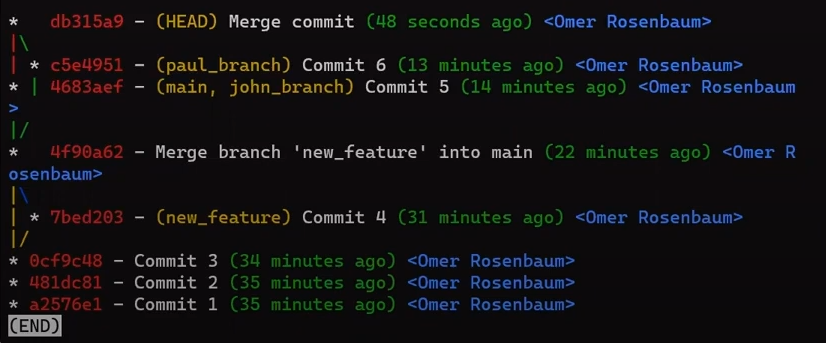 The history after creating a merge commit and resetting
 HEAD
(Note: in this state, HEAD is "detached" - that is, it directly points to a commit object rather than a named reference. gg does not show HEAD when it is "detached", so don't be confused if you can't see HEAD in the output of gg.)
This is almost what we wanted. Remember that when you ran git merge, the result was HEAD pointing to main which pointed to the newly created commit (as shown in the image with the caption "When you merge paul_branch, you get a new merge commit". What should you do then?
Well, what you want is to modify main, so you can just point it to the new commit:
git checkout main
git reset --hard db315a
And now you have the same result as when you ran git merge: main points to the new commit, which has "Commit 5" and "Commit 6" as its parents. You can use git lol to verify that.
So this is exactly the same result as the merge done by Git, with the exception of the timestamp and thus the SHA-1 value, of course.
Overall, you got to merge both the contents of the two commits - that is, the state of the files, and also the history of those commits - by creating a merge commit that points to both histories.
In this simple case, you could actually just apply the patches using git apply, and everything works quite well.
Quick Recap of a Three-way Merge
So to quickly recap, on a three-way merge, Git:
- First, locates the merge base - the common ancestor of the two branches. That is, the first commit that is reachable from both branches.
- Second, Git calculates two diffs - one diff from the merge base to the first branch, and another diff from the merge base to the second branch.
- Third, Git applies both patches to the merge base, using a 3-way merge algorithm. I haven't explained the 3-way merge yet, but I will elaborate on that later. The result is the state of the new merge commit.
You can also understand why it's called a "3-way merge": Git merges three different states - that of the first branch, that of the second branch, and their common ancestor. In our previous example, main, paul_branch, and the merge commit (with "Commit 3" and "Commit 4" as parents), respectively.
This is unlike, say, the fast-forward examples we saw before. The fast-forward examples are actually a case of a two-way merge, as Git only compares two states - for example, where main pointed to, and where john_branch pointed to.
Moving on
Still, this was a simple case of a 3-way merge. John and Paul created different songs, so each of them touched a different file. It was pretty straightforward to execute the merge.
What about more interesting cases?
Let's assume that now John and Paul are co-authoring a new song.
So, John checked out main branch and started writing the song:
git checkout main
 John's new song
He staged and committed it ("Commit 7"):
git add a_day_in_the_life.md
git commit -m "Commit 7"
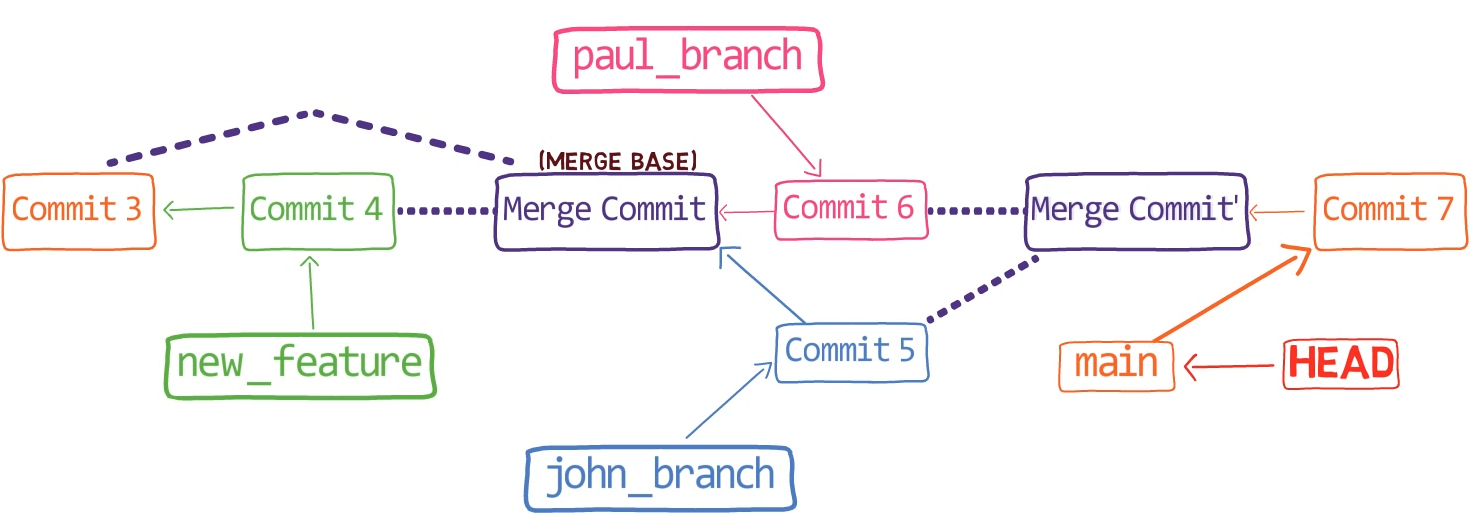 John's new song is committed
Now, Paul branches:
git checkout -b paul_branch_2
And edits the song, adding another verse:
 Paul added a new verse
Of course, the original song does not include the title "Paul's Verse", but I added it here for clarity.
Paul stages and commits the changes:
git add a_day_in_the_life.md
git commit -m "Commit 8"
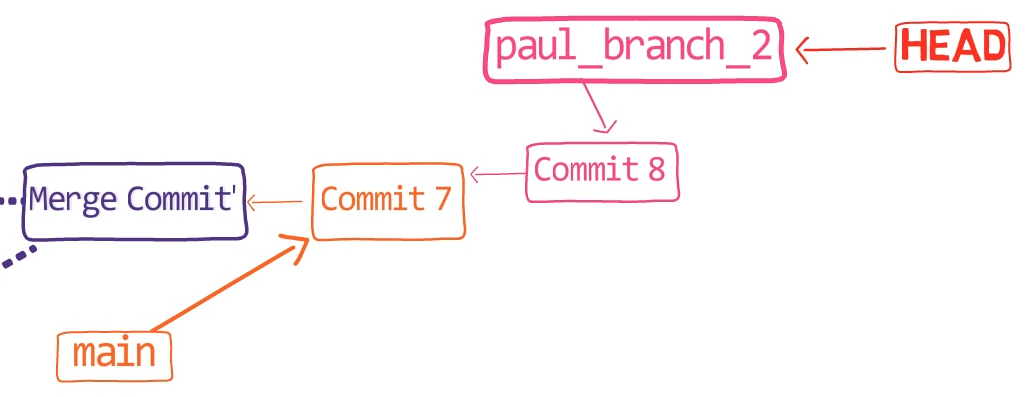 The history after introducing "Commit 8"
John also branches out from main and adds an additional two lines at the end:
git checkout main
git checkout -b john_branch_2
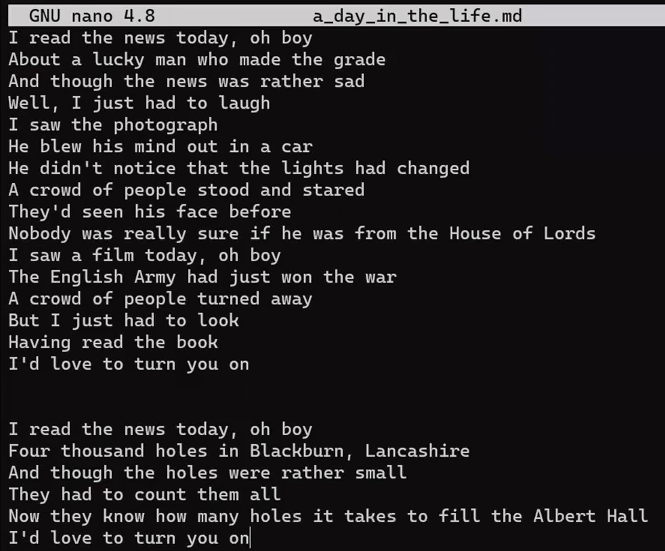 John added the two last lines
John stages and commits his changes too ("Commit 9"):
git add a_day_in_the_life.md
git commit -m "Commit 9"
This is the resulting history:
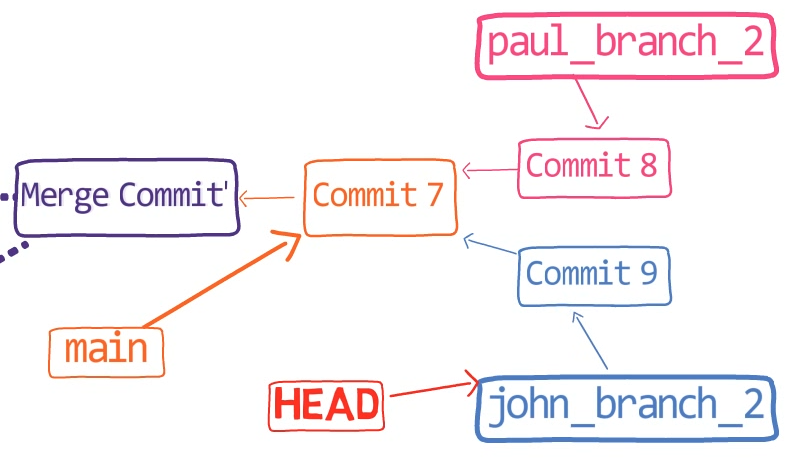 The history after John's last commit
So, both Paul and John modified the same file on different branches. Will Git be successful in merging them?
Say now we don't go through main, but John will try to merge Paul's new branch into his branch:
git merge paul_branch_2
Wait! Don't run this command! Why would you let Git do all the hard work? You are trying to understand the process here.
So, first, Git needs to find the merge base. Can you see which commit that would be?
Correct, it would be the last commit on the main branch, where the two diverged - that is, "Commit 7".
You can verify that by using:
git merge-base john_branch_2 paul_branch_2
 "Commit 7" is the merge base
Checkout the merge base so you can later apply the patches you will create:
git checkout main
Great, now Git should compute the diffs and generate the patches. You can observe the diffs directly:
git diff main paul_branch_2
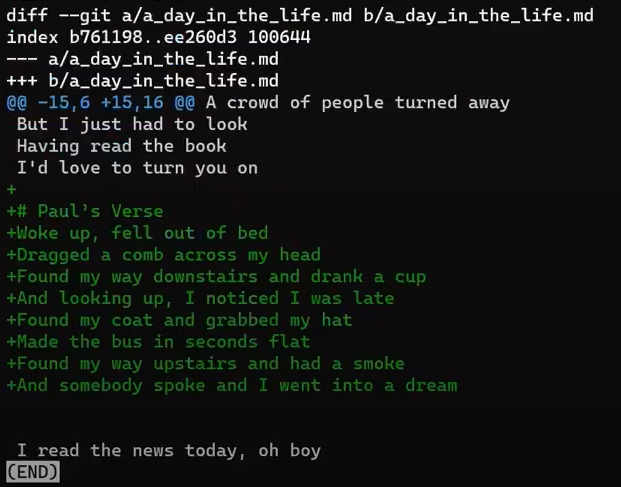 _The output of
 git diff main paul_branch_2_
Will applying this patch succeed? Well, no problem, Git has all the context lines in place.
Switch to the merge-base (which is "Commit 7", also referenced by main), and ask Git to apply this patch:
git checkout main
git diff main paul_branch_2 > paul_branch_2.patch
git apply --index paul_branch_2.patch
And this worked, no problem at all.
Now, compute the diff between John's new branch and the merge base. Notice that you haven't committed the applied changes, so john_branch_2 still points at the same commit as before, "Commit 9":
git diff main john_branch_2
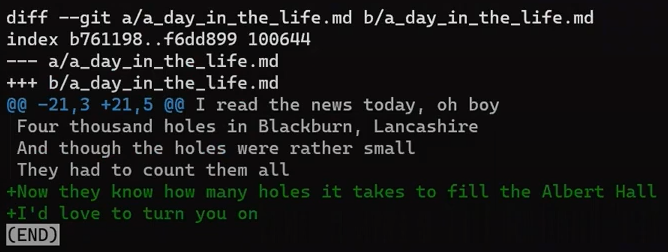 _The output of
 git diff main john_branch_2_
Will applying this diff work?
Well, indeed, yes. Notice that even though the line numbers have changed on the current version of the file, thanks to the context lines Git is able to locate where it needs to add these lines…
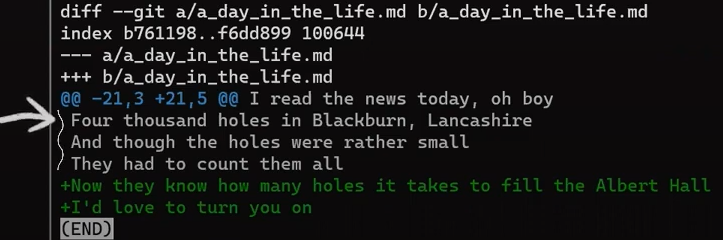 Git can rely on the context lines
Save this patch and apply it then:
git diff main john_branch_2 > john_branch_2.patch
git apply --index john_branch_2.patch
Observe the result file:
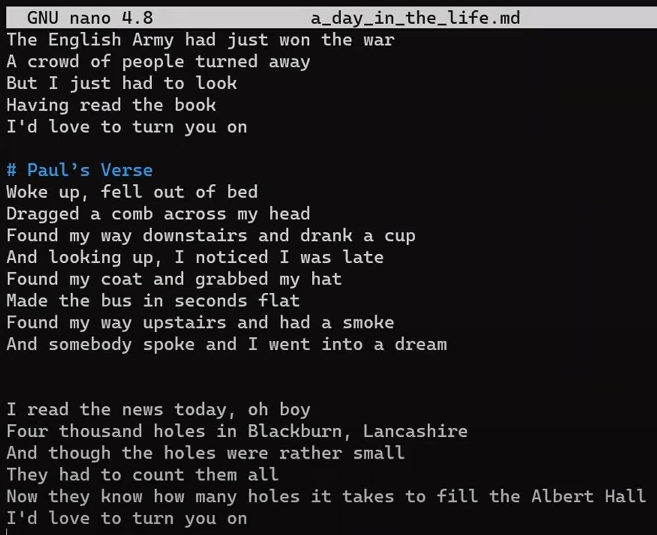 The result after applying Paul's patch
Cool, exactly what we wanted.
You can now create the tree and relevant commit:
git write-tree
Don't forget to specify both parents:
git commit-tree <TREE-ID> -p paul_branch_2 -p john_branch_2 -m "Merging new changes"
See how I used the branch names here? After all, they are just pointers to the commits we want.
Cool, look at the log from the new commit:
 _
_git lol <SHA_OF_THE_MERGE_COMMIT> after creating the merge commit_
 The history after creating the merge commit
Exactly what we wanted.
You can also let Git perform the job for you. You can checkout john_branch_2, which you haven't moved - so it still points to the same commit as it did before the merge. So all you need to do is run:
git checkout john_branch_2
git merge paul_branch_2
Observe the resulting history:
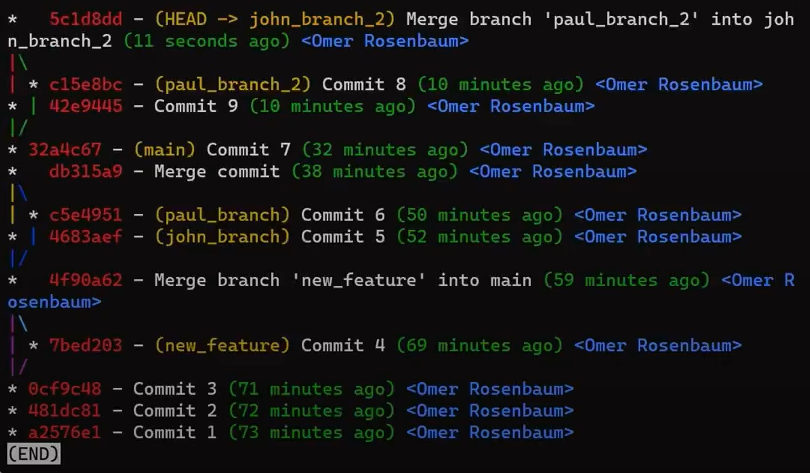
git lol after letting Git perform the merge
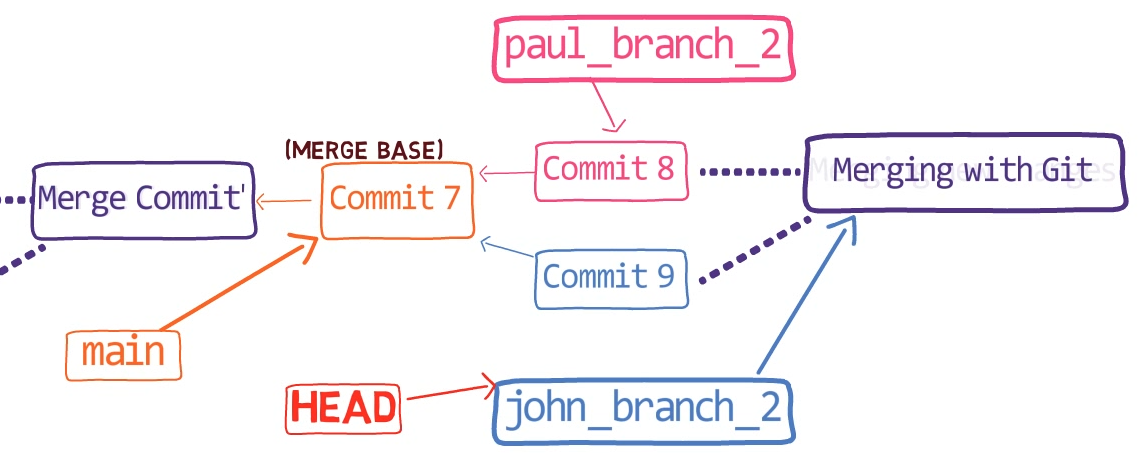 A visualization of the history after letting Git perform the merge
Just as before, you have a merge commit pointing to "Commit 8" and "Commit 9" as its parents. "Commit 9" is the first parent since you merged into it.
But this was still quite simple… John and Paul worked on the same file, but on very different parts. You could also directly apply Paul's changes to John's branch. If you go back to John's branch before the merge:
git reset --hard HEAD~
And now apply Paul's changes:
git apply --index paul_branch_2.patch
You will get the same result.
But what happens when the two branches include changes on the same files, in the same locations?
More Advanced Git Merge Cases
What would happen if John and Paul were to coordinate a new song, and work on it together?
In this case, John creates the first version of this song in the main branch:
git checkout main
nano everyone.md
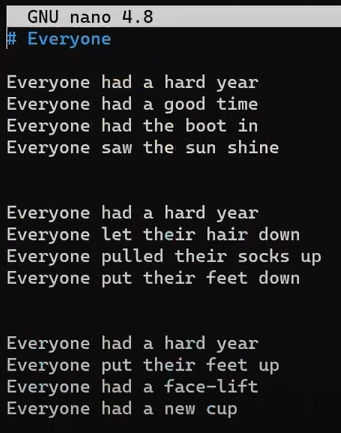 The contents of
 everyone.md prior to the first commit
By the way, this text is indeed taken from the version that John Lennon recorded for a demo in 1968. But this isn't a book about the Beatles. If you're curious about the process the Beatles underwent while writing this song, you can follow the links in the end of this chapter.
git add everyone.md
git commit -m "Commit 10"
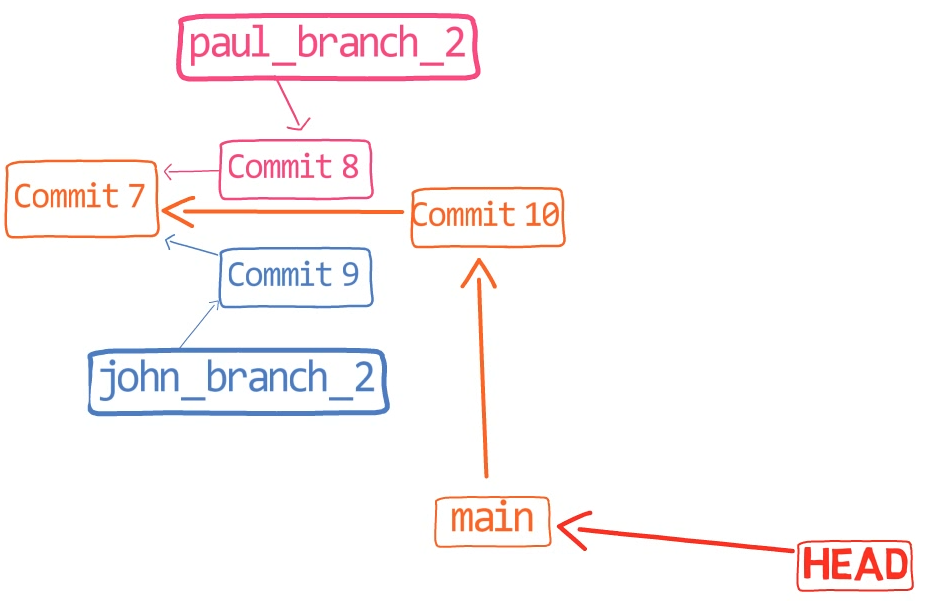 Introducing "Commit 10"
Now John and Paul split. Paul creates a new verse in the beginning:
git checkout -b paul_branch_3
nano everyone.md
 Paul added a new verse in the beginning
Also, while talking to John, they decided to change the word "feet" to "foot", so Paul adds this change as well.
And Paul adds and commits his changes to the repo:
git add everyone.md
git commit -m "Commit 11"
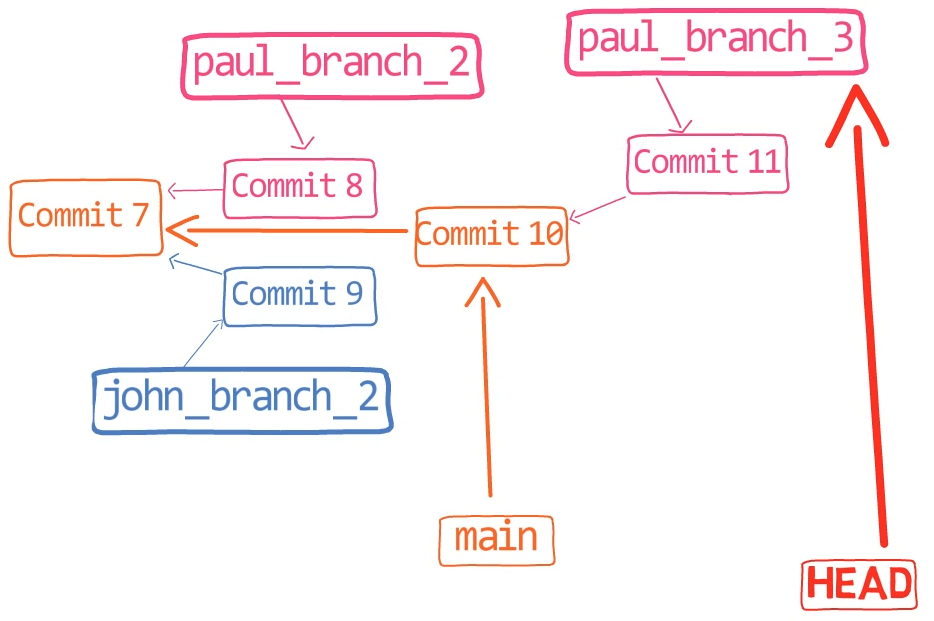 The history after introducing "Commit 11"
You can observe Paul's changes, by comparing this branch's state to the state of branch main:
git diff main
 The output of
 git diff main from Paul's branch
Store this diff in a patch file:
git diff main > paul_3.patch
Now back to main…
git checkout main
John decides to make another change, in his own new branch:
git checkout -b john_branch_3
And he replaces the line "Everyone had the boot in" with the line "Everyone had a wet dream". In addition, John changed the word "feet" to "foot", following his talk with Paul.
Observe the diff:
git diff main
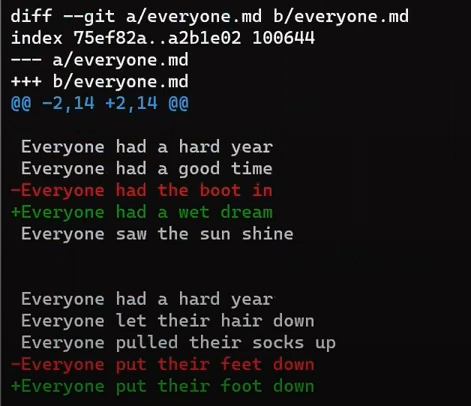 The output of
 git diff main from John's branch
Store this output as well:
git diff main > john_3.patch
Now, stage and commit:
git add everyone.md
git commit -m "Commit 12"
This should be your current history:
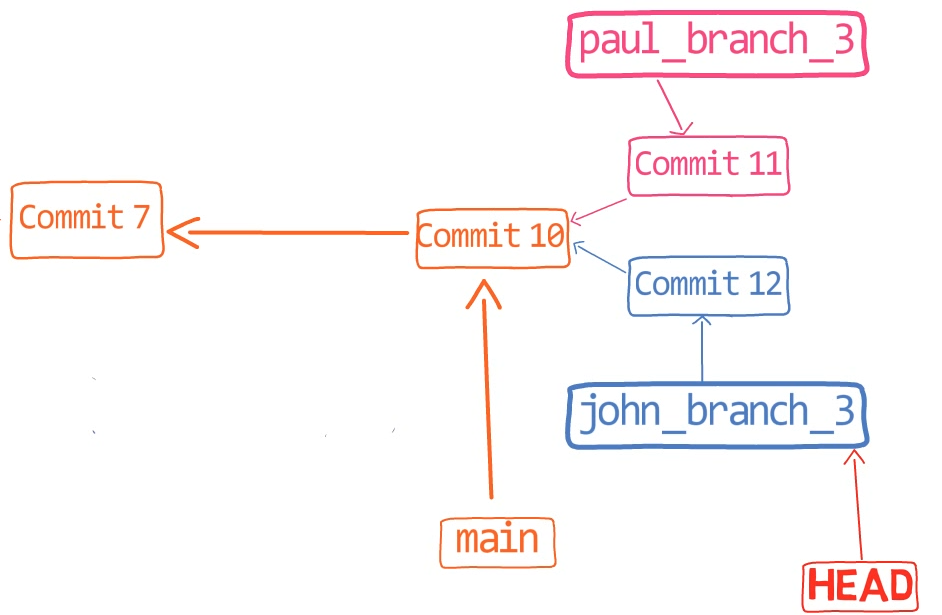 The history after introducing "Commit 12"
Note that I deleted john_branch_2 and paul_branch_2 for simplicity. Of course, you can erase them from Git by using git branch -D <branch_name>. As a result, these branch names will not appear in the output of git log or other similar commands.
This also applies to commits that are no longer reachable from any named reference, such as "Commit 8" or "Commit 9". Since they are not reachable from any named reference via the parents' chain, they will not be included in the output of commands such as git log.
Back to our story - Paul told John he had added a new verse, so John would like to merge Paul's changes.
Can John simply apply Paul's patch?
Consider the patch again:
git diff main paul_branch_3
 _The output of
 git diff main paul_branch_3_
As you can see, this diff relies on the line "Everyone had the boot in", but this line no longer exists on John's branch. As a result, you could expect applying the patch to fail. Go on, give it a try:
git apply paul_3.patch
 Applying the patch failed
Indeed, you can see that it failed.
But should it really fail?
As explained earlier, git merge uses a 3-way merge algorithm, and this can come in handy here. What would be the first step of this algorithm?
Well, first, Git would find the merge base - that is, the common ancestor of Paul's branch and John's branch. Consider the history:
 The history after introducing "Commit 12"
So the common ancestor of "Commit 11" and "Commit 12" is "Commit 10". You can verify this by running the command:
git merge-base john_branch_3 paul_branch_3
Now we can take the patches we generated from the diffs on both branches, and apply them to main. Would that work?
First, try to apply John's patch, and then Paul's patch.
Consider the diff:
git diff main john_branch_3
 _The output of
 git diff main john_branch_3_
We can store it in a file:
git diff main john_branch_3 > john_3.patch
And apply this patch on main:
git checkout main
git apply john_3.patch
Let's consider the result:
nano everyone.md
 The contents of
 everyone.md after applying John's patch
The line changed as expected. Nice 😎
Now, can Git apply Paul's patch? To remind you, this is the patch:
 The contents of Paul's patch
Well, Git cannot apply this patch, because this patch assumes that the line "Everyone had the boot in" exists. Trying to apply it is liable to fail:
git apply -v paul_3.branch
 Applying Paul's patch failed
What you tried to do now, applying Paul's patch on the main branch after applying John's patch, is the same as being on john_branch_3, and attempting to apply the patch. That is, running:
git apply paul_3.patch
What would happen if we tried the other way around?
First, clean up the state:
git reset --hard
And start from Paul's branch:
git checkout paul_branch_3
Can we apply John's patch? As a reminder, this is the status of everyone.md on this branch:
 _The contents of
 everyone.md on paul_branch_3_
And this is John's patch:
 The contents of John's patch
Would applying John's patch work?
Try to answer yourself before reading on.
You can try:
git apply john_3.patch
 Git fails to apply John's patch
Well, no! Again, if you are not sure what happened, you can always ask git apply to be a bit more verbose:
git apply -v john_3.patch
 You can get more information by using the
 -v flag
Git is looking for "Everyone put the feet down", but Paul has already changed this line so it now consists of the word "foot" instead of "feet". As a result, applying this patch fails.
Notice that changing the number of context lines here (that is, using git apply with the -C flag, as discussed in the previous chapter) is irrelevant - Git is unable to locate the actual line that the patch is trying to erase.
But actually, Git can make this work, if you just add a flag to apply, telling it to perform a 3-way merge under the hood:
git apply -3 john_3.patch
 Applying with
 -3 flag succeeds
And consider the result:
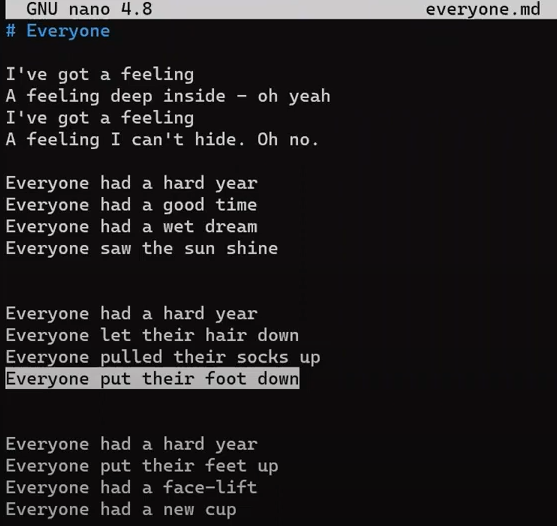 The contents of
 everyone.md after the merge
Exactly what we wanted! You have Paul's verse, and both of John's changes!
So, how was Git able to accomplish that?
Well, as I mentioned, Git really did a 3-way merge, and with this example, it will be a good time to dive into what this actually means.
How Git's 3-way Merge Algorithm Works
Get back to the state before applying this patch:
git reset --hard
You have now three versions: the merge base, which is "Commit 10", Paul's branch, and John's branch. In general terms, we can say these are the merge base, commit A and commit B. Notice that the merge base is by definition an ancestor of both commit A and commit B.
To perform the merge, Git looks at the diff between the three different versions of the file in question on these three revisions. In your case, it's the file everyone.md, and the revisions are "Commit 10", Paul's branch - that is, "Commit 11", and John's branch, that is, "Commit 12".
Git makes the merging decision based on the status of each line in each of these versions.
 The three versions considered for the 3-way merge
In case not all three versions match, that is a conflict. Git can resolve many of these conflicts automatically, as we will now see.
Let's consider specific lines.
The first lines here exist only on Paul's branch:
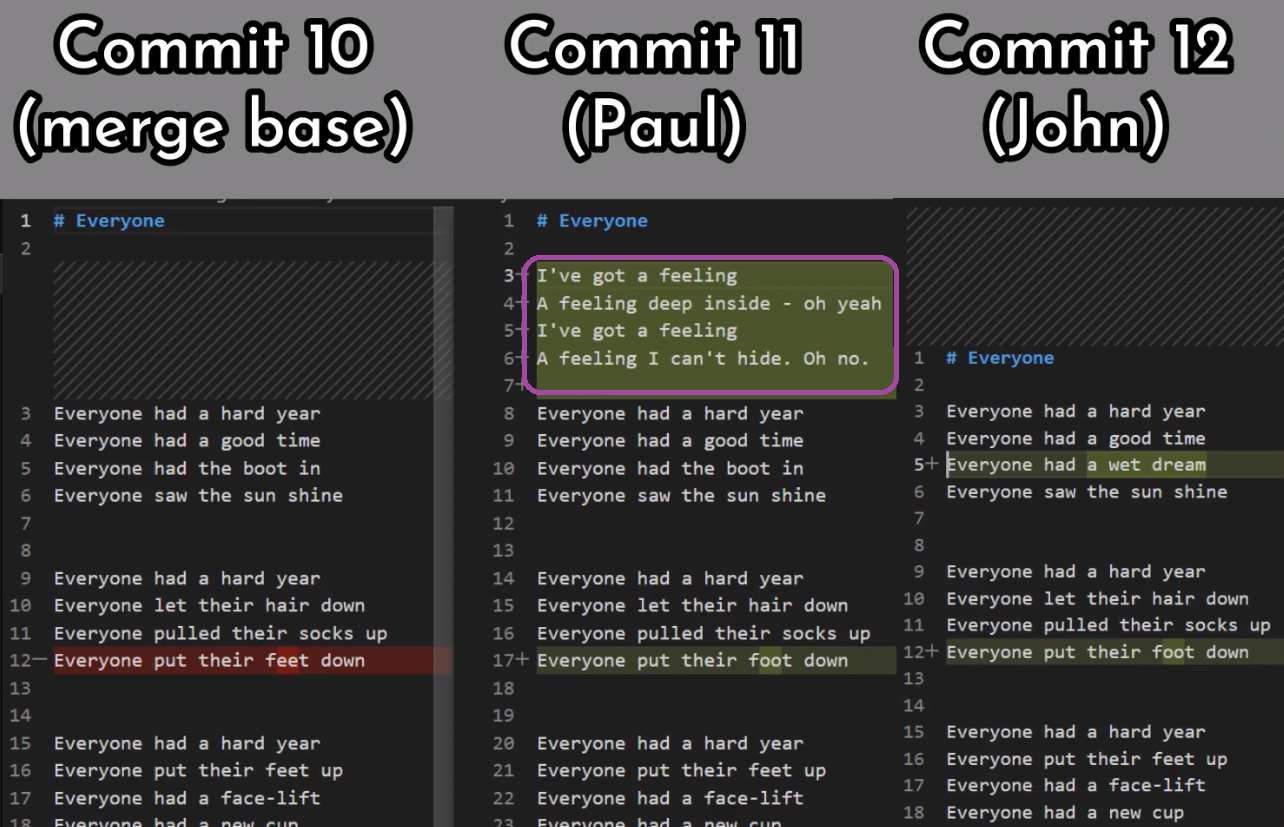 Lines that appear on Paul's branch only
This means that the state of John's branch is equal to the state of the merge base. So the 3-way merge goes with Paul's version.
In general, if the state of the merge base is the same as A, the algorithm goes with B. The reason is that since the merge base is the ancestor of both A and B, Git assumes that this line hasn't changed in A, and it has changed in B, which is the most recent version for that line, and should thus be taken into account.
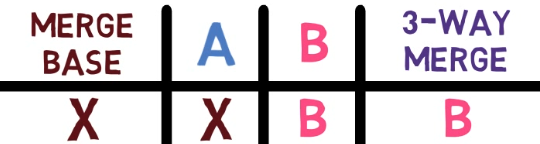 If the state of the merge base is the same as
 A, and this state is different from B, the algorithm goes with B
Next, you can see lines where all three versions agree - they exist on the merge base, A and B, with equal data.
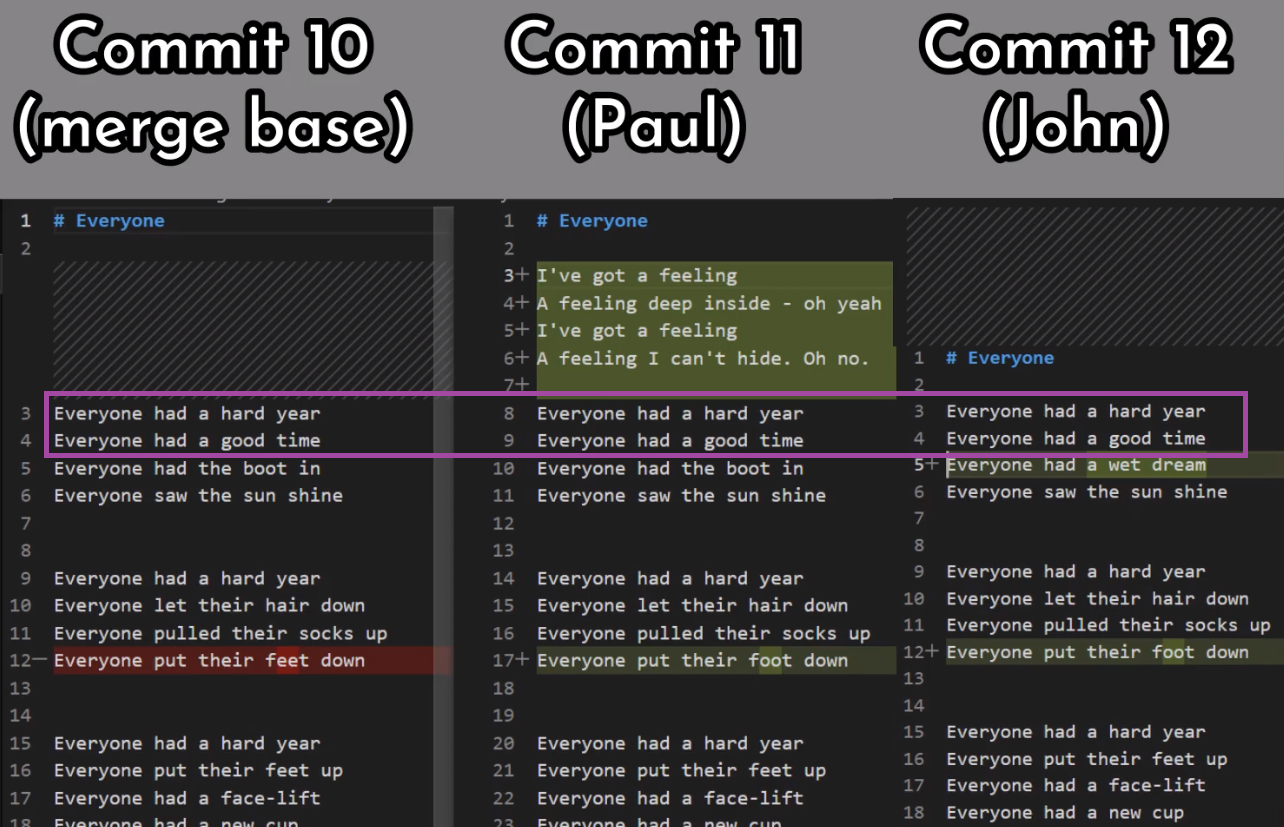 Lines where all three versions agree
In this case the algorithm has a trivial choice - just take that version.
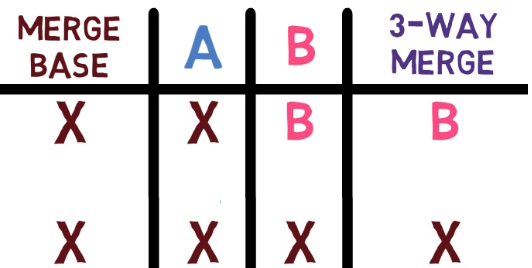 In case all three versions agree, the algorithm goes with that single version
In a previous example, we saw that if the merge base and A agree, and B's version is different, the algorithm picks B. This works in the other direction too - for example, here you have a line that exists on John's branch, different than that on the merge base and Paul's branch.
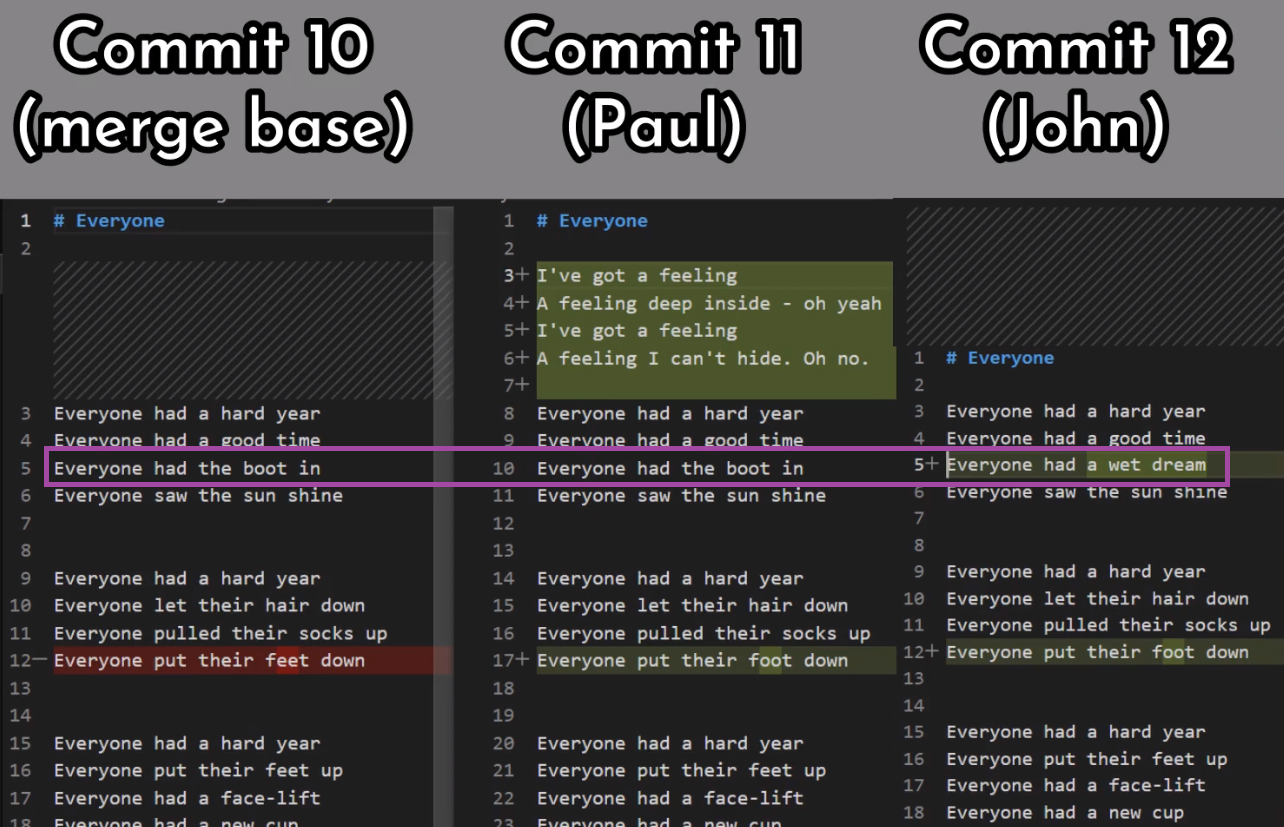 A line where Paul's version matches the merge base's version, and John has a different version
Hence, John's version is chosen.
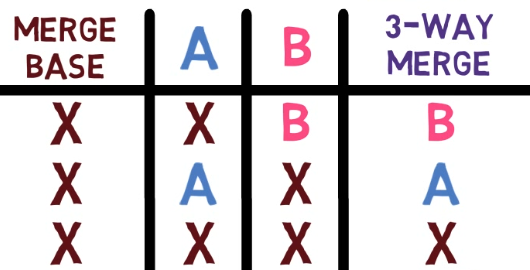 If the state of the merge base is the same as
 B, and this state is different from A, the algorithm goes with A
Now consider another case, where both A and B agree on a line, but the value they agree upon is different from the merge base: both John and Paul agreed to change the line "Everyone put their feet down" to "Everyone put their foot down":
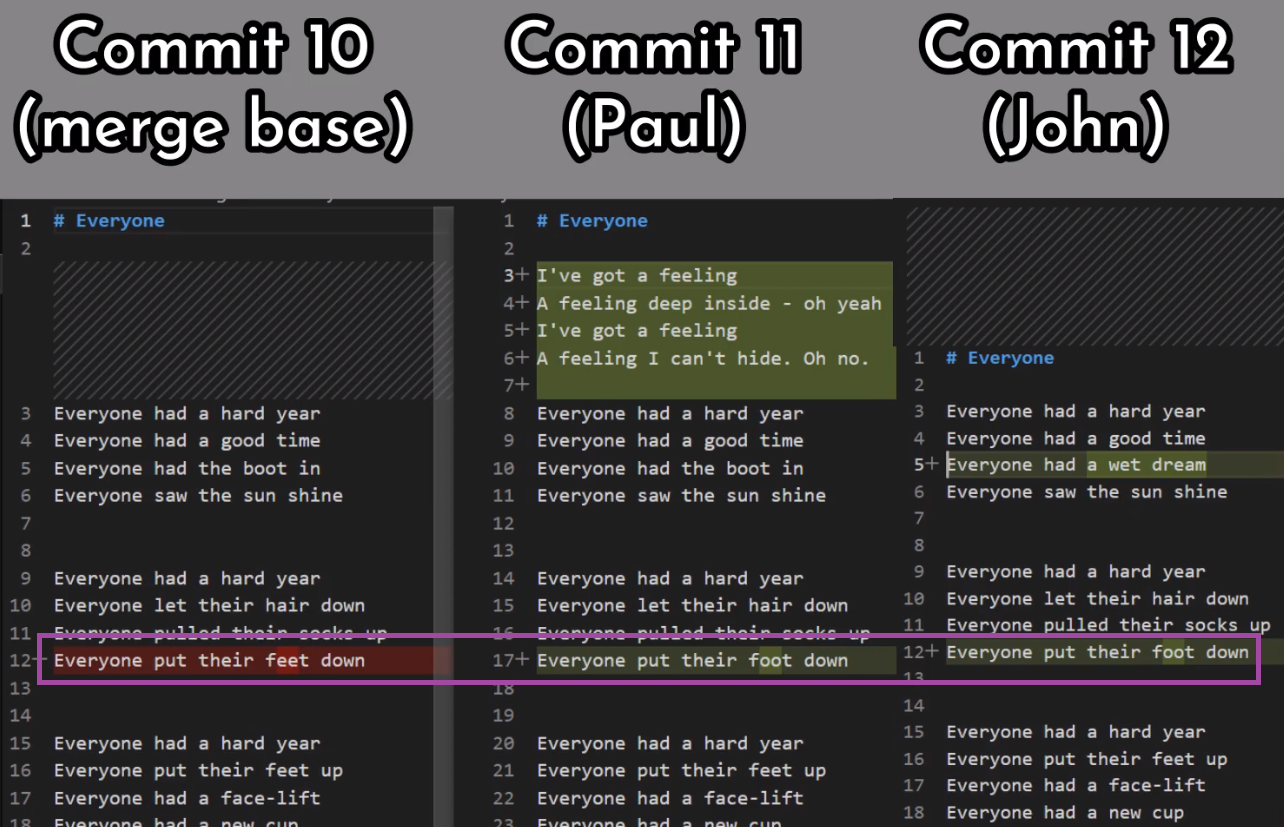 A line where Paul's version matches John's version, yet the merge base has a different version
In this case, the algorithm picks the version on both A and B.
 In case
 A and B agree on a version which is different from the merge base's version, the algorithm picks the version on both A and B
Notice this is not a democratic vote. In the previous case, the algorithm picked the minority version, as it resembled the newest version of this line. In this case, it happens to pick the majority - but only because A and B are the revisions that agree on the new version.
The same would happen if we used git merge:
git merge john_branch_3
Without specifying any flags, git merge will default to using a 3-way merge.
 By default,
 git merge uses a 3-way merge algorithm
The status of everyone.md after running git merge john_branch would be the same as the result you achieved by applying the patches with git apply -3.
If you consider the history:
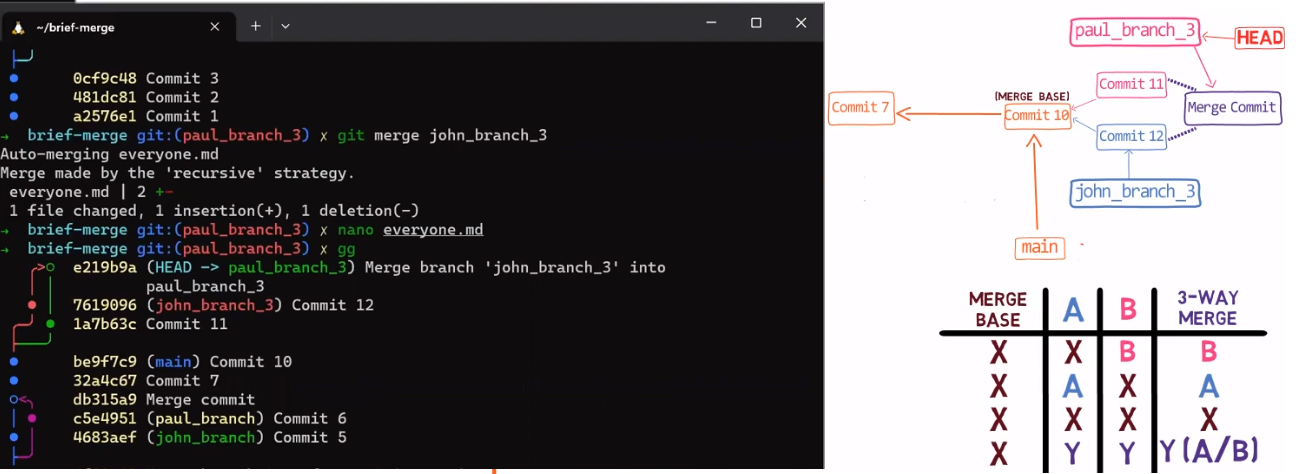 Git's history after performing the merge
You will see that the merge commit indeed has two parents: the first is "Commit 11", that is, where paul_branch_3 pointed to before the merge. The second is "Commit 12", where john_branch_3 pointed to, and still points to now.
What will happen if you now merge from main? That is, switch to the main branch, which is pointing to "Commit 10":
git checkout main
And then merge Paul's branch?
git merge paul_branch_3
Indeed, we get a fast-forward merge - as before running this command, main was an ancestor of paul_branch_3.
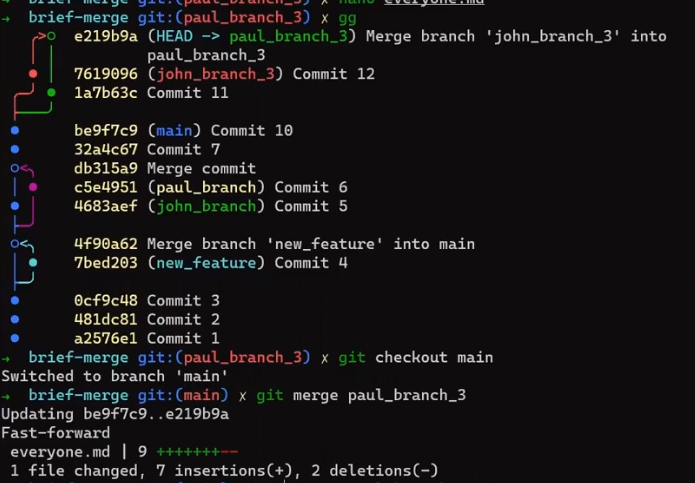 A fast-forward merge
So, this is a 3-way merge. In general, if all versions agree on a line, then this line is used. If A and the merge base match, and B has another version, B is taken. In the opposite case, where the merge base and B match, the A version is selected. If A and B match, this version is taken, whether the merge base agrees or not.
This description leaves one open question though: What happens in cases where all three versions disagree?
Well, that's a conflict that Git does not resolve automatically. In these cases, Git calls for a human's help.
How to Resolve Merge Conflicts
By following so far, you should understand the basics of the command git merge, and how Git can automatically resolve some conflicts. You also understand what cases are automatically resolved.
Next, let's consider a more advanced case.
Say Paul and John keep working on this song.
Paul creates a new branch:
git checkout -b paul_branch_4
And he decides to add some "Yeah"s to the song, so he changes this verse as follows:
 Paul's additions
So Paul stages and commits these changes:
git add everyone.md
git commit -m "Commit 13"
Paul also creates another song, let_it_be.md and adds it to the repo:
git add let_it_be.md
git commit -m "Commit 14"
This is the history:
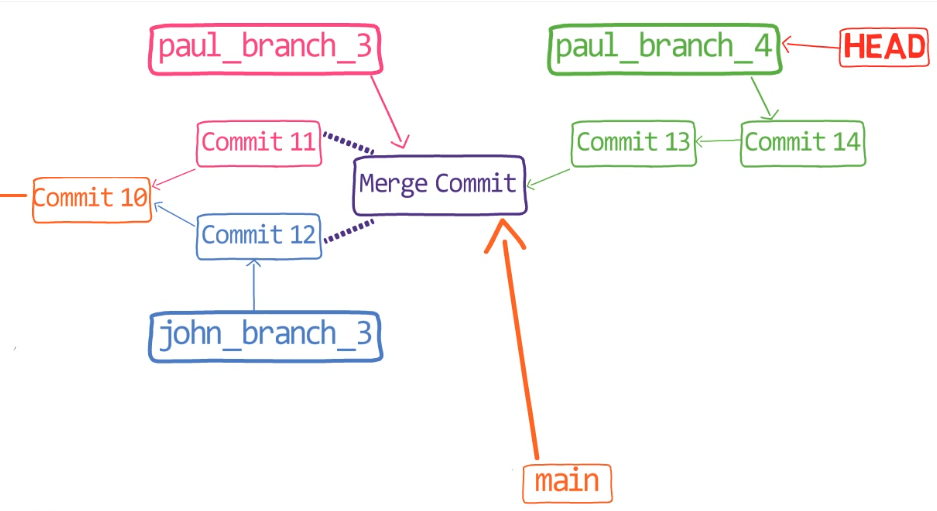 The history after Paul introduced "Commit 14"
Going back to main:
git checkout main
John also branches out:
git checkout -b john_branch_4
And John also works on the song "Everyone had a hard year", later to be called "I've got a feeling" (again, this is not a book about the Beatles, so I won't elaborate on it here. See the additional links if you are curious).
John decides to change all occurrences of "Everyone" to "Everybody":
 John changes all occurrences of "Everyone" to "Everybody"
He stages and commits this song to the repo:
git add everyone.md
git commit -m "Commit 15"
Nice. Now John also creates another song, across_the_universe.md. He adds it to the repo as well:
git add across_the_universe.md
git commit -m "Commit 16"
Observe the history again:
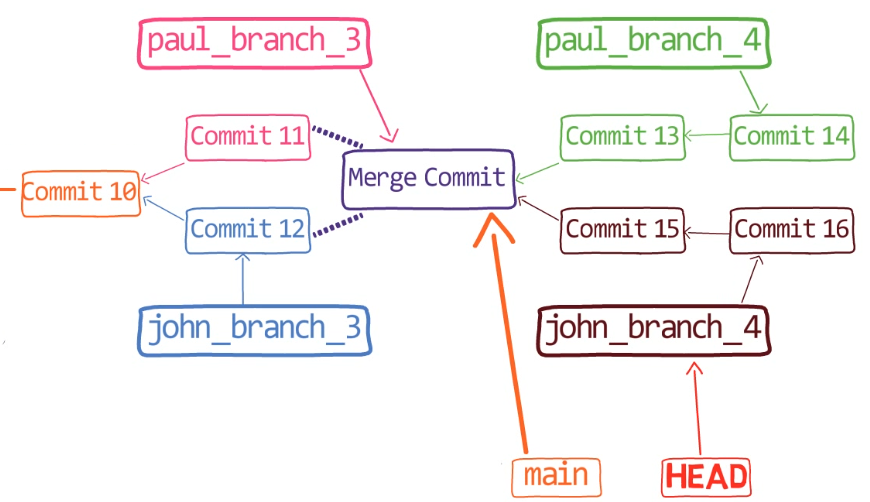 The history after John introduced "Commit 16"
You can see that the history diverges from main, to two different branches - paul_branch_4, and john_branch_4.
At this point, John would like to merge the changes introduced by Paul.
What is going to happen here?
Remember the changes introduced by Paul:
git diff main paul_branch_4
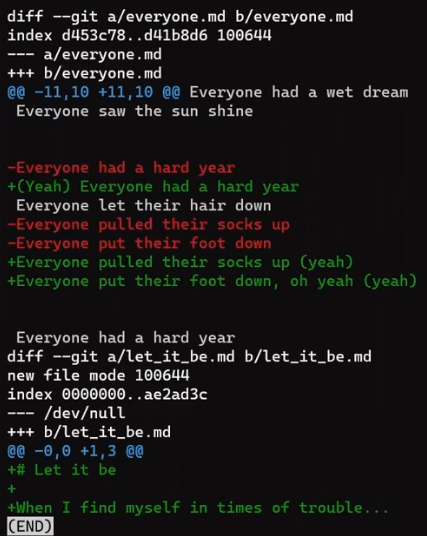 _The output of
 git diff main paul_branch_4_
What do you think? Will merge work?
Try it out:
git merge paul_branch_4
 A merge conflict
We have a conflict!
Git cannot merge these branches on its own. You can get an overview of the merge state, using git status:
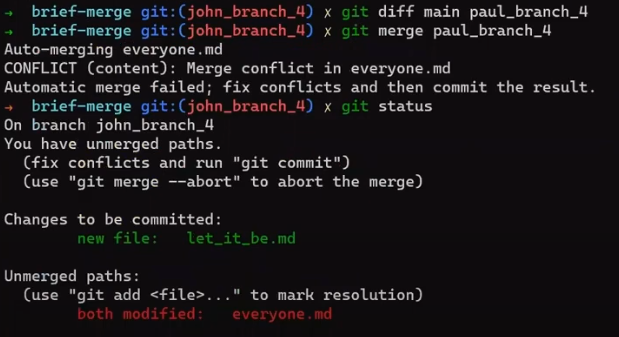 The output of
 git status right after the merge operation
The changes that Git had no problem resolving are staged for commit. And there is a separate section for "unmerged paths" - these are files with conflicts that Git could not resolve on its own.
It's time to understand why and when these conflicts happen, how to resolve them, and also how Git handles them under the hood.
Alright then! I hope you are at least as excited as I am. 😇
Let's recall what we know about 3-way merges:
First, Git will look for the merge base - the common ancestor of john_branch_4 and paul_branch_4. Which commit would that be?
It would be the tip of the main branch, the commit in which we merged john_branch_3 into paul_branch_3.
Again, if you are not sure, you can verify that by running:
git merge-base john_branch_4 paul_branch_4
And at the current state, git status knows which files are staged and which aren't.
Consider the process for each file, which is the same as the 3-way merge algorithm we considered per line, but on a file's level:
across_the_universe.md exists on John's branch, but doesn't exist on the merge base or on Paul's branch. So Git chooses to include this file. Since you are already on John's branch and this file is included in the tip of this branch, it is not mentioned by git status.
let_it_be.md exists on Paul's branch, but doesn't exist on the merge base or John's branch. So git merge "chooses" to include it.
What about everyone.md? Well, here we have three different states of this file: its state on the merge base, its state on John's branch, and its state on Paul's branch. While performing a merge, Git stores all of these versions on the index.
Let's observe that by looking directly at the index with the command git ls-files:
git ls-files -s --abbrev
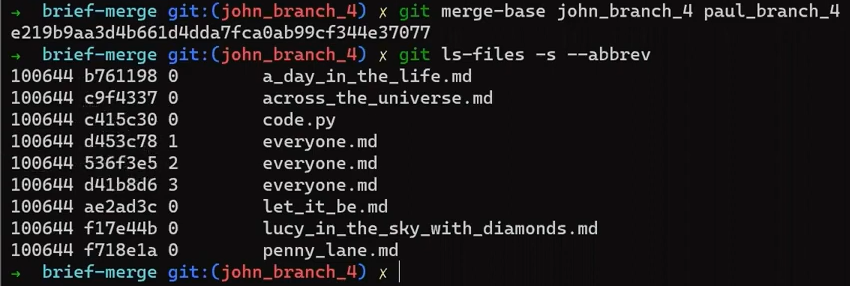 The output of
 git ls-files -s --abbrev after the merge operation
You can see that everyone.md has three different entries. Git assigns each version a number that represents the "stage" of the file, and this is a distinct property of an index entry, alongside the file's name and the mode bits.
When there is no merge conflict regarding a file, its "stage" is 0. This is indeed the state for across_the_universe.md, and for let_it_be.md.
On a conflict's state, we have:
- Stage
1- which is the merge base. - Stage
2- which is "your" version. That is, the version of the file on the branch you are merging into. In our example, this would bejohn_branch_4. - Stage
3- which is "their" version, also called theMERGE_HEAD. That is, the version on the branch you are merging (into the current branch). In our example, that ispaul_branch_4.
To observe the file's contents in a specific stage, you can use a command I introduced in a previous post, git cat-file, and provide the blob's SHA:
git cat-file -p <BLOB_SHA_FOR_STAGE_2>
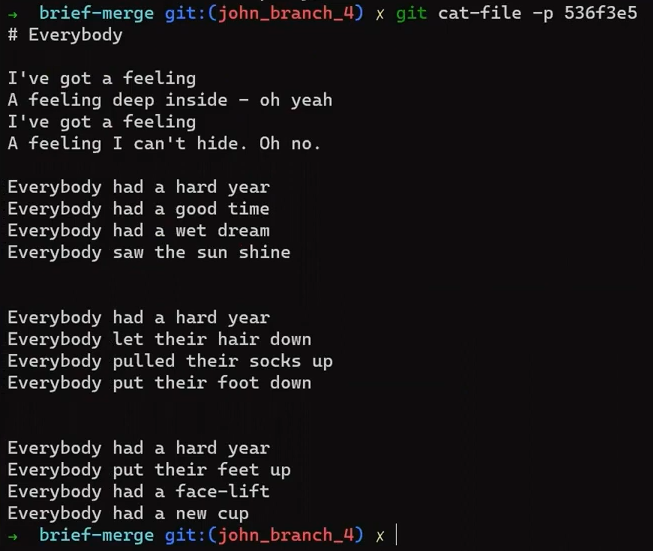 Using
Using git cat-file to present the content of the file on John's branch, right from its state in the index
And indeed, this is the content we expected - from John's branch, where the lines start with "Everybody" rather than "Everyone".
A nice trick that allows you to see the content quickly without providing the blob's SHA-1 value, is by using git show, like so:
git show :<STAGE>:everyone.md
For example, to get the content of the same version as with git cat-file -p , you can write git show :2:everyone.md.
Git records the three states of the three commits into the index in this way at the start of the merge. It then follows the three-way merge algorithm to quickly resolve the simple cases:
In case all three stages match, then the selection is trivial.
If one side made a change while the other did nothing - that is, stage 1 matches stage 2- then we choose stage 3, or vice versa. That's exactly what happened with let_it_be.md and across_the_universe.md.
In case of a deletion on the incoming branch, for example, and given there were no changes on the current branch, then we would see that stage 1 matches stage 2, but there is no stage 3. In this case, git merge removes the file for the merged version.
What's really cool here is that for matching, Git doesn't need the actual files. Rather, it can rely on the SHA-1 values of the corresponding blobs. This way, Git can easily detect the state a file is in.
 Git performs the same 3-way merge algorithm on a files level
For everyone.md you have this special case - where stage 1, stage 2 and stage 3 are all different from one another. That is, they have different blob SHAs. It's time to go deeper and understand the merge conflict. 😊
One way to do that would be to simply use git diff. In a previous chapter, we examined git diff in detail, and saw that it shows the differences between various combinations of the working tree, index or commits.
But git diff also has a special mode for helping with merge conflicts:
git diff
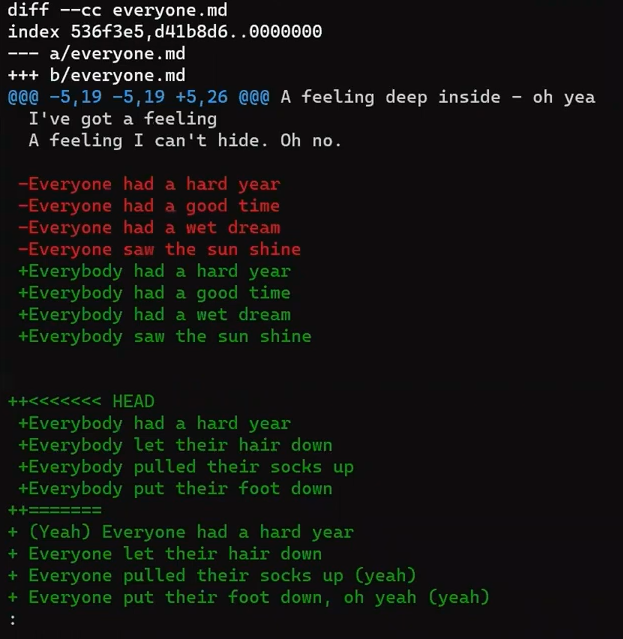 The output of
 git diff during a merge conflict
This output may be confusing at first, but once you get used to it, it's pretty clear. Let's start by understanding it, and then see how you can resolve conflicts with other, more visual tools.
The conflicted section is separated by the "equal" marks (====), and marked with the corresponding branches. In this context, "ours" is the current branch. In this example, that would be john_branch_4, the branch that HEAD was pointing to when we initiated the git merge command. "Theirs" is the MERGE_HEAD, the branch that we are merging in - in this case, paul_branch_4.
So git diff without any special flags shows changes between the working tree and the index - which in this case are the conflicts yet to be resolved. The output doesn't include staged changes, which is very convenient for resolving the conflict.
Time to resolve this manually. Fun!
So, why is this a conflict?
For Git, Paul and John made different changes to the same line, for a few lines. John changed it to one thing, and Paul changed it to another thing. Git cannot decide which one is correct.
This is not the case for the last lines, like the line that used to be "Everyone had a hard year" on the merge base. Paul hasn't changed this line, or the lines surrounding it, so its version on paul_branch_4, or "theirs" in our case, agrees with the merge_base. Yet John's version, "ours", is different. Thus git merge can easily decide to take this version.
But what about the conflicted lines?
In this case, I know what I want, and that is actually a combination of these lines. I want the lines to start with "Everybody", following John's change, but also to include Paul's "yeah"s. So go ahead and create the desired version by editing everyone.md:
nano everyone.md
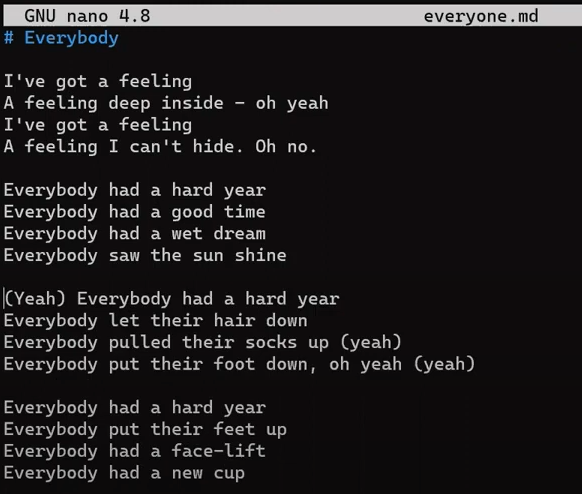 Editing the file manually to achieve the desired state
To compare the result file to what you had in the branch prior to the merge, you can run:
git diff --ours
Similarly, if you wish to see how the result of the merge differs from the branch you merged into our branch, you can run:
git diff --theirs
You can even see how the result is different from both sides using:
git diff --base
Now you can stage the fixed version:
git add everyone.md
After staging, if you look at git status, you will see no conflicts:
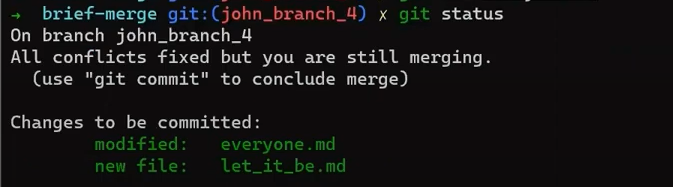 After staging the fixed version
 everyone.md, there are no conflicts
You can now simply use git commit, and Git will present you with a commit message containing details about the merge. You can modify it if you like, or leave it as is. Regardless of the commit message, Git will create a "merge commit" - that is, a commit with more than one parent.
To validate that, consider the history:
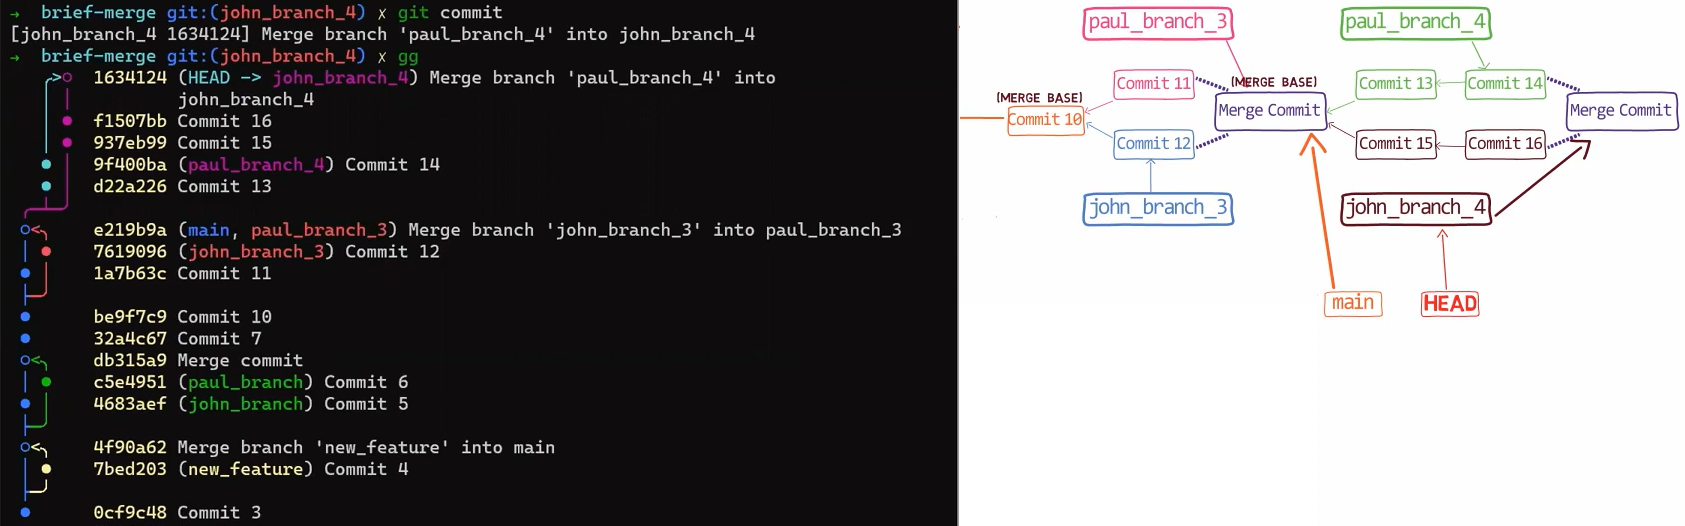 The history after completing the merge operation
john_branch_4 now points to the new merge commit. The incoming branch, "theirs", in this case, paul_branch_4, stays where it was.
How to Use VS Code to Resolve Conflicts
You will now see how to resolve the same conflict using a graphical tool. For this example, I use VS Code, which is a free and popular code editor. There are many other tools, but the process is similar, so I will just show VS Code as an example.
First, get back to the state before the merge:
git reset --hard HEAD~
And try to merge again:
git merge paul_branch_4
You should be back at the same status:
 Back at the conflicting status
Let's see how this appears on VS Code:
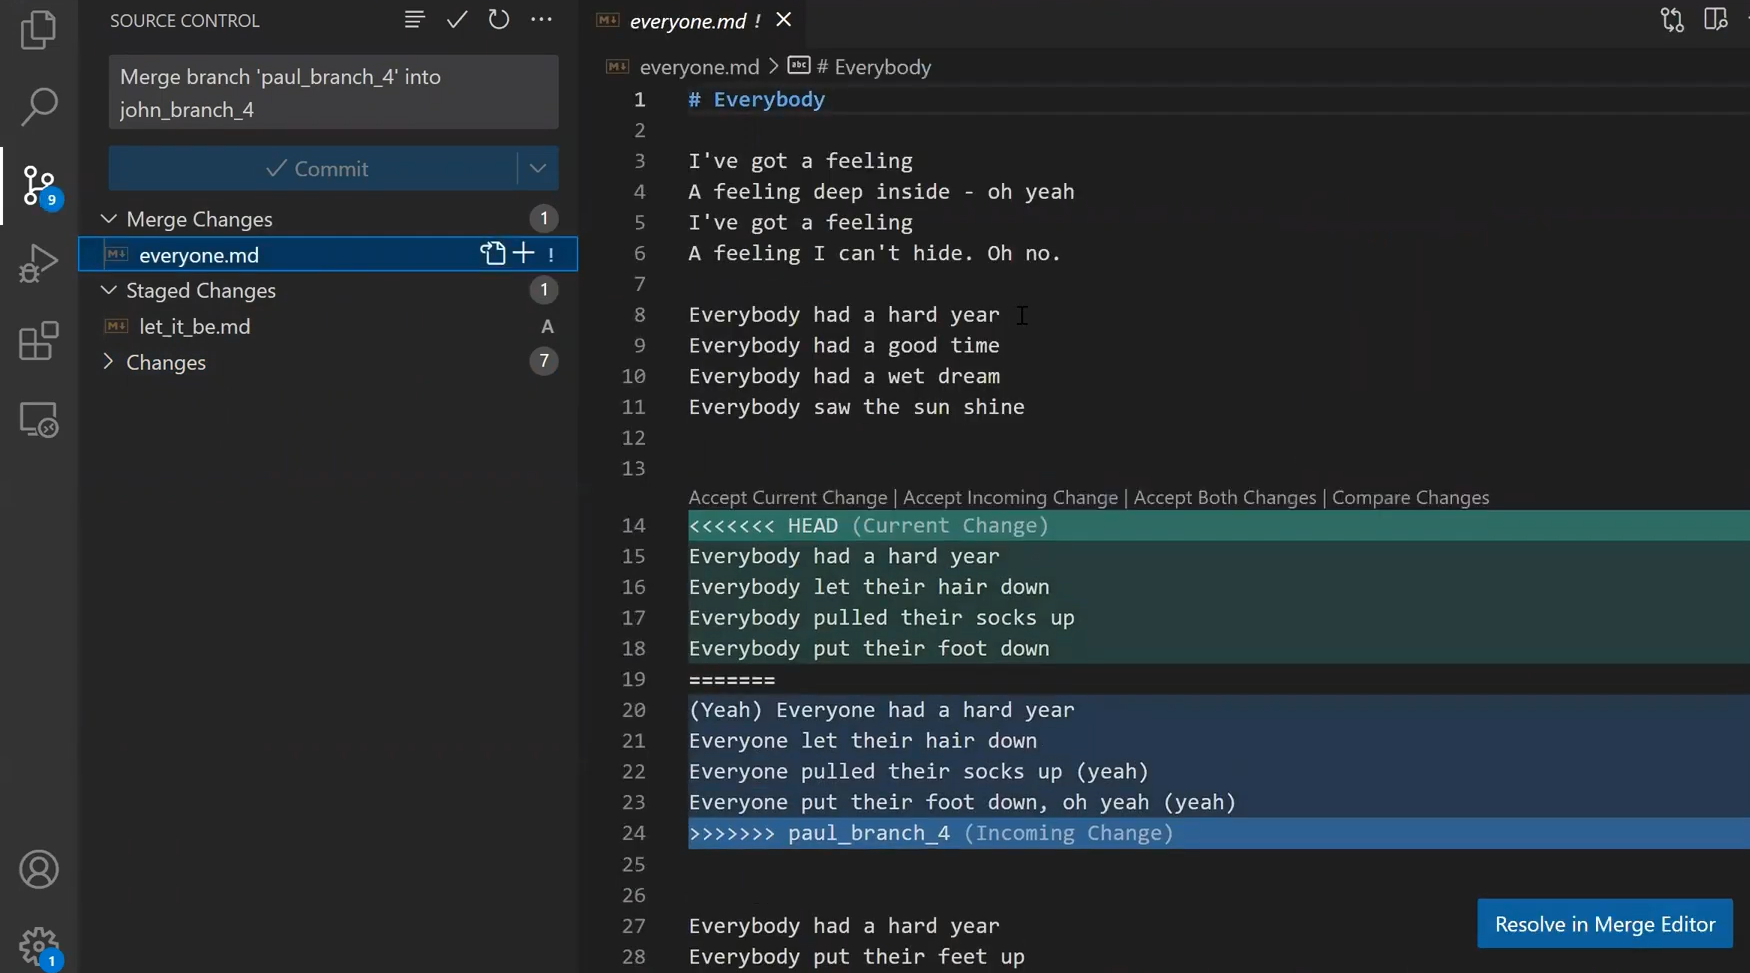 Conflict resolution with VS Code
VS Code marks the different versions with "Current Change" - which is the "ours" version, the current HEAD, and "Incoming Change" for the branch we are merging into the active branch. You can accept one of the changes (or both) by clicking on one of the options.
If you clicked on Resolve in Merge editor, you'll get a more visual view of the state. VS Code shows the status of each line:
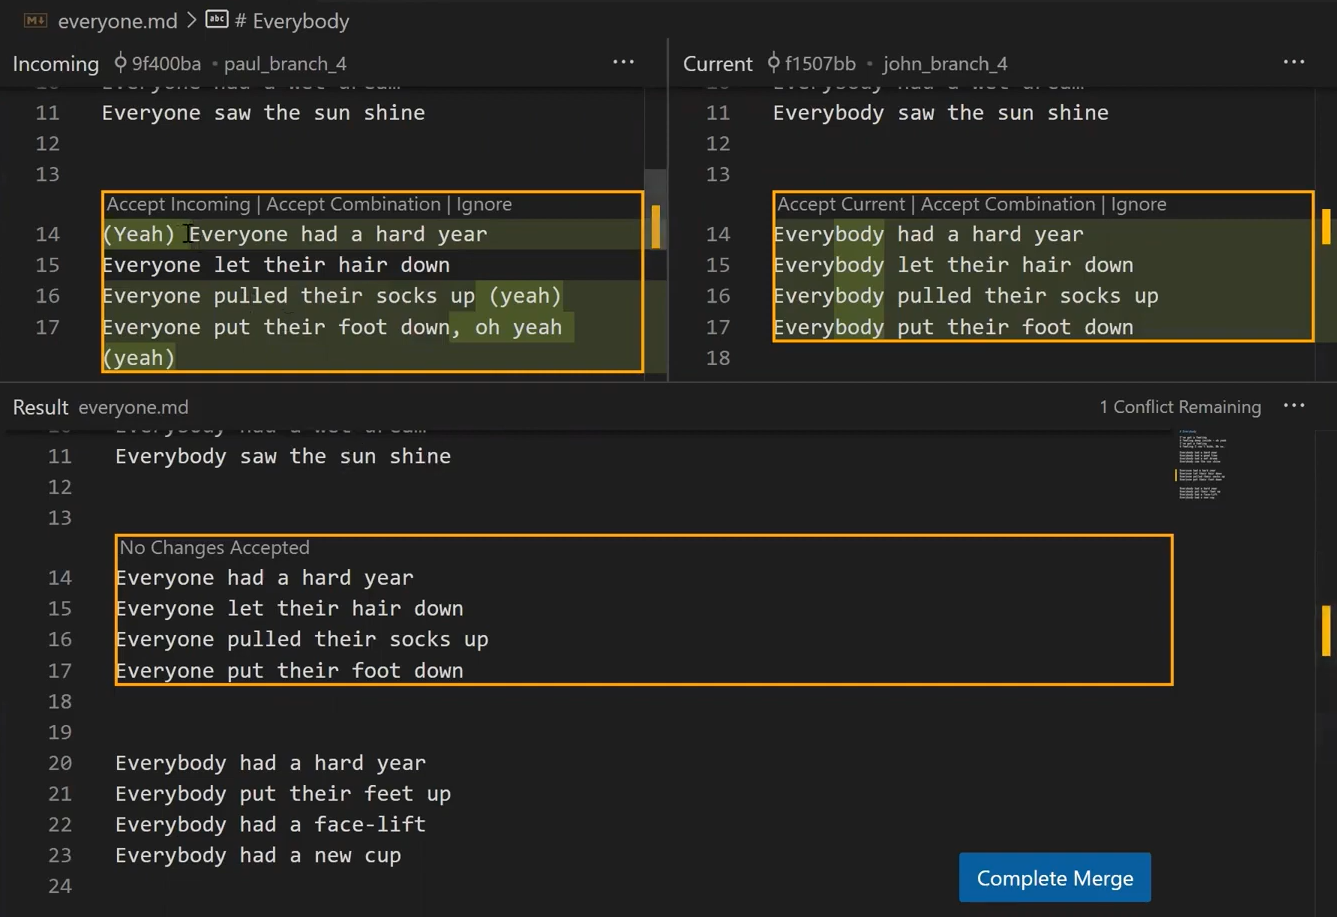 VS Code's Merge Editor
If you look closely, you will see that VS Code shows changes within words - for example, showing that "Everyone" was changed to "Everybody", marking the changed parts.
You can accept either version, or you can accept a combination. In this case, if you click on "Accept Combination", you get this result:
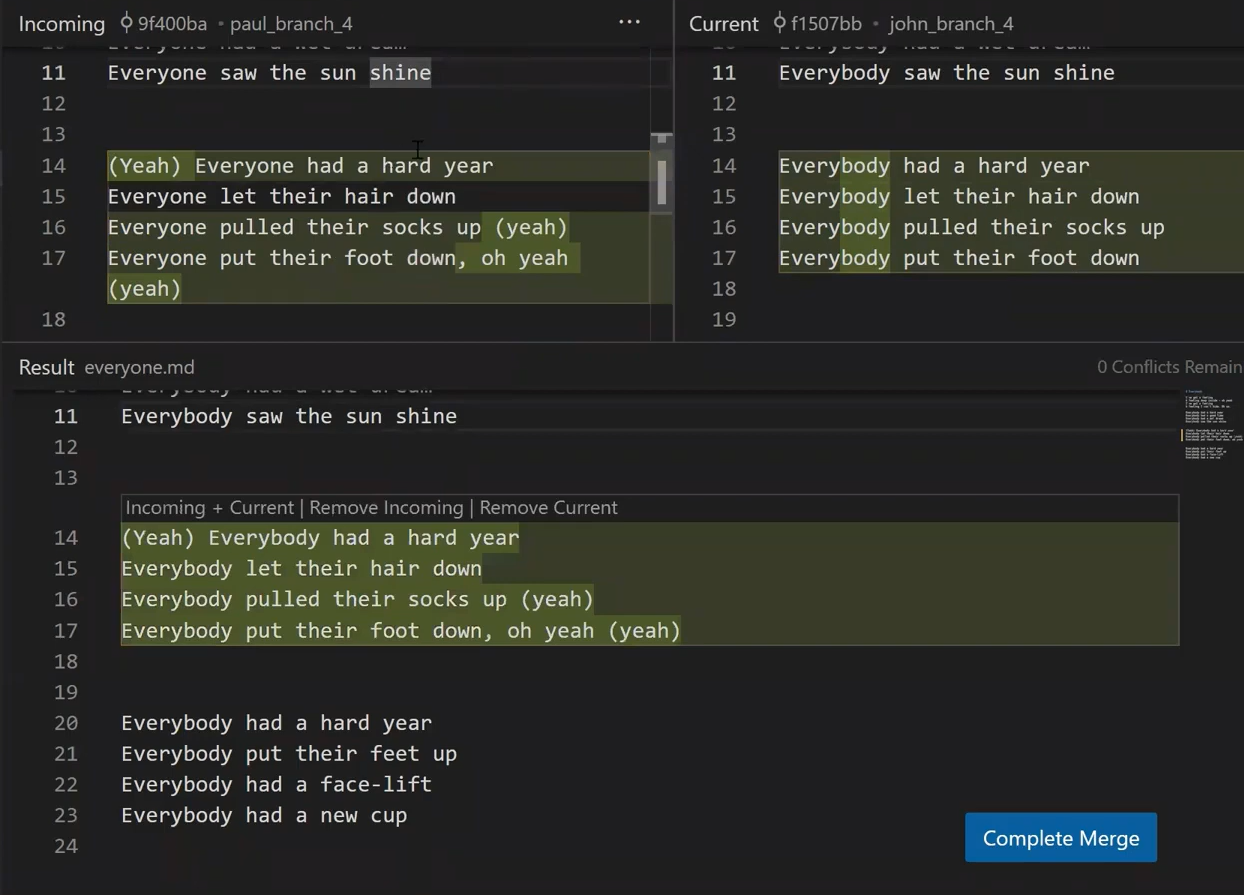 VS Code's Merge Editor after clicking on "Accept Combination"
VS Code did a really good job! The same three way merge algorithm was implemented here and used on the word level rather than the line level. So VS Code was able to actually resolve this conflict in a rather impressive way. Of course, you can modify VS Code's suggestion, but it provided a very good start.
One More Powerful Tool
Well, this was the first time in this book that I've used a tool with a graphical user interface. Indeed, graphical interfaces can be convenient to understand what's going on when you are resolving merge conflicts.
However, like in many other cases, when we need to really understand what's going on, the command line becomes handy. So, let's get back to the command line and learn a tool that can come in handy in more complicated cases.
Again, go back to the state before the merge:
git reset --hard HEAD~
And merge:
git merge paul_branch_4
And say, you are not exactly sure what happened. Why is there a conflict? One very useful command would be:
git log -p --merge
As a reminder, git log shows the history of commits that are reachable from HEAD. Adding -p tells git log to show the commits along with the diffs they introduced. The --merge switch makes the command show all commits containing changes relevant to any unmerged files, on either branch, together with their diffs.
This can help you identify the changes in history that led to the conflicts. So in this example, you'd see:
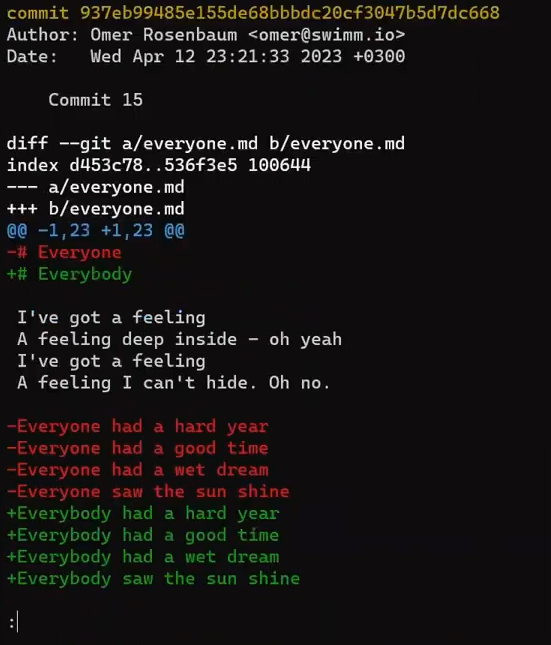 The output of
 git log -p --merge
The first commit we see is "Commit 15", as in this commit John modified everyone.md, a file that still has conflicts. Next, Git shows "Commit 13", where Paul changed everyone.md:
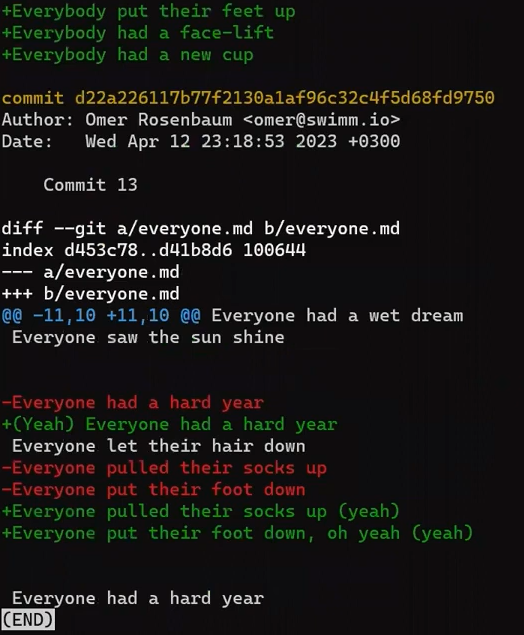 The output of
 git log -p --merge - continued
Notice that git log --merge did not mention previous commits that changed everyone.md before "Commit 13", as they didn't affect the current conflict.
This way, git log tells you all you need to know to understand the process that got you into the current conflicting state. Cool! 😎
Using the command line, you can also ask Git to take only one side of the changes - either "ours" or "theirs", even for a specific file.
You can also instruct Git to take some parts of the diffs of one file and another from another file. I will provide links that describe how to do that in the additional resources of this chapter in the appendix.
For the most part, you can accomplish that pretty easily, either manually or from the UI of your favorite IDE.
For now, it's time for a recap.
Recap - Understanding Git Merge
In this chapter, you got an extensive overview of merging with Git. You learned that merging is the process of combining the recent changes from several branches into a single new commit. The new commit has two parents - those commits which had been the tips of the branches that were merged.
We considered a simple, fast-forward merge, which is possible when one branch diverged from the base branch, and then just added commits on top of the base branch.
We then considered three-way merges, and explained the three-stage process:
- First, Git locates the merge base. As a reminder, this is the first commit that is reachable from both branches.
- Second, Git calculates two diffs - one diff from the merge base to the first branch, and another diff from the merge base to the second branch. Git generates patches based on those diffs.
- Third and last, Git applies both patches to the merge base using a 3-way merge algorithm. The result is the state of the new merge commit.
We dove deeper into the process of a 3-way merge, whether at a file level or a hunk level. We considered when Git is able to rely on a 3-way merge to automatically resolve conflicts, and when it just can't.
You saw the output of git diff when we are in a conflicting state, and how to resolve conflicts either manually or with VS Code.
There is much more to be said about merges - different merge strategies, recursive merges, and so on. Yet, I believe this chapter covered everything needed so you have a robust understanding of what merge is, and what happens under the hood in the vast majority of cases.
Beatles-Related Resources
- https://www.the-paulmccartney-project.com/song/ive-got-a-feeling/
- https://www.cheatsheet.com/entertainment/did-john-lennon-or-paul-mccartney-write-the-classic-a-day-in-the-life.html/
- http://lifeofthebeatles.blogspot.com/2009/06/ive-got-feeling-lyrics.html
Chapter 8 - Understanding Git Rebase
One of the most powerful tools a developer can have in their toolbox is git rebase. Yet it is notorious for being complex and misunderstood.
The truth is, if you understand what it actually does, git rebase is a very elegant, and straightforward tool to achieve so many different things in Git.
In the previous chapters in this part, you learned what Git diffs are, what a merge is, and how Git resolves merge conflicts. In this chapter, you will understand what Git rebase is, why it's different from merge, and how to rebase with confidence.
Short Recap - What is Git Merge?
Under the hood, git rebase and git merge are very, very different things. Then why do people compare them all the time?
The reason is their usage. When working with Git, we usually work in different branches and introduce changes to those branches.
In the previous chapter, we considered the example where John and Paul (of the Beatles) were co-authoring a new song. They started from the main branch, and then each diverged, modified the lyrics, and committed their changes.
Then, the two wanted to integrate their changes, which is something that happens very frequently when working with Git.
 _A diverging history -
 paul_branch and john_branch diverged from main_
There are two main ways to integrate changes introduced in different branches in Git, or in other words, different commits and commit histories. These are merge and rebase.
In the previous chapter, we got to know git merge pretty well. We saw that when performing a merge, we create a merge commit - where the contents of this commit are a combination of the two branches, and it also has two parents, one in each branch.
So, say you are on the branch john_branch (assuming the history depicted in the drawing above), and you run git merge paul_branch. You will get to this state - where on john_branch, there is a new commit with two parents. The first one will be the commit on the john_branch branch where HEAD was pointing to a state before performing the merge - in this case, "Commit 6". The second will be the commit pointed to by paul_branch, "Commit 9".
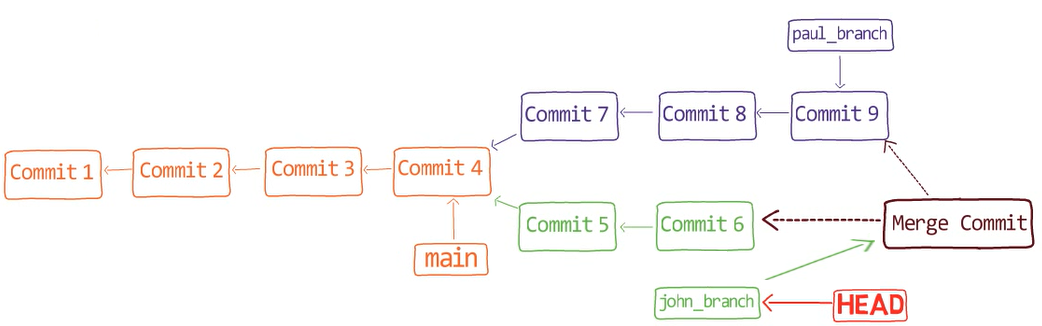 _The result of running
 git merge paul_branch: a new Merge Commit with two parents_
Look again at the history graph: you created a diverged history. You can actually see where it branched and where it merged again.
So when using git merge, you do not rewrite history - but rather, you add a commit to the existing history. And specifically, a commit that creates a diverged history.
How is git rebase Different than git merge?
When using git rebase, something different happens.
Let's start with the big picture: if you are on paul_branch, and use git rebase john_branch, Git goes to the common ancestor of John's branch and Paul's branch. Then it takes the patches introduced in the commits on Paul's branch, and applies those changes to John's branch.
So here, you use rebase to take the changes that were committed on one branch - Paul's branch - and replay them on a different branch, john_branch.
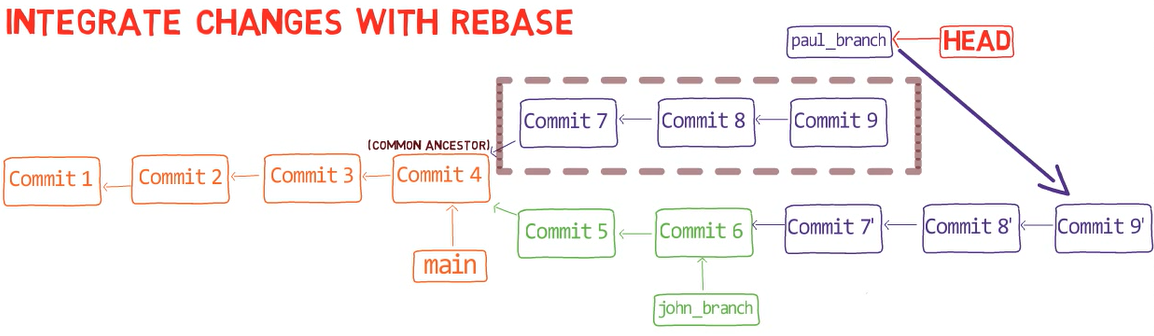 _The result of running
 git rebase john_branch: the commits on paul_branch were "replayed" on top of john_branch_
Wait, what does that mean?
We will now take this bit by bit to make sure you fully understand what's happening under the hood 😎
cherry-pick as a Basis for Rebase
It is useful to think of rebase as performing git cherry-pick - a command that takes a commit, computes the patch this commit introduces by computing the difference between the parent's commit and the commit itself, and then cherry-pick "replays" this difference.
Let's do this manually.
If we look at the difference introduced by "Commit 5" by performing git diff main <SHA_OF_COMMIT_5>:
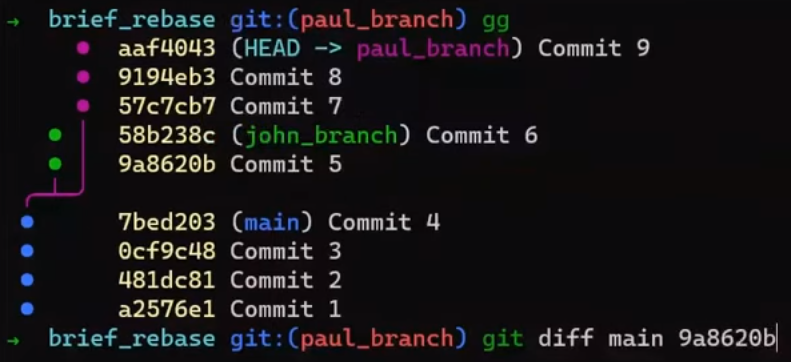 Running
 git diff to observe the patch introduced by "Commit 5"
As always, you are encouraged to run the commands yourself while reading this chapter. Unless noted otherwise, I will use the following repository:
https://github.com/Omerr/rebase_playground.git
I recommend you clone it locally and have the same starting point I am using for this chapter.
You can see that in this commit, John started working on a song called "Lucy in the Sky with Diamonds":
 The output of
 git diff - the patch introduced by "Commit 5"
As a reminder, you can also use the command git show to get the same output:
git show <SHA_OF_COMMIT_5>
Now, if you cherry-pick this commit, you will introduce this change specifically, on the active branch. Switch to main first:
git checkout main (or git switch main)
And create another branch:
git checkout -b my_branch (or git switch -c my_branch)
 _Creating
 my_branch that branches from main_
Next, cherry-pick "Commit 5":
git cherry-pick <SHA_OF_COMMIT_5>
 Using
Using cherry-pick to apply the changes introduced in "Commit 5" onto main
Consider the log (output of git lol):
 The output of
 git lol
It seems like you copy-pasted "Commit 5". Remember that even though it has the same commit message, and introduces the same changes, and even points to the same tree object as the original "Commit 5" in this case - it is still a different commit object, as it was created with a different timestamp.
Looking at the changes, using git show HEAD:
 The output of
 git show HEAD
They are the same as "Commit 5"'s.
And of course, if you look at the file (say, by using nano lucy_in_the_sky_with_diamonds.md), it will be in the same state as it has been after the original "Commit 5".
Cool! 😎
You can now remove the new branch so it doesn't appear on your history every time:
git checkout main
git branch -D my_branch
Beyond cherry-pick - How to Use git rebase
You can view git rebase as a way to perform multiple cherry-picks one after the other - that is, to "replay" multiple commits. This is not the only thing you can do with rebase, but it's a good starting point for our explanation.
It's time to play with git rebase!
Before, you merged paul_branch into john_branch. What would happen if you rebased paul_branch on top of john_branch? You would get a very different history.
In essence, it would seem as if we took the changes introduced in the commits on paul_branch, and replayed them on john_branch. The result would be a linear history.
To understand the process, I will provide the high level view, and then dive deeper into each step. The process of rebasing one branch on top of another branch is as follows:
- Find the common ancestor.
- Identify the commits to be "replayed".
- For every commit
X, computediff(parent(X), X), and store it as apatch(X). - Move
HEADto the new base. - Apply the generated patches in order on the target branch. Each time, create a new commit object with the new state.
The process of making new commits with the same change sets as existing ones is also called "replaying" those commits, a term we have already used.
Time to Get Hands-On with Rebase
Before running the following command command, make sure you have john_branch locally, so run:
git checkout john_branch
Start from Paul's branch:
git checkout paul_branch
This is the history:
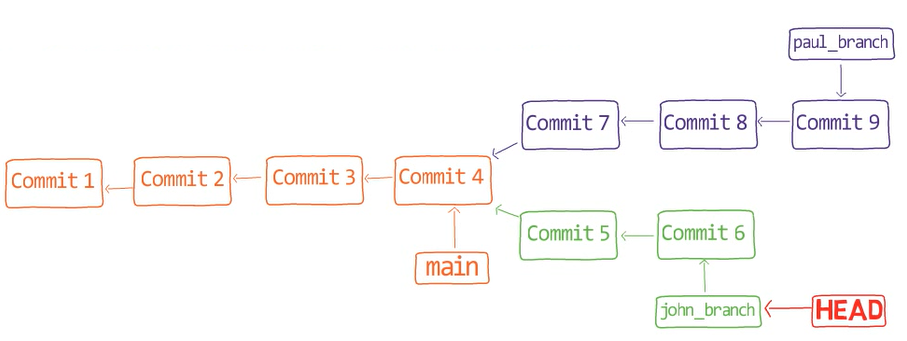 Commit history before performing
 git rebase
And now, to the exciting part:
git rebase john_branch
And observe the history:
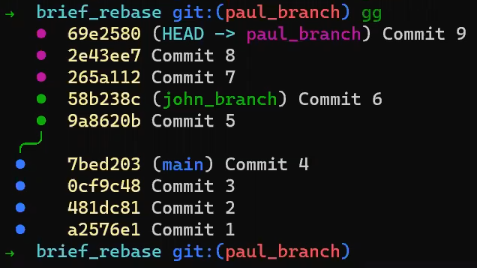 The history after rebasing
With git merge you added to the history, while with git rebase you rewrite history. You create new commit objects. In addition, the result is a linear history graph - rather than a diverging graph.
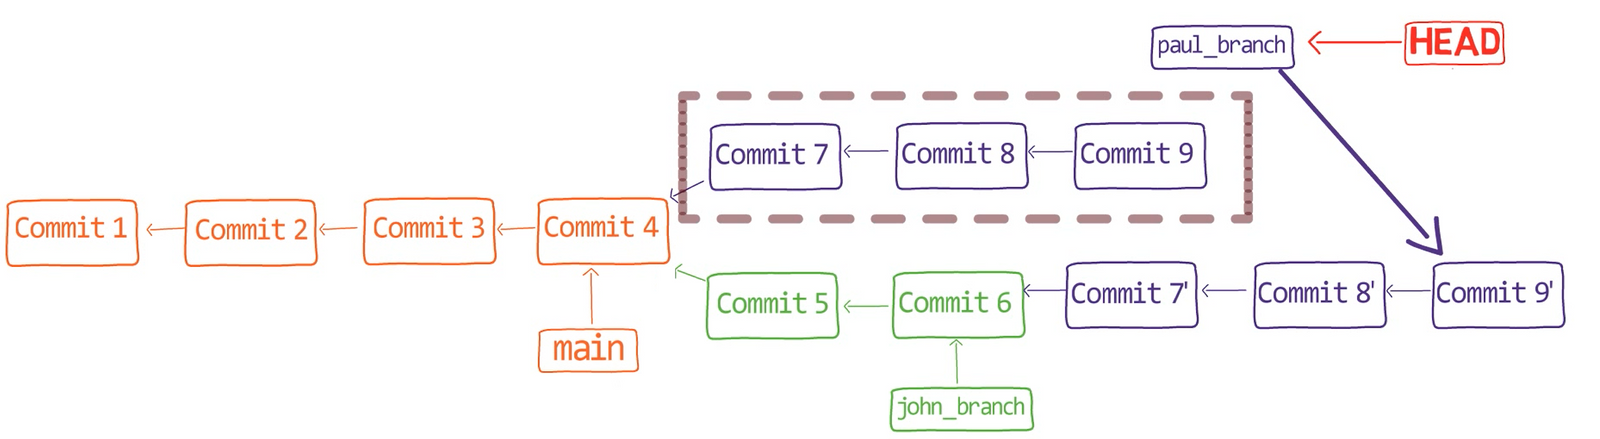 The history after rebasing
In essence, you "copied" the commits that were on paul_branch and that were introduced after "Commit 4", and "pasted" them on top of john_branch.
The command is called "rebase", because it changes the base commit of the branch it's run from. That is, in your case, before running git rebase, the base of paul_branch was "Commit 4" - as this is where the branch was "born" (from main). With rebase, you asked Git to give it another base - that is, pretend as if it had been born from "Commit 6".
To do that, Git took what used to be "Commit 7", and "replayed" the changes introduced in this commit onto "Commit 6". Then it created a new commit object. This object differs from the original "Commit 7" in three aspects:
- It has a different timestamp.
- It has a different parent commit - "Commit 6", rather than "Commit 4".
- The tree object it is pointing to is different - as the changes were introduced to the tree pointed to by "Commit 6", and not the tree pointed to by "Commit 4".
Notice the last commit here, "Commit 9'". The snapshot it represents (that is, the tree that it points to) is exactly the same tree you would get by merging the two branches. The state of the files in your Git repository would be the same as if you used git merge. It's only the history that is different, and the commit objects of course.
Now, you can simply use:
git checkout main
git merge paul_branch
Hm.... What would happen if you ran this last command? Consider the commit history again, after checking out main:
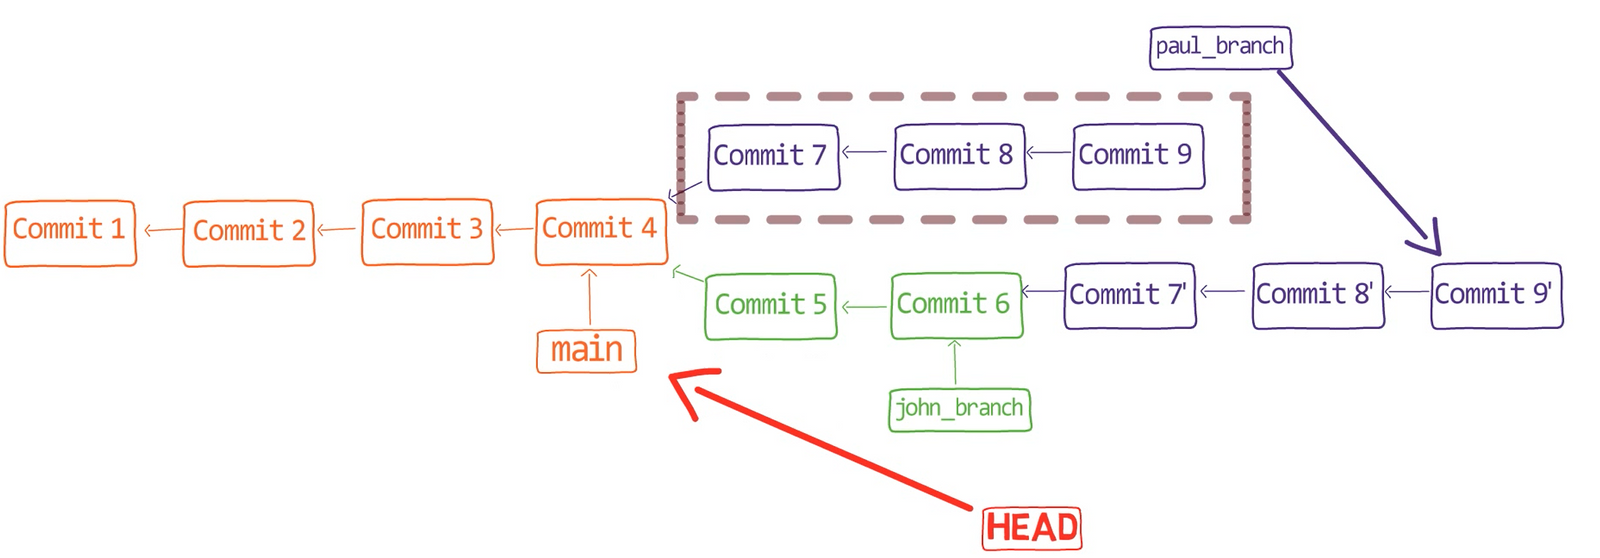 The history after rebasing and checking out
 main
What would it mean to merge main and paul_branch?
Indeed, Git can simply perform a fast-forward merge, as the history is completely linear (if you need a reminder about fast-forward merges, check out the previous chapter). As a result, main and paul_branch now point to the same commit:
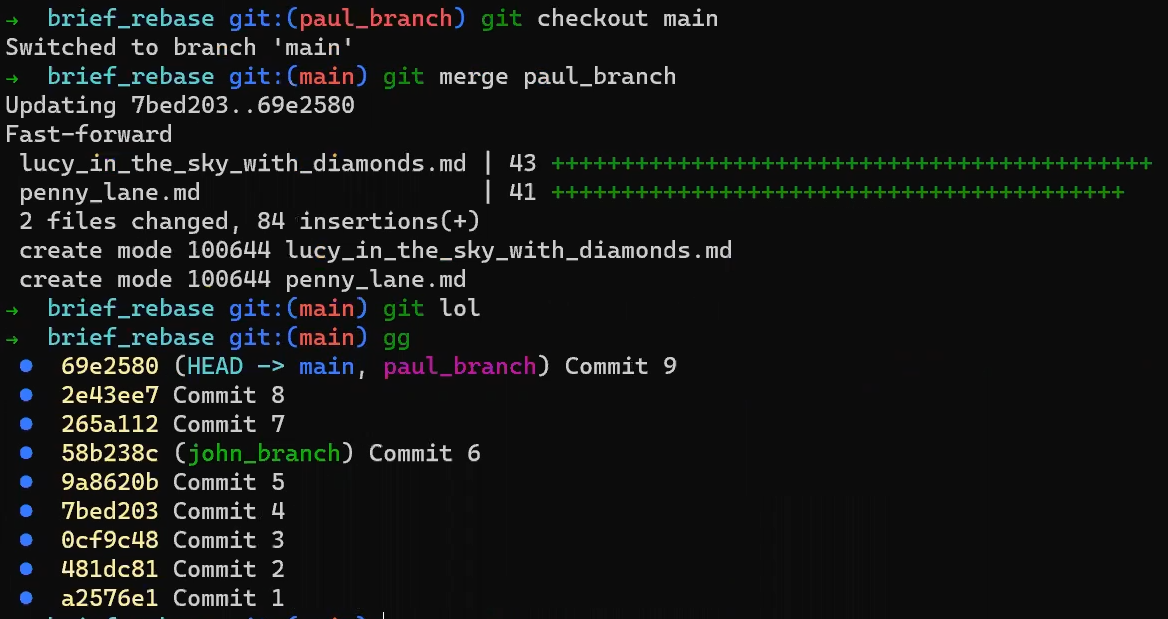 The result of a fast-forward merge
Advanced Rebasing in Git
Now that you understand the basics of rebase, it is time to consider more advanced cases, where additional switches and arguments to the rebase command will come in handy.
In the previous example, when you only used rebase (without additional switches), Git replayed all the commits from the common ancestor to the tip of the current branch.
But rebase is a super-power. It's an almighty command capable of…well, rewriting history. And it can come in handy if you want to modify history to make it your own.
Undo the last merge by making main point to "Commit 4" again:
git reset --hard <ORIGINAL_COMMIT 4>
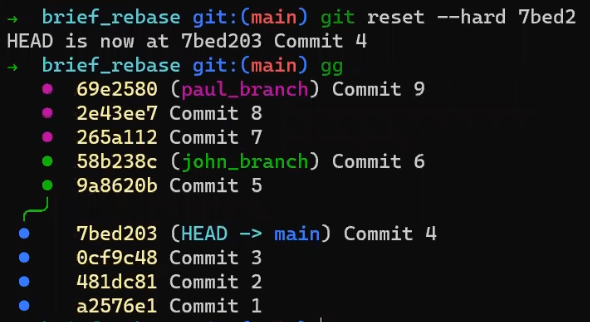 "Undoing" the last merge operation
And undo the rebasing by using:
git checkout paul_branch
git reset --hard <ORIGINAL_COMMIT 9>
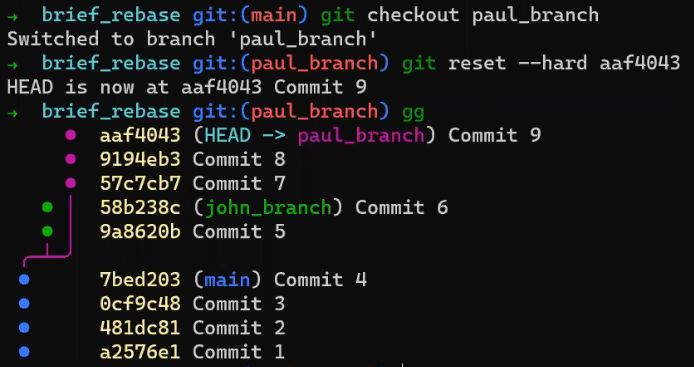 "Undoing" the rebase operation
Notice that you got to exactly the same history you used to have:
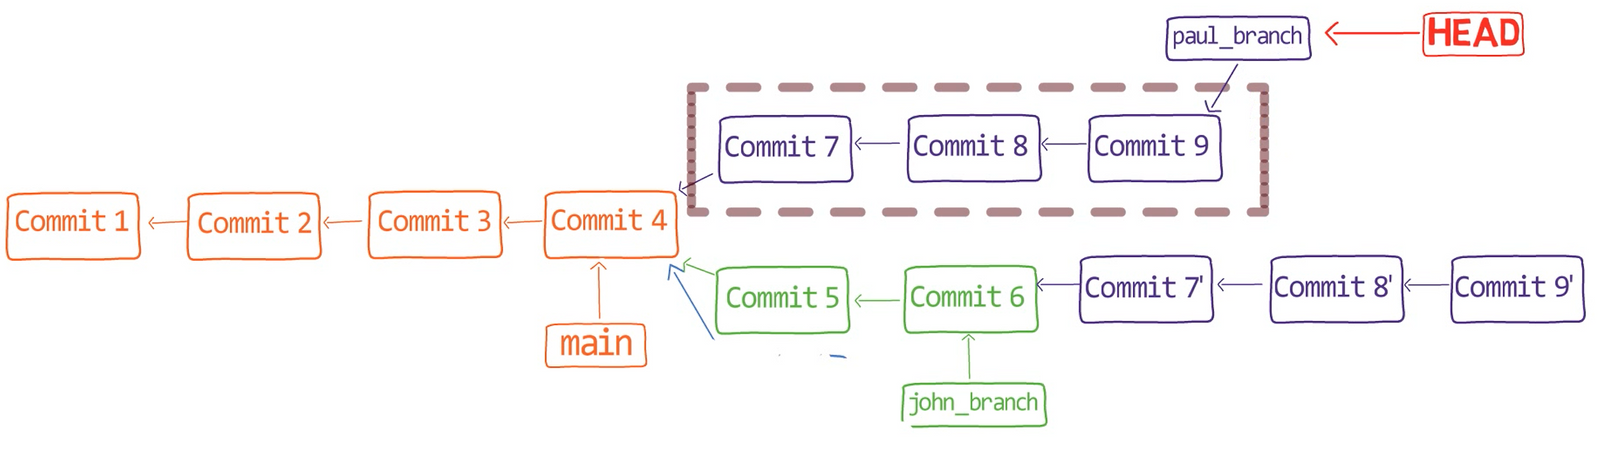 Visualizing the history after "undoing" the rebase operation
To be clear, "Commit 9" doesn't just disappear when it's not reachable from the current HEAD. Rather, it's still stored in the object database. And as you used git reset now to change HEAD to point to this commit, you were able to retrieve it, and also its parent commits since they are also stored in the database. Pretty cool, huh? 😎
You will learn more about git reset in the next part, where we discuss undoing changes in Git.
View the changes that Paul introduced:
git show HEAD
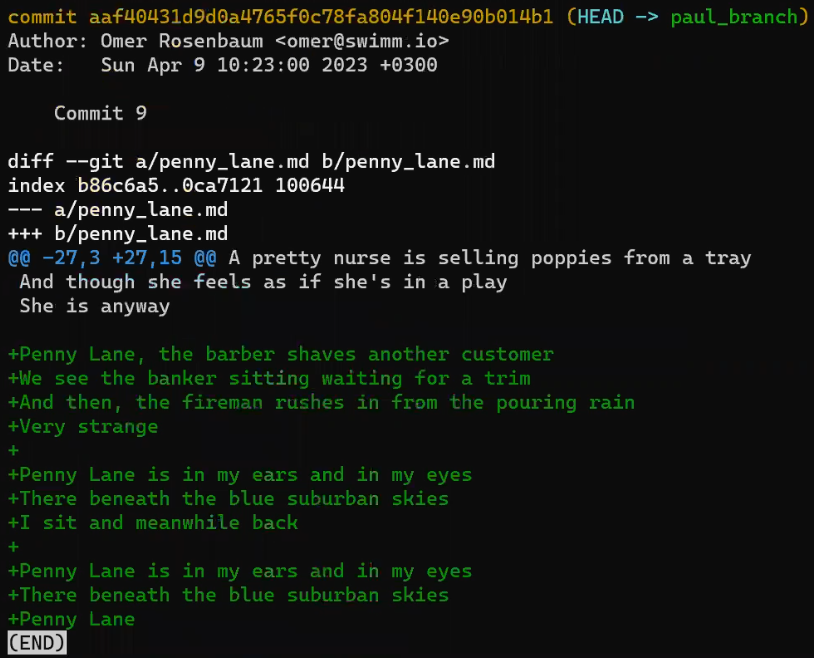
git show HEAD shows the patch introduced by "Commit 9"
Keep going backwards in the commit graph:
git show HEAD~
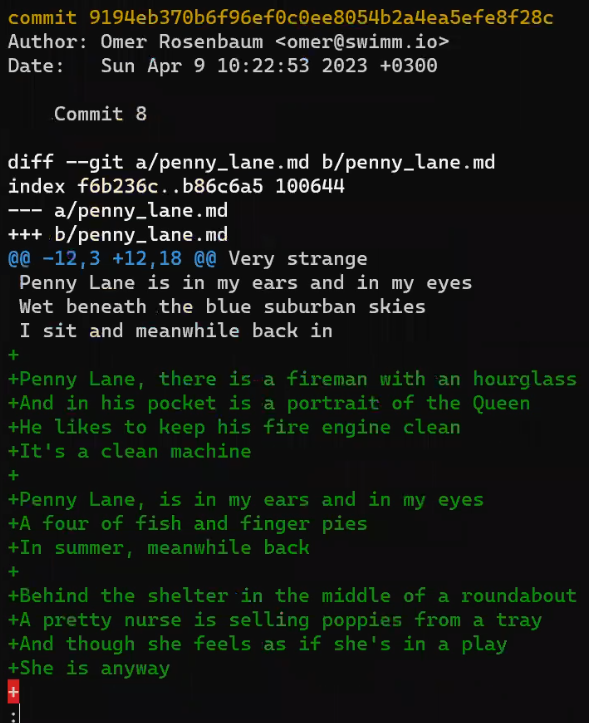
git show HEAD~ (same as git show HEAD~1) shows the patch introduced by "Commit 8"
And one commit further:
git show HEAD~2
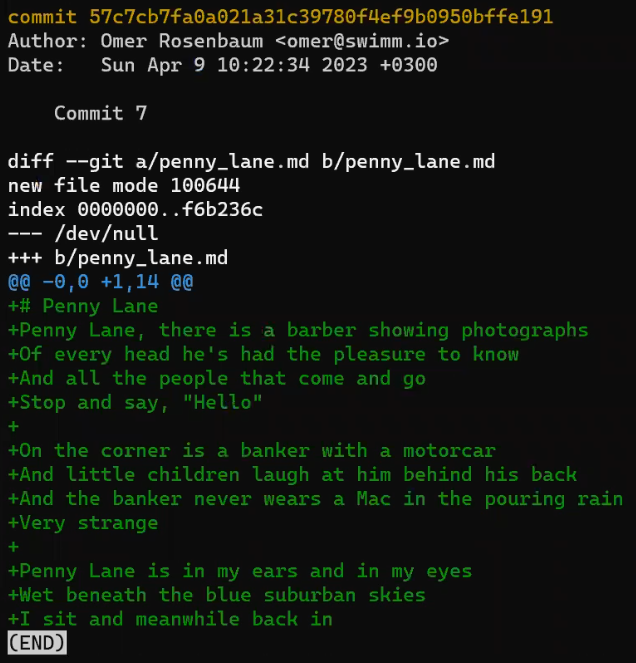
git show HEAD~2 shows the patch introduced by "Commit 7"
Perhaps Paul doesn't want this kind of history. Rather, he wants it to seem as if he introduced the changes in "Commit 7" and "Commit 8" as a single commit.
For that, you can use an interactive rebase. To do that, we add the -i (or --interactive) switch to the rebase command:
git rebase -i <SHA_OF_COMMIT_4>
Or, since main is pointing to "Commit 4", we can run:
git rebase -i main
By running this command, you tell Git to use a new base, "Commit 4". So you are asking Git to go back to all commits that were introduced after "Commit 4" and that are reachable from the current HEAD, and replay those commits.
For every commit that is replayed, Git asks us what we'd like to do with it:
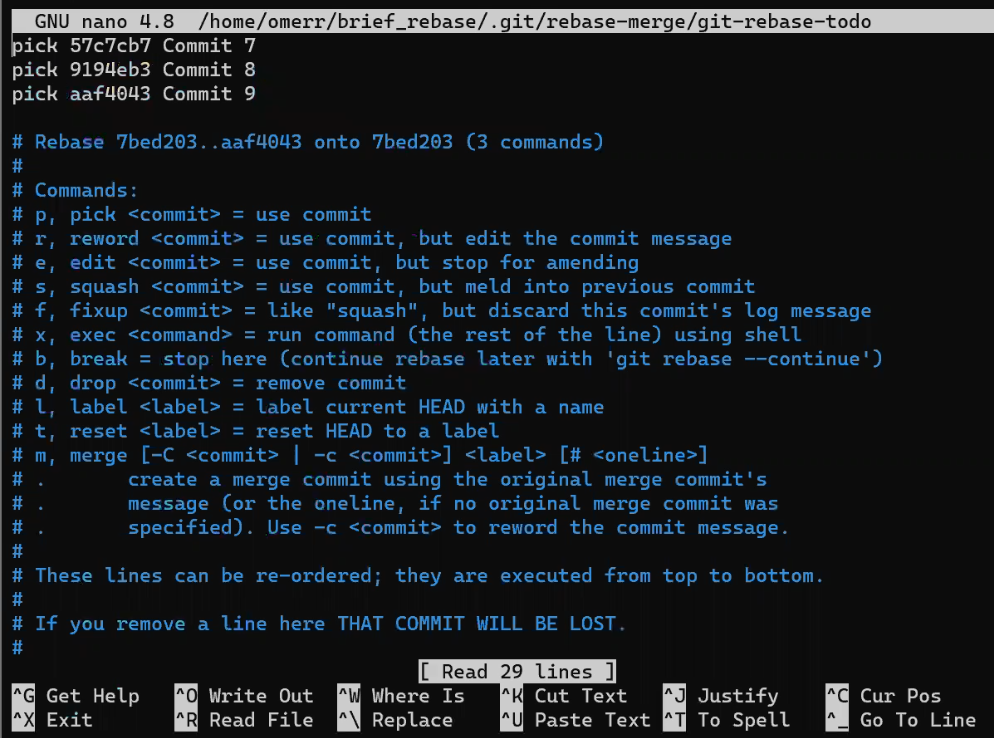
git rebase -i main prompts you to select what to do with each commit
In this context it's useful to think of a commit as a patch. That is, "Commit 7", as in "the patch that "Commit 7" introduced on top of its parent".
One option is to use pick. This is the default behavior, which tells Git to replay the changes introduced in this commit. In this case, if you just leave it as is - and pick all commits - you will get the same history, and Git won't even create new commit objects.
Another option is squash. A squashed commit will have its contents "folded" into the contents of the commit preceding it. So in our case, Paul would like to squash "Commit 8" into "Commit 7":
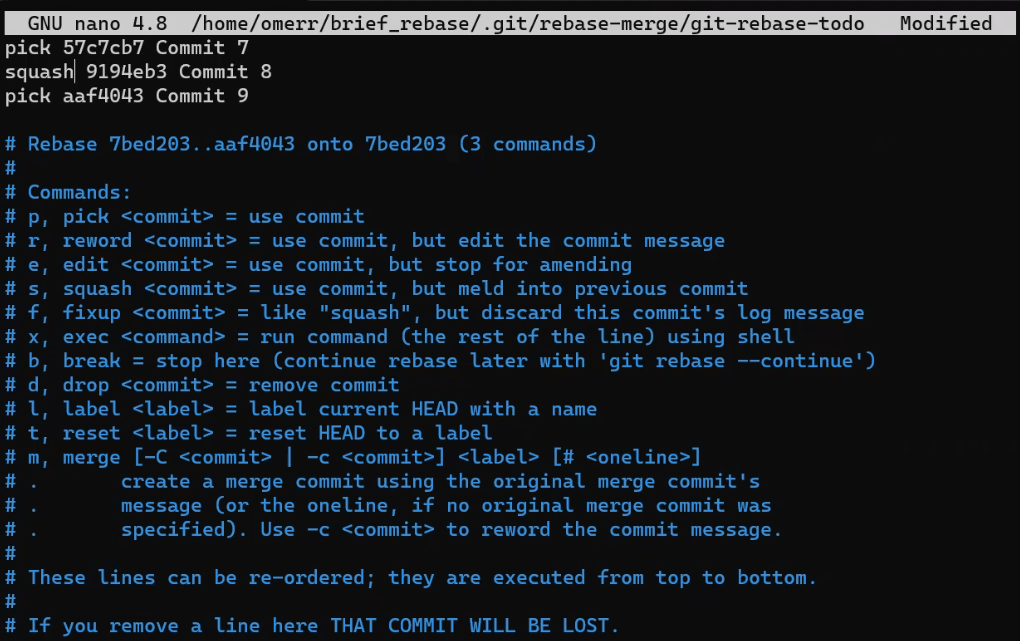 Squashing "Commit 8" into "Commit 7"
As you can see, git rebase -i provides additional options, but we won't go into all of them in this chapter. If you allow the rebase to run, you will get prompted to select a commit message for the newly created commit (that is, the one that introduced the changes of both "Commit 7" and "Commit 8"):
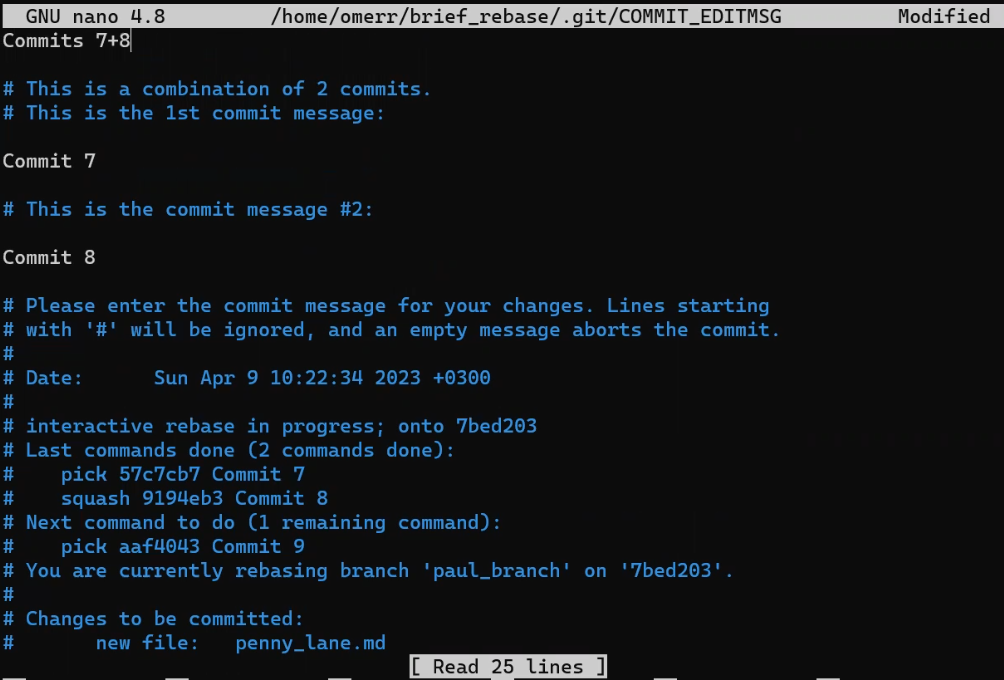 Providing the commit message: Commits 7+8
And look at the history:
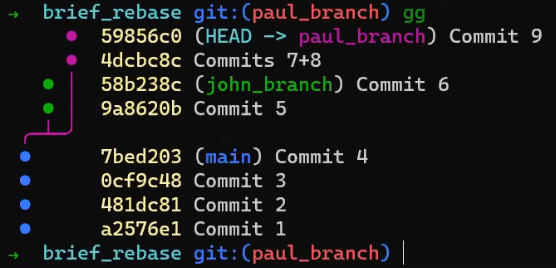 The history after the interactive rebase
Exactly as we wanted! On paul_branch, we have "Commit 9" (of course, it's a different object than the original "Commit 9"). This object points to "Commits 7+8", which is a single commit introducing the changes of both the original "Commit 7" and the original "Commit 8". This commit's parent is "Commit 4", where main is pointing to.
Oh wow, isn't that cool? 😎
git rebase grants you unlimited control over the shape of any branch. You can use it to reorder commits, or to remove incorrect changes, or modify a change in retrospect. Alternatively, you could perhaps move the base of your branch onto another commit, any commit that you wish.
How to Use the --onto Switch of git rebase
Let's consider one more example. Get to main again:
git checkout main
And delete the pointers to paul_branch and john_branch so you don't see them in the commit graph anymore:
git branch -D paul_branch
git branch -D john_branch
Next, branch from main to a new branch:
git checkout -b new_branch
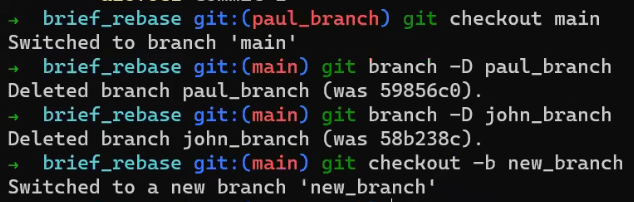 _Creating
 new_branch that diverges from main_
This is the clean history you should have:
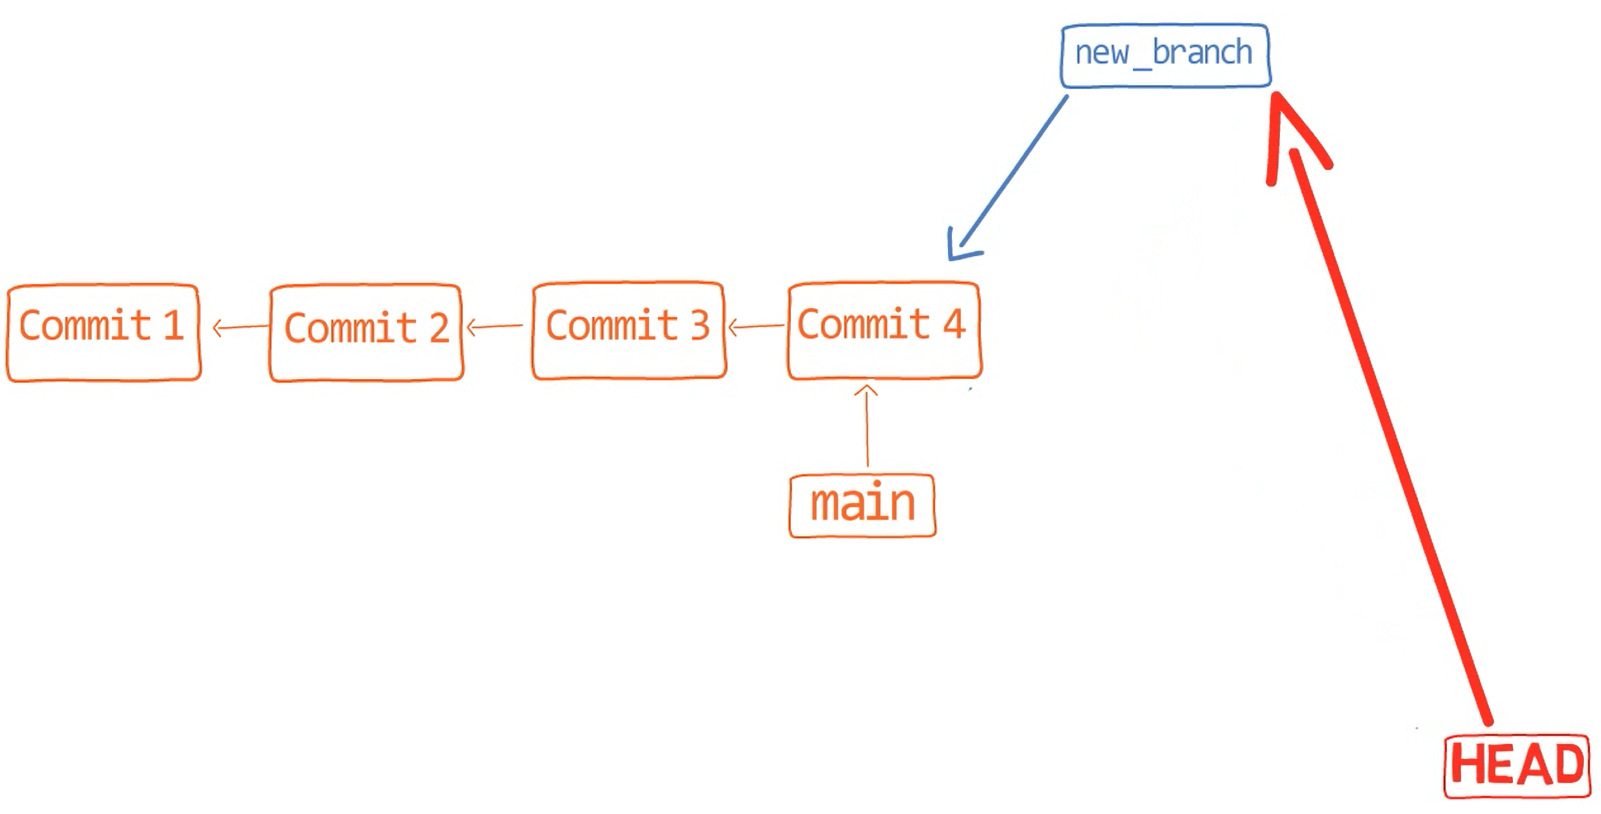 _A clean history with
 new_branch that diverges from main_
Now, change the file code.py (for example, add a new function) and commit your changes:
nano code.py
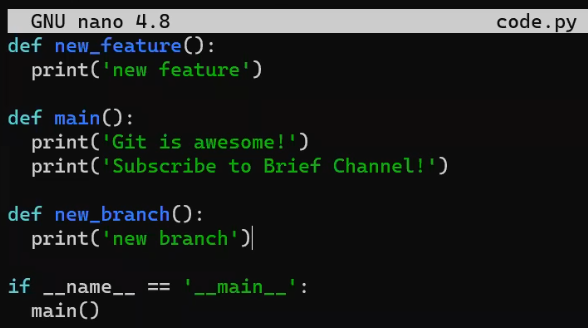 _Adding the function
 new_branch to code.py_
git add code.py
git commit -m "Commit 10"
Get back to main:
git checkout main
And introduce another change - adding a docstring at the beginning of the file:
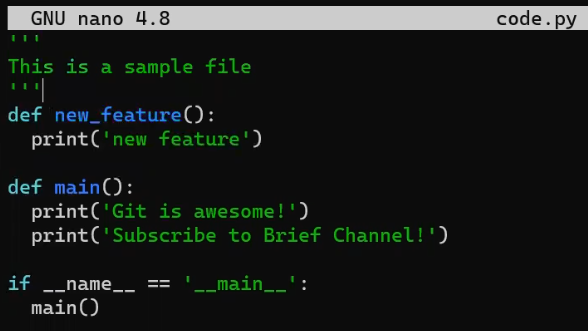 Added a docstring at the beginning of the file
Time to stage and commit these changes:
git add code.py
git commit -m "Commit 11"
And yet another change, perhaps add @Author to the docstring:
 Added
Added @Author to the docstring
Commit this change as well:
git add code.py
git commit -m "Commit 12"
Oh wait, now I realize that I wanted you to make the changes introduced in "Commit 11" as a part of the new_branch. Ugh. What can you do?
Consider the history:
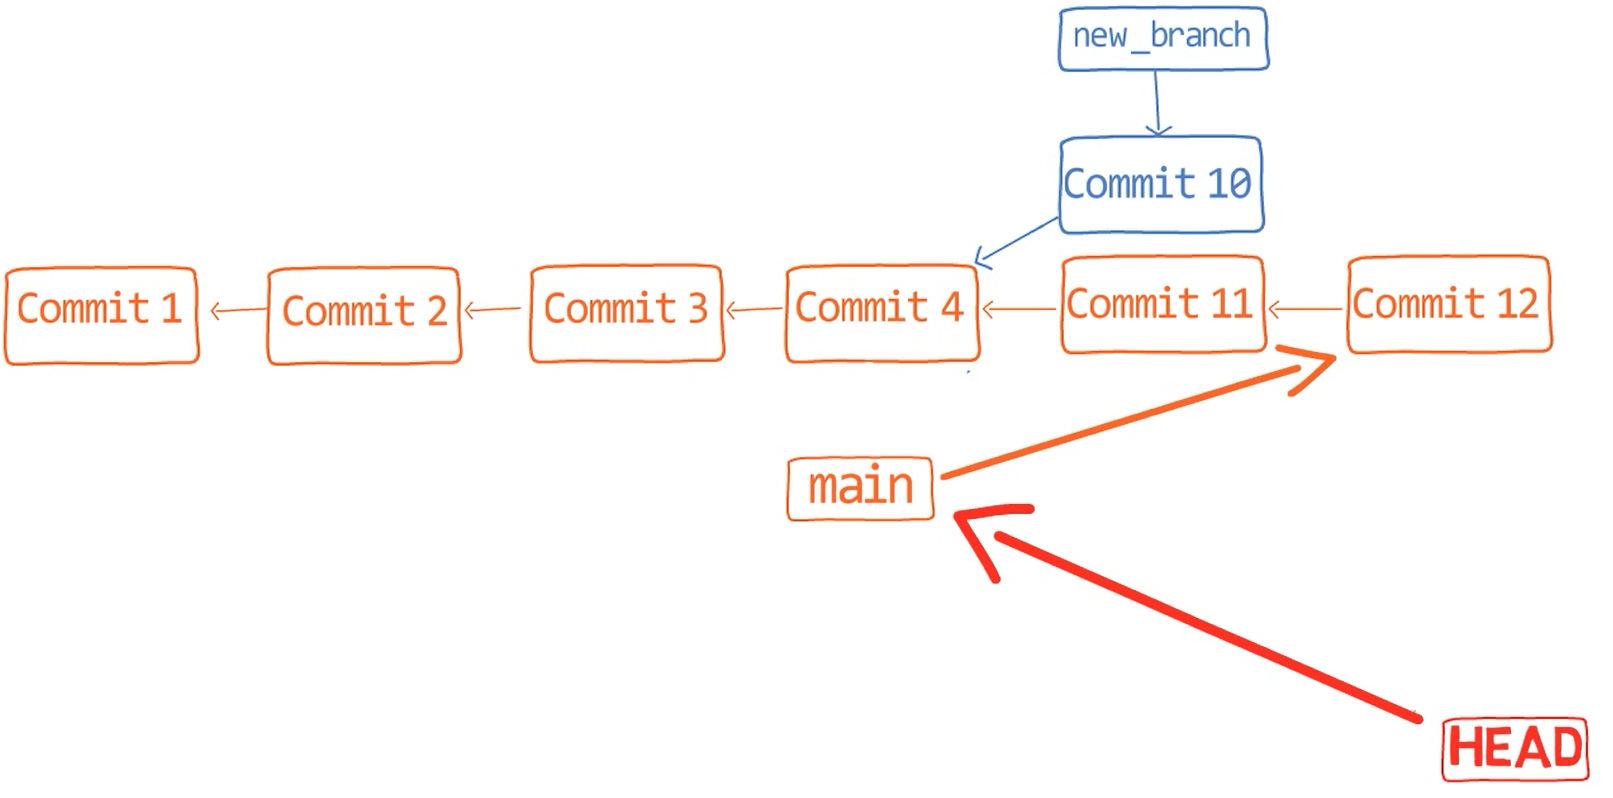 The history after introducing "Commit 12"
Instead of having "Commit 11" reside only on the main branch, I want it to be on both the main branch as well as new_branch. Visually, I would want to move it down the graph here:
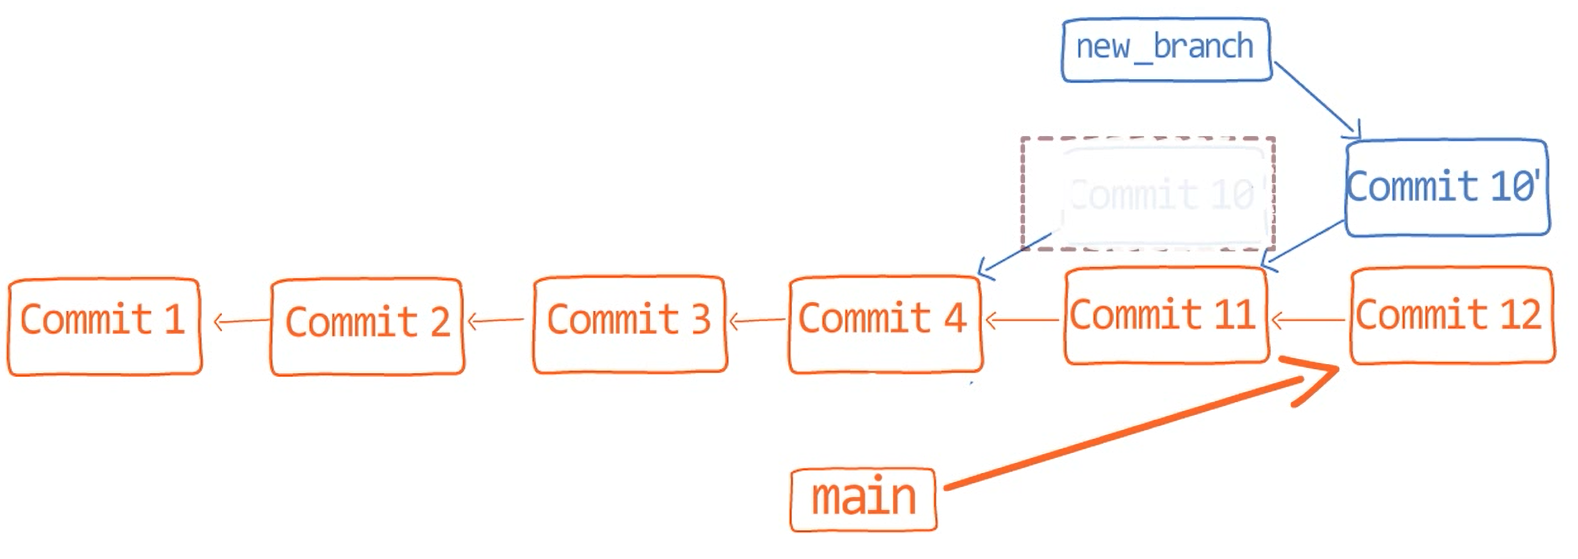 Visually, I want you to "push down" "Commit 10"
Can you see where I am going? 😇
Well, rebase allows you to basically replay the changes introduced in new_branch, those introduced in "Commit 10", as if they had been originally conducted on "Commit 11", rather than "Commit 4".
To do that, you can use other arguments of git rebase. Specifically, you can use git rebase --onto, which optionally takes three parameters:
git rebase --onto <new_parent> <old_parent> <until>
That is, you take all commits between old_parent and until, and you "cut" and "paste" them onto new_parent.
In this case, you'd tell Git that you want to take all the history introduced between the common ancestor of main and new_branch, which is "Commit 4", and have the new base for that history be "Commit 11". To do that, use:
git rebase --onto <SHA_OF_COMMIT_11> main new_branch
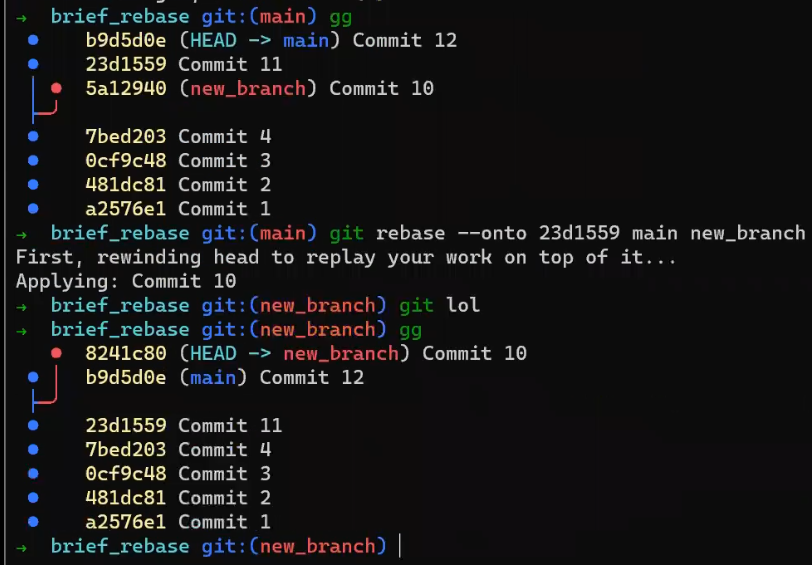 The history before and after the rebase, "Commit 10" has been "pushed"
And look at our beautiful history! 😍
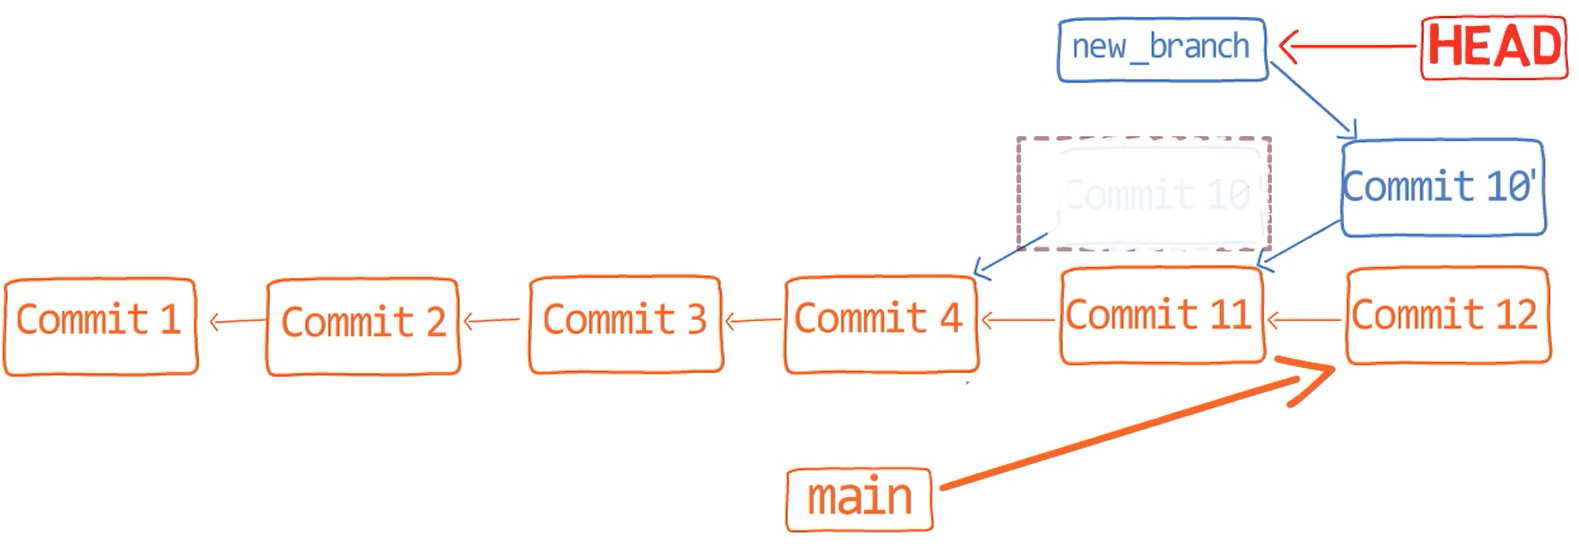 The history before and after the rebase, "Commit 10" has been "pushed"
Let's consider another case.
Say I started working on a new feature, and by mistake I started working from feature_branch_1, rather than from main.
So to emulate this, create feature_branch_1:
git checkout main
git checkout -b feature_branch_1
And erase new_branch so you don't see it in the graph anymore:
git branch -D new_branch
Create a simple Python file called 1.py:
 A new file,
 1.py, with print('Hello world!')
Stage and commit this file:
git add 1.py
git commit -m  "Commit 13"
Now branch out from feature_branch_1 (this is the mistake you will later fix):
git checkout -b feature_branch_2
And create another file, 2.py:
 Creating
 2.py
Stage and commit this file as well:
git add 2.py
git commit -m  "Commit 14"
And introduce some more code to 2.py:
 Modifying
 2.py
Stage and commit these changes too:
git add 2.py
git commit -m  "Commit 15"
So far you should have this history:
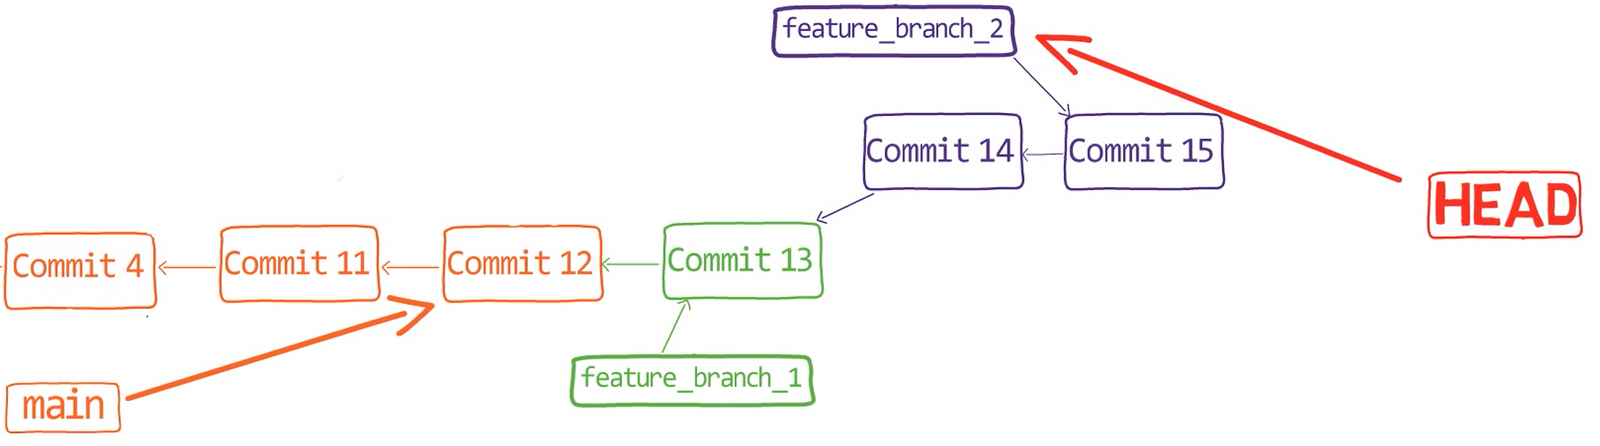 The history after introducing "Commit 15"
Get back to feature_branch_1 and edit 1.py:
git checkout feature_branch_1
 Modifying
 1.py
Now stage and commit:
git add 1.py
git commit -m  "Commit 16"
Your history should look like this:
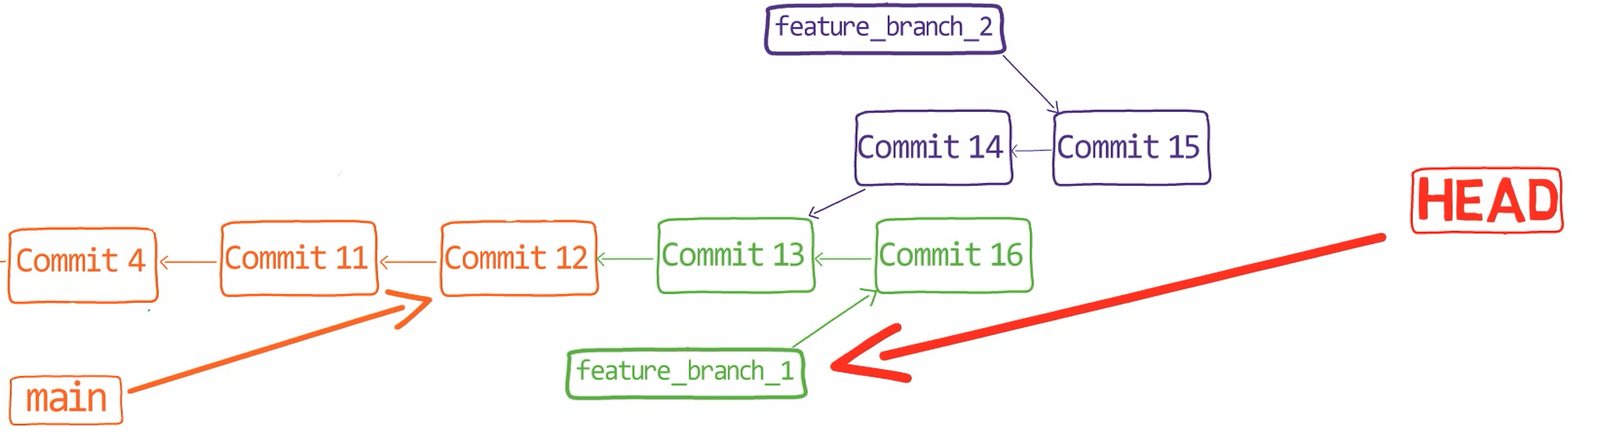 The history after introducing "Commit 16"
Say now you realize that you've made a mistake. You actually wanted feature_branch_2 to be born from the main branch, rather than from feature_branch_1.
How can you achieve that?
Try to think about it given the history graph and what you've learned about the --onto flag for the rebase command.
Well, you want to "replace" the parent of your first commit on feature_branch_2, which is "Commit 14", so that it's on top of main branch - in this case, "Commit 12" - rather than the beginning of feature_branch_1 - in this case, "Commit 13". So again, you will be creating a new base, this time for the first commit on feature_branch_2.
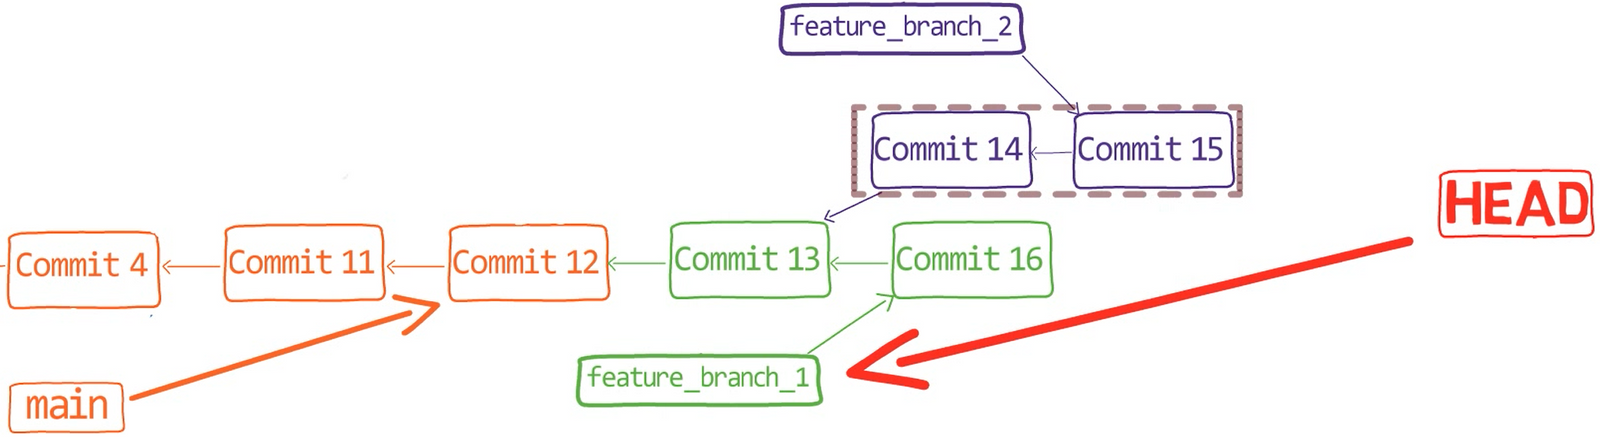 You want to move around "Commit 14" and "Commit 15"
How would you do that?
First, switch to feature_branch_2:
git checkout feature_branch_2
And now you can use:
git rebase --onto main <SHA_OF_COMMIT_13>
This tells Git to take the history with "Commit 13" as a base, and change that base to be "Commit 12" (pointed to by main) instead.
As a result, you have feature_branch_2 based on main rather than feature_branch_1:
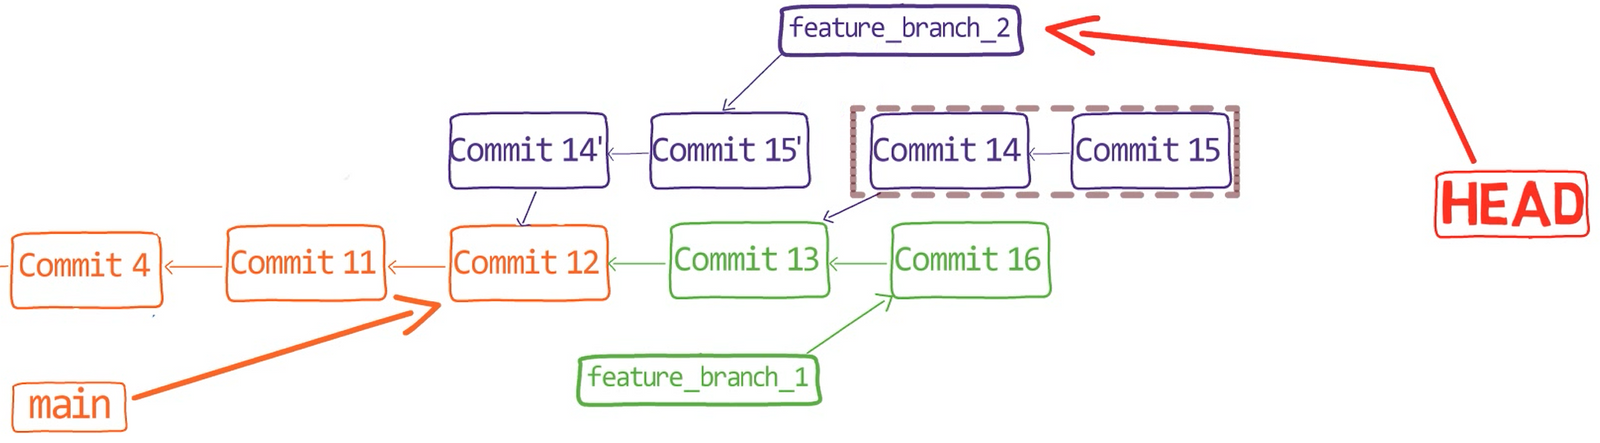 The commit history after performing rebase
The syntax of the command is:
git rebase --onto <new_parent> <old_parent>
How to Rebase on a Single Branch
You can also use git rebase while looking at the history of a single branch.
Let's see if you can help me here.
Say I worked from feature_branch_2, and specifically edited the file code.py. I started by changing all strings to be wrapped by double quotes rather than single quotes:
 Changing
 ' into " in code.py
Then, I staged and committed:
git add code.py
git commit -m "Commit 17"
I then decided to add a new function at the beginning of the file:
 _Adding the function
 another_feature_
Again, I staged and committed:
git add code.py
git commit -m "Commit 18"
And now I realized that I actually forgot to change the single quotes to double quotes wrapping __main__ (as you might have noticed), so I did that too:
 Changing
 '__main__' into "__main__"
Of course, I staged and committed this change:
git add code.py
git commit -m "Commit 19"
Now, consider the history:
 The commit history after introducing "Commit 19"
It isn't really nice, is it? I mean, I have two commits that are related to one another, "Commit 17" and "Commit 19" (turning 's into "s), but they are split by the unrelated "Commit 18" (where I added a new function). What can we do? Can you help me?
Intuitively, I want to edit the history here:
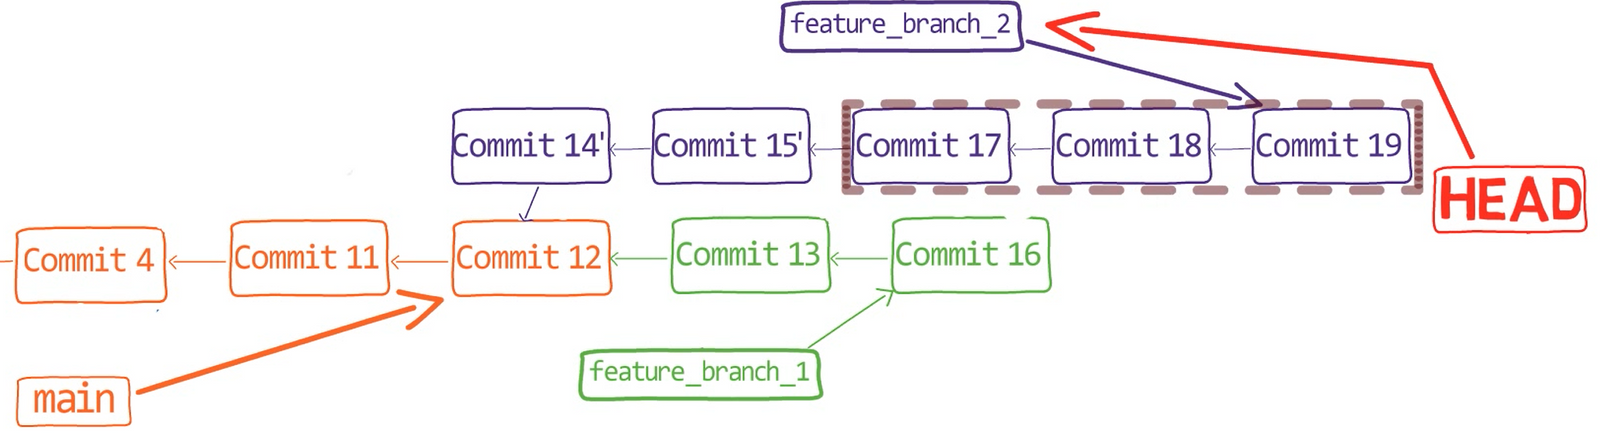 These are the commits I want to edit
So, what would you do?
You are right!
I can rebase the history from "Commit 17" to "Commit 19", on top of "Commit 15". To do that:
git rebase --interactive --onto <SHA_OF_COMMIT_15> <SHA_OF_COMMIT_15>
Notice I specified "Commit 15" as the beginning of the range of commits, excluding this commit. And I didn't need to explicitly specify HEAD as the last parameter.
 Using
Using rebase --onto on a single branch
(Note: If you follow the steps above with my repository and get a merge conflict, you may have a different configuration than on my machine with regards to whitespace characters at line endings. In that case, you can add the --ignore-whitespace switch to the rebase command, resulting in the following command: git rebase --ignore-whitespace --interactive --onto <SHA_OF_COMMIT_15> <SHA_OF_COMMIT_15>. If you are curious to find out more about this issue, search for autocrlf.)
After following your advice and running the rebase command (thanks! 😇) I get the following screen:
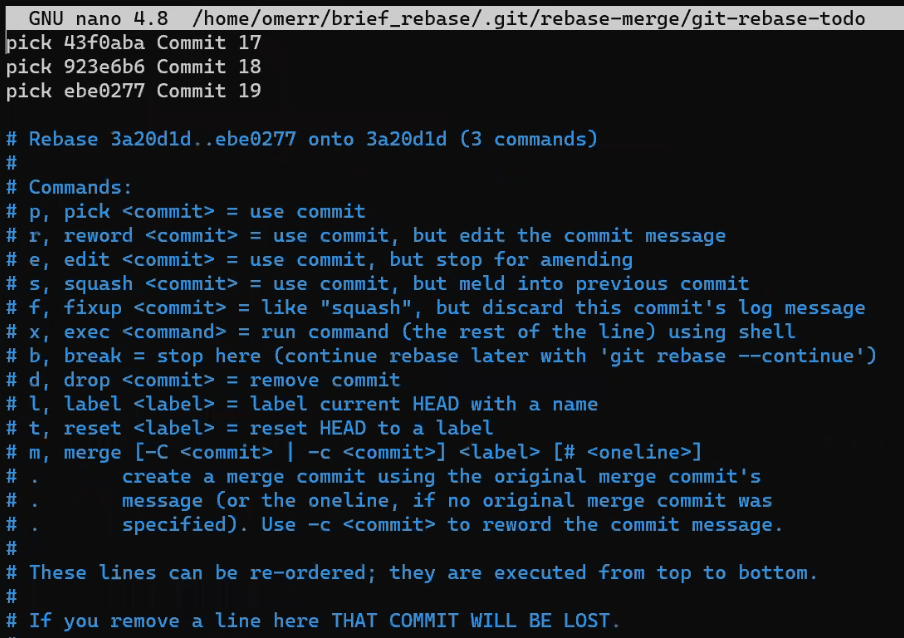 Interactive rebase
So what would I do? I want to put "Commit 19" before "Commit 18", so it comes right after "Commit 17". I can go further and squash them together, like so:
 Interactive rebase - changing the order of commit and squashing
Now when I get prompted for a commit message, I can provide the message "Commit 17+19":
 Providing a commit message
And now, see our beautiful history:
 The resulting history
Thanks again!
More Rebase Use Cases + More Practice
By now I hope you feel comfortable with the syntax of rebase. The best way to actually understand it is to consider various cases and figure out how to solve them yourself.
With the upcoming use cases, I strongly suggest you stop reading after I've introduced each use case, and then try to solve it on your own.
How to Exclude Commits
Say you have this history on another repo:
 Another commit history
Before playing around with it, store a tag to "Commit F" so you can get back to it later:
git tag original_commit_f
(A tag is a named reference to a commit, just like a branch - but it doesn't change when you add additional commits. It is like a constant named reference.)
Now, you actually don't want the changes in "Commit C" and "Commit D" to be included. You could use an interactive rebase like before and remove their changes. Or, you could use git rebase --onto again. How would you use --onto in order to "remove" these two commits?
You can rebase HEAD on top of "Commit B", where the old parent was actually "Commit D", and now it should be "Commit B". Consider the history again:
 The history again
Rebasing so that "Commit B" is the base of "Commit E" means "moving" both "Commit E" and "Commit F", and giving them another base - "Commit B". Can you come up with the command yourself?
git rebase --onto <SHA_OF_COMMIT_B> <SHA_OF_COMMIT_D> HEAD
Notice that using the syntax above (exactly as provided) would not move main to point to the new commit, so the result is a "detached" HEAD. If you use gg or another tool that displays the history reachable from branches, it might confuse you:
 Rebasing with
 --onto results in a detached HEAD
But if you simply use git log (or my alias git lol), you will see the desired history:
 The resulting history
I don't know about you, but these kinds of things make me really happy. 😊😇
By the way, you could omit HEAD from the previous command as this is the default value for the third parameter. So just using:
git rebase --onto <SHA_OF_COMMIT_B> <SHA_OF_COMMIT_D>
Would have the same effect. The last parameter actually tells Git where the end of the current sequence of commits to rebase is. So the syntax of git rebase --onto with three arguments is:
git rebase --onto <new_parent> <old_parent> <until>
How to Move Commits Across Branches
So let's say we get to the same history as before:
git checkout original_commit_f
And now I want only "Commit E" to be on a branch based on "Commit B". That is, I want to have a new branch, branching from "Commit B", with only "Commit E".
 The current history, considering "Commit E"
So, what does this mean in terms of rebase? Consider the image above. What commit (or commits) should I rebase, and which commit would be the new base?
I know I can count on you here 😉
What I want is to take "Commit E", and this commit only, and change its base to be "Commit B". In other words, to replay the changes introduced in "Commit E" onto "Commit B".
Can you apply that logic to the syntax of git rebase?
Here it is (this time I'm writing <COMMIT_X> instead of <SHA_OF_COMMIT_X>, for brevity):
git rebase --onto <COMMIT_B> <COMMIT_D> <COMMIT_E>
Now the history looks like so:
 The history after rebase
Notice that rebase moved HEAD, but not any other reference named (such as a branch or a tag). In other words, you are in a detached HEAD state. So here too, using gg or another tool that displays the history reachable from branches and tags might confuse you. You can use git log (or my alias git lol) to display the reachable history from HEAD.
Awesome!
A Note About Conflicts
Note that when performing a rebase, you may run into conflicts just as when merging. You may have conflicts because, when rebasing, you are trying to apply patches on a different base, perhaps where the patches do not apply.
For example, consider the previous repository again, and specifically, consider the change introduced in "Commit 12", pointed to by main:
git show main
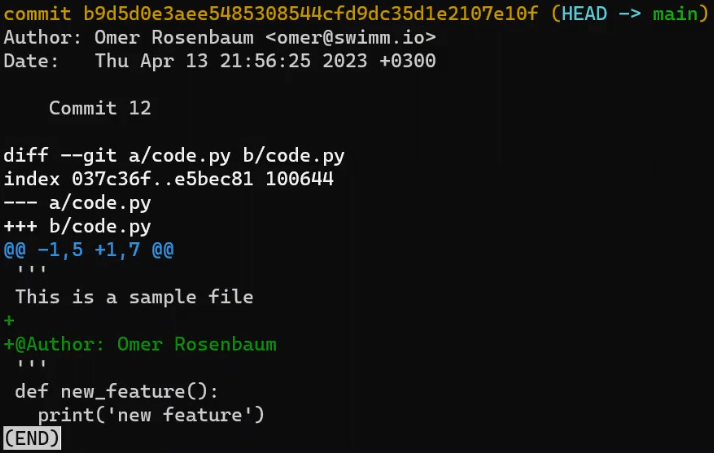 The patch introduced in "Commit 12"
I already covered the format of git diff in detail in chapter 6, but as a quick reminder, this commit instructs Git to add a line after the two lines of context:
This is a sample file
And before these three lines of context:

```patch
def new_feature(): print('new feature')
Say you are trying to rebase "Commit 12" onto another commit. If, for some reason, these context lines don't exist as they do in the patch on the commit you are rebasing onto, then you will have a conflict.
### Zooming Out for the Big Picture
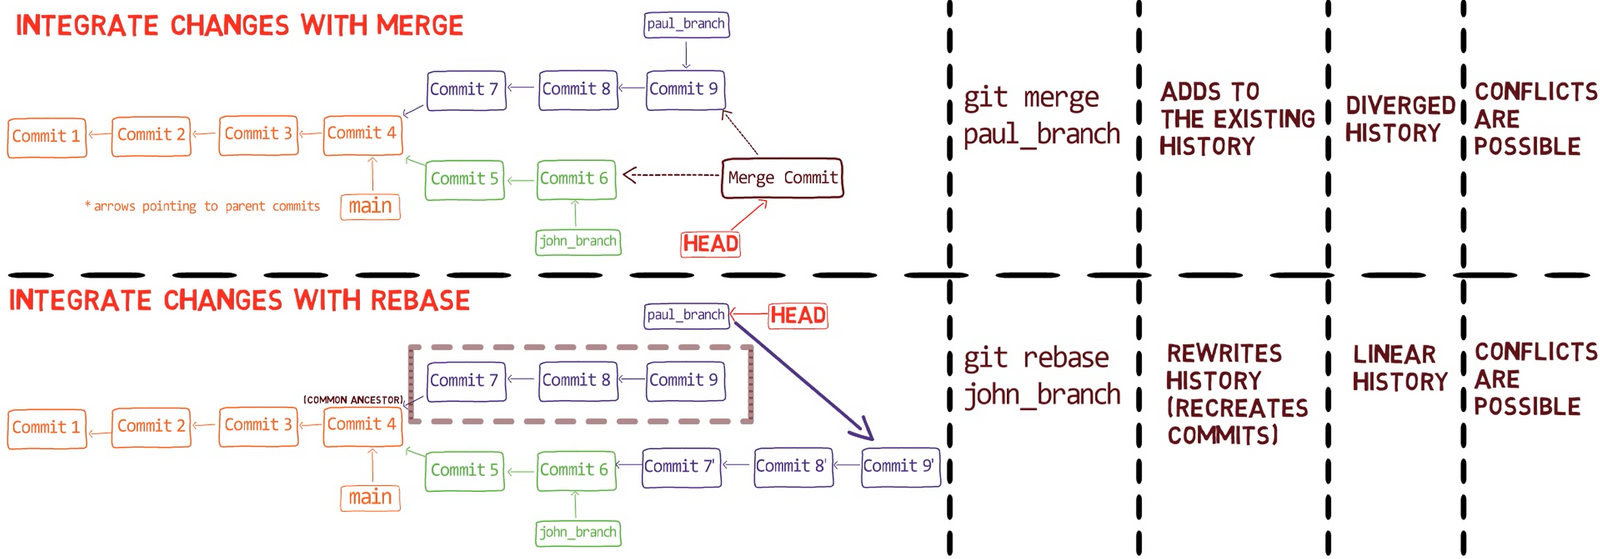
_Comparing rebase and merge_
In the beginning of this chapter, I started by mentioning the similarity between `git merge` and `git rebase`: both are used to integrate changes introduced in different histories.
But, as you now know, they are very different in how they operate. While merging results in a _diverged_ history, rebasing results in a _linear_ history. Conflicts are possible in both cases. And there is one more column described in the table above that requires some close attention.
Now that you know what "Git rebase" is, and how to use interactive rebase or rebase `--onto`, as I hope you agree, `git rebase` is a super powerful tool. Yet, it has one huge drawback when compared with merging.
**Git rebase changes the history.**
This means that you should **not** rebase commits that exist outside your local copy of the repository, and that other people may have based their commits on.
In other words, if the only commits in question are those you created locally - go ahead, use rebase, go wild.
But if the commits have been pushed, this can lead to a huge problem - as someone else may rely on these commits that you later overwrite, and then you and they will have different versions of the repository.
This is unlike `merge` which, as we have seen, does not modify history.
For example, consider the last case where we rebased and resulted in this history:
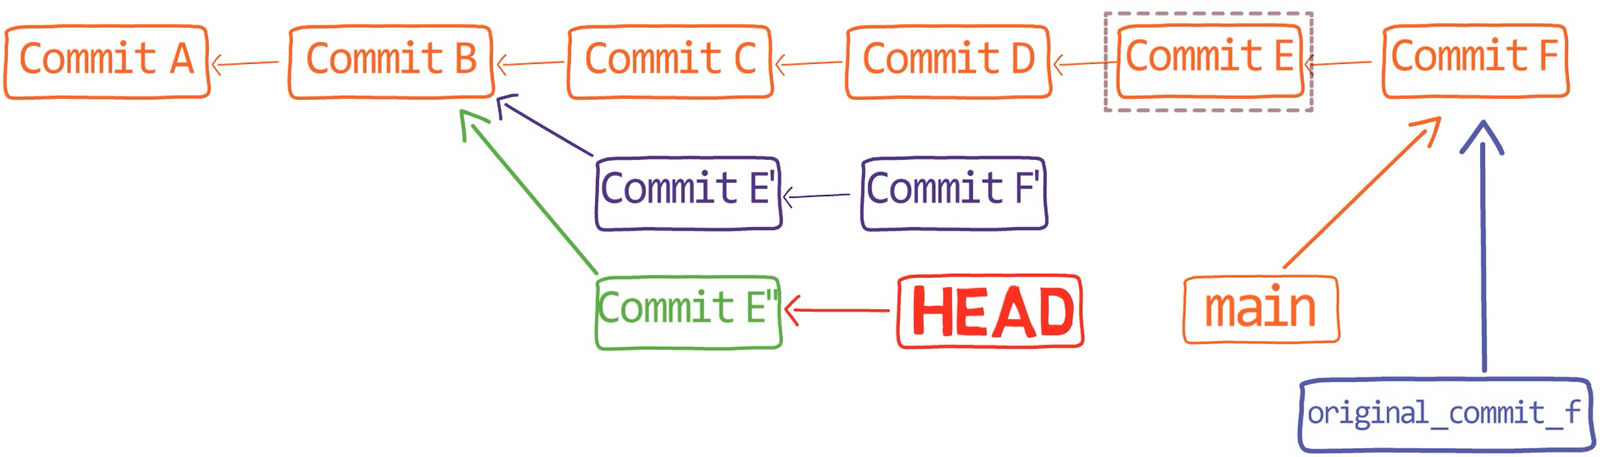
_The history after rebase_
Now, assume that I have already pushed this branch to the remote. And after I had pushed the branch, another developer pulled it and branched out from "Commit C". The other developer didn't know that meanwhile, I was locally rebasing my branch, and would later push it again.
This results in an inconsistency: the other developer works from a commit that is no longer available on my copy of the repository.
I will not elaborate on what exactly this causes in this book, as my main message is that you should definitely avoid such cases. If you're interested in what would actually happen, I'll leave a link to a useful resource in the [additional references](#heading-additional-references-by-part). For now, let's summarize what we have covered.
### Recap - Understanding Git Rebase
In this chapter, you learned about `git rebase`, a super-powerful tool to rewrite history in Git. You considered a few use cases where git rebase can be helpful, and how to use it with one, two, or three parameters, with and without the `--onto` switch.
I hope I was able to convince you that `git rebase` is powerful - but also that it is quite simple once you get the gist. It is a tool you can use to "copy-paste" commits (or, more accurately, patches). And it's a useful tool to have under your belt. In essence, `git rebase` takes the patches introduced by commits, and replays them on another commit. As described in this chapter, this is useful in many different scenarios.
## Part 2 - Summary
In this part you learned about branching and integrating changes in Git.
You learned what a **diff** is, and the difference between a diff and a **patch**. You also learned how the output of `git diff` is constructed.
Understanding diffs is a major milestone for understanding many other processes within Git such as merging or rebasing.
Then, you got an extensive overview of merging with Git. You learned that **merging** is the process of **combining the recent changes from several branches into a single new commit**. The new commit has multiple parents - those commits which had been the tips of the branches that were merged. In most cases, merging combines the changes from two branches, and the resulting merge commit then has two parents - one from each branch.
We considered a simple, fast-forward merge, which is possible when one branch diverged from the base branch, and then just added commits on top of the base branch.
We then considered three-way merges, and explained the three-stage process:
* First, Git locates the merge base. As a reminder, this is the first commit that is reachable from both branches.
* Second, Git calculates two diffs - one diff from the merge base to the _first_ branch, and another diff from the merge base to the _second_ branch. Git generates patches based on those diffs.
* Third and last, Git applies both patches to the merge base using a 3-way merge algorithm. The result is the state of the new merge commit.
You saw the output of `git diff` when we are in a conflicting state, and how to resolve conflicts either manually or with VS Code.
Ultimately, you got to know Git rebase. You saw that `git rebase` is powerful - but also that it is quite simple once you understand what it does. It is a tool to "copy-paste" commits (or, more accurately, patches).

_Comparing rebase and merge_
Both `git merge` and `git rebase` are used to integrate changes introduced in different histories.
Yet, they differ in how they operate. While merging results in a _diverged_ history, rebasing results in a _linear_ history. `git rebase` _changes_ the history, whereas `git merge` adds to the existing history.
With this deep understanding of diffs, patches, merge and rebase, you should feel confident introducing changes to a git repository.
The next part will focus on what happens when things go wrong - how you can change history (with or without `git rebase`), or find "lost" commits.
# Part 3 - Undoing Changes
Did you ever get to a point where you said: "Uh-oh, what did I just do?" I guess you have, just like about anyone who uses Git.
Perhaps you committed to the wrong branch. Perhaps you lost some code that you had written. Perhaps you committed something that you didn't mean to.
This part will give you the tools to rewrite history with confidence, thereby "undoing" all kinds of changes in Git.
Just like the other parts of the book, this part will be practical yet in-depth - so instead of providing you with a list of things to do when things go wrong, we will understand the underlying mechanisms, so that you will feel confident whenever you get to the "uh-oh" moment. Actually, you will find these moments as opportunities for an interesting challenge, rather than a dreadful scenario.
## Chapter 9 - Git Reset
Our journey starts with a powerful command that can be used to undo many different actions with Git - `git reset`.
### A Short Reminder - Recording Changes
In [chapter 3](#heading-chapter-3-how-to-record-changes-in-git), you learned how to record changes in Git. If you remember everything from this part, feel free to jump to the next section.
It is very useful to think about Git as a system for recording snapshots of a filesystem in time. Considering a Git repository, it has three "states" or "trees":
1. The **working directory**, a directory that has a repository associated with it.
2. The **staging area (index)** which holds the tree for the next commit.
3. The **repository**, which is a collection of commits and references.
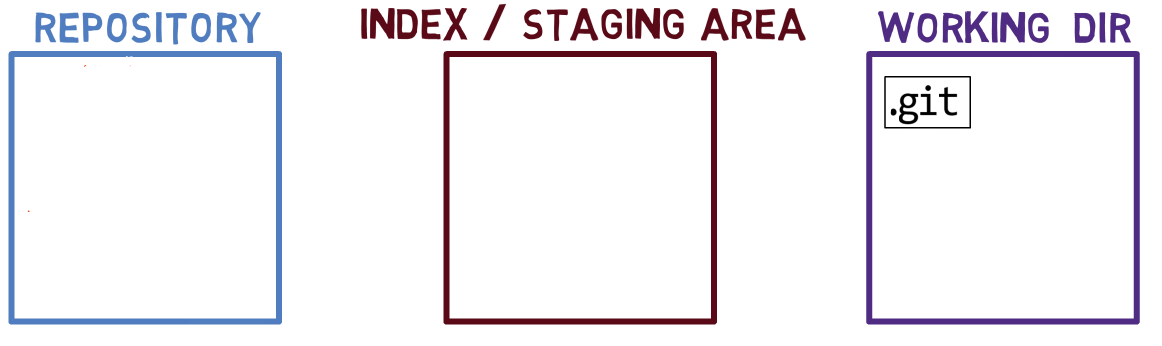
_The three "trees" of a Git repo_
Note regarding the drawing conventions I use: I include `.git` within the working directory, to remind you that it is a folder within the project's folder on the filesystem. The `.git` folder actually contains the objects and references of the repository, as explained in [chapter 4](#heading-chapter-4-how-to-create-a-repo-from-scratch).
#### Hands-on Demonstration
Use `git init` to initialize a new repository. Write some text into a file called `1.txt`:
```bash
mkdir my_repo
cd my_repo
git init
echo Hello world > 1.txt
Out of the three tree states described above, where is 1.txt now?
In the working tree, as it hasn't yet been introduced to the index.
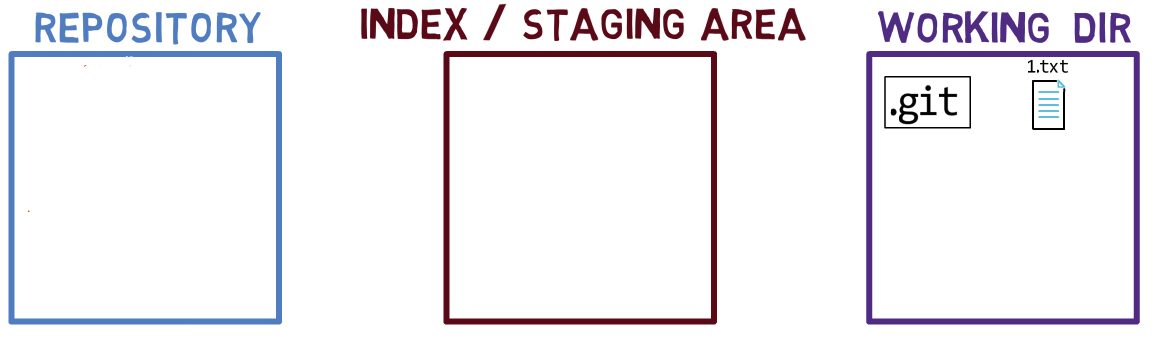 The file
 1.txt is now a part of the working dir only
In order to stage it, to add it to the index, use:
git add 1.txt
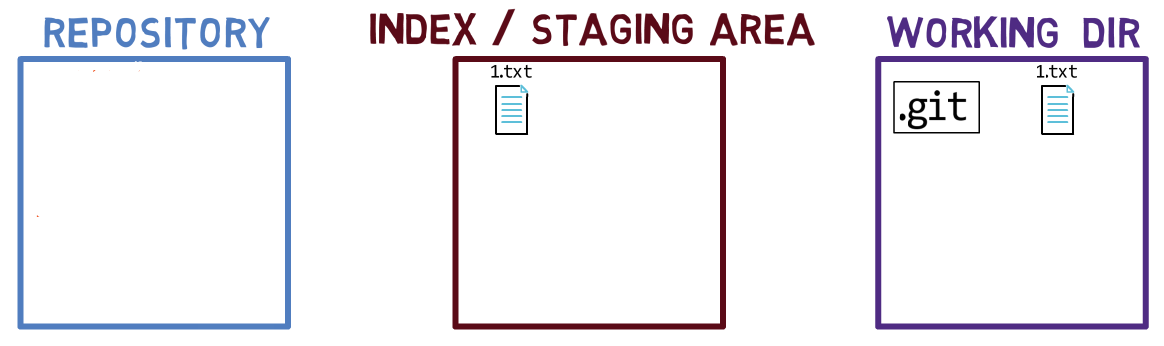 Using
Using git add stages the file so it is now in the index as well
Notice that once you stage 1.txt, Git creates a blob object with the content of this file, and adds it to the internal object database (within .git folder), as covered in chapter 3 and chapter 4. I do not draw it as part of the "repository" as in this representation, the "repository" refers to a tree of commits and their references, and this blob has not been a part of any commit.
Now, use git commit to commit your changes to the repository:
git commit -m "Commit 1"
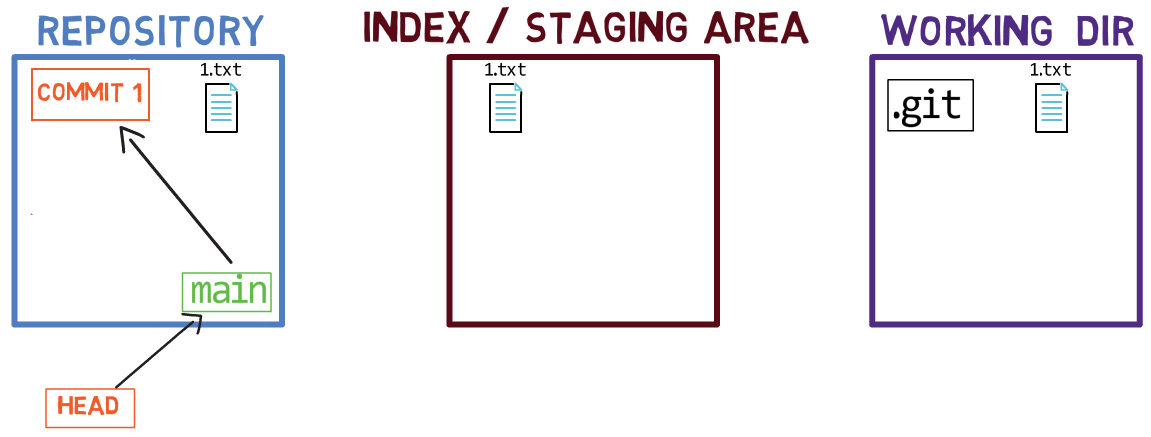 Using
Using git commit creates a commit object in the repository
You created a new commit object, which includes a pointer to a tree describing the entire working tree. In this case, this tree consists only of 1.txt within the root folder. In addition to a pointer to the tree, the commit object includes metadata, such as timestamps and author information.
When considering the diagrams, notice that we only have a single copy of the file 1.txt on disk, and a corresponding blob object in Git's object database. The "repository" tree now shows this file as it is part of the active commit - that is, the commit object "Commit 1" points to a tree that points to the blob with the contents of 1.txt, the same blob that the index is pointing to.
For more information about the objects in Git (such as commits and trees), refer to chapter 1.
Next, create a new file, and add it to the index, as before:
echo second file > 2.txt
git add 2.txt
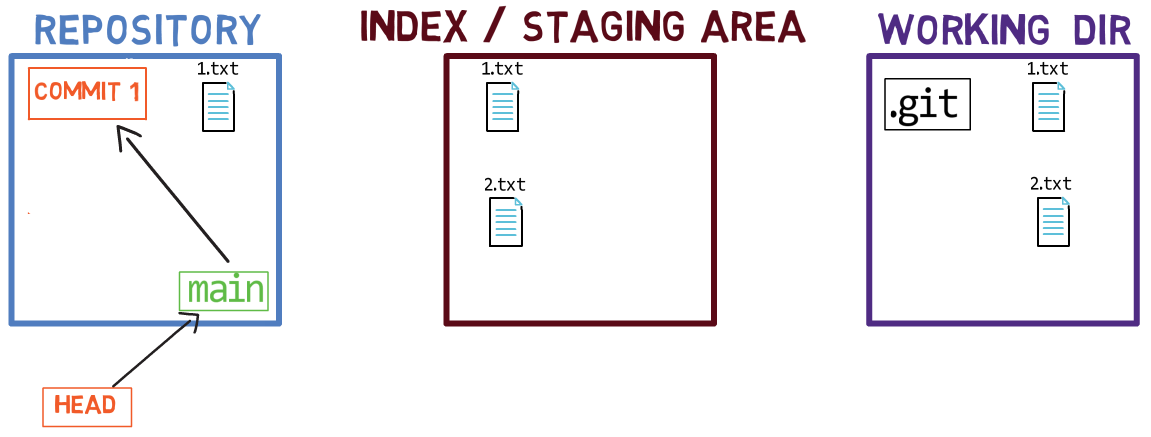 The file
 2.txt is in the working dir and the index after staging it with git add
Next, commit:
git commit -m "Commit 2"
Importantly, git commit does two things:
First, it creates a commit object, so there is an object within Git's internal object database with a corresponding SHA-1 value. This new commit object also points to the parent commit. That is the commit that HEAD was pointing to when you wrote the git commit command.
 A new commit object has been created, at first -
 main still points to the previous commit
Second, git commit moves the pointer of the active branch — in our case, that would be main, to point to the newly created commit object.

git commit also updates the active branch to point to the newly created commit object
Introducing git reset
You will now learn how to reverse the process of introducing a commit. For that, you will get to know the command git reset.
git reset --soft
The very last step you did before was to git commit, which actually means two things — Git created a commit object and moved main, the active branch. To undo this step, use the following command:
git reset --soft HEAD~1
The syntax HEAD~1 refers to the first parent of HEAD. Consider a case where I had more than one commit in the commit-graph, say "Commit 3" pointing to "Commit 2", which is, in turn, pointing to "Commit 1. And consider HEAD was pointing to "Commit 3". You could use HEAD~1 to refer to "Commit 2", and HEAD~2 would refer to "Commit 1".
So, back to the command: git reset --soft HEAD~1
This command asks Git to change whatever HEAD is pointing to. (Note: In the diagrams below, I use *HEAD for "whatever HEAD is pointing to".) In our example, HEAD is pointing to main. So Git will only change the pointer of main to point to HEAD~1. That is, main will point to "Commit 1".
However, this command did not affect the state of the index or the working tree. So if you use git status you will see that 2.txt is staged, just like before you ran git commit:
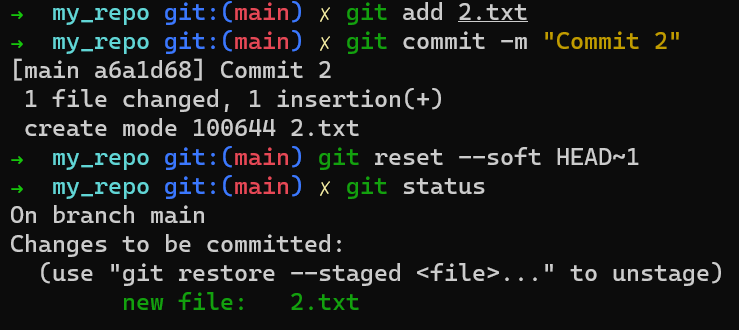
git status shows that 2.txt is in the index, but not in the active commit
The state is now:
 Resetting
 main to "Commit 1"
(Note: I removed 2.txt from the "repository" in the diagram as it is not part of the active commit - that is, the tree pointed to by "Commit 1" does not reference this file. However, it has not been removed from the file system - as it still exists in the working tree and the index.)
What about git log? It will start from HEAD , go to main, and then to "Commit 1":
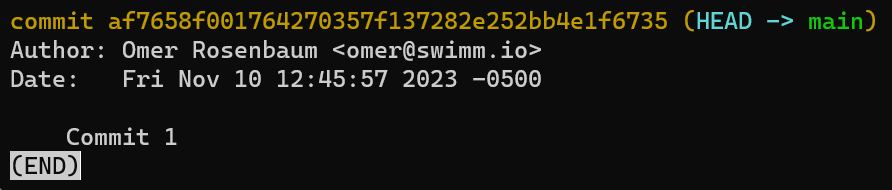 The output of
 git log
Notice that this means that "Commit 2" is no longer reachable from our history.
Does that mean the commit object of "Commit 2" is deleted?
No, it's not deleted. It still resides within Git's internal object database of objects.
If you push the current history now, by using git push, Git will not push "Commit 2" to the remote server (as it is not reachable from the current HEAD), but the commit object still exists on your local copy of the repository.
Now, commit again - and use the commit message of "Commit 2.1" to differentiate this new object from the original "Commit 2":
git commit -m "Commit 2.1"
This is the resulting state:
 Creating a new commit
I omitted "Commit 2" as it is not reachable from HEAD, even though its object exists in Git's internal object database.
Why are "Commit 2" and "Commit 2.1" different? Even if we used the same commit message, and even though they point to the same tree object (of the root folder consisting of 1.txt and 2.txt), they still have different timestamps, as they were created at different times. Both "Commit 2" and "Commit 2.1" now point to "Commit 1", but only "Commit 2.1" is reachable from HEAD.
git reset --mixed
It's time to undo even further. This time, use:
git reset --mixed HEAD~1
(Note: --mixed is the default switch for git reset.)
This command starts the same as git reset --soft HEAD~1. That is, the command takes the pointer of whatever HEAD is pointing to now, which is the main branch, and sets it to HEAD~1, in our example - "Commit 1".
 The first step of
 git reset --mixed is the same as git reset --soft
Next, Git goes further, effectively undoing the changes we made to the index. That is, changing the index so that it matches with the current HEAD, the new HEAD after setting it in the first step.
If we ran git reset --mixed HEAD~1, then HEAD (main) would be set to HEAD~1 ("Commit 1"), and then Git would match the index to the state of "Commit 1" - in this case, it means that 2.txt would no longer be part of the index.
 The second step of
 git reset --mixed is to match the index with the new HEAD
It's time to create a new commit with the state of the original "Commit 2". This time you need to stage 2.txt again before creating it:
git add 2.txt
git commit -m "Commit 2.2"
 Creating "Commit 2.2"
Similarly to "Commit 2.1", I "name" this commit "Commit 2.2" to differentiate it from the original "Commit 2" or "Commit 2.1" - these commits result in the same state as the original "Commit 2", but they are different commit objects.
git reset --hard
Go on, undo even more!
This time, use the --hard switch, and run:
git reset --hard HEAD~1
Again, Git starts with the --soft stage, setting whatever HEAD is pointing to (main), to HEAD~1 ("Commit 1").
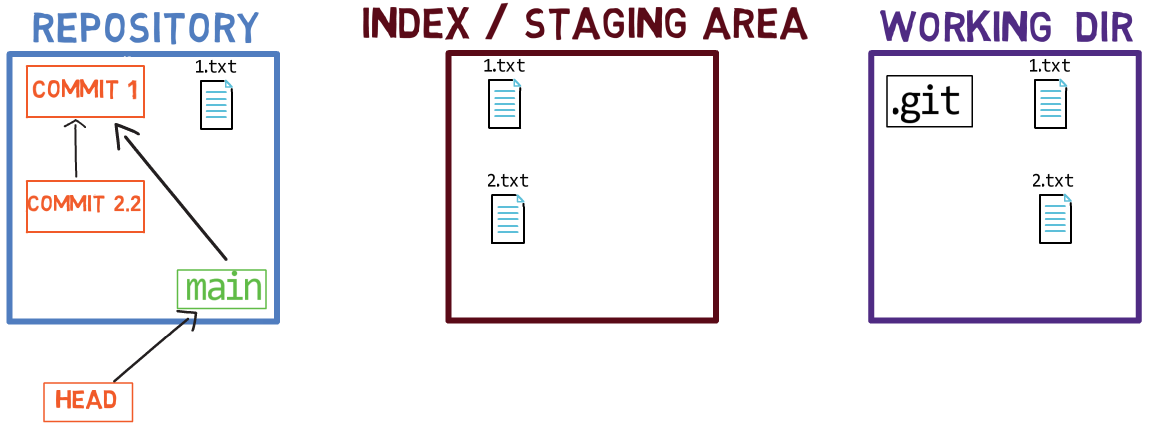 The first step of
 git reset --hard is the same as git reset --soft
Next, moving on to the --mixed stage, matching the index with HEAD. That is, Git undoes the staging of 2.txt.
 The second step of
 git reset --hard is the same as git reset --mixed
Next comes the --hard step, where Git goes even further and matches the working dir with the stage of the index. In this case, it means removing 2.txt also from the working dir.
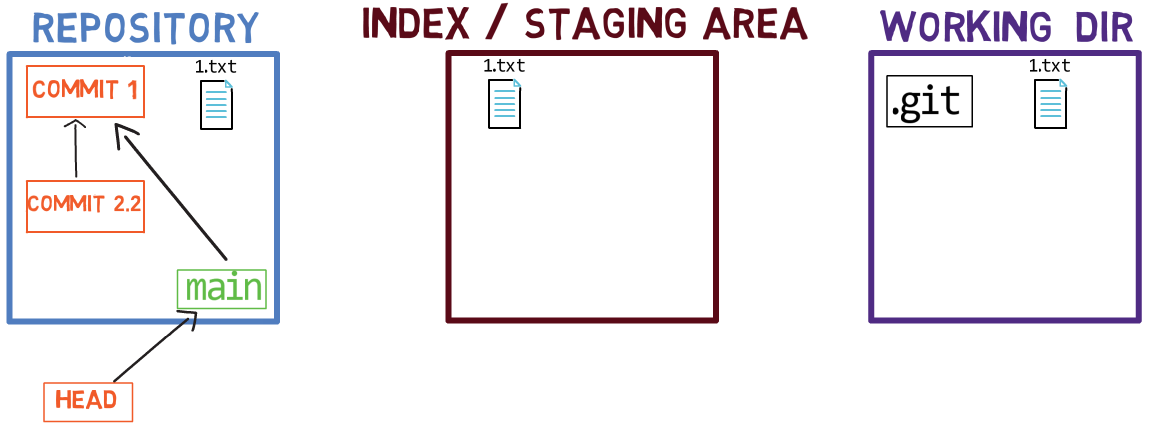 The third step of
 git reset --hard matches the state of the working dir with that of the index
So to introduce a change to Git, you have three steps: you change the working dir, the index, or the staging area, and then you commit a new snapshot with those changes. To undo these changes:
- If we use
git reset --soft, we undo the commit step. - If we use
git reset --mixed, we also undo the staging step. - If we use
git reset --hard, we undo the changes to the working dir.
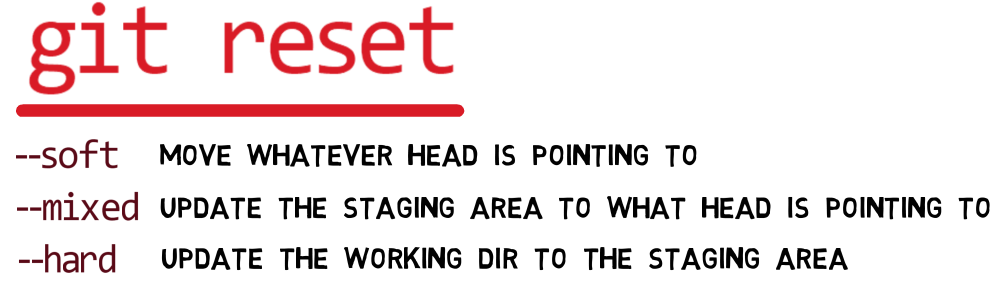 The three main switches of
 git reset
Real-Life Scenarios
Scenario #1
So in a real-life scenario, write "I love Git" into a file (love.txt), as we all love Git 😍. Go ahead, stage and commit this as well:
echo I love Git > love.txt
git add love.txt
git commit -m "Commit 2.3"
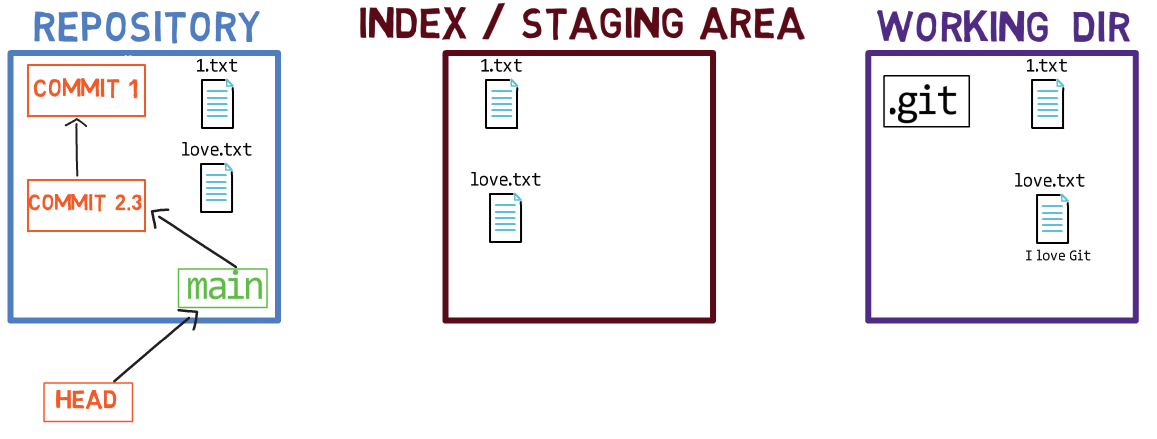 Creating "Commit 2.3"
Also, save a tag so that you can get back to this commit later if needed:
git tag scenario-1
Oh, oops!
Actually, I didn't want you to commit it.
What I actually wanted you to do is write some more love words in this file before committing it.
What can you do?
Well, one way to overcome this would be to use git reset --mixed HEAD~1, effectively undoing both the committing and the staging actions you took:
git reset --mixed HEAD~1
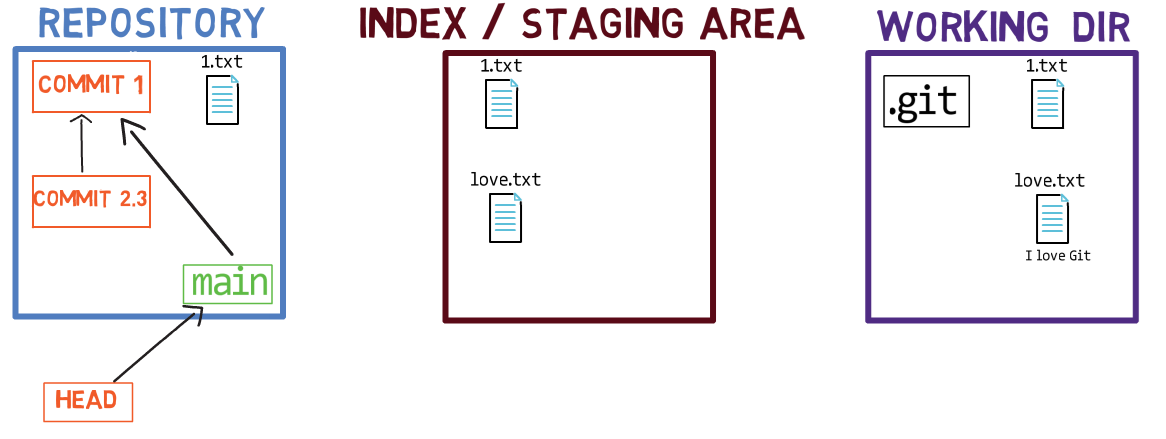 Undoing the staging and committing steps
So main points to "Commit 1" again, and love.txt is no longer a part of the index. However, the file remains in the working dir. You can now add more content to it:
echo and Gitting Things Done >> love.txt
 Adding more love lyrics
Stage and commit your file:
git add love.txt
git commit -m "Commit 2.4"
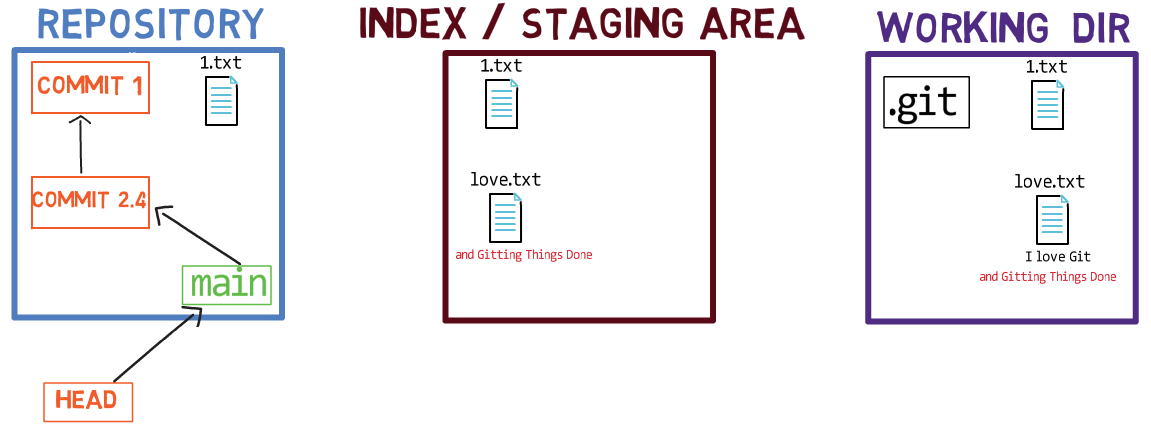 Introducing "Commit 2.4"
Well done!
You got this clear, nice history of "Commit 2.4" pointing to "Commit 1".
You now have a new tool in your toolbox, git reset.
This tool is super, super useful, and you can accomplish almost anything with it. It's not always the most convenient tool to use, but it's capable of solving almost any rewriting-history scenario if you use it carefully.
For beginners, I recommend using only git reset for almost any time you want to undo in Git. Once you feel comfortable with it, move on to other tools.
Scenario #2
Let us consider another case.
Create a new file called new.txt; stage and commit:
echo this is a new file > new.txt
git add new.txt
git commit -m "Commit 3"
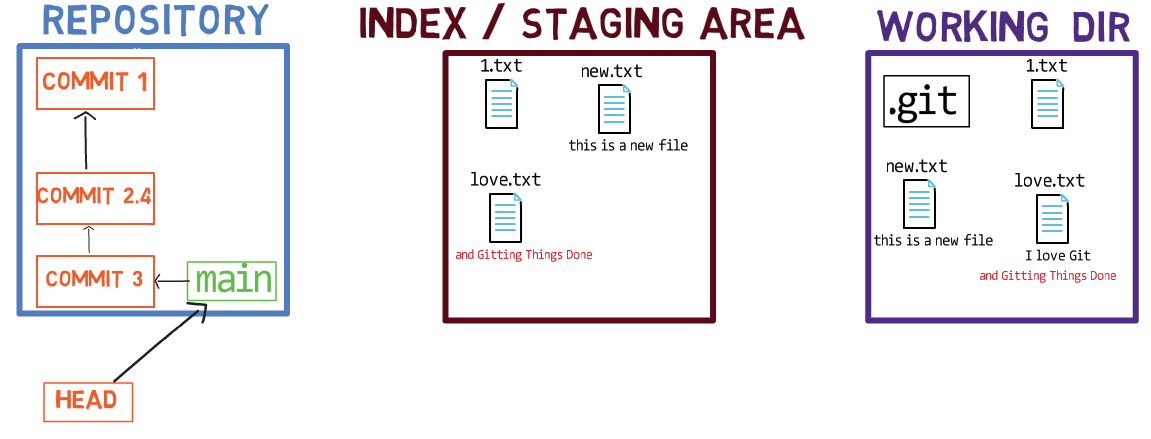 Creating
 new.txt and "Commit 3"
(Note: In the drawing I omitted the files from the repository to avoid clutter. Commit 3 includes 1.txt, love.txt and new.txt at this stage).
Oops. Actually, that's a mistake. You were on main, and I wanted you to create this commit on a feature branch. My bad 😇
There are two most important tools I want you to take from this chapter. The second is git reset. The first and by far more important one is to whiteboard the current state versus the state you want to be in.
For this scenario, the current state and the desired state look like so:
 Scenario #2: current-vs-desired states
(Note: In following diagrams, I will refer to the current state as the "original" state - before starting the process of rewriting history.)
You will notice three changes:
mainpoints to "Commit 3" (the blue one) in the current state, but to "Commit 2.4" in the desired state.feature_branchdoesn't exist in the current state, yet it exists and points to "Commit 3" in the desired state.HEADpoints tomainin the current state, and tofeature_branchin the desired state.
If you can draw this and you know how to use git reset, you can definitely get yourself out of this situation.
So again, the most important thing is to take a breath and draw this out.
Observing the drawing above, how do you get from the current state to the desired one?
There are a few different ways of course, but I will present one option only for each scenario. Feel free to play around with other options as well.
You can start by using git reset --soft HEAD~1. This would set main to point to the previous commit, "Commit 2.4":
git reset --soft HEAD~1
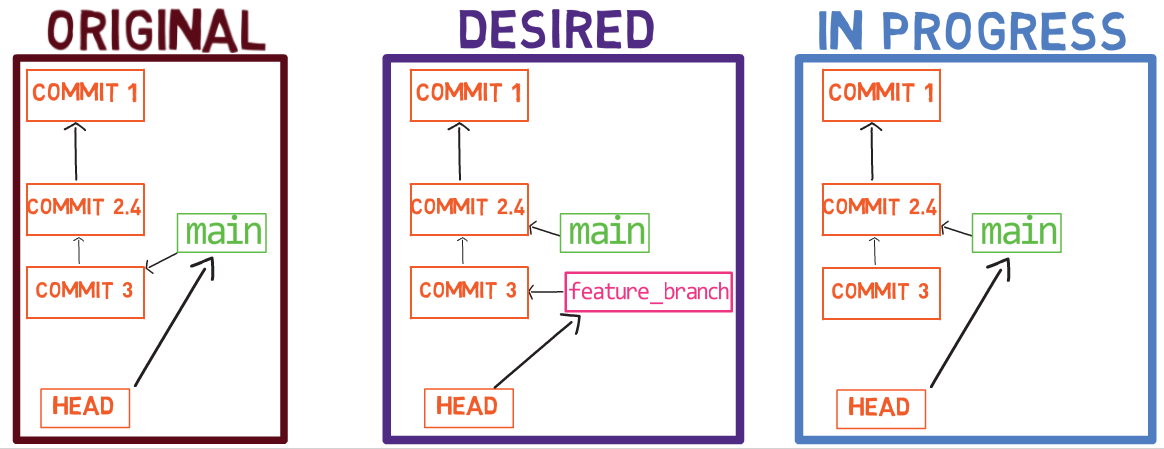 Changing
 main: "Commit 3" is still there, just not reachable from HEAD
Peeking at the current-vs-desired diagram again, you can see that you need a new branch, right? You can use git switch -c feature_branch for it, or git checkout -b feature_branch (which does the same thing):
git switch -c feature_branch
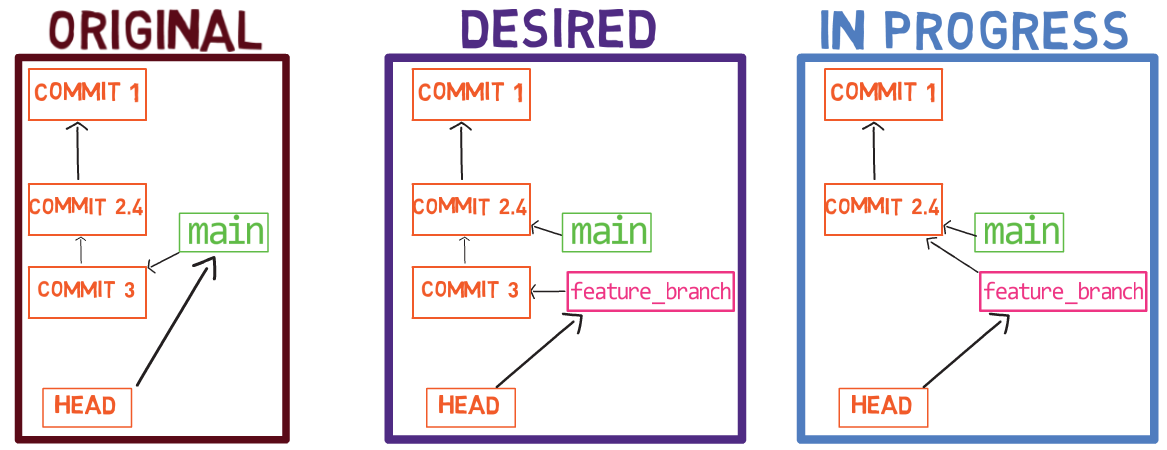 _Creating
 feature_branch branch_
This command also updates HEAD to point to the new branch.
Since you used git reset --soft, you didn't change the index, so it currently has exactly the state you want to commit - how convenient! You can simply commit to feature_branch:
git commit -m "Commit 3.1"
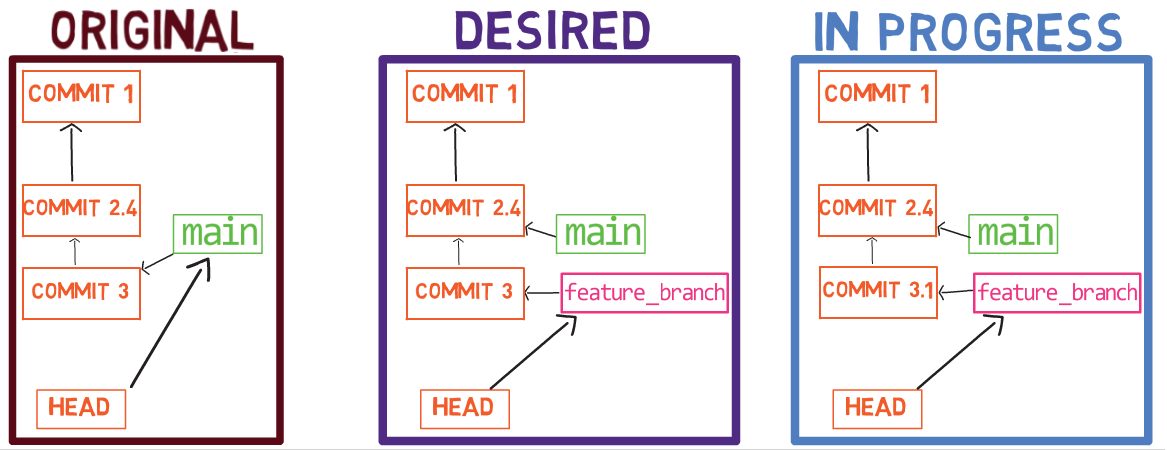 _Committing to
 feature_branch branch_
And you got to the desired state.
Scenario #3
Ready to apply your knowledge to additional cases?
Still on feature_branch, add some changes to love.txt, and create a new file called cool.txt. Stage them and commit:
echo Some changes >> love.txt
echo Git is cool > cool.txt
git add love.txt
git add cool.txt
git commit -m "Commit 4"
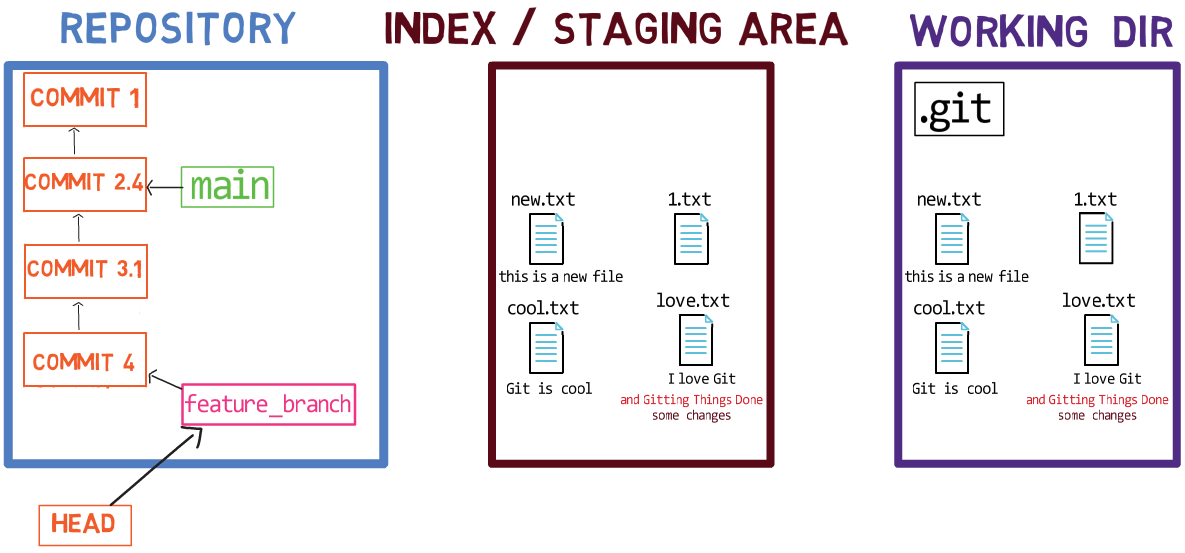 The history, as well as the state of the index and the working dir after creating "Commit 4"
Oh, oops, actually I wanted you to create two separate commits, one with each change...
Want to try this one yourself (before reading on)?
You can undo the committing and staging steps:
git reset --mixed HEAD~1
Following this command, the index no longer includes those two changes, but they're both still in your file system:
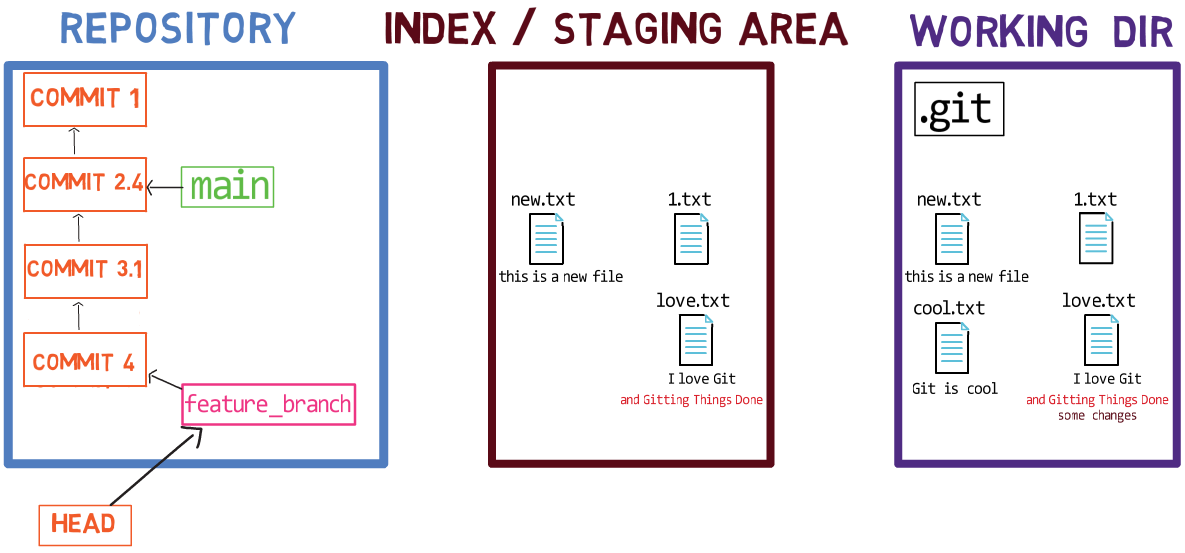 Resulting state after using
 git reset --mixed HEAD~1
So now, if you only stage love.txt, you can commit it separately:
git add love.txt
git commit -m "Love"
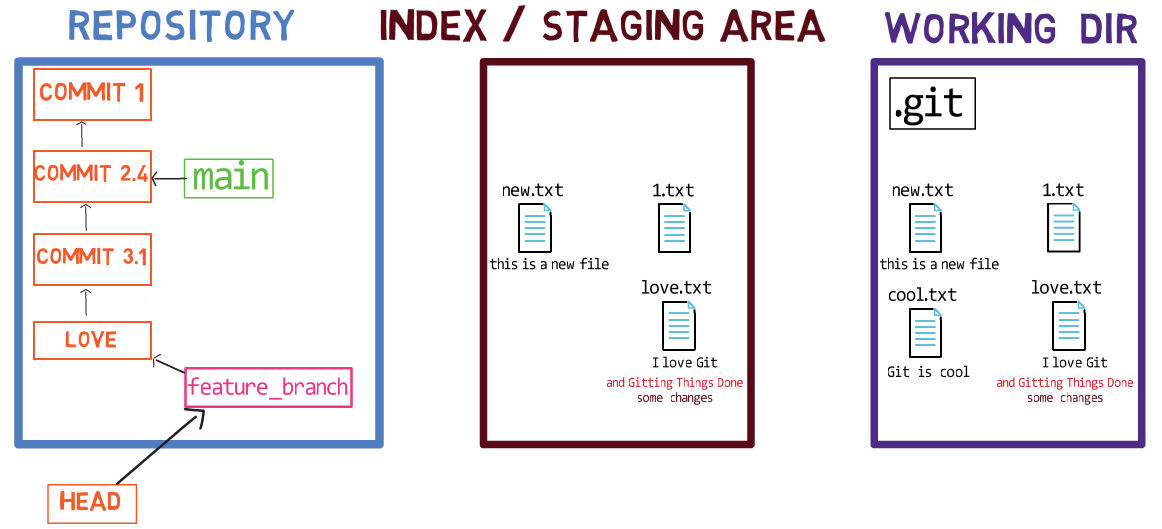 Resulting state after committing the changes to
 love.txt
Then, do the same for cool.txt:
git add cool.txt
git commit -m "Cool"
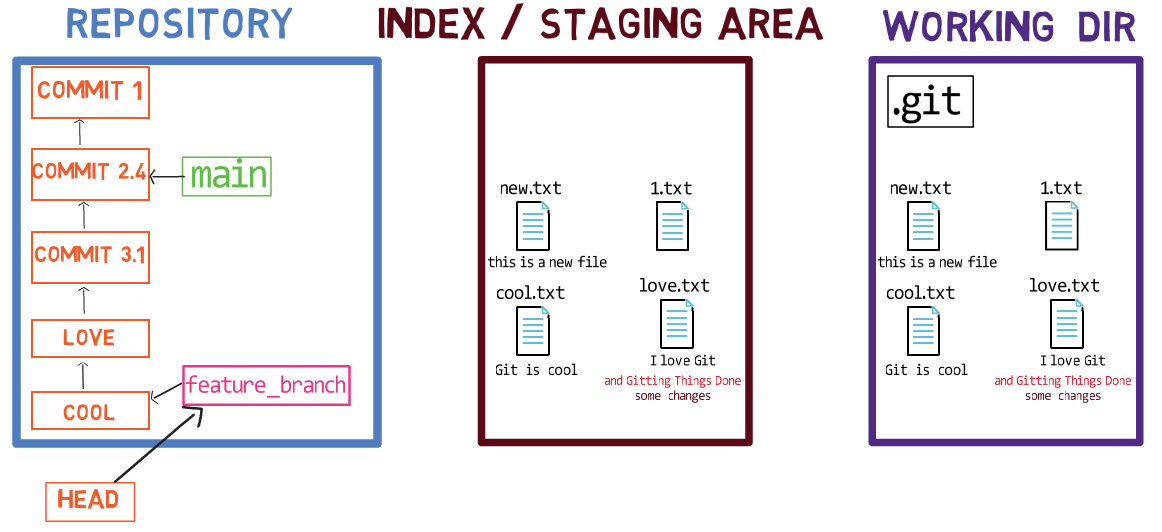 Committing separately
Nice!
Scenario #4
To clear up the state, switch to main and use reset --hard to make it point to "Commit 3.1", while setting the index and the working dir to the state of "Commit 3.1":
git checkout main
git reset --hard <SHA_OF_COMMIT_3_1>
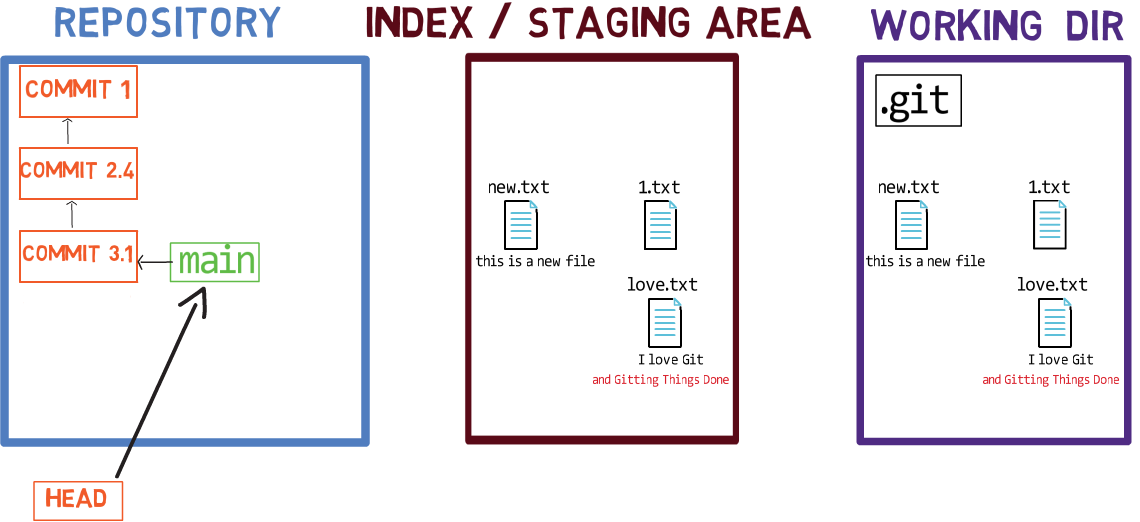 Resetting
 main to "Commit 3.1"
Create another file (another.txt) with some text, and add some text to love.txt. Stage both changes, and commit them:
echo Another file > another.txt
echo More love >> love.txt
git add another.txt
git add love.txt
git commit -m "Commit 4.1"
This should be the result:
 A new commit
Oops...
So this time, I wanted it to be on another branch, but not a new branch, rather - an already-existing branch.
So what can you do?
I'll give you a hint. The answer is really short and really easy. What do we do first?
No, not reset. We draw. That's the first thing to do, as it would make everything else so much easier. So this is the current state:
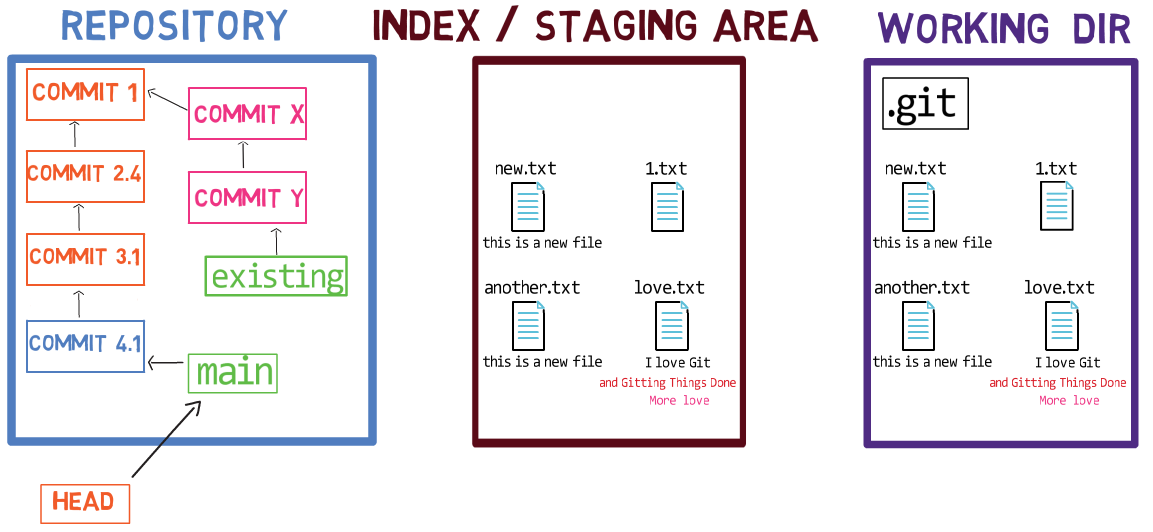 The new commit on
 main appears blue
And the desired state?
 We want the "blue" commit to be on another,
 existing, branch
How do you get from the current state to the desired state, what would be easiest?
One way would be to use git reset as you did before, but there is another way that I would like you to try.
Note that the following commands indeed assume the branch existing exists on your repository, yet you haven't created it earlier. To match a state where this branch actually exists, you can use the following commands:
git checkout <SHA_OF_COMMIT_1>
git checkout -b existing
echo "Hello" > x.txt
git add x.txt
git commit -m "Commit X"
git checkout <SHA_OF_COMMIT_3_1> -- love.txt
git commit -m "Commit Y"
git checkout main
(The command git checkout <SHA_OF_COMMIT_3_1> -- love.txt copies the contents of love.txt from "Commit 3.1" to the index and the working dir, so that you can commit it on the existing branch. We need the state of love.txt on "Commit Y" to be the same as of "Commit 3.1" to avoid conflicts.)
Now your history should match the one shown in the picture with the caption "We want the "blue" commit to be on another, existing, branch".
First, move HEAD to point to existing branch:
git switch existing
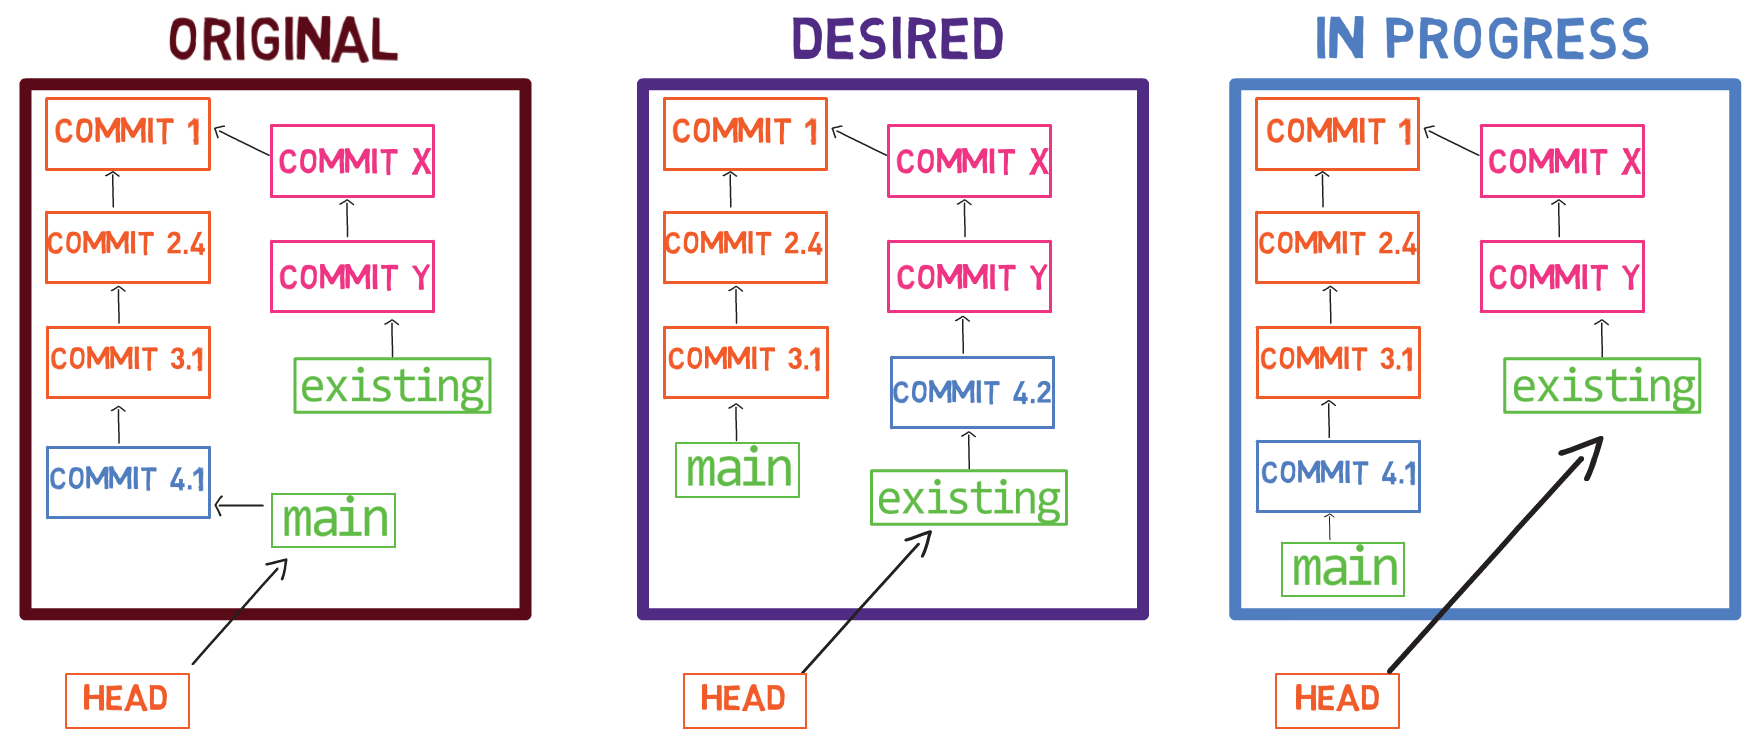 Switch to the
 existing branch
Intuitively, what you want to do is take the changes introduced in "Commit 4.1", and apply these changes ("copy-paste") on top of existing branch. And Git has a tool just for that.
To ask Git to take the changes introduced between a commit and its parent commit and just apply these changes on the active branch, you can use git cherry-pick, a command we introduced in chapter 8. This command takes the changes introduced in the specified revision and applies them to the state of the active commit. Run:
git cherry-pick <SHA_OF_COMMIT_4_1>
You can specify the SHA-1 identifier of the desired commit, but you can also use git cherry-pick main, as the commit whose changes you are applying is the one main is pointing to.
git cherry-pick also creates a new commit object, and updates the active branch to point to this new object, so the resulting state would be:
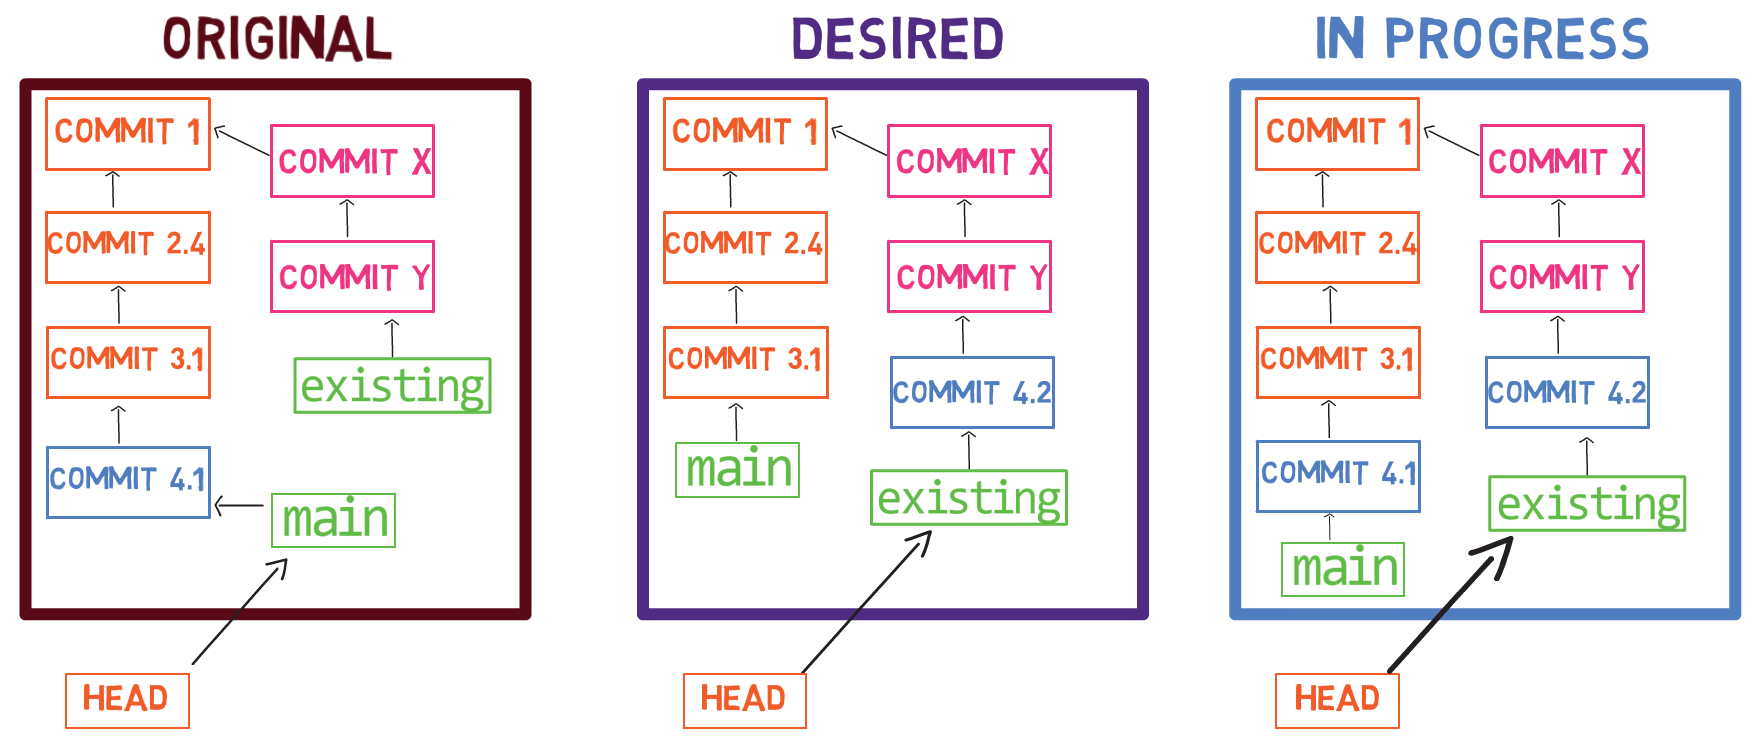 The result after using
 git cherry-pick
I mark the commit as "Commit 4.2" since it has a different timestamp, parent and SHA-1 value than "Commit 4.1", though the changes it introduces are the same.
You made good progress - the desired commit is now on the existing branch! But we don't want these changes to exist on main branch. git cherry-pick only applied the changes to the existing branch. How can you remove them from main?
One way would be to switch back to main, and then reset it:
git switch main
git reset --hard HEAD~1
And the result:
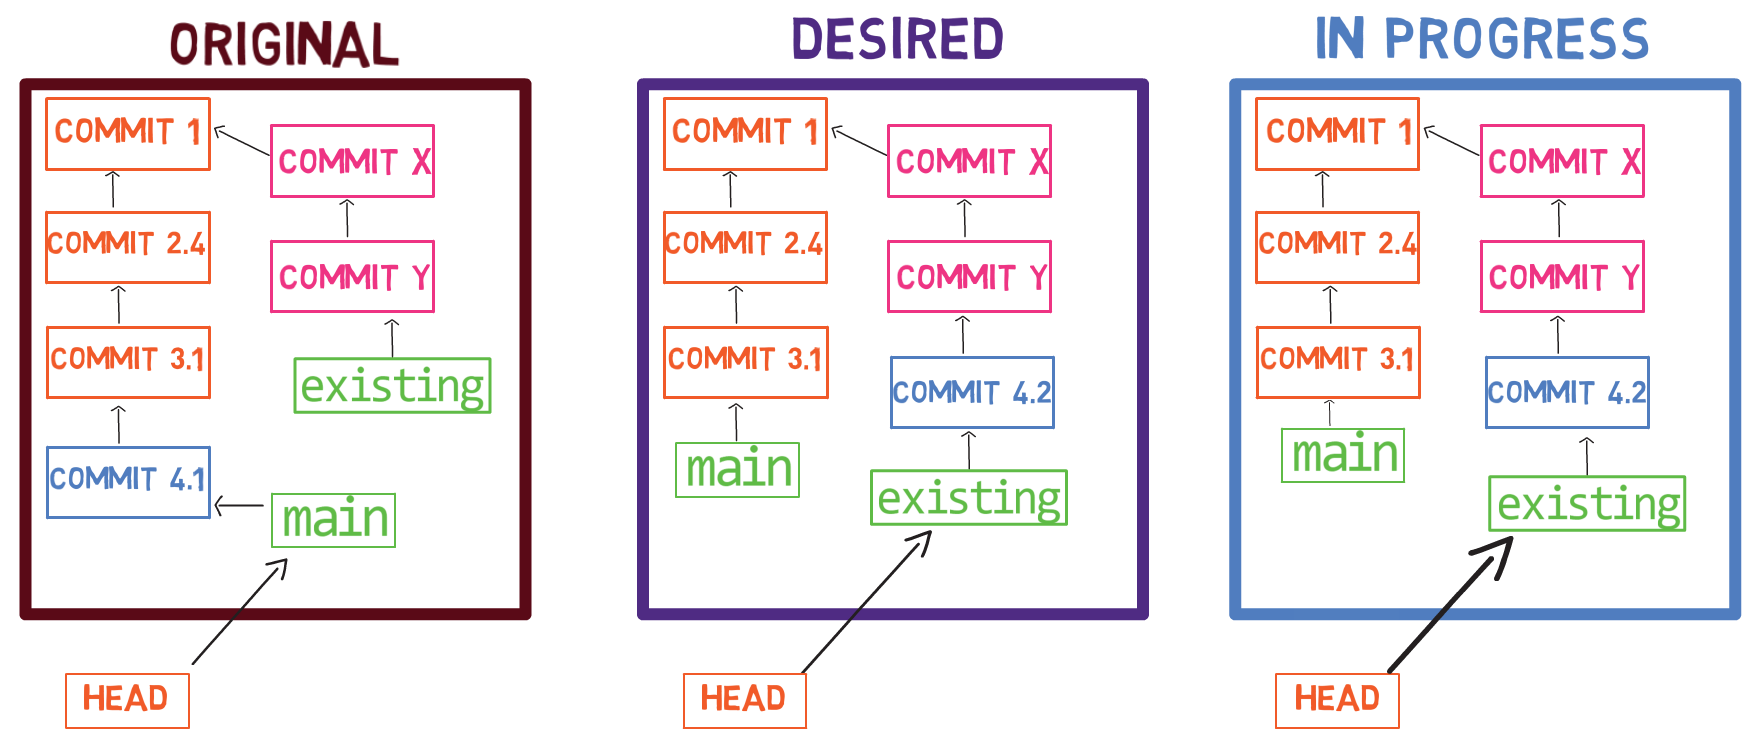 The resulting state after resetting
 main
You did it!
Note that git cherry-pick actually computes the difference between the specified commit and its parent, and then applies the difference to the active commit. This means that sometimes, Git won't be able to apply those changes due to a conflict.
Also, note that you can ask Git to cherry-pick the changes introduced in any commit, not only commits referenced by a branch.
Recap - Git Reset
In this chapter, we learned how git reset operates, and clarified its three main modes of operation:
git reset --soft <commit>, which changes whateverHEADis pointing to - to<commit>.git reset --mixed <commit>, which goes through the--softstage, and also sets the state of the index to match that ofHEAD.git reset --hard <commit>, which goes through the--softand--mixedstages, and then sets the state of the working dir to match that of the index.
You then applied your knowledge about git reset to solve some real-life issues that arise when using Git.
By understanding the way Git operates, and by whiteboarding the current state versus the desired state, you can confidently tackle all kinds of scenarios.
In the future chapters, we will cover additional Git commands and how they can help us solve all kinds of undesired situations.
Chapter 10 - Additional Tools for Undoing Changes
In the previous chapter, you met git reset. Indeed, git reset is a super powerful tool, and I highly recommend to use it until you feel completely comfortable with it.
Yet, git reset is not the only tool at our disposal. Some of the times, it is not the most convenient tool to use. In others, it's just not enough. This short chapter touches a few tools that are helpful for undoing changes in Git.
git commit --amend
Consider Scenario #1 from the previous chapter again. As a reminder, you wrote "I love Git" into a file (love.txt), staged and committed this file:
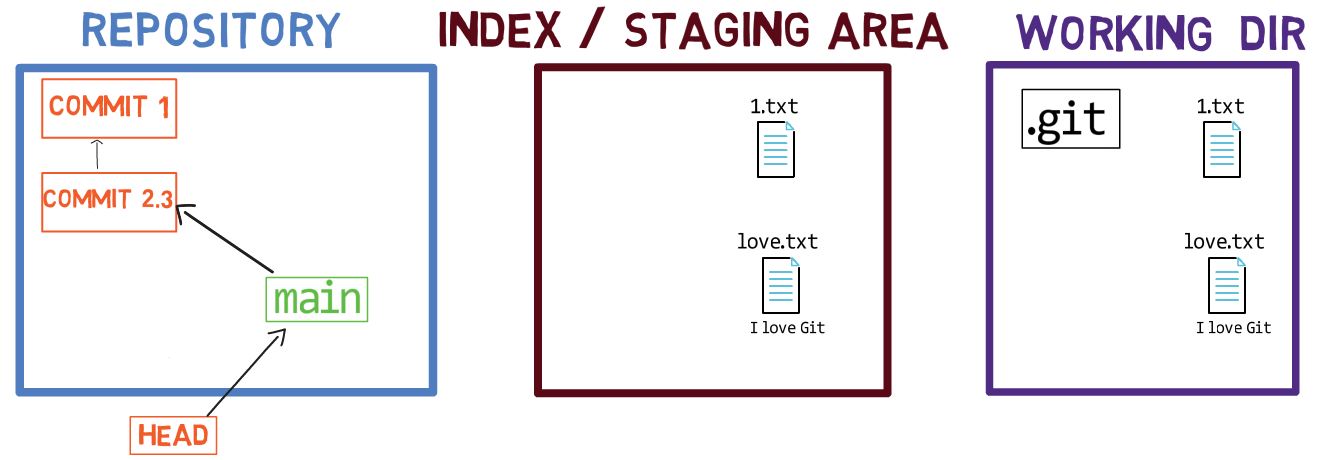 The state after creating "Commit 2.3"
And then I realized I didn't want you to commit it at that state, but rather - write some more love words in this file before committing it.
To match this state, simply checkout the tag you created, which points to "Commit 2.3":
git checkout scenario-1
In the previous chapter, when we introduced git reset, you solved this issue by using git reset --mixed HEAD~1, effectively undoing both the committing and the staging actions you took.
Now I would like you to consider another approach. Keep working at the state of the last introduced commit ("Commit 2.3", referenced by the tag "scenario-1"), and make the changes you want:
echo And I love this book >> love.txt
Add this change to the index:
git add love.txt
Now, you can use git commit with the --amend switch, which tells it to override the commit HEAD is pointing to. Actually, it will create another, new commit, pointing to HEAD~1 ("Commit 1" in our example), and make HEAD point to this newly created commit. By providing the -m argument you can specify a new commit message as well:
git commit --amend -m "Commit 2.4"
After running this command, HEAD points to main, which points to "Commit 2.4", which in turn points to "Commit 1". The previous "Commit 2.3" is no longer reachable from the history.
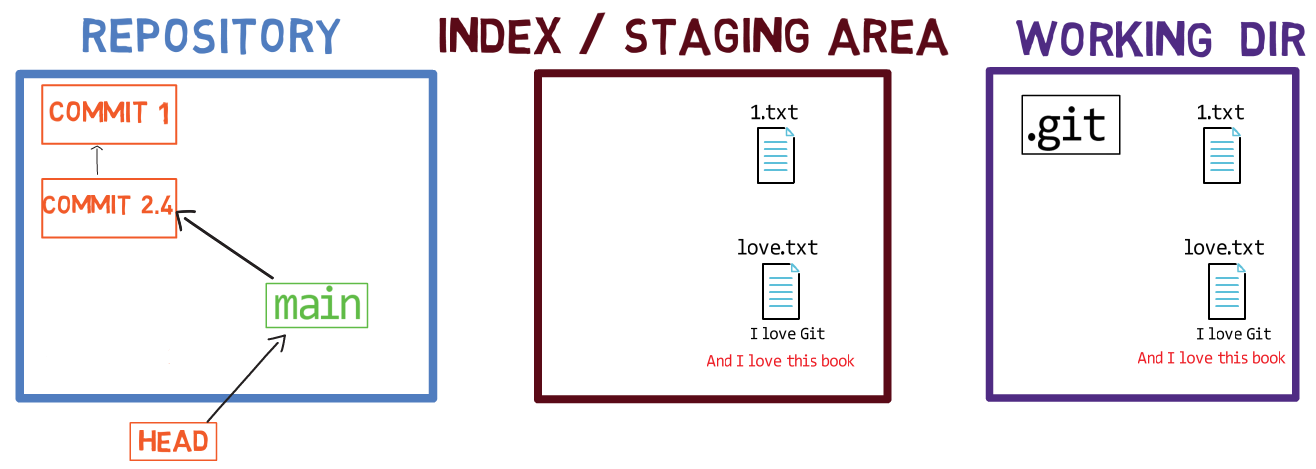 The state after using
 git commit --amend (Commit "2.3" is unreachable and thus not included in the drawing)
This tool is useful when you want to quickly override the last commit you created. Indeed, you could use git reset to accomplish the same thing, but you can view git commit --amend as a more convenient shortcut.
git revert
Okay, so another day, another problem.
Add the following text to love.txt, stage and commit as follows:
echo This is more tezt >> love.txt
git add love.txt
git commit -m "Commit 3"
 The state after committing "Commit 3"
And push it to the remote server:
git push origin HEAD
Um, oops 😓…
I just noticed something. I had a typo there. I wrote "This is more tezt" instead of "This is more text". Whoops. So what's the big problem now? I pushed, which means that someone else might have already pulled those changes.
If I override those changes by using git reset, we will have different histories, and all hell might break loose. You can rewrite your own copy of the repo as much as you like until you push it.
Once you push the change, you need to be certain no one else has fetched those changes if you are going to rewrite history.
Alternatively, you can use another tool called git revert. This command takes the commit you're providing it with and computes the diff from its parent commit, just like git cherry-pick, but this time, it computes the reverse changes. That is, if in the specified commit you added a line, the reverse would delete the line, and vice versa.
In our case we are reverting "Commit 3", so the reverse would be to delete the line "This is more tezt" from love.txt. Since "Commit 3" is referenced by main and HEAD, we can use any of these named references in this command:
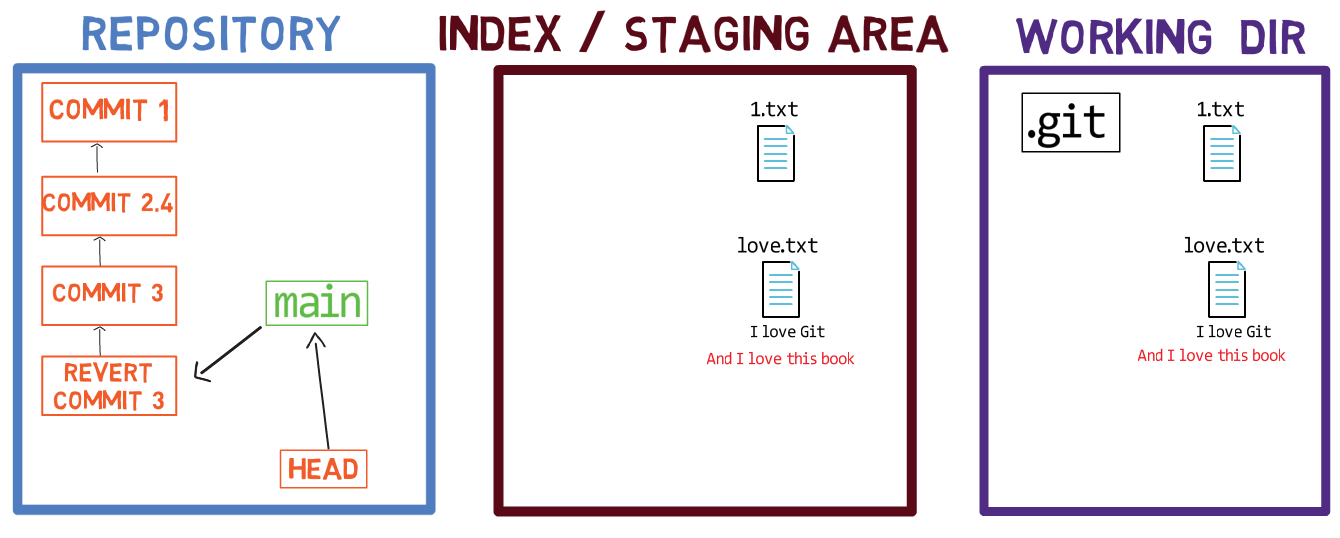 Using
Using git revert to undo the changes
git revert created a new commit object, which means it's an addition to the history. By using git revert, you didn't rewrite history. You admitted your past mistake, and this commit is an acknowledgment that you made a mistake and now you fixed it.
Some would say it's the more mature way. Some would say it's not as clean a history as you would get if you used git reset to rewrite the previous commit. But this is a way to avoid rewriting history.
You can now fix the typo and commit again:
echo This is more text >> love.txt
git add love.txt
git commit -m "Commit 3.1"
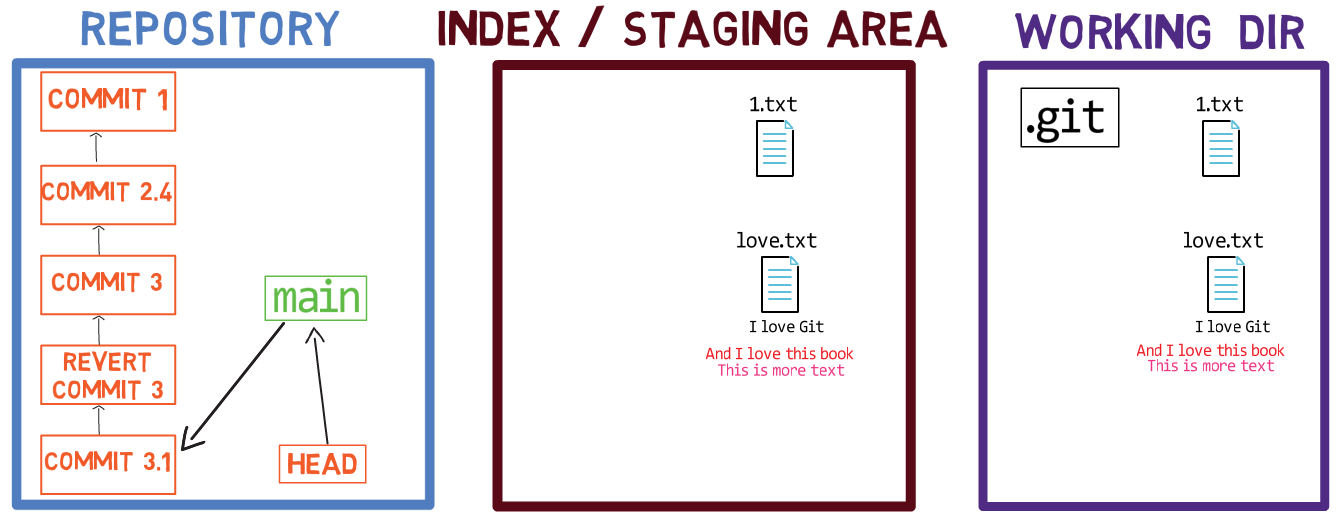 The resulting state after redoing the changes
You can use git revert to revert a commit other than HEAD. Say that you want to reverse the parent of HEAD, you can use:
git revert HEAD~1
Or you could provide the SHA-1 of the commit to revert.
Notice that since Git will apply the reverse patch of the previous patch - this operation might fail, as the patch may no longer apply and you might get a conflict.
Git Rebase as a Tool for Undoing Things
In chapter 8, you learned about Git rebase. We then considered it mainly as a tool to combine changes introduced in different branches. Yet, as long as you haven't pushed your changes, using rebase on your own branch can be a very convenient way to rearrange your commit history.
For that, you would usually rebase on a single branch, and use interactive rebase. Consider again this example covered in chapter 8, where I worked from feature_branch_2, and specifically edited the file code.py. I started by changing all strings to be wrapped by double quotes rather than single quotes:
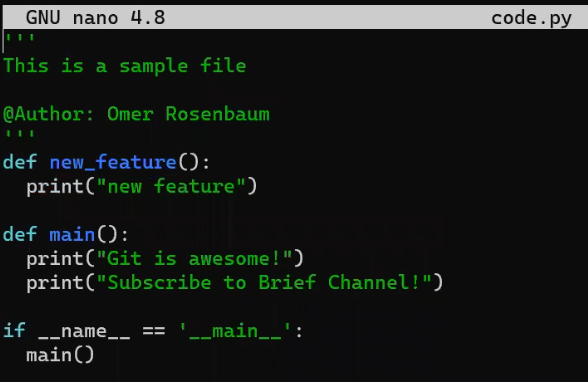 Changing
 ' into " in code.py
Then, I staged and committed:
git add code.py
git commit -m "Commit 17"
I then decided to add a new function at the beginning of the file:
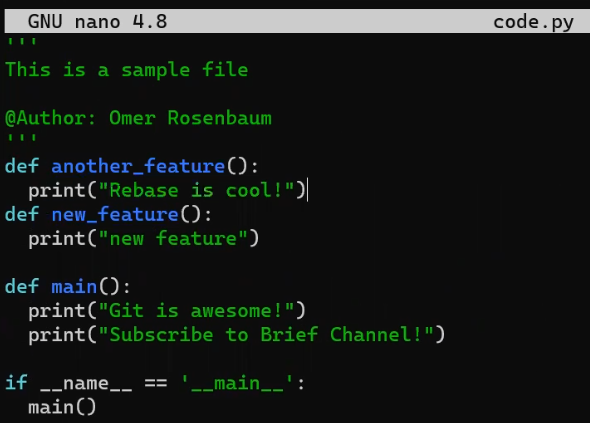 _Adding the function
 another_feature_
Again, I staged and committed:
git add code.py
git commit -m "Commit 18"
And now I realized I actually forgot to change the single quotes to double quotes wrapping the __main__ (as you might have noticed), so I did that too:
 Changing
 '__main__' into "__main__"
Of course, I staged and committed this change:
git add code.py
git commit -m "Commit 19"
Now, consider the history:
 The commit history after introducing "Commit 19"
As explained in chapter 8, I got to a state with two commits that are related to one another, "Commit 17" and "Commit 19" (turning 's into "s), but they are split by the unrelated "Commit 18" (where I added a new function).
This is a classic case where git rebase would come in handy, to undo the local changes before pushing a clean history.
Intuitively, I want to edit the history here:
 These are the commits I want to edit
I can rebase the history from "Commit 17" to "Commit 19", on top of "Commit 15". To do that:
git rebase --interactive --onto <SHA_OF_COMMIT_15> <SHA_OF_COMMIT_15>
 Using
Using rebase --onto on a single branch
This results in the following screen:
 Interactive rebase
So what would I do? I want to put "Commit 19" before "Commit 18", so it comes right after "Commit 17". I can go further and squash them together, like so:
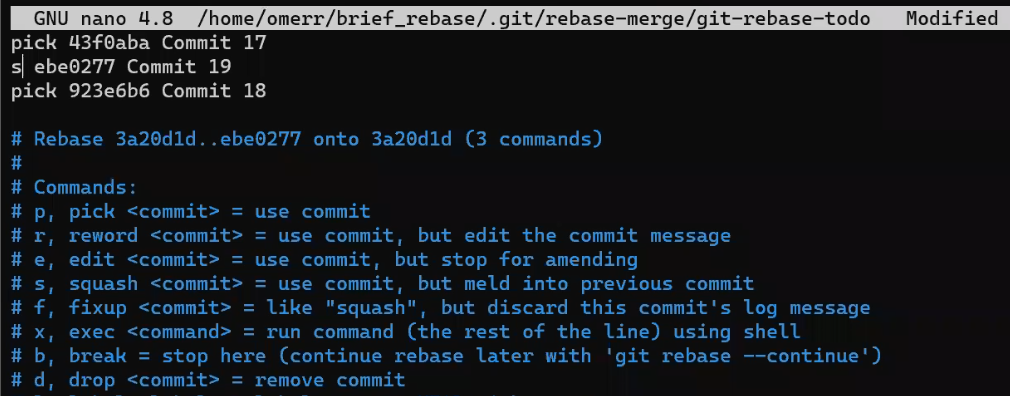 Interactive rebase - changing the order of commit and squashing
Now when I get prompted for a commit message, I can provide the message "Commit 17+19":
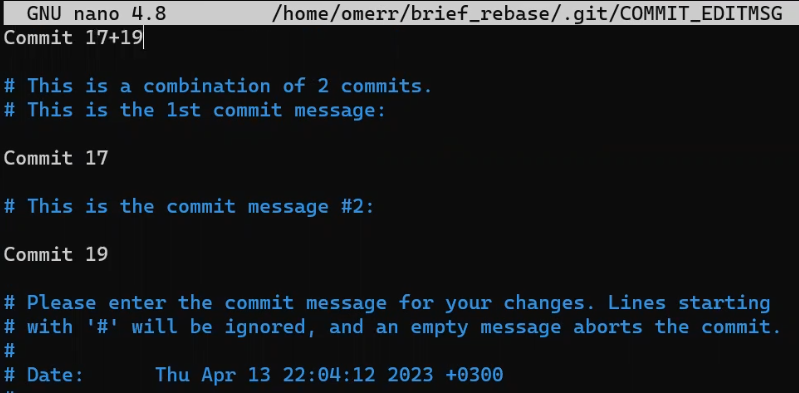 Providing a commit message
And now, see our beautiful history:
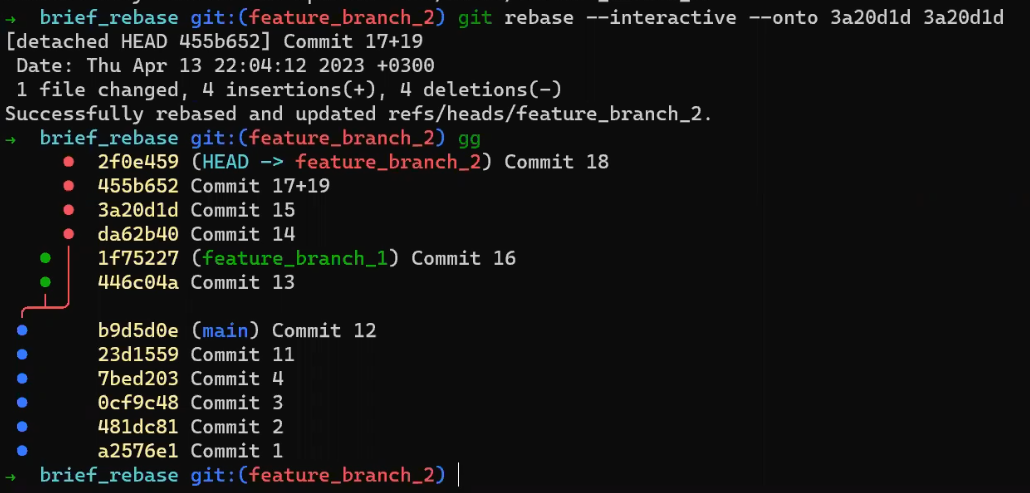 The resulting history
The syntax used above, git rebase --interactive --onto <COMMIT X> <COMMIT X> would be the most commonly used syntax by those who use rebase regularly. The state of mind these developers usually have is to create atomic commits while working, all the time, without being scared to change them later. Then, before pushing their changes, they would rebase the entire set of changes since the last push, and rearrange it so the history becomes coherent.
git reflog
Time to consider a more startling case.
Go back to "Commit 2.4":
git reset --hard <SHA_OF_COMMIT_2_4>
Get some work done, write some code, and add it to love.txt. Stage this change, and commit it:
echo lots of work >> love.txt
git add love.txt
git commit -m "Commit 3.2"
(I'm using "Commit 3.2" to indicate that this is not the same commit as "Commit 3" we used when explaining git revert.)
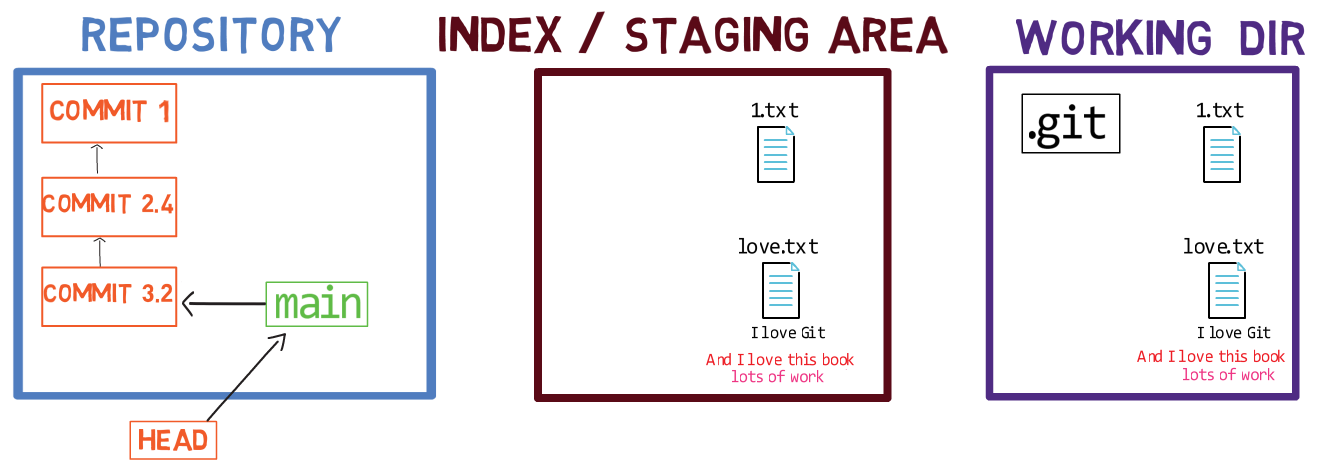 Another commit - "Commit 3.2"
I did the same on my machine, and I used the Up arrow key on my keyboard to scroll back to previous commands, and then I hit Enter, and… Wow.
Whoops.
 Did I just
 git reset -- hard?
Did I just use git reset --hard? 😨
What actually happened? As you learned in the previous chapter, Git moved the pointer to HEAD~1, so the last commit, with all of my precious work, is not reachable from the current history. Git also removed all the changes from the staging area, and then matched the working dir to the state of the staging area.
That is, everything matches this state where my work is… gone.
Freak out time. Freaking out.
But, really, is there a reason to freak out? Not really… We're relaxed people. What do we do? Well, intuitively, is the commit really, really gone?
No. Why not? It still exists inside the internal database of Git.
If I only knew where that is, I would know the SHA-1 value that identifies this commit, and we could restore it. I could even undo the undoing, and reset back to this commit.
Actually, the only thing I really need here is the SHA-1 of the "deleted" commit.
Now the question is, how do I find it? Would git log be useful?
Well, not really. git log would go to HEAD, which points to main, which points to the parent commit of the commit we are looking for. Then, git log would trace back through the parent chain, which does not include the commit with my precious work.
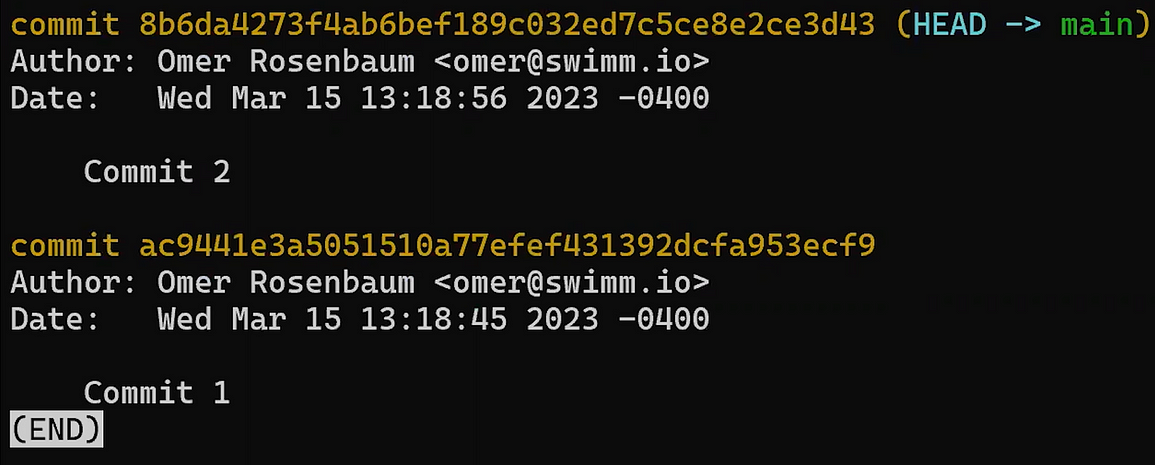
git log doesn't help in this case
Thankfully, the very smart people who created Git also created a backup plan for us, and that is called the reflog.
While you work with Git, whenever you change HEAD, which you can do by using git reset, but also other commands like git switch or git checkout, Git adds an entry to the reflog.

git reflog shows us where HEAD was
We found our commit! It's the one starting with 0fb929e.
We can also relate to it by its "nickname" - HEAD@{1}. Similar to the way Git uses HEAD~1 to get to the first parent of HEAD, and HEAD~2 to refer to the second parent of HEAD and so on, Git uses HEAD@{1} to refer to the first reflog parent of HEAD, that is, where HEAD pointed to in the previous step.
We can also ask git rev-parse to show us its value:
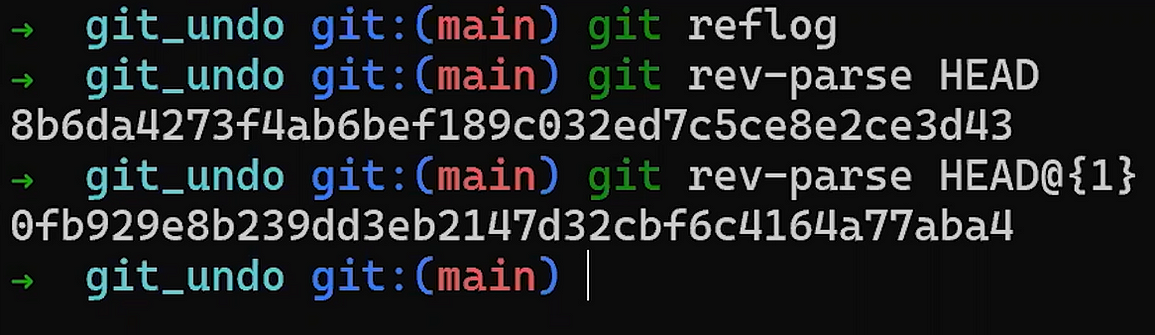 Using
Using git rev-parse HEAD@{1}
Note: In case you are using Windows, you may need to wrap it with quotation marks - like so:
git rev-parse "HEAD@{1}"
Another way to view the reflog is by using git log -g, which asks git log to actually consider the reflog:
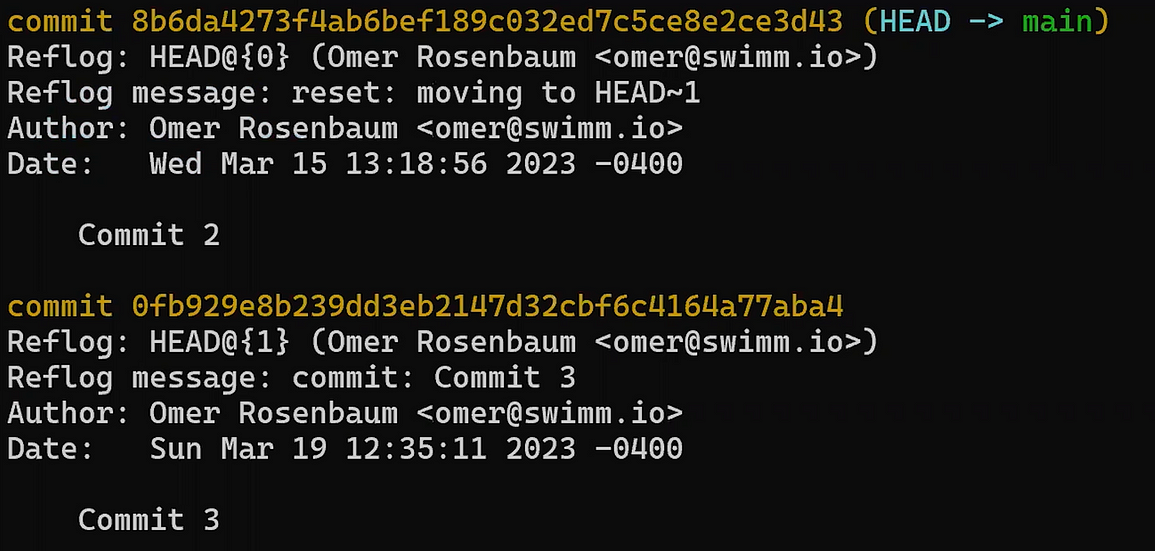 The output of
 git log -g
You can see in the output of git log -g that the reflog's entry HEAD@{0}, just like HEAD, points to main, which points to "Commit 2". But the parent of that entry in the reflog points to "Commit 3".
So to get back to "Commit 3", you can just use git reset --hard HEAD@{1} (or the SHA-1 value of "Commit 3"):
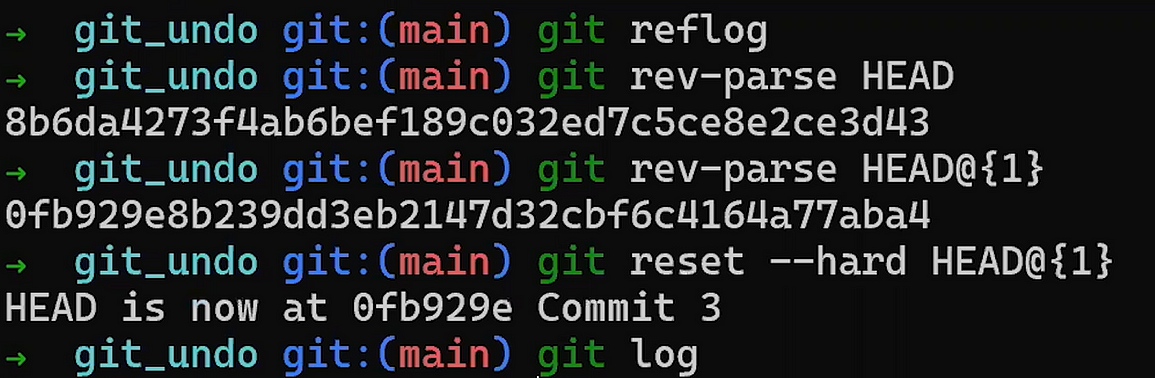
git reset --hard HEAD@{1}
And now, if you git log:
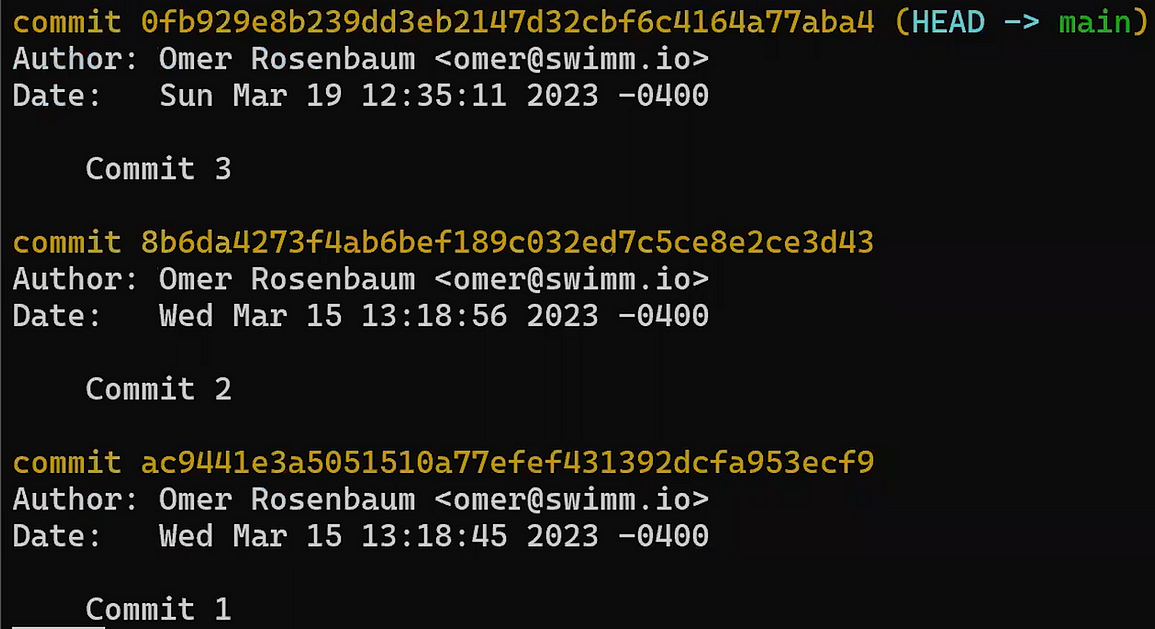 Our history is back!!!
We saved the day!
What would happen if I used this command again? And ran git reset --hard HEAD@{1}?
Git would set HEAD to where HEAD was pointing before the last reset, meaning to "Commit 2". We can keep going all day:
git reset --hard again
Recap - Additional Tools for Undoing Changes
In the previous chapter, you learned how to use git reset to undo changes.
In this chapter, you extended your toolbox for undoing changes in Git with a few new commands:
git commit --amend- which "overrides" the last commit with the stage of the index. Mostly useful when you just committed something and want to modify that last commit.git revert- which creates a new commit, that reverts a past commit by adding a new commit to the history with the reversed changes. Useful especially when the "faulty" commit has already been pushed to the remote.git rebase- which you already know from chapter 8, and is useful for rewriting the history of multiple commits, especially before pushing them.git reflog(andgit log -g) - which tracks all changes toHEAD, so you might find the SHA-1 value of a commit you need to get back to.
The most important tool, even more important than the tools I just listed, is to whiteboard the current situation vs the desired one. Trust me on this, it will make every situation seem less daunting and the solution more clear.
There are additional tools that allow you to reverse changes in Git (I will provide links in the appendix), but the collection of tools covered here should prepare you to tackle any challenge with confidence.
Chapter 11 - Exercises
This chapter includes a few exercises to deepen your understanding of the tools you learned in Part 3. The full version of this book also includes detailed solutions for each.
The exercises are found on this repository:
https://github.com/Omerr/undo-exercises.git
Each exercise exists on a branch with the name exercise_XX, so Exercise 1 is found on branch exercise_01, Exercise 2 is found on branch exercise_02 and so on.
Note: As explained in previous chapters, if you work with commits that can be found on a remote server (which you are in this case, as you are using my repository "undo-exercises"), you should probably use git revert instead of git reset. Similar to git rebase, the command git reset also rewrites history - and thus you should refrain from using it on commits that others may have relied on.
For the purposes of these exercises, you can assume no one else has cloned or pulled code from the remote repository. Just remember - in real life, you should probably use git revert instead of commands that rewrite history in such cases.
Exercise 1
On branch exercise_01, consider the file hello.txt:
 The file
 hello.txt
This file includes a typo (in the last character). Find the commit that introduced this typo.
Exercise (1a)
Remove this commit from the reachable history using git reset (with the right arguments), fix the typo, and commit again. Consider your history.
Revert to the previous state.
Exercise (1b)
Remove the faulty commit using git commit --amend, and get to the same state of the history as in the end of exercise (1a).
Revert to the previous state.
Exercise (1c)
revert the faulty commit using git revert and fix the typo. Consider your history.
Revert to the previous state.
Exercise (1d)
Using git rebase, get to the same state as in the end of exercise (1a).
Exercise 2
Switch to exercise_02, and consider the contents of exercise_02.txt:
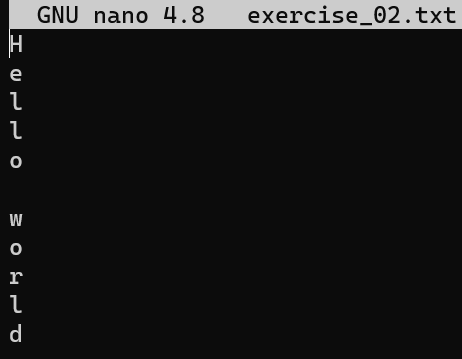 _The contents of
 exercise_02.txt_
A simple file, with one character at each line.
Consider the history (using git lol):

git lol
Oh my. Each character was introduced in a separate commit. That doesn't make any sense!
Use the tools you've acquired to create a history where the creation of exercise_02.txt is all done in a single commit.
Exercise 3
Consider the history on branch exercise_03:
 _The history on
 exercise_03_
This seems like a mess. You will notice that:
- The order is skewed. We need "Commit 1" to be the earliest commit on this branch, and have "Initial Commit" as its parent, followed by "Commit 2" and so on.
- We shouldn't have "Commit 2a" and "Commit 2b", or "Commit 4a" and "Commit 4b" - these two pairs need to be combined into a single commit each - "Commit 2" and "Commit 4".
- There is a typo on the commit message of "Commit 1", it should not have 3
ms.
Fix these issues, but rely on the changes of each original commit. The resulting history should look like so:
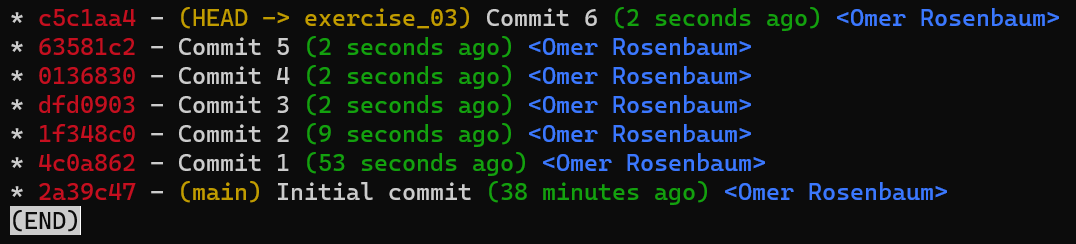 The desired history
Exercise 4
This exercise actually consists of three branches: exercise_04, exercise_04_a, and exercise_04_b.
To see the history of these branches without others, use the following syntax:
git lol --branches="exercise_04*"
The result is:
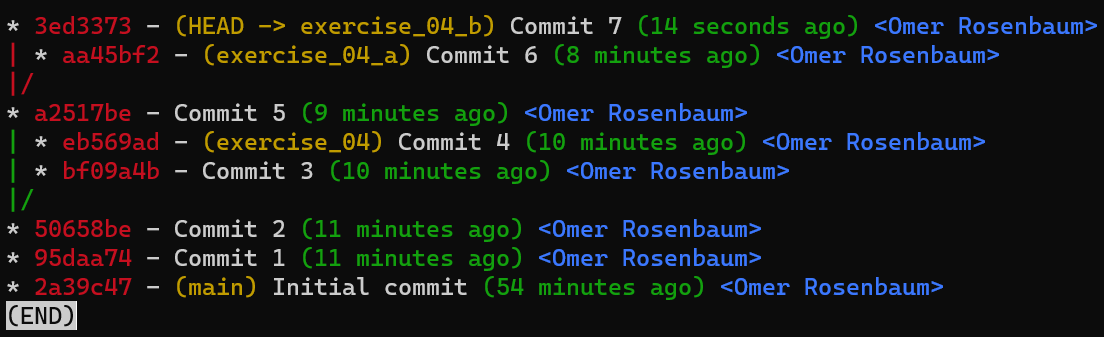 _The output of
 git lol --branches="exercise_04*"_
Your goal is to make exercise_04_b independent of exercise_04_a. That is, get to this history:
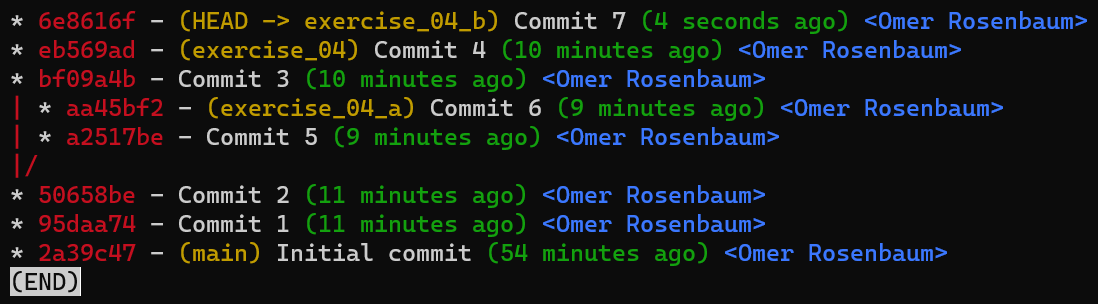 The desired history
Good luck!
Part 4 - Amazing and Useful Git Tools
Git has lots of commands, and these commands have so many options and arguments. I could try to cover them all (though they do change over time), but I don't see a point in that. You should probably know a subset of these commands really well, those that you use regularly. Then, you can always search for a specific command to perform a task at hand.
This part relies on the basics you acquired in the previous parts, and covers specific commands and options that you may find useful. Given your understanding of how Git works, having these small tools can make you a real pro in Gitting things done.
Chapter 12 - Git Log
You used git log many times across different chapters, and you had probably used it many times before reading this book.
Most developers use git log, few use it effectively. In this chapter you will learn useful tweaks for making the most of git log. Once you feel comfortable with the different switches of this command, it will be a game changer in your day to day work with Git.
Thinking about it, git log encompasses the essence of every version control system - that is, to record changes in versions. You record versions so that you can consider the history of your project - perhaps revert or apply specific changes, prefer to switch to a different point in time and test things there. Perhaps you would like to know who contributed a certain piece of code or when they did that.
While git does preserve this information by using commit objects, that also point to their parent commits, and references to commit objects (such as branches or HEAD), this storing of versions is not enough. Without being able to find the relevant commit you would like to consider, or gather the relevant information about it, having this data stored is pretty useless.
You can think of your commit objects as different books that pile up in a huge stack, or in a library, filling long shelves. The information you might need is in these books, but if you don't have an index - a way to know in which book the information you seek lies, or where this book is located within the library - you wouldn't be able to make much use of it. git log is this indexing of your library - it's a way to find the relevant commits and the information about them.
The useful arguments for git log that you will learn in this chapter either format how commits are displayed in the log, or filter specific commits.
git lol, an alias which I have used throughout the book, uses some of these switches, as I will demonstrate. Feel free to tweak this alias (or create another from scratch) after reading this chapter.
As in other chapters, the goal is not to provide a complete reference, therefore I will not provide all different switches of git log. I will focus on the switches I believe you will find useful.
Filtering Commits
Consider the default output of git log:
 The output of
 git log without additional switches
The log starts from HEAD, and follows the parent chain.
Commits (Not) Reachable From...
When you write git log <revision>, git log will include all entries reachable from <revision>. By "reachable", I refer to reachable by following the parent chain. So running git log without any arguments is equivalent to running git log HEAD.
You can specify multiple revisions for git log - if you write git log branch_1 branch_2, you ask git log to include every commit that is reachable from branch_1 or branch_2 (or both).
git log will exclude any commits that are reachable from revisions preceded by a ^.
For example, the following command:
git log branch_1 ^branch_2
asks git log to include every commit that is reachable from branch_1, but not those reachable from branch_2.
Consider the history when I use git log feature_branch_1 on this repo:
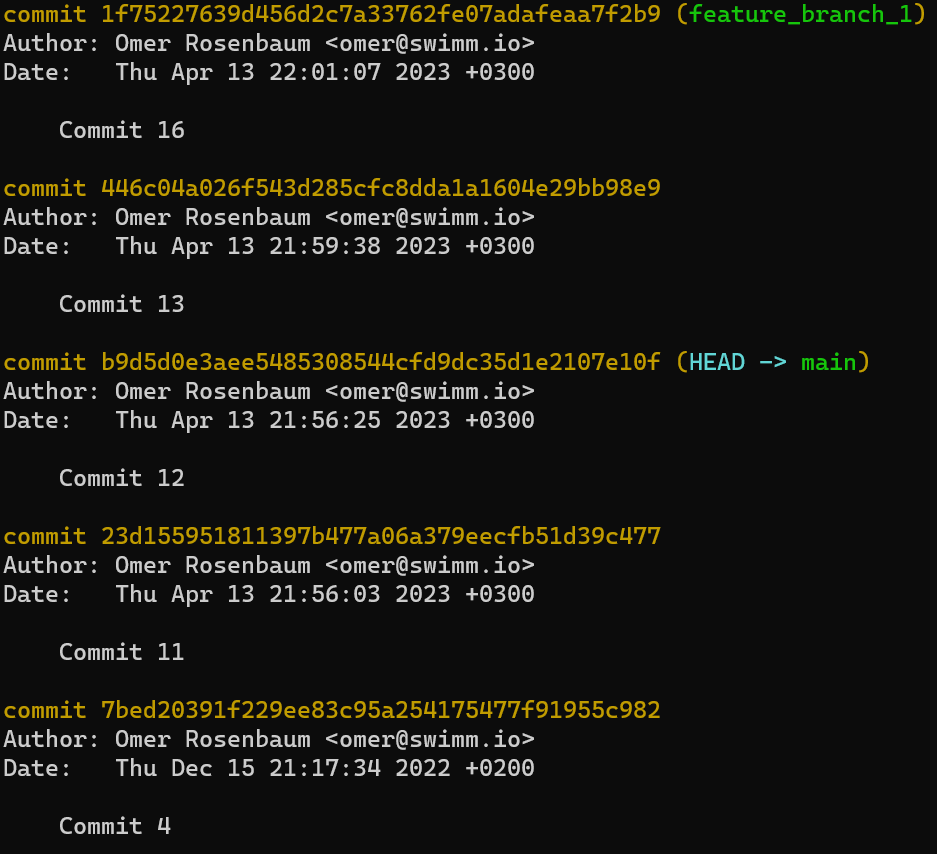 _
_git log feature_branch_1_
The history includes all commits reachable by feature_branch_1. Since this branch "branched off" main (that is, "Commit 12", which main points to, is reachable from the parent chain) - the log also includes the commits reachable from main.
What would happen if I ran this command?
git log feature_branch_1 ^main
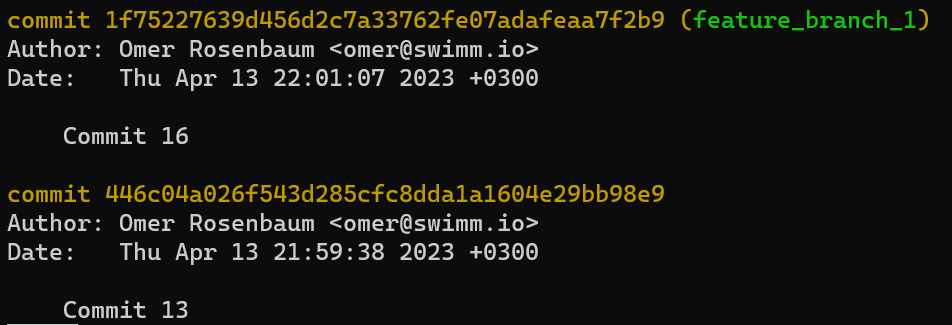 _
_git log feature_branch_1 ^main_
Indeed, git log outputs only "Commit 13" and "Commit 16", which are reachable from feature_branch_1 but not from main.
git log --all
To follow commits that are reachable from any named reference or (any refs in refs/) or HEAD.
By Author
If you know you are looking for a commit that a specific person has authored, you can filter these commits by using that user's name or email, like so:
git log --author="Name"
You can use regular expressions to look for author names that match a specific pattern, for example:
git log --author="John\|Jane"
will filter commits authored by either John or Jane.
By Date
When you know that the change you are looking for has been committed within a specific timeframe, you can use --before or --after to filter commits from that timeframe.
For example, to get all commits introduced after April 12th, 2023 (inclusive), use:
git log --after="2023-04-12"
By Paths
You can ask git log to only show commits where changes to files in specific paths have been introduced. Notice that this does not mean any commit that points to a tree that includes the files in question, but rather that if we compute the difference between the commit in question and its parent, we would see that at least one of the paths has been modified.
For example, you can use:
git log --all -- 1.py
to find all commits that are reachable from any named pointer, or HEAD, and introduce a change to 1.py. You can specify multiple paths:
git log --all -- 1.py 2.py
The previous command will make git log include reachable commits that introduced a change to 1.py or 2.py (or both).
You can also use a glob pattern, for example:
git log -- *.py
will include commits reachable from HEAD that include a change to any file in the root directory whose name ends with a .py. To look for any file whose name ends with .py, you can use:
git log -- **/*.py
By Commit Message
If you know the commit message (or parts of it) of the commit you are searching, you can use the --grep switch for "git log", for example:
git log --grep="Commit 12"
yields back the commit with the message "Commit 12".
By Diff Content
This one is super useful, and it saved me countless times. By using git log -S, you can search for commits that introduce or remove a particular line of source code.
This comes in handy, for example, when you know you have created something in the repo, but you don't know where it is now. You can't find it anywhere on your filesystem (it's not in HEAD), and you know it must be there - lurking somewhere in this library (bunch of commits) that you have.
Say I remember I wrote a line with the text Git is awesome, but I can't find it now. I could run:
git log --all -S"Git is awesome"
Notice I used --all to avoid restraining myself to commits reachable from HEAD.
You can also search for a regular expression, using -G:
git log --all -G"Git .* awesome"
Formatting Log
Consider the default output of git log again:
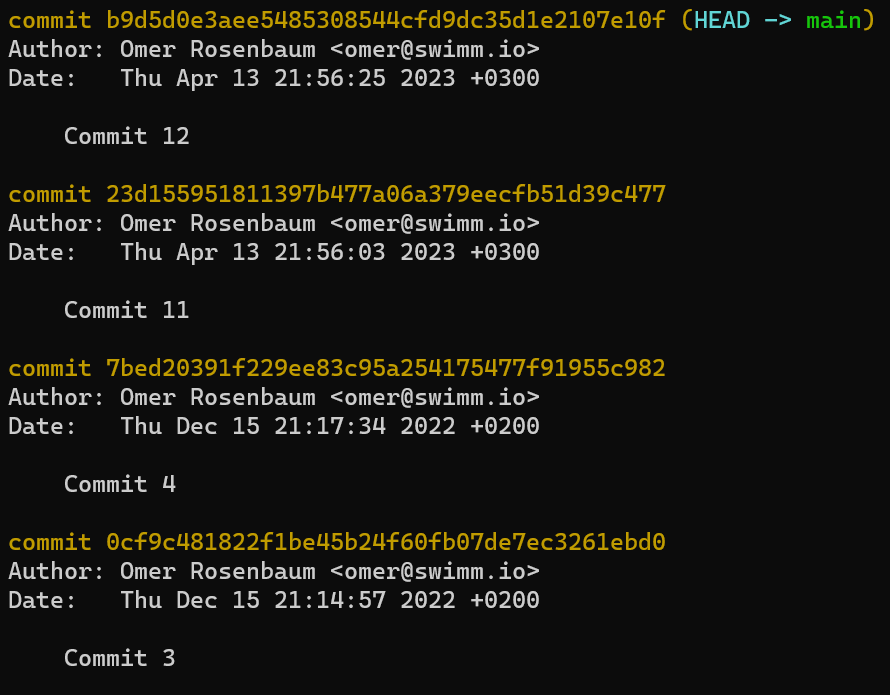 The output of
 git log without additional switches
The log starts from HEAD, and follows the parent chain.
Each log entry begins with a line starting with commit and then the SHA-1 of the commit, perhaps followed by additional pointers that point to this commit.
It is then followed by the author, date, and commit message.
--oneline
The main difficulty with the default output of git log is that it is hard to understand a history with more than a few commits, as you simply don't see them all.
In the output of git log shown before, only four commit objects appeared on my screen. Using git log --oneline provides a more concise view, showing the SHA-1 of the commit, next to its message, and named references if relevant:
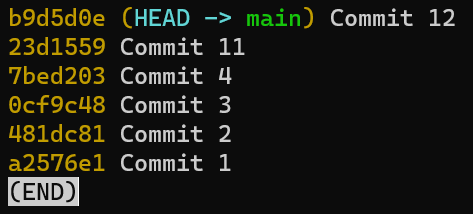 The output of
 git log --oneline
If you wish to omit the named references, you can add the --no-decorate switch:
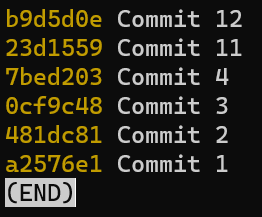 The output of
 git log --oneline --no-decorate
To explicitly ask for git log to show decorations, you can use git log --decorate.
--graph
git log --oneline shows a compact representation. That is great when we have a linear history, perhaps on a single branch. But what happens when we have multiple branches, that may diverge from one another?
Consider the output of the following command on my repository:
git log --oneline feature_branch_1 feature_branch_2
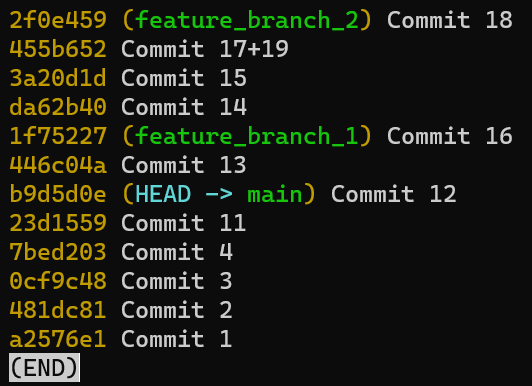 _The output of
 git log --oneline feature_branch_1 feature_branch_2_
git log outputs any commit reachable by feature_branch_1, feature_branch_2, or both. But what does the history look like? Did feature_branch_2 diverge from feature_branch_1? Or did it diverge from main? It is impossible to tell from this view.
This is where --graph comes in handy, drawing an ASCII graph representing the branch structure of the commit history. If we add this option to the previous command:
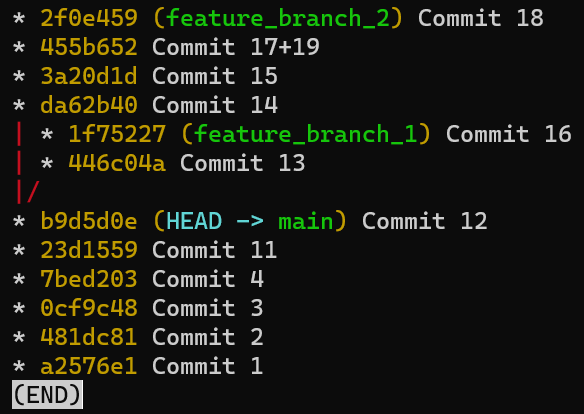 _The output of
 git log --oneline --graph feature_branch_1 feature_branch_2_
You can actually see that feature_branch_1 branched from main (as "Commit 12", main, is the parent of "Commit 13"), and also that feature_branch_2 branched from main (as the parent of "Commit 14" is also "Commit 12").
The * symbol tells us which branch a certain commit is "on", so you can know for sure that "Commit 13" is on feature_branch_1, and not feature_branch_2.
--pretty=format
The above result is already very useful! Yet, it lacks a few things. We don't know the author or the time of the commit. These two information details were included in the default output of git log which was very long. Perhaps we can add them in a more compact way?
By using --pretty=format:, you can display the information of each commit in various ways using printf-style placeholders.
In the following command, the %s, %an and %cd placeholders are replaced by the commit's subject (message), author name, and the commit's date, respectively.
git log --oneline --graph feature_branch_1 feature_branch_2 --pretty=format:"%s (%an) [%cd]"
The output looks like this:
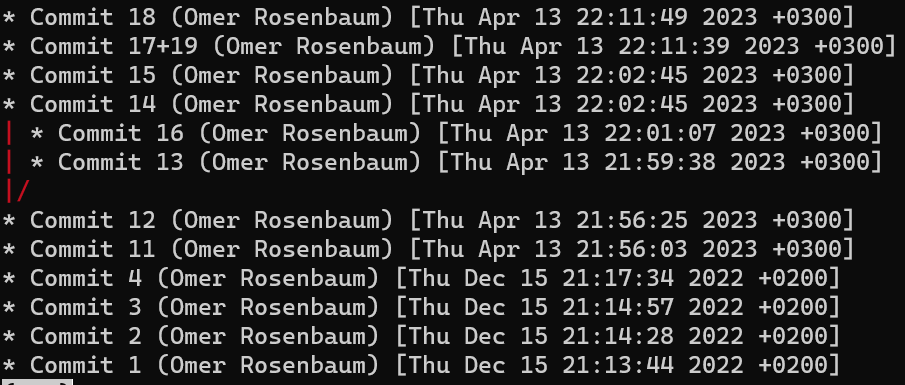 _
_git log --oneline --graph feature_branch_1 feature_branch_2 --pretty=format:"%s (%an) [%cd]_
That's useful, but not really great to look at. We can then use other formatting tricks, specifically %C(color) that will switch the color to color, until reaching a %Creset that resets the color. To make the author name's yellow, you can use:
git log --oneline --graph feature_branch_1 feature_branch_2 --pretty=format:"%s %C(yellow)(%an)%Creset [%cd]"
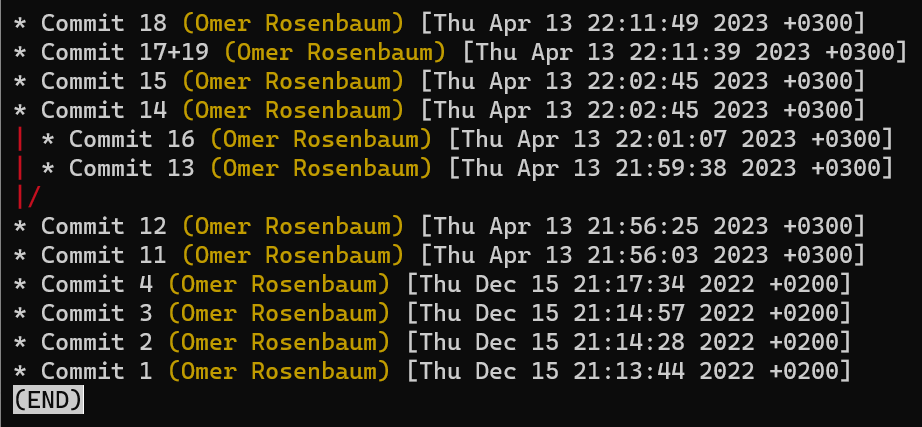 _
_git log --oneline --graph feature_branch_1 feature_branch_2 --pretty=format:"%s %C(yellow)(%an)%Creset [%cd]"_
For some colors, like red or green, it is unnecessary to include the parenthesis, so Cred is enough.
How is git lol Structured?
When I run git lol, it actually executes the following:
git log --graph --pretty=format:'%Cred%h%Creset -%C(yellow)%d%Creset %s %Cgreen(%cr) %C(bold blue)<%an>%Creset' --abbrev-commit
Can you take this bit by bit?
You already know --graph, which makes the output include an ASCII graph.
--abbrev-commit uses a short prefix from the full SHA-1 of the commit (in my configuration, the first seven characters).
The rest is just coloring of various details about the commit:
git lol --all
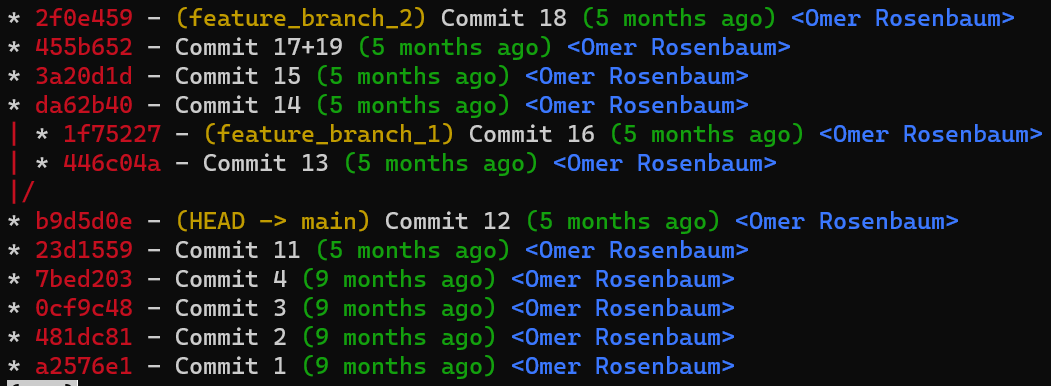
git lol --all
I like this output because I find it clear. It gives me the information I need, with enough coloring so that every detail stands out without hurting my eyes. But if you prefer other information, other colors, a different order, or anything else - go ahead and tweak it to your liking.
Setting an alias
As you know, I set git lol as an alias - that is, when I run git lol, it executes the long command I provided previously.
How can you create an alias in Git?
The easiest way is to use git alias, like so:
git config --global alias.co checkout
This command sets co to be an alias for the command checkout, so you can use git co main instead of git checkout main.
To define git lol as an alias, you can use:
git config --global alias.lol 'log --graph --pretty=format:'%Cred%h%Creset -%C(yellow)%d%Creset %s %Cgreen(%cr) %C(bold blue)<%an>%Creset' --abbrev-commit'
Chapter 13 - Git Bisect
Oops.
I have a bug.
Yes, that happens some times, to all of us. Something in my system is broken, and I can't tell why. I have been debugging for a while, but the solution is not clear.
I can tell that two weeks ago, this didn't happen. Luckily for me, I have been using Git (obviously, I know...), so I can go back in time and test a past version of my code. Indeed, in this version - everything worked fine.
But... I have made many changes in these two weeks. Alas, not just me - my entire team has contributed commits that add, delete, or modify parts of the code base. Where do I begin? Should I go over every change introduced in those two weeks?
Enter - git bisect.
The goal of git bisect is help you find the commit where a bug was introduced, in an effective manner.
How Does git bisect Work?
git bisect first asks you to mark one commit as "bad" (where the bug occurs), and another commit as "good" (one without the bug). Then, it checks out a commit halfway between these two commits, and then asks you to identify the commit as either "good" or "bad". This process is repeated until you find the first "bad" commit.
The key here is using binary search - by looking at the halfway point and deciding if it is the new top or bottom of the list of commits, you can find the right commit efficiently. Even if you have 10,000 commits to hunt through, it only takes a maximum of 13 steps to find the first commit that introduced the bug.
git bisect Example
For this example, I will use the repository on https://github.com/Omerr/bisect-exercise.git. To create it, I adapted the open source repository https://github.com/bast/git-bisect-exercise (according to its license).
In this repository, we have a single python file that is used to compute the value of pi (which is approximately 3.14). If you run python3 get_pi.py on main, however, you will get a wrong result:
 A wrong result, we have a bug
This branch consists of more than 500 commits.
Find the first commit on this branch by using:
git log --oneline | tail -n 1

git log --oneline | tail -n 1
If you checkout to this commit and run python3 get_pi.py again, the result is correct:
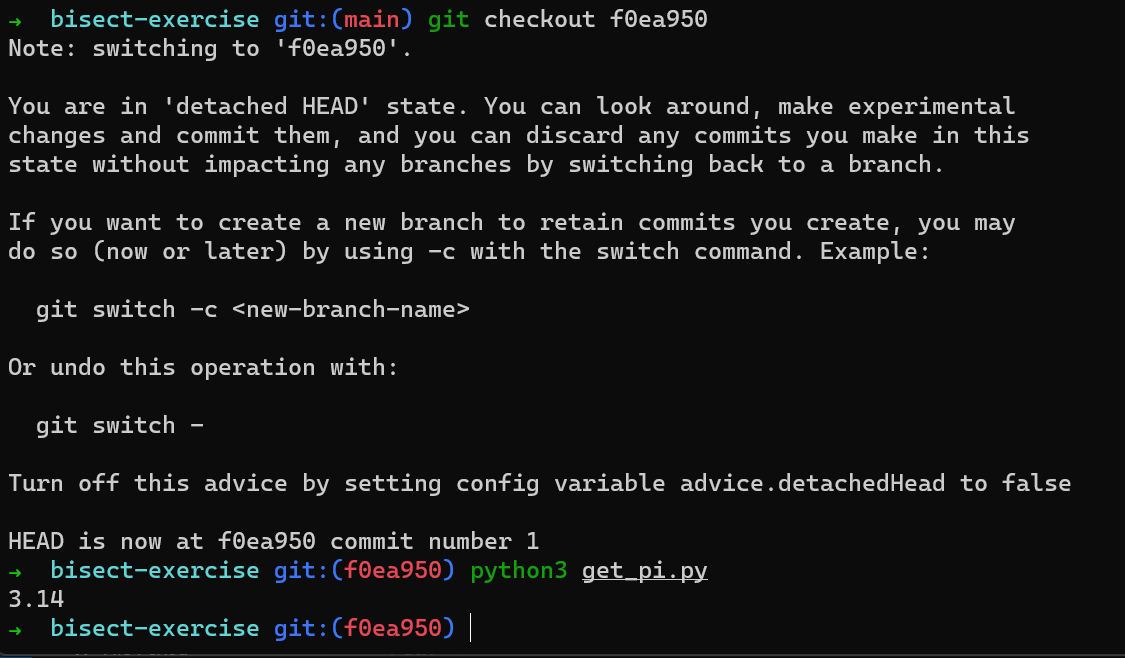 From the first commit, the result is valid
So somewhere between HEAD and commit f0ea950, a change was introduced that resulted in this wrong output.
To find it using git bisect, start the bisect process, and mark this commit as "good":
git bisect start
git bisect good
By default, git bisect good would take HEAD as the "good" commit. To mark main as "bad", you can use git bisect bad main:

git bisect bad main
git bisect checked out commit number 251, the "middle point" of main branch. Does the state in this commit produce the right or wrong output?
 Trying again...
We still get the wrong output, which means we can discard commits 252 through 500 (and additional commits after that), and narrow our search to commits 2 through 251. Mark this as bad:
 Mark as
 bad
git bisect checked out the "middle" commit (number 126), and running the code again results in the right answer! This means that this commit is "good", and that the first "bad" commit is somewhere between 127 and 251. Mark it as "good":
 Mark as
 good
Nice, git bisect takes us to commit 188, as this is the "middle" commit between 127 and 251. By running the code again, you can see that the result is wrong, so this is actually a "bad" commit, which means the first faulty commit is somewhere between 127 and 188. As you can see, git bisect narrows down the search space by half on each iteration.
Come on, now it's your turn - keep going from here! Test the result of python3 get_pi.py and use git bisect good or git bisect bad to mark the commit accordingly. What is the faulty commit?
When you are done, use git bisect reset to stop the bisect process.
Automatic git bisect
In the previous example, you could simply run python3 get_pi.py and check the result. Other times, the process of validating whether a certain commit is "good" or "bad" can be tricky, error prone, or just time consuming.
It is possible to automate the process of git bisect by creating code that would be executed on each iteration, returning 0 when the current commit is "good", and a value between 1-127 (inclusive), except 125, if it should be considered "bad".
The syntax is:
git bisect run my_script arguments
As this book is not about programming and doesn't assume you know a specific programming language, I will not show an example of implementing my_script. The README.md file in the repository used in this chapter (https://github.com/Omerr/bisect-exercise.git) includes an example for a script that you can run with git bisect run to automatically find the faulty commit for the previous example.
Chapter 14 - Other Useful Commands
This chapter highlights a few commands that had have already been mentioned in previous chapters. I am putting them here together so that you can come back to them as a reference when needed.
git cherry-pick
Introduced in chapter 8, this command takes a given commit, computes the patch this commit introduces by computing the difference between the parent's commit and the commit itself, and then cherry-pick "replays" this difference. It is like "copy-pasting" a commit, that is, the diff this commit introduced.
In chapter 8 we considered the difference introduced by "Commit 5" (using git diff main <SHA_OF_COMMIT_5>):
 Running
 git diff to observe the patch introduced by "Commit 5"
You can see that in this commit, John started working on a song called "Lucy in the Sky with Diamonds":
 The output of
 git diff - the patch introduced by "Commit 5"
As a reminder, you can also use the command git show to get the same output:
git show <SHA_OF_COMMIT_5>
Now, if you cherry-pick this commit, you will introduce this change specifically, on the active branch. You can switch to main branch:
git checkout main (or git switch main)
And create another branch:
git checkout -b my_branch (or git switch -c my_branch)
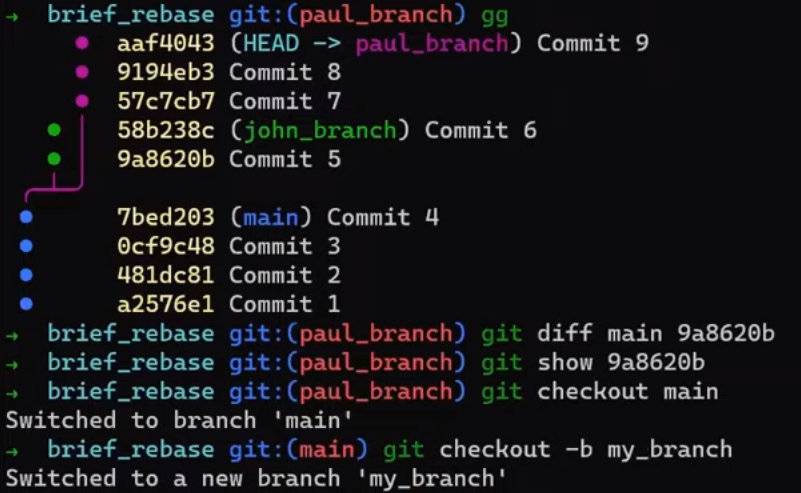 _Creating
 my_branch that branches from main_
Next, cherry-pick "Commit 5":
git cherry-pick <SHA_OF_COMMIT_5>
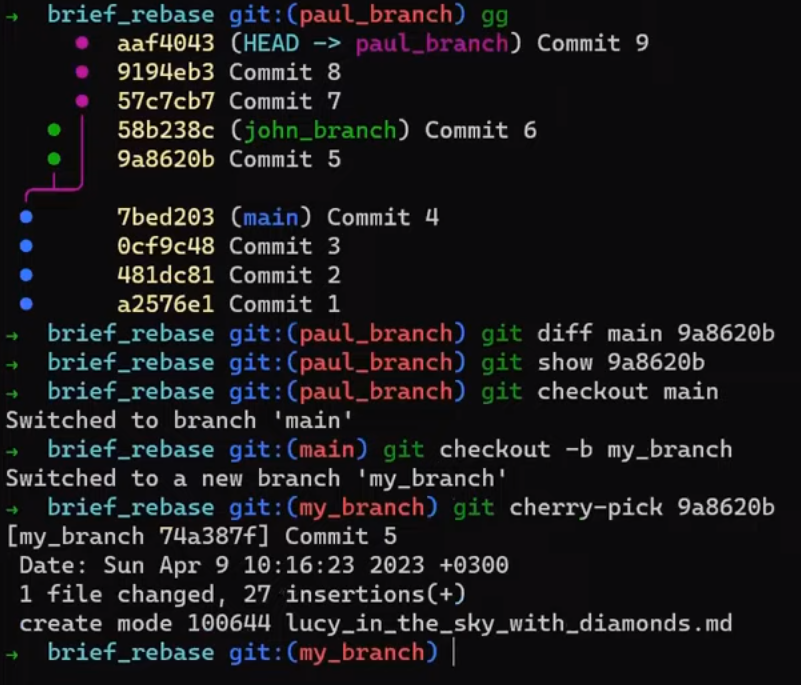 Using
Using cherry-pick to apply the changes introduced in "Commit 5" onto main
Consider the log (output of git lol):
 The output of
 git lol
It seems like you copy-pasted "Commit 5". Remember that even though it has the same commit message, and introduces the same changes, and even points to the same tree object as the original "Commit 5" in this case - it is still a different commit object, as it was created with a different timestamp.
Looking at the changes, using git show HEAD:
 The output of
 git show HEAD
They are the same as "Commit 5"'s.
git revert
git revert is essentially the reverse of git cherry-pick, introduced in chapter 10. This command takes the commit you're providing it with and computes the diff from its parent commit, just like git cherry-pick, but this time, it computes the reverse changes. That is, if in the specified commit you added a line, the reverse would delete the line, and vice versa.
git add -p
Staging changes is an integral part of introducing changes to Git. Sometimes, you wish to stage all changes together (with git add .), or perhaps stage all changes of a specific file (using git add <file_path>). Yet there are times where it would be convenient to stage only certain parts of modified files.
In chapter 6, we introduced git add -p. This command allows you to stage certain parts of files, by splitting them into hunks (p stands for patch). For example, say you have this file, my_file.py:
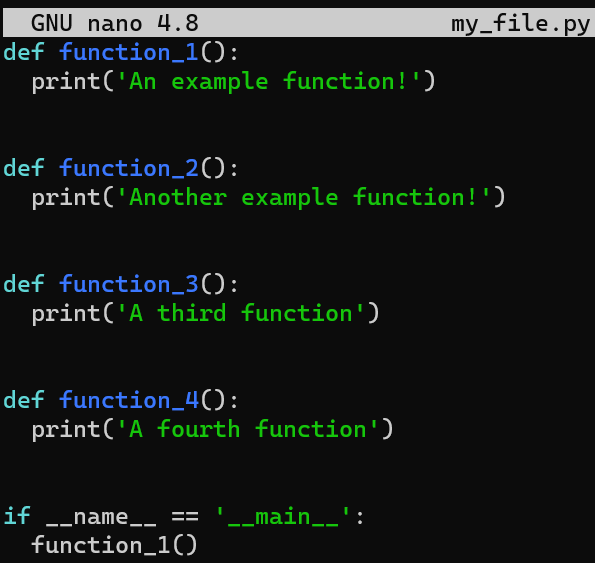 _
_my_file.py_
You then modify this file - by changing text within function_1, and also adding a new function, function_5:
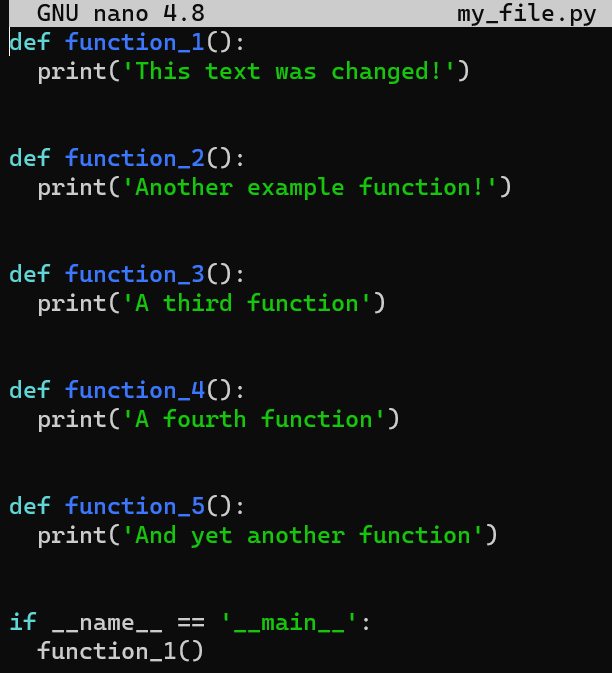 _
_my_file.py after the changes_
If you used git add my_file.py at this point, you would stage both of these changes together. In case you want to separate them into different commits, you could use git add -p, which splits these two changes and asks you about each one as a standalone hunk:
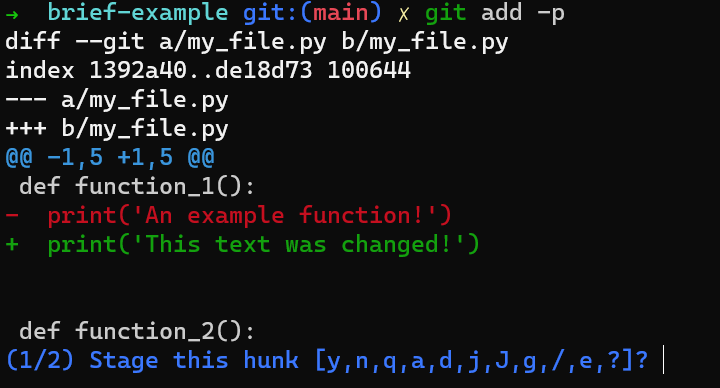
git add -p
By typing ?, you can see what the different options stand for:
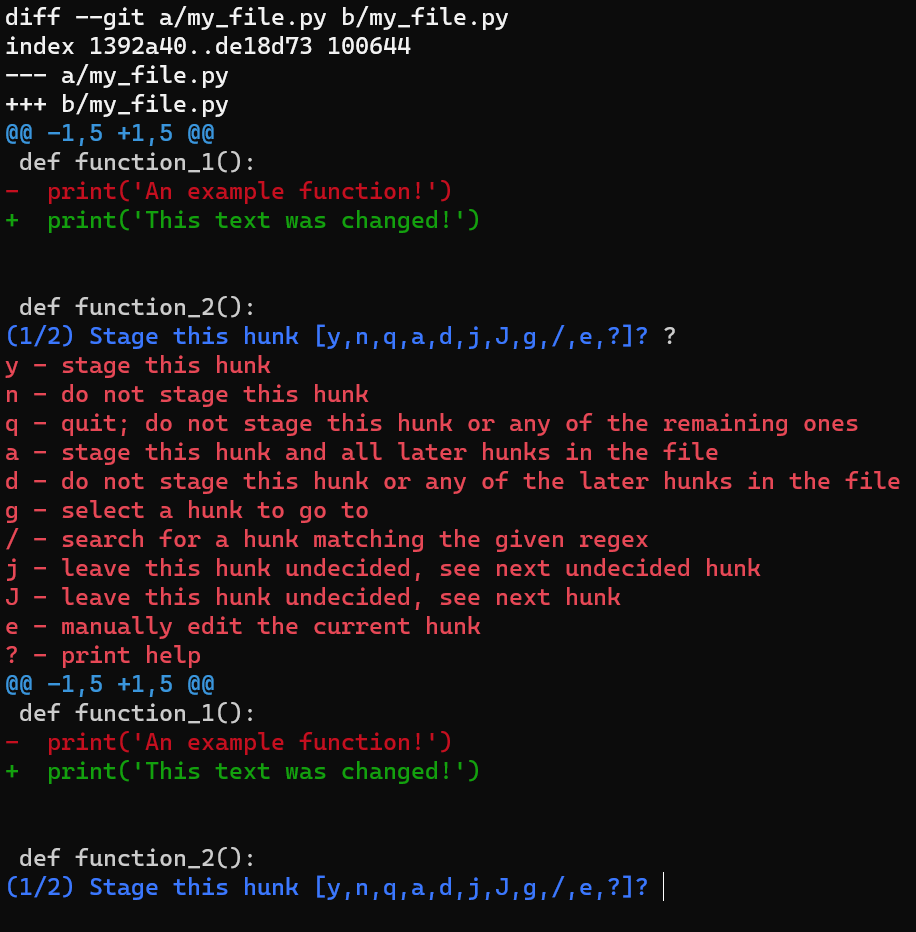 Using a
 ? to get a description of the different options
In this case, say we only want to stage the change introducing function_5. We do not want to stage the change of function_1, so we select n:
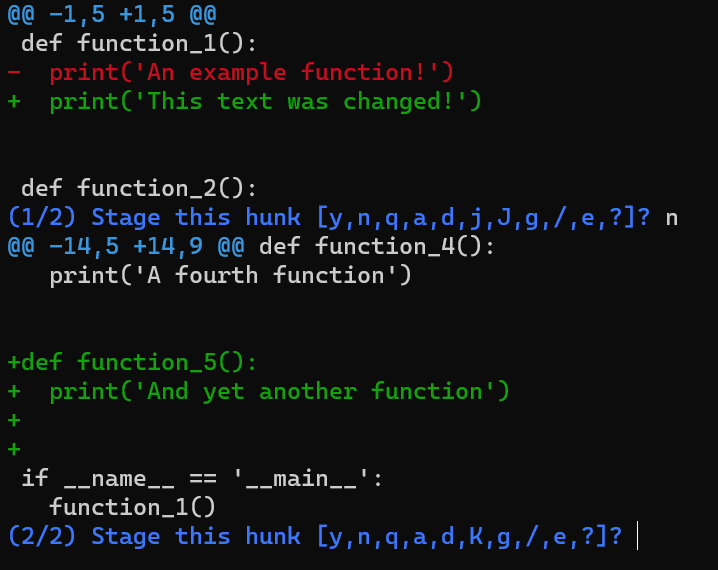 _Not staging the change to
 function_1_
Next, we are prompted for the second change - the one introducing function_5. We want to stage this hunk indeed, to can do so we can type y.
Summary
Well, this was FUN!
Can you believe how much you have learned?
In Part 1 you learned about - blobs, trees, and commits.
You then learned about branches, seeing that they are nothing but a named reference to a commit.
You learned the process of recording changes in Git, and that it involves the working directory, the staging area (index), and the repository.
Then - you created a new repository from scratch, by using echo and low-level commands such as git hash-object. You created a blob, a tree, and a commit object pointing to that tree.
In Part 2 you learned about branching and integrating changes in Git.
You learned what a diff is, and the difference between a diff and a patch. You also learned how the output of git diff is constructed.
Then, you got an extensive overview of merging with Git, specifically understanding the three-way merge algorithm. You understood when merging conflicts occur, when Git can resolve them automatically, and how to resolve them manually when needed.
You saw that git rebase is powerful - but also that it is quite simple once you understand what it does. You understood the differences between merging and rebasing, and when you should use each.
In Part 3 you learned how to undo changes in Git - especially when things go wrong. You learned how to use a bunch of tools, like git reset, git commit --amend, git revert, git reflog (and git log -g).
The most important tool, even more important than the tools I just listed, is to whiteboard the current situation vs the desired one. Trust me on this, it will make every situation seem less daunting and the solution more clear.
In Part 4 you acquired additional powerful tools, like different switches of git log, git bisect, git cherry-pick, git revert and git add -p.
Wow, you should be proud of yourself!
A Message From Me to You
Indeed, this was fun, but all things must pass. You finished reading this book, but this doesn't mean your learning journey ends here.
What you have acquired, more than any specific tool, is intuition and understanding of how Git operates, and how to think about various operations in Git. Keep researching, reading, and using Git. I am sure you will be able to teach me something new, and by all means - please do.
If you liked this book, please share it with more people.
If you want to read more of my Git articles and handbooks, here they are:
- The Git Rebase Handbook
- The Git Merge Handbook
- The Git Diff and Patch Handbook
- Git Internals - Objects, Branches, and How to Create a Repo
- Git Reset Command Explained
Acknowledgements
Many people helped make this book the best it can be. Among them, I was lucky to have many beta readers that provided me with feedback so that I can improve the book. Specifically, I would like to thank Jason S. Shapiro, Anna Łapińska, C. Bruce Hilbert, and Jonathon McKitrick for their thorough reviews.
Abbey Rennemeyer has been a wonderful editor. After she has reviewed my posts for freeCodeCamp for over three years, it was clear that I would like to ask her to be the editor of this book as well. She helped me improve the book in many ways, and I am grateful for her help.
Quincy Larson founded the amazing community at freeCodeCamp, motivated me throughout emails and face to face discussions. I thank him for starting this incredible community, and for his friendship.
Estefania Cassingena Navone designed the cover of this book. I am grateful for her professional work and her patience with my perfectionism and requests.
Daphne Gray-Grant's website, "Publication Coach", has provided me with inspiring as well as technical advice that has greatly helped me with my writing process.
If You Wish to Support This Book
If you would like to support this book, you are welcome to buy the Paperback version, an E-Book version, or buy me a coffee. Thank you!
Contact Me
This book has been created to help you and people like you learn, understand Git, and apply their knowledge in real life.
Right from the beginning, I asked for feedback and was lucky to receive it from great people (mentioned in the Acknowledgements) to make sure the book achieves these goals. If you liked something about this book, felt that something was missing or needed improvement - I would love to hear from you. Please reach out at gitting.things@gmail.com.
Thank you for learning and allowing me to be a part of your journey.
- Omer Rosenbaum
Appendixes
Additional References - By Part
(Note - this is a short list. You can find a longer list of references on the E-Book or printed version.)
Part 1
- Git Internals YouTube playlist - by Brief:
https://www.youtube.com/playlist?list=PL9lx0DXCC4BNUby5H58y6s2TQVLadV8v7 - Tim Berglund's lecture - "Git From the Bits Up":
https://www.youtube.com/watch?v=MYP56QJpDr4 - as promised, docs: Git for the confused:
https://www.gelato.unsw.edu.au/archives/git/0512/13748.html
Part 2
Diffs and Patches
Git Diffs algorithms:
The most default diff algorithm in Git is Myers:
- https://www.nathaniel.ai/myers-diff/
- https://blog.jcoglan.com/2017/02/12/the-myers-diff-algorithm-part-1/
- https://blog.robertelder.org/diff-algorithm/
Git Merge
- https://git-scm.com/book/en/v2/Git-Tools-Advanced-Merging
- https://blog.plasticscm.com/2010/11/live-to-merge-merge-to-live.html
Git Rebase
- https://jwiegley.github.io/git-from-the-bottom-up/1-Repository/7-branching-and-the-power-of-rebase.html
- https://git-scm.com/book/en/v2/Git-Branching-Rebasing
Beatles-Related Resources
- https://www.the-paulmccartney-project.com/song/ive-got-a-feeling/
- https://www.cheatsheet.com/entertainment/did-john-lennon-or-paul-mccartney-write-the-classic-a-day-in-the-life.html/
- http://lifeofthebeatles.blogspot.com/2009/06/ive-got-feeling-lyrics.html
Part 3
- https://git-scm.com/book/en/v2/Git-Tools-Reset-Demystified
- https://www.edureka.co/blog/common-git-mistakes/
About the Author
Omer Rosenbaum is Swimm’s Chief Technology Officer. He's the author of the Brief YouTube Channel. He's also a cyber training expert and founder of Checkpoint Security Academy. He's the author of Computer Networks (in Hebrew). You can find him on Twitter.